
Reference Manual
Page 14
...Package Contents...ii About This Manual...iii Information and Precautions...iv For Your Safety...vi WARNINGS ...vi Notices ...ix Notes on GPS/electronic compass (COOLPIX S9300 only xi Parts of the Camera and Basic Operations 1 Parts of the Camera ...2 The Camera Body...2 Controls Used in Shooting Mode ...4 Controls... Language, Date, and Time 22 Step 2 Select a Shooting Mode...24 Available Shooting Modes...25 Step 3 Frame a Picture...26 Using the Zoom...27 Step 4 Focus and Shoot ...28 Step 5 Play Back Images ...30 Changing How Images Are Displayed 31 Step 6 Delete Unwanted Images 32 xii
...Package Contents...ii About This Manual...iii Information and Precautions...iv For Your Safety...vi WARNINGS ...vi Notices ...ix Notes on GPS/electronic compass (COOLPIX S9300 only xi Parts of the Camera and Basic Operations 1 Parts of the Camera ...2 The Camera Body...2 Controls Used in Shooting Mode ...4 Controls... Language, Date, and Time 22 Step 2 Select a Shooting Mode...24 Available Shooting Modes...25 Step 3 Frame a Picture...26 Using the Zoom...27 Step 4 Focus and Shoot ...28 Step 5 Play Back Images ...30 Changing How Images Are Displayed 31 Step 6 Delete Unwanted Images 32 xii
Reference Manual
Page 18
...and Date...E67 Monitor Settings...E70 Print Date (Imprinting Date and Time on Pictures E72 Vibration Reduction ...E73 Motion Detection...E74 AF Assist...E75 Digital Zoom...E76 Sound Settings...E77 Auto Off ...E77 Format Memory/Format Card...E78 Language...E78 TV Settings ...E79 Charge by Computer...E80 Blink Warning ...E82 Eye...F3 Charging AC Adapter ...F4 The Memory Cards...F5 Caring for the Camera ...F6 Cleaning ...F6 Storage ...F6 USER LICENSE AGREEMENT FOR LOCATION NAME DATA (COOLPIX S9300 only).... F7 Troubleshooting...F11 Specifications ...F19 Supported Standards ...F22 Index ...F23 xvi
...and Date...E67 Monitor Settings...E70 Print Date (Imprinting Date and Time on Pictures E72 Vibration Reduction ...E73 Motion Detection...E74 AF Assist...E75 Digital Zoom...E76 Sound Settings...E77 Auto Off ...E77 Format Memory/Format Card...E78 Language...E78 TV Settings ...E79 Charge by Computer...E80 Blink Warning ...E82 Eye...F3 Charging AC Adapter ...F4 The Memory Cards...F5 Caring for the Camera ...F6 Cleaning ...F6 Storage ...F6 USER LICENSE AGREEMENT FOR LOCATION NAME DATA (COOLPIX S9300 only).... F7 Troubleshooting...F11 Specifications ...F19 Supported Standards ...F22 Index ...F23 xvi
Reference Manual
Page 20
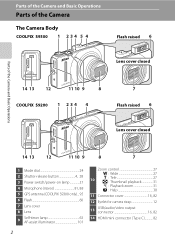
Parts of the Camera and Basic Operations Parts of the Camera The Camera Body COOLPIX S9300 1 2 3 4 5 4 Flash raised 6 Lens cover closed Parts of the Camera and Basic Operations 14 13 12 11 10 9 8 COOLPIX S9200 1 2 3 4 4 7 Flash raised 6 Lens cover closed 14 13 12 11 10 9 8 7 1 Mode ... 21 4 Microphone (stereo 81, 88 5 GPS antenna (COOLPIX S9300 only)... 95 6 Flash 60 7 Lens cover 8 Lens 9 Self-timer lamp 63 AF-assist illuminator 101 Zoom control 27 f : Wide 27 10 g : Tele 27 h: Thumbnail playback 31 i : Playback zoom 31 j : Help 38 11 Connector cover 16, 82...
Parts of the Camera and Basic Operations Parts of the Camera The Camera Body COOLPIX S9300 1 2 3 4 5 4 Flash raised 6 Lens cover closed Parts of the Camera and Basic Operations 14 13 12 11 10 9 8 COOLPIX S9200 1 2 3 4 4 7 Flash raised 6 Lens cover closed 14 13 12 11 10 9 8 7 1 Mode ... 21 4 Microphone (stereo 81, 88 5 GPS antenna (COOLPIX S9300 only)... 95 6 Flash 60 7 Lens cover 8 Lens 9 Self-timer lamp 63 AF-assist illuminator 101 Zoom control 27 f : Wide 27 10 g : Tele 27 h: Thumbnail playback 31 i : Playback zoom 31 j : Help 38 11 Connector cover 16, 82...
Reference Manual
Page 22
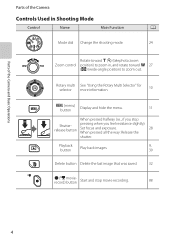
... Controls Used in Shooting Mode Control Name Main Function A Mode dial Change the shooting mode. 24 Rotate toward g (i) (telephoto zoom Zoom control position) to zoom in, and rotate toward f 27 (h) (wide-angle position) to zoom out. Rotary multi See "Using the Rotary Multi Selector" for selector more information. 10 d (menu) button Display and hide...
... Controls Used in Shooting Mode Control Name Main Function A Mode dial Change the shooting mode. 24 Rotate toward g (i) (telephoto zoom Zoom control position) to zoom in, and rotate toward f 27 (h) (wide-angle position) to zoom out. Rotary multi See "Using the Rotary Multi Selector" for selector more information. 10 d (menu) button Display and hide...
Reference Manual
Page 23
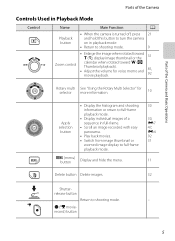
..., E7 47, E4 92 31 11 Delete button Delete images. 32 Shutterrelease button Return to full-frame playback mode. display image thumbnail or the 31 Zoom control calendar when rotated toward g (i); Parts of the Camera and Basic Operations Parts of the Camera Controls Used in Playback Mode Control Name Main Function... individual images of a sequence in full-frame. • Scroll an image recorded with easy panorama. • Play back movies. • Switch from image thumbnail or zoomed image display to shooting mode. -
..., E7 47, E4 92 31 11 Delete button Delete images. 32 Shutterrelease button Return to full-frame playback mode. display image thumbnail or the 31 Zoom control calendar when rotated toward g (i); Parts of the Camera and Basic Operations Parts of the Camera Controls Used in Playback Mode Control Name Main Function... individual images of a sequence in full-frame. • Scroll an image recorded with easy panorama. • Play back movies. • Switch from image thumbnail or zoomed image display to shooting mode. -
Reference Manual
Page 25
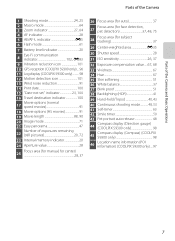
...Shooting mode 24, 25 2 Macro mode 64 3 Zoom indicator 27, 64 4 AF indicator 28 5 AE/AF-L indicator E5 6 Flash mode 61 7 Battery level indicator 20 Eye-Fi communication 8 indicator 102, E83 9 Vibration reduction icon 101 10 GPS reception (COOLPIX S9300 only).....96 11 Log display (COOLPIX S9300 only 98 12 Motion detection icon 101 13... shooting mode 48, 53 41 Self-timer 63 42 Smile timer 50 43 Pet portrait auto release 48 Compass display (Direction gauge) 44 (COOLPIX S9300 only 98 Compass display (Compass) (COOLPIX 45 S9300 only 98 Location name information (POI 46 information...
...Shooting mode 24, 25 2 Macro mode 64 3 Zoom indicator 27, 64 4 AF indicator 28 5 AE/AF-L indicator E5 6 Flash mode 61 7 Battery level indicator 20 Eye-Fi communication 8 indicator 102, E83 9 Vibration reduction icon 101 10 GPS reception (COOLPIX S9300 only).....96 11 Log display (COOLPIX S9300 only 98 12 Motion detection icon 101 13... shooting mode 48, 53 41 Self-timer 63 42 Smile timer 50 43 Pet portrait auto release 48 Compass display (Direction gauge) 44 (COOLPIX S9300 only 98 Compass display (Compass) (COOLPIX 45 S9300 only 98 Location name information (POI 46 information...
Reference Manual
Page 44
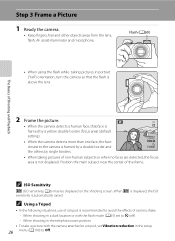
... or when no faces are detected, the focus area is recommended to avoid the effects of a tripod is not displayed. When shooting in the telephoto zoom position • To take a picture with the flash mode (A61) set Vibration reduction in portrait ("tall") orientation, turn the camera so that the flash is...
... or when no faces are detected, the focus area is recommended to avoid the effects of a tripod is not displayed. When shooting in the telephoto zoom position • To take a picture with the flash mode (A61) set Vibration reduction in portrait ("tall") orientation, turn the camera so that the flash is...
Reference Manual
Page 45
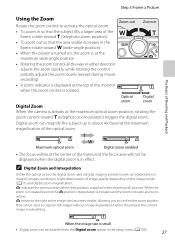
...center of the frame and the focus area will not be displayed when the digital zoom is small • Digital zoom can be at the top of the frame, rotate toward g (telephoto zoom position). • To zoom out so that can magnify the subject up to about 4× beyond the V... in so that the subject fills a larger area of the monitor when the zoom control is turned on the image mode (A71) and digital zoom magnification. C Digital Zoom and Interpolation Unlike the optical zoom, the digital zoom uses a digital imaging process known as the image size becomes smaller, allowing you...
...center of the frame and the focus area will not be displayed when the digital zoom is small • Digital zoom can be at the top of the frame, rotate toward g (telephoto zoom position). • To zoom out so that can magnify the subject up to about 4× beyond the V... in so that the subject fills a larger area of the monitor when the zoom control is turned on the image mode (A71) and digital zoom magnification. C Digital Zoom and Interpolation Unlike the optical zoom, the digital zoom uses a digital imaging process known as the image size becomes smaller, allowing you...
Reference Manual
Page 46
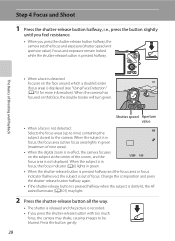
... is detected: Focuses on the subject at the center of the screen, and the focus area is out of nine areas). • When the digital zoom is in green (maximum of focus. Step 4 Focus and Shoot 1 Press the shutter-release button halfway, i.e., press the button slightly until you feel resistance. •...
... is detected: Focuses on the subject at the center of the screen, and the focus area is out of nine areas). • When the digital zoom is in green (maximum of focus. Step 4 Focus and Shoot 1 Press the shutter-release button halfway, i.e., press the button slightly until you feel resistance. •...

Reference Manual
Page 49
... displayed area of the image as a separate file by pressing the d button (E22). • Press the k button to return to display a different face. The zoom increases up to about 10×. • To view a different area of the image, press the multi selector H, I , J, or K to select a date... select an image and then press the k button to display that image in full-frame playback mode. • When 72 images are displayed, rotate the zoom control toward f (h) to switch to calendar display. • While using calendar display mode, rotate the multi selector or press H, I , J, or K. • ...
... displayed area of the image as a separate file by pressing the d button (E22). • Press the k button to return to display a different face. The zoom increases up to about 10×. • To view a different area of the image, press the multi selector H, I , J, or K to select a date... select an image and then press the k button to display that image in full-frame playback mode. • When 72 images are displayed, rotate the zoom control toward f (h) to switch to calendar display. • While using calendar display mode, rotate the multi selector or press H, I , J, or K. • ...
Reference Manual
Page 51
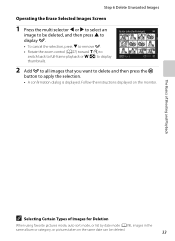
... instructions displayed on the same date can be deleted, and then press H to display y. • To cancel the selection, press I to remove y. • Rotate the zoom control (A27) toward g (i) to switch back to full-frame playback or f(h) to display thumbnails. Step 6 Delete Unwanted Images Operating the Erase Selected Images Screen 1 Press...
... instructions displayed on the same date can be deleted, and then press H to display y. • To cancel the selection, press I to remove y. • Rotate the zoom control (A27) toward g (i) to switch back to full-frame playback or f(h) to display thumbnails. Step 6 Delete Unwanted Images Operating the Erase Selected Images Screen 1 Press...
Reference Manual
Page 56
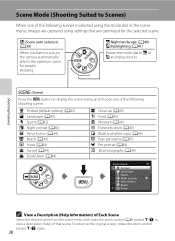
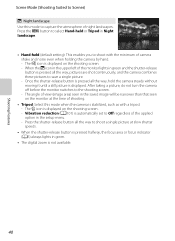
j Night landscape (A40) W Backlighting (A41) Rotate the mode dial to the original screen, rotate the zoom control toward g (j) to view a description (help) of that are captured using the mode dial or the scene menu, images are optimized for simpler shooting. y (... Sports Night portrait Party/indoor Beach Snow C View a Description (Help Information) of Each Scene Select the desired scene from the scene menu and rotate the zoom control (A4) toward g (j) again. 38 To return to j or W and take pictures. Shooting Features Scene Mode (Shooting Suited to Scenes) When one of the...
j Night landscape (A40) W Backlighting (A41) Rotate the mode dial to the original screen, rotate the zoom control toward g (j) to view a description (help) of that are captured using the mode dial or the scene menu, images are optimized for simpler shooting. y (... Sports Night portrait Party/indoor Beach Snow C View a Description (Help Information) of Each Scene Select the desired scene from the scene menu and rotate the zoom control (A4) toward g (j) again. 38 To return to j or W and take pictures. Shooting Features Scene Mode (Shooting Suited to Scenes) When one of the...
Reference Manual
Page 57
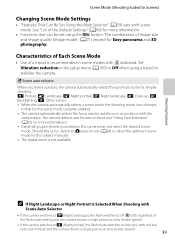
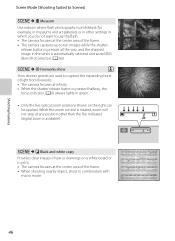
... a tripod is not available. Should this occur, switch to A (auto) mode (A24) or select the optimum scene mode for the subject manually. • The digital zoom is recommended in the setup menu (A100) to Off when using the d button: The combination of the Default Settings" (A69) for autofocus in accordance with...
... a tripod is not available. Should this occur, switch to A (auto) mode (A24) or select the optimum scene mode for the subject manually. • The digital zoom is recommended in the setup menu (A100) to Off when using the d button: The combination of the Default Settings" (A69) for autofocus in accordance with...
Reference Manual
Page 58
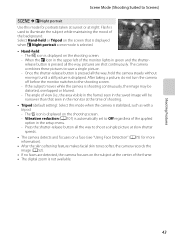
... of shooting. • Tripod: Select this mode to shoot with a tripod. - Press the d button to select Hand-held or Tripod in green. • The digital zoom is automatically set to the shooting screen. - Once the shutter-release button is pressed all the way, hold the camera steady without moving it until...
... of shooting. • Tripod: Select this mode to shoot with a tripod. - Press the d button to select Hand-held or Tripod in green. • The digital zoom is automatically set to the shooting screen. - Once the shutter-release button is pressed all the way, hold the camera steady without moving it until...
Reference Manual
Page 59
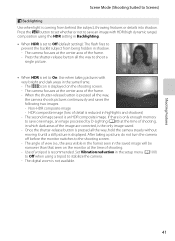
... area of view (i.e., the area visible in the frame) seen in highlights and shadows) - Non-HDR composite image - The angle of the frame. - The digital zoom is an HDR composite image. The second image saved is not available. 41 After taking pictures with HDR (high dynamic range) composition using a tripod to...
... area of view (i.e., the area visible in the frame) seen in highlights and shadows) - Non-HDR composite image - The angle of the frame. - The digital zoom is an HDR composite image. The second image saved is not available. 41 After taking pictures with HDR (high dynamic range) composition using a tripod to...
Reference Manual
Page 60
... the camera focusing. • Focus, exposure, and hue are detected, the camera focuses on the subject at the center of the frame. • The digital zoom is pressed halfway, the focus area or focus indicator (A6) always lights in green. About six pictures are shot at a rate of about two frames...
... the camera focusing. • Focus, exposure, and hue are detected, the camera focuses on the subject at the center of the frame. • The digital zoom is pressed halfway, the focus area or focus indicator (A6) always lights in green. About six pictures are shot at a rate of about two frames...
Reference Manual
Page 61
... the e icon in the upper left of the background. The Z icon is displayed on the subject at the center of the frame. • The digital zoom is not available. 43 Select Hand-held or Tripod on a face (see "Using Face Detection" (A75) for portraits taken at sunset or at night. Shooting...
... the e icon in the upper left of the background. The Z icon is displayed on the subject at the center of the frame. • The digital zoom is not available. 43 Select Hand-held or Tripod on a face (see "Using Face Detection" (A75) for portraits taken at sunset or at night. Shooting...

Reference Manual
Page 63
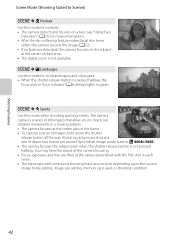
... this mode to photograph flowers, insects, and other small objects at close range. • Macro mode (A64) is set to ON and the camera automatically zooms to the closest position to the subject where the camera can shoot. • You can adjust the hue by pressing the multi selector H or I. To... Suited to Scenes) y M k Close-up Use this mode when taking pictures of food. • Macro mode (A64) is set to ON and the camera automatically zooms to the closest position to the subject where the camera can shoot. • You can move the focus area that the camera focuses on. You...
... this mode to photograph flowers, insects, and other small objects at close range. • Macro mode (A64) is set to ON and the camera automatically zooms to the closest position to the subject where the camera can shoot. • You can adjust the hue by pressing the multi selector H or I. To... Suited to Scenes) y M k Close-up Use this mode when taking pictures of food. • Macro mode (A64) is set to ON and the camera automatically zooms to the closest position to the subject where the camera can shoot. • You can move the focus area that the camera focuses on. You...
Reference Manual
Page 64
... y M l Museum Use indoors where flash photography is pressed halfway, the focus indicator (A6) always lights in green. • Only the five optical zoom positions shown on a white board or in print. • The camera focuses at the center area of the frame. • The camera captures up ...(Best Shot Selector) (A56)). release button is pressed all the way, and the sharpest image in combination with macro mode. When the zoom control is rotated, zoom will not stop at the center area of the frame. • When shooting nearby object, shoot in the series is available). Shooting ...
... y M l Museum Use indoors where flash photography is pressed halfway, the focus indicator (A6) always lights in green. • Only the five optical zoom positions shown on a white board or in print. • The camera focuses at the center area of the frame. • The camera captures up ...(Best Shot Selector) (A56)). release button is pressed all the way, and the sharpest image in combination with macro mode. When the zoom control is rotated, zoom will not stop at the center area of the frame. • When shooting nearby object, shoot in the series is available). Shooting ...
Reference Manual
Page 65
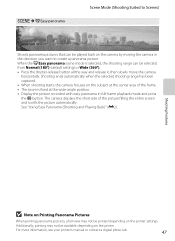
... camera by moving the camera in full-frame playback mode and press the k button. The camera displays the short side of the frame. • The zoom is selected, the shooting range can be printed depending on Printing Panorama Pictures When printing panorama pictures, a full view may not be selected from Normal...
... camera by moving the camera in full-frame playback mode and press the k button. The camera displays the short side of the frame. • The zoom is selected, the shooting range can be printed depending on Printing Panorama Pictures When printing panorama pictures, a full view may not be selected from Normal...


