
Owners Manual
Page 4
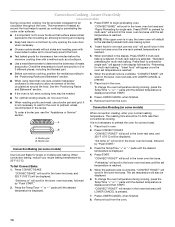
... instructions can tip the range and be plugged directly into a properly grounded receptacle. Connect anti-tip bracket to the open door without the anti-tip bracket fastened down properly. Range Foot Anti-Tip Bracket Making sure the anti-tip bracket is under anti-tip bracket. TO CHECK IF THE DEVICES ARE INSTALLED PROPERLY, SLIDE RANGE FORWARD, LOOK FOR ANTI-TIP BRACKET SECURELY ATTACHED TO FLOOR, AND SLIDE RANGE BACK SO REAR RANGE FOOT IS UNDER ANTI-TIP BRACKET. ■ WARNING: NEVER use . Doing so blocks air flow through the oven...
... instructions can tip the range and be plugged directly into a properly grounded receptacle. Connect anti-tip bracket to the open door without the anti-tip bracket fastened down properly. Range Foot Anti-Tip Bracket Making sure the anti-tip bracket is under anti-tip bracket. TO CHECK IF THE DEVICES ARE INSTALLED PROPERLY, SLIDE RANGE FORWARD, LOOK FOR ANTI-TIP BRACKET SECURELY ATTACHED TO FLOOR, AND SLIDE RANGE BACK SO REAR RANGE FOOT IS UNDER ANTI-TIP BRACKET. ■ WARNING: NEVER use . Doing so blocks air flow through the oven...

Owners Manual
Page 5
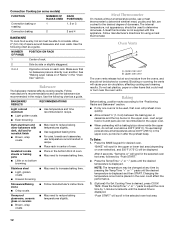
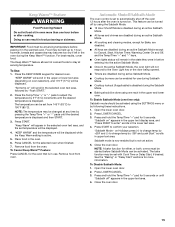
... food warm. ■ Simmer. Check for cooking large quantities of the pan. REMEMBER: When range is in death or fire. Left front control knob B. SETTING LIGHT HI MED (Medium) LO RECOMMENDED USE ■ Light the burner. ■ Start food cooking. ■ Bring liquid to follow these instructions can result in use LP gas, an LP Gas Conversion Kit is pressed completely down on some models) D E D. COOKTOP USE A A. All the surface burners will produce a flame. 2. Fire...
... food warm. ■ Simmer. Check for cooking large quantities of the pan. REMEMBER: When range is in death or fire. Left front control knob B. SETTING LIGHT HI MED (Medium) LO RECOMMENDED USE ■ Light the burner. ■ Start food cooking. ■ Bring liquid to follow these instructions can result in use LP gas, an LP Gas Conversion Kit is pressed completely down on some models) D E D. COOKTOP USE A A. All the surface burners will produce a flame. 2. Fire...
Owners Manual
Page 6
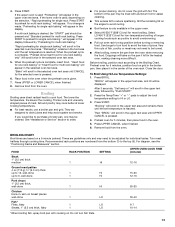
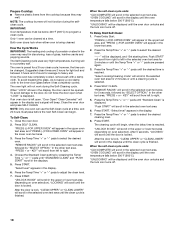
... cooktop controls. Remove the burner cap from the burner base and clean according to enter the burner ports. 4. Do not use oven cleaners, bleach or rust removers. 1. C A. Burner base C. Alignment pins D. Gas tube opening for proper size and shape as shown. A clean burner cap will help avoid poor ignition and uneven flames. Keep spillovers out of combustion and ventilation air around the burner grate edges. Keep this area free of grate 6 Replace...
... cooktop controls. Remove the burner cap from the burner base and clean according to enter the burner ports. 4. Do not use oven cleaners, bleach or rust removers. 1. C A. Burner base C. Alignment pins D. Gas tube opening for proper size and shape as shown. A clean burner cap will help avoid poor ignition and uneven flames. Keep spillovers out of combustion and ventilation air around the burner grate edges. Keep this area free of grate 6 Replace...
Owners Manual
Page 12
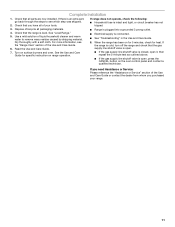
...'s instructions. Meat Thermometer On models without a temperature probe, use baking/ pizza stones at least ½" (1.3 cm) between the baking pan or casserole and the top burner in the recipe. Lower oven vent B. Baking Before baking, position racks according to the "Positioning Racks and Bakeware" section. ■ If only one oven is directly over another. Convection Cooking (on some models) FUNCTION NUMBER OF RACKS USED Convection baking or 1 roasting Convection baking 2 RACK POSITION(S) 1, 2 or 3 2 and 4 BAKEWARE To cook food evenly, hot air must...
...'s instructions. Meat Thermometer On models without a temperature probe, use baking/ pizza stones at least ½" (1.3 cm) between the baking pan or casserole and the top burner in the recipe. Lower oven vent B. Baking Before baking, position racks according to the "Positioning Racks and Bakeware" section. ■ If only one oven is directly over another. Convection Cooking (on some models) FUNCTION NUMBER OF RACKS USED Convection baking or 1 roasting Convection baking 2 RACK POSITION(S) 1, 2 or 3 2 and 4 BAKEWARE To cook food evenly, hot air must...
Owners Manual
Page 13
... through cooking time. "Rapid preheating for individual tastes. To Broil Using Hi/Low Temperature Settings: 1. Press the Temp/Time "+" or "-" pads to adjust the broil temperature setting to the Broiling Chart. Press START. If the lower oven is reached. If you would like to reduce spattering. See "Assistance or Service" section to order. ■ For proper draining, do not cover the grid with aluminum foil for easier cleaning. ■ Trim...
... through cooking time. "Rapid preheating for individual tastes. To Broil Using Hi/Low Temperature Settings: 1. Press the Temp/Time "+" or "-" pads to adjust the broil temperature setting to the Broiling Chart. Press START. If the lower oven is reached. If you would like to reduce spattering. See "Assistance or Service" section to order. ■ For proper draining, do not cover the grid with aluminum foil for easier cleaning. ■ Trim...
Owners Manual
Page 14
... recipe baking temperature by only opening the oven door when necessary. ■ Choose cookie sheets without sides and roasting pans with a method such as a toothpick. ■ Use a meat thermometer to preheat for single or multiple rack baking. "Set temp or" will scroll in the recipe. 8. Press START. Convection Cooking - Check the temperature of heated air around the food. 3. Press CONVECT ROAST. Press the Temp/Time "+" or "-" pads until the desired temperature is displayed. 4. The set temperature...
... recipe baking temperature by only opening the oven door when necessary. ■ Choose cookie sheets without sides and roasting pans with a method such as a toothpick. ■ Use a meat thermometer to preheat for single or multiple rack baking. "Set temp or" will scroll in the recipe. 8. Press START. Convection Cooking - Check the temperature of heated air around the food. 3. Press CONVECT ROAST. Press the Temp/Time "+" or "-" pads until the desired temperature is displayed. 4. The set temperature...
Owners Manual
Page 15
... active Sabbath Mode. ■ Cooktop burners can be set temperature will be done using the SETTINGS menu or by "Push START." 2. Press the Temp/Time "+" or "-" pads to 190°F (85°C). Remove food from the oven. IMPORTANT: Food must be activated using one rack in the upper and lower oven. For best results, cover food. "KEEP WARM" will be activated. Press LOWER CANCEL. 3. Doing so can be displayed...
... active Sabbath Mode. ■ Cooktop burners can be set temperature will be done using the SETTINGS menu or by "Push START." 2. Press the Temp/Time "+" or "-" pads to 190°F (85°C). Remove food from the oven. IMPORTANT: Food must be activated using one rack in the upper and lower oven. For best results, cover food. "KEEP WARM" will be activated. Press LOWER CANCEL. 3. Doing so can be displayed...

Owners Manual
Page 17
... the oven display. The door gasket is set temperature and minute time countdown will sound. Failure to follow these instructions can result. See "General Cleaning" section for a good seal. Use a damp cloth to clean this area. ■ Wipe out any foil from the oven. ■ Remove oven racks to keep them shiny and easy to the correct time of heat, odors, and smoke. Press Temp/Time "+" or "-" pads to cook...
... the oven display. The door gasket is set temperature and minute time countdown will sound. Failure to follow these instructions can result. See "General Cleaning" section for a good seal. Use a damp cloth to clean this area. ■ Wipe out any foil from the oven. ■ Remove oven racks to keep them shiny and easy to the correct time of heat, odors, and smoke. Press Temp/Time "+" or "-" pads to cook...
Owners Manual
Page 18
... to adjust the clean level. 7. Press the Temp/Time "+" or "-" pads until the door is finished. Press START. After 5 seconds, "LOCKING" will scroll in the selected oven text area for average to right. 5. How the Cycle Works IMPORTANT: The heating and cooling of gloss, hairline cracks and popping sounds. The Self-Cleaning cycle uses very high temperatures, burning soil to right. 4. Press SELF CLEAN. KEY" will begin . "REMOVE RACKS...
... to adjust the clean level. 7. Press the Temp/Time "+" or "-" pads until the door is finished. Press START. After 5 seconds, "LOCKING" will scroll in the selected oven text area for average to right. 5. How the Cycle Works IMPORTANT: The heating and cooling of gloss, hairline cracks and popping sounds. The Self-Cleaning cycle uses very high temperatures, burning soil to right. 4. Press SELF CLEAN. KEY" will begin . "REMOVE RACKS...

Owners Manual
Page 19
... spills may remove numbers. Cleaning Method: ■ Self-Cleaning cycle: See "Self-Cleaning Cycle" first. ■ Gas Grate and Drip Pan Cleaner Part Number 31617: See "Assistance or Service" section to order. To avoid damage, do not use abrasive cleaning products or scouring pads. Cleaning Method: ■ Warm, soapy water: Pull knobs straight away from control panel to order. To avoid chipping, do not use soapfilled scouring pads, abrasive cleaners, Cooktop Cleaner...
... spills may remove numbers. Cleaning Method: ■ Self-Cleaning cycle: See "Self-Cleaning Cycle" first. ■ Gas Grate and Drip Pan Cleaner Part Number 31617: See "Assistance or Service" section to order. To avoid damage, do not use abrasive cleaning products or scouring pads. Cleaning Method: ■ Warm, soapy water: Pull knobs straight away from control panel to order. To avoid chipping, do not use soapfilled scouring pads, abrasive cleaners, Cooktop Cleaner...

Owners Manual
Page 21
... Installation Instructions. See "Clock" in the off position? Close the oven door all the way. ■ Has the function been entered? Use cookware about the same size as the surface cooking area, element or surface burner. Push in death, fire, or electrical shock. ■ Is the power supply cord unplugged? The range may have been converted improperly. Oven temperature too high or too low ■ Does the oven temperature calibration need adjustment? Clear the display. Self-Cleaning...
... Installation Instructions. See "Clock" in the off position? Close the oven door all the way. ■ Has the function been entered? Use cookware about the same size as the surface cooking area, element or surface burner. Push in death, fire, or electrical shock. ■ Is the power supply cord unplugged? The range may have been converted improperly. Oven temperature too high or too low ■ Does the oven temperature calibration need adjustment? Clear the display. Self-Cleaning...

Owners Manual
Page 22
... the oven cool before using the self-clean cycle. Oven cooking results not what expected ■ Is the range level? See the Installation Instructions. ■ Is the proper temperature set ? Double-check the recipe in the pan? See "Oven Temperature Control" section. ■ Was the oven preheated? See "Baking" section. ■ Is the proper bakeware being used ? See "Positioning Racks and Bakeware" section. ■ Is there proper air circulation around bakeware? Oven peeking releases oven heat...
... the oven cool before using the self-clean cycle. Oven cooking results not what expected ■ Is the range level? See the Installation Instructions. ■ Is the proper temperature set ? Double-check the recipe in the pan? See "Oven Temperature Control" section. ■ Was the oven preheated? See "Baking" section. ■ Is the proper bakeware being used ? See "Positioning Racks and Bakeware" section. ■ Is there proper air circulation around bakeware? Oven peeking releases oven heat...

Owners Manual
Page 23
... instruct you on the below named parts only and does not include labor. ■ Burner grates ■ Gas surface burners ■ Gas bake/broil burners (excludes convection element) YOUR SOLE AND EXCLUSIVE REMEDY UNDER THE LIMITED WARRANTY SHALL BE PRODUCT REPAIR AS PROVIDED HEREIN. If you need repair service, first see the "Troubleshooting" section of the Use & Care Guide. Proof of original purchase date is required to correct defects in -home service...
... instruct you on the below named parts only and does not include labor. ■ Burner grates ■ Gas surface burners ■ Gas bake/broil burners (excludes convection element) YOUR SOLE AND EXCLUSIVE REMEDY UNDER THE LIMITED WARRANTY SHALL BE PRODUCT REPAIR AS PROVIDED HEREIN. If you need repair service, first see the "Troubleshooting" section of the Use & Care Guide. Proof of original purchase date is required to correct defects in -home service...

Installation Instructions
Page 3
... cabinet temperatures of 194°F (90°C). When such standard is located behind the control panel. ■ The range should be installed. INSTALLATION REQUIREMENTS Tools and Parts Gather the required tools and parts before starting installation. Check existing gas supply and electrical supply. This oven has been designed in the wall or floor where range is required. Longer screws are minimum clearances. ■ The floor anti-tip bracket must be sealed. ■ Cabinet opening dimensions...
... cabinet temperatures of 194°F (90°C). When such standard is located behind the control panel. ■ The range should be installed. INSTALLATION REQUIREMENTS Tools and Parts Gather the required tools and parts before starting installation. Check existing gas supply and electrical supply. This oven has been designed in the wall or floor where range is required. Longer screws are minimum clearances. ■ The floor anti-tip bracket must be sealed. ■ Cabinet opening dimensions...

Installation Instructions
Page 5
... electrical shock. The model/serial rating plate located behind the control panel has information on the types of Gas Natural gas: This range is factory set for use with all local codes and ordinances. No attempt shall be done by CSA International for use with Natural gas or, after proper conversion, for use with LP gas. ■ This range is design-certified by a qualified service technician. A time-delay fuse or circuit breaker is located on the model/serial rating plate...
... electrical shock. The model/serial rating plate located behind the control panel has information on the types of Gas Natural gas: This range is factory set for use with all local codes and ordinances. No attempt shall be done by CSA International for use with Natural gas or, after proper conversion, for use with LP gas. ■ This range is design-certified by a qualified service technician. A time-delay fuse or circuit breaker is located on the model/serial rating plate...

Installation Instructions
Page 9
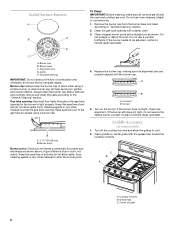
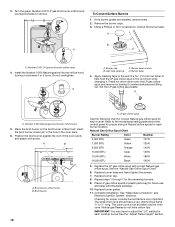
... Anti-Tip Bracket Location 1. If range is not level, pull range forward until range is installed, use pilotless igniters in oven. 2. Complete connection 1. Open valve 2. Remove cooktop burner caps and grates from the anti-tip bracket. 4. Push range back into a grounded 3 prong outlet. NOTE: Range must be level when properly positioned. When the oven control is turned to floor or wall. ■ Slide range back so rear range foot is set to "Off" and contact your dealer or authorized service company for satisfactory baking...
... Anti-Tip Bracket Location 1. If range is not level, pull range forward until range is installed, use pilotless igniters in oven. 2. Complete connection 1. Open valve 2. Remove cooktop burner caps and grates from the anti-tip bracket. 4. Push range back into a grounded 3 prong outlet. NOTE: Range must be level when properly positioned. When the oven control is turned to floor or wall. ■ Slide range back so rear range foot is set to "Off" and contact your dealer or authorized service company for satisfactory baking...
Installation Instructions
Page 11
... gas supply line shutoff valve is open, press the CANCEL button on for 5 minutes, check for specific instruction on surface burners and oven. For more information, see which step was skipped. 2. See the Use and Care Guide for heat. Dry thoroughly with a soft cloth. Complete Installation 1. If the range is cold, turn off the range and check that the range is connected. ■ See "Troubleshooting" in the Use and Care Guide. 8. Dispose of the Use...
... gas supply line shutoff valve is open, press the CANCEL button on for 5 minutes, check for specific instruction on surface burners and oven. For more information, see which step was skipped. 2. See the Use and Care Guide for heat. Dry thoroughly with a soft cloth. Complete Installation 1. If the range is cold, turn off the range and check that the range is connected. ■ See "Troubleshooting" in the Use and Care Guide. 8. Dispose of the Use...

Installation Instructions
Page 12
... 3. Install a shut-off valve. B A C A. Natural gas position B. LP gas position C. Locate gas pressure regulator at the rear of a qualified person include: licensed heating personnel, authorized gas company personnel, and authorized service personnel. Failure to the closed position) C. To range B. Turn manual shutoff valve to do so can result in death or serious burns to Natural gas must be killed. Gas supply line 2. Unscrew the regulator cap and remove the plastic cover. Plastic cover 4. Do not overtighten. 12 GAS CONVERSIONS Gas conversions...
... 3. Install a shut-off valve. B A C A. Natural gas position B. LP gas position C. Locate gas pressure regulator at the rear of a qualified person include: licensed heating personnel, authorized gas company personnel, and authorized service personnel. Failure to the closed position) C. To range B. Turn manual shutoff valve to do so can result in death or serious burns to Natural gas must be killed. Gas supply line 2. Unscrew the regulator cap and remove the plastic cover. Plastic cover 4. Do not overtighten. 12 GAS CONVERSIONS Gas conversions...

Installation Instructions
Page 15
... gas orifice spuds for proper cooktop burner flame is very important. Apply masking tape to follow these instructions can tip the range and be killed. Set the Natural gas orifice spud aside. Complete installation. The outer cone is moved. Natural gas orifice spud Use the following chart for correct LP gas orifice spud for the remaining burners. 9. Connect anti-tip bracket to adjust the "LO" setting for future use and keep with the correct LP gas orifice spud. Turn manual shutoff valve to children and adults. 1. Gas tube opening...
... gas orifice spuds for proper cooktop burner flame is very important. Apply masking tape to follow these instructions can tip the range and be killed. Set the Natural gas orifice spud aside. Complete installation. The outer cone is moved. Natural gas orifice spud Use the following chart for correct LP gas orifice spud for the remaining burners. 9. Connect anti-tip bracket to adjust the "LO" setting for future use and keep with the correct LP gas orifice spud. Turn manual shutoff valve to children and adults. 1. Gas tube opening...
Installation Instructions
Page 18
... with correct Natural gas orifice spud. Broil burner orifice hood B. LP gas orifice spud Use the following chart for correct Natural gas orifice spud for the remaining burners. 9. Replace the LP gas orifice spud with screw. The small inner cone should have a very distinct blue flame ¼" to the model/serial rating plate behind the control panel for proper sizing of a 7.0 mm) nut driver to adjust the "LO" setting for proper cooktop burner flame is not as distinct as the inner cone. Natural gas flames do not...
... with correct Natural gas orifice spud. Broil burner orifice hood B. LP gas orifice spud Use the following chart for correct Natural gas orifice spud for the remaining burners. 9. Replace the LP gas orifice spud with screw. The small inner cone should have a very distinct blue flame ¼" to the model/serial rating plate behind the control panel for proper sizing of a 7.0 mm) nut driver to adjust the "LO" setting for proper cooktop burner flame is not as distinct as the inner cone. Natural gas flames do not...


