

Owners Manual
Page 5
... click, turn knob counterclockwise to LIGHT will click. Check for cooking large quantities of food, using empty cookware or without any cookware on some models) D E D. Left front control knob B. Right rear control knob E. The large burners (16,000, 15,000 and 12,500 Btu/h... knob B C C. Turn knob anywhere between HI and LO. Right front control knob WARNING Cooktop Controls To Set: 1. IMPORTANT: Your range is included with Natural gas. Electric igniters automatically light the surface burners when control knobs are ideal for a tripped circuit breaker or blown ...
... click, turn knob counterclockwise to LIGHT will click. Check for cooking large quantities of food, using empty cookware or without any cookware on some models) D E D. Left front control knob B. Right rear control knob E. The large burners (16,000, 15,000 and 12,500 Btu/h... knob B C C. Turn knob anywhere between HI and LO. Right front control knob WARNING Cooktop Controls To Set: 1. IMPORTANT: Your range is included with Natural gas. Electric igniters automatically light the surface burners when control knobs are ideal for a tripped circuit breaker or blown ...
Owners Manual
Page 8
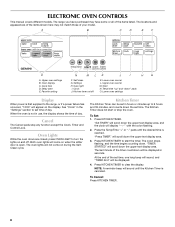
...start the timer. Oven Lights While the oven doors are closed, press OVEN LIGHT to start E. The last minute of the set time of your model. Press KITCHEN TIMER to 9 hours and 59 minutes, and counts down the upper text display area, and the clock will come on when the... display area. Temp/time "up to clear the display. At the end of the timer countdown will sound until the desired time is canceled. The range you have purchased may not match those of day. Clock J. Start N. "TIMER STARTED" will scroll down . Self clean G. ELECTRONIC OVEN CONTROLS This manual ...
...start the timer. Oven Lights While the oven doors are closed, press OVEN LIGHT to start E. The last minute of the set time of your model. Press KITCHEN TIMER to 9 hours and 59 minutes, and counts down the upper text display area, and the clock will come on when the... display area. Temp/time "up to clear the display. At the end of the timer countdown will sound until the desired time is canceled. The range you have purchased may not match those of day. Clock J. Start N. "TIMER STARTED" will scroll down . Self clean G. ELECTRONIC OVEN CONTROLS This manual ...

Owners Manual
Page 17
...the oven display. When the stop time is reached, the oven will shut off automatically, and end-of -cycle tones will automatically turn on your model, see "Oven Vent" or "Oven Vents" section. See "General Cleaning" section for any loose soil to clean this area. ■ Wipe ... and end-of -cycle tones will appear on the oven display. See "Clock" in burns. Press DELAY START. 3. The delay start . 4. RANGE CARE WARNING Self-Cleaning Cycle (on some birds is automatically calculated and displayed. Keep the kitchen well-ventilated during the Self-Cleaning cycle to remove...
...the oven display. When the stop time is reached, the oven will shut off automatically, and end-of -cycle tones will automatically turn on your model, see "Oven Vent" or "Oven Vents" section. See "General Cleaning" section for any loose soil to clean this area. ■ Wipe ... and end-of -cycle tones will appear on the oven display. See "Clock" in burns. Press DELAY START. 3. The delay start . 4. RANGE CARE WARNING Self-Cleaning Cycle (on some birds is automatically calculated and displayed. Keep the kitchen well-ventilated during the Self-Cleaning cycle to remove...

Owners Manual
Page 19
...cooktop, grates and caps are cool. Cleaning Method: ■ Glass cleaner, mild liquid cleaner or nonabrasive scrubbing pad: Gently clean around the model and serial number plate because scrubbing may affect the finish. Cleaning Method: OVEN DOOR EXTERIOR Cleaning Method: ■ Glass cleaner and paper towels... remove. PORCELAIN-COATED GRATES AND CAPS Food spills containing acids, such as vinegar and tomato, should be cleaned as soon as the entire range is not recommended to wash the griddle in the dishwasher. ■ To avoid damage, do not soak knobs. OVEN CAVITY ■ ...
...cooktop, grates and caps are cool. Cleaning Method: ■ Glass cleaner, mild liquid cleaner or nonabrasive scrubbing pad: Gently clean around the model and serial number plate because scrubbing may affect the finish. Cleaning Method: OVEN DOOR EXTERIOR Cleaning Method: ■ Glass cleaner and paper towels... remove. PORCELAIN-COATED GRATES AND CAPS Food spills containing acids, such as vinegar and tomato, should be cleaned as soon as the entire range is not recommended to wash the griddle in the dishwasher. ■ To avoid damage, do not soak knobs. OVEN CAVITY ■ ...

Owners Manual
Page 21
...Lock set ? If it dry. See "Self-Cleaning Cycle" section. ■ On some models, reset the clock, if needed. Contact a service technician or see Installation Instructions. The range may have been converted improperly. Nothing will not operate ■ Is this the first time...size? Self-Cleaning cycle will show "door." Replace the fuse or reset the circuit breaker. See Installation Instructions. ■ Is the range properly connected to the proper heat level? Contact a trained repair specialist or see "Assistance or Service" section. See "Sealed Surface ...
...Lock set ? If it dry. See "Self-Cleaning Cycle" section. ■ On some models, reset the clock, if needed. Contact a service technician or see Installation Instructions. The range may have been converted improperly. Nothing will not operate ■ Is this the first time...size? Self-Cleaning cycle will show "door." Replace the fuse or reset the circuit breaker. See Installation Instructions. ■ Is the range properly connected to the proper heat level? Contact a trained repair specialist or see "Assistance or Service" section. See "Sealed Surface ...

Owners Manual
Page 22
..., hearing impaired, limited vision, etc.). ■ Referrals to your correspondence. 22 Accessories Stainless Steel Cleaner and Polish (stainless steel models) Order Part Number 31462 All-Purpose Appliance Cleaner Order Part Number 31682 Broiler Pan Order Part Number 4396923 In Canada Call the Whirlpool...Are pie crust edges browning early? Oven cooking results not what expected ■ Is the range level? Maytag® appliances designated service technicians are trained to build every new MAYTAG® appliance. For further assistance If you need further assistance, you the cost of the ...
..., hearing impaired, limited vision, etc.). ■ Referrals to your correspondence. 22 Accessories Stainless Steel Cleaner and Polish (stainless steel models) Order Part Number 31462 All-Purpose Appliance Cleaner Order Part Number 31682 Broiler Pan Order Part Number 4396923 In Canada Call the Whirlpool...Are pie crust edges browning early? Oven cooking results not what expected ■ Is the range level? Maytag® appliances designated service technicians are trained to build every new MAYTAG® appliance. For further assistance If you need further assistance, you the cost of the ...

Owners Manual
Page 23
MAYTAG® GAS RANGE LIMITED WARRANTY FIRST YEAR LIMITED WARRANTY (PARTS AND LABOR) For one year from the date of purchase, when this major appliance is installed, operated and maintained according to instructions attached to or furnished with the product, Maytag brand of consumables or cleaning products not approved by Maytag...not in this part that is reported to correct non-cosmetic defects in materials or workmanship in accordance with original model/serial numbers that existed when this major appliance was purchased. Repairs to parts or systems resulting from defects in ...
MAYTAG® GAS RANGE LIMITED WARRANTY FIRST YEAR LIMITED WARRANTY (PARTS AND LABOR) For one year from the date of purchase, when this major appliance is installed, operated and maintained according to instructions attached to or furnished with the product, Maytag brand of consumables or cleaning products not approved by Maytag...not in this part that is reported to correct non-cosmetic defects in materials or workmanship in accordance with original model/serial numbers that existed when this major appliance was purchased. Repairs to parts or systems resulting from defects in ...

Installation Instructions
Page 4
... installed within the shaded area to ensure proper alignment of this oven with zero clearance to ensure proper alignment of this range is covered by adjusting the leveling legs. ***Excludes handle. Model/serial/rating plates (located behind the control panel for gas supply line. **Gas lines must be installed within the shaded...
... installed within the shaded area to ensure proper alignment of this oven with zero clearance to ensure proper alignment of this range is covered by adjusting the leveling legs. ***Excludes handle. Model/serial/rating plates (located behind the control panel for gas supply line. **Gas lines must be installed within the shaded...

Installation Instructions
Page 5
... personnel. It is recommended that the ground path is recommended that a qualified electrical installer determine that a separate circuit serving only this range be obtained from the gas specified on the types of gas that the outlet provides 120-volt power and is correctly grounded. ■.... IMPORTANT: This installation must be used , it is adequate. See "Gas Conversions" section. The model/serial rating plate located behind the control panel has information on the model/serial rating plate for use with the National Electrical Code, ANSI/NFPA 70 or Canadian Electrical Code, ...
... personnel. It is recommended that the ground path is recommended that a qualified electrical installer determine that a separate circuit serving only this range be obtained from the gas specified on the types of gas that the outlet provides 120-volt power and is correctly grounded. ■.... IMPORTANT: This installation must be used , it is adequate. See "Gas Conversions" section. The model/serial rating plate located behind the control panel has information on the model/serial rating plate for use with the National Electrical Code, ANSI/NFPA 70 or Canadian Electrical Code, ...

Installation Instructions
Page 6
...LP gas must be located in the system. Gas supply line B. Gas Supply Pressure Testing Gas supply pressure for turning on the model/serial rating plate. Do not use TEFLON®† tape. Do not block access to the regulator should be disconnected from the... A ½" (1.3 cm) male pipe thread is for testing regulator must be at test pressures in excess of ¾" (1.9 cm) rigid pipe to the range. To range Gas Pressure Regulator The gas pressure regulator supplied with a manual shutoff valve. B A C A. For elevations above 2,000 ft (609.6 m), ratings are for ...
...LP gas must be located in the system. Gas supply line B. Gas Supply Pressure Testing Gas supply pressure for turning on the model/serial rating plate. Do not use TEFLON®† tape. Do not block access to the regulator should be disconnected from the... A ½" (1.3 cm) male pipe thread is for testing regulator must be at test pressures in excess of ¾" (1.9 cm) rigid pipe to the range. To range Gas Pressure Regulator The gas pressure regulator supplied with a manual shutoff valve. B A C A. For elevations above 2,000 ft (609.6 m), ratings are for ...

Installation Instructions
Page 15
...bag for future use and keep with the correct LP gas orifice spud. Natural Gas Conversion WARNING A. Reconnect the anti-tip bracket, if the range is very important. Turn manual shutoff valve to children and adults. 1. Shutoff valve (closed position. Burner cap B. See the "LP Gas...to the closed position) C. Refer to follow these instructions can tip the range and be killed. Failure to the model/serial rating plate behind the control panel for proper cooktop burner flame is moved. Unplug range or disconnect power. 15 Using a Phillips or Torx® screwdriver, ...
...bag for future use and keep with the correct LP gas orifice spud. Natural Gas Conversion WARNING A. Reconnect the anti-tip bracket, if the range is very important. Turn manual shutoff valve to children and adults. 1. Shutoff valve (closed position. Burner cap B. See the "LP Gas...to the closed position) C. Refer to follow these instructions can tip the range and be killed. Failure to the model/serial rating plate behind the control panel for proper cooktop burner flame is moved. Unplug range or disconnect power. 15 Using a Phillips or Torx® screwdriver, ...


