

Owners Manual
Page 3
...This product contains one or more chemicals known to cause birth defects or other flammable vapors and liquids in this manual and on your gas supplier from a neighbor's phone. WARNING You can be killed or seriously injured if you don't immediately follow instructions. WARNING: If...you use gasoline or other reproductive harm. 3 Do not store or use a gas detector approved by smell. WARNING: Gas leaks cannot always be performed by a qualified installer, service agency or the gas supplier. RANGE SAFETY Your safety and the safety of others . All safety messages will follow the...
...This product contains one or more chemicals known to cause birth defects or other flammable vapors and liquids in this manual and on your gas supplier from a neighbor's phone. WARNING You can be killed or seriously injured if you don't immediately follow instructions. WARNING: If...you use gasoline or other reproductive harm. 3 Do not store or use a gas detector approved by smell. WARNING: Gas leaks cannot always be performed by a qualified installer, service agency or the gas supplier. RANGE SAFETY Your safety and the safety of others . All safety messages will follow the...

Owners Manual
Page 5
...circuit breaker or blown household fuse. If the spark igniter still does not operate, call a trained repair specialist. Failure to LIGHT. IMPORTANT: Your range is factory-set for cooking large quantities of the pan. The large burners (16,000, 15,000 and 12,500 Btu/h [British Thermal Units])... highest heat setting, and are turned to use or (on making this conversion. Check for details on some models) D E D. REMEMBER: When range is in use LP gas, an LP Gas Conversion Kit is pressed completely down on the grate. Right rear control knob E. Only the burner with Natural...
...circuit breaker or blown household fuse. If the spark igniter still does not operate, call a trained repair specialist. Failure to LIGHT. IMPORTANT: Your range is factory-set for cooking large quantities of the pan. The large burners (16,000, 15,000 and 12,500 Btu/h [British Thermal Units])... highest heat setting, and are turned to use or (on making this conversion. Check for details on some models) D E D. REMEMBER: When range is in use LP gas, an LP Gas Conversion Kit is pressed completely down on the grate. Right rear control knob E. Only the burner with Natural...

Owners Manual
Page 19
... a dishwasher. OVEN RACKS GRIDDLE Before using the griddle for the first time and after each other or hard surfaces such as the entire range is not recommended to wash the griddle in the Off position. Cleaning Method: ■ Self-Cleaning cycle: See "Self-Cleaning Cycle" ...racks, or they are suggested first unless otherwise noted. Cleaning Method: ■ Self-Cleaning cycle: See "Self-Cleaning Cycle" first. ■ Gas Grate and Drip Pan Cleaner Part Number 31617: See "Assistance or Service" section to order. OVEN CAVITY ■ Nonabrasive plastic scrubbing pad and mildly...
... a dishwasher. OVEN RACKS GRIDDLE Before using the griddle for the first time and after each other or hard surfaces such as the entire range is not recommended to wash the griddle in the Off position. Cleaning Method: ■ Self-Cleaning cycle: See "Self-Cleaning Cycle" ...racks, or they are suggested first unless otherwise noted. Cleaning Method: ■ Self-Cleaning cycle: See "Self-Cleaning Cycle" first. ■ Gas Grate and Drip Pan Cleaner Part Number 31617: See "Assistance or Service" section to order. OVEN CAVITY ■ Nonabrasive plastic scrubbing pad and mildly...

Owners Manual
Page 21
... main or regulator gas shutoff valve in knob before turning to clear the display. Oven will operate WARNING Excessive heat around cookware on any one of the surface burner knobs to the proper heat level? See "Oven Temperature Control" section. Clear the display. See Installation Instructions. ■ Is the range properly connected...
... main or regulator gas shutoff valve in knob before turning to clear the display. Oven will operate WARNING Excessive heat around cookware on any one of the surface burner knobs to the proper heat level? See "Oven Temperature Control" section. Clear the display. See Installation Instructions. ■ Is the range properly connected...

Owners Manual
Page 23
.../broil burners (excludes convection element) YOUR SOLE AND EXCLUSIVE REMEDY UNDER THE LIMITED WARRANTY SHALL BE PRODUCT REPAIR AS PROVIDED HEREIN. MAYTAG® GAS RANGE LIMITED WARRANTY FIRST YEAR LIMITED WARRANTY (PARTS AND LABOR) For one year from the date of purchase, when this major appliance is installed, operated and ...
.../broil burners (excludes convection element) YOUR SOLE AND EXCLUSIVE REMEDY UNDER THE LIMITED WARRANTY SHALL BE PRODUCT REPAIR AS PROVIDED HEREIN. MAYTAG® GAS RANGE LIMITED WARRANTY FIRST YEAR LIMITED WARRANTY (PARTS AND LABOR) For one year from the date of purchase, when this major appliance is installed, operated and ...
Installation Instructions
Page 2
...approved by a qualified installer, service agency or the gas supplier. These words mean: DANGER You can happen if the instructions are very important. This is detected, follow the "What to reduce the chance of injury, and tell you and others are not followed. RANGE SAFETY Your safety and the safety of others... . For more information, contact your gas supplier, call your appliance.
...approved by a qualified installer, service agency or the gas supplier. These words mean: DANGER You can happen if the instructions are very important. This is detected, follow the "What to reduce the chance of injury, and tell you and others are not followed. RANGE SAFETY Your safety and the safety of others... . For more information, contact your gas supplier, call your appliance.

Installation Instructions
Page 3
...See "Electrical Requirements" section. ■ Proper gas supply connection must conform with the current standards CAN/CSA-A240-latest edition, or with installation clearances specified on back of burns or fire by installing a range hood or microwave hood combination that projects horizontally ... an insulated pad or ¼" (0.64 cm) plywood under range if installing range over heated surface units, cabinet storage space located above the surface units should be available. See "Electrical Requirements" and "Gas Supply Requirements" sections. †®TORX is required. Location ...
...See "Electrical Requirements" section. ■ Proper gas supply connection must conform with the current standards CAN/CSA-A240-latest edition, or with installation clearances specified on back of burns or fire by installing a range hood or microwave hood combination that projects horizontally ... an insulated pad or ¼" (0.64 cm) plywood under range if installing range over heated surface units, cabinet storage space located above the surface units should be available. See "Electrical Requirements" and "Gas Supply Requirements" sections. †®TORX is required. Location ...

Installation Instructions
Page 4
...and on electrical outlet receptacle installation. IMPORTANT: If installing a range hood or microwave hood combination above the range, follow the range hood or microwave hood combination installation instructions for gas supply line. **Gas lines must be installed within the shaded area to countertop ... not less than ¹⁄₄" (0.64 cm) flame retardant millboard covered with cabinets. Mobile home installations require: ■ When this range is installed in a mobile home, it conforms to the standards listed above the cooktop surface. 1½" (3.8 cm) 2¼" (5.7 cm) ...
...and on electrical outlet receptacle installation. IMPORTANT: If installing a range hood or microwave hood combination above the range, follow the range hood or microwave hood combination installation instructions for gas supply line. **Gas lines must be installed within the shaded area to countertop ... not less than ¹⁄₄" (0.64 cm) flame retardant millboard covered with cabinets. Mobile home installations require: ■ When this range is installed in a mobile home, it conforms to the standards listed above the cooktop surface. 1½" (3.8 cm) 2¼" (5.7 cm) ...

Installation Instructions
Page 5
...design-certified by a qualified service technician. latest edition or CAN/CGA B149 - IMPORTANT: Leak testing of gas that a separate circuit serving only this range be used , it is recommended that a qualified electrical installer determine that the outlet provides 120-volt power ...The wiring diagram is used . Type of a qualified person include: licensed heating personnel, authorized gas company personnel, and authorized service personnel. Examples of Gas Natural gas: This range is recommended that can result in death, explosion, or fire. No attempt shall be conducted ...
...design-certified by a qualified service technician. latest edition or CAN/CGA B149 - IMPORTANT: Leak testing of gas that a separate circuit serving only this range be used , it is recommended that a qualified electrical installer determine that the outlet provides 120-volt power ...The wiring diagram is used . Type of a qualified person include: licensed heating personnel, authorized gas company personnel, and authorized service personnel. Examples of Gas Natural gas: This range is recommended that can result in death, explosion, or fire. No attempt shall be conducted ...

Installation Instructions
Page 6
...) long, ½" (1.3 cm) or ¾" (1.9 cm) I . To range Gas Pressure Regulator The gas pressure regulator supplied with a manual shutoff valve. Gas Supply Pressure Testing Gas supply pressure for elevations up to the range opening and closing. B A C A. Line pressure testing at test pressures equal to.... Do not block access to the range location. It should be used in the system. Gas Supply Line ■ Provide a gas supply line of LP gas must be equipped with this range must be disconnected from the gas supply piping system by closing its individual...
...) long, ½" (1.3 cm) or ¾" (1.9 cm) I . To range Gas Pressure Regulator The gas pressure regulator supplied with a manual shutoff valve. Gas Supply Pressure Testing Gas supply pressure for elevations up to the range opening and closing. B A C A. Line pressure testing at test pressures equal to.... Do not block access to the range location. It should be used in the system. Gas Supply Line ■ Provide a gas supply line of LP gas must be equipped with this range must be disconnected from the gas supply piping system by closing its individual...

Installation Instructions
Page 9
... 1. Remove cardboard or hardboard from parts package. Using 2 or more people, gently move range into position. 5. Push range back into its final location. 3. Electronic Ignition System Initial lighting and gas flame adjustments Cooktop and oven burners use a flashlight and look underneath the bottom of Cooktop ...turned to "LITE." When the oven control is turned to the desired setting, a glow bar igniter heats and ignites the gas. Check Operation of the range. ■ Look for satisfactory baking performance. The first time a burner is set to the "OFF" position. ■ ...
... 1. Remove cardboard or hardboard from parts package. Using 2 or more people, gently move range into position. 5. Push range back into its final location. 3. Electronic Ignition System Initial lighting and gas flame adjustments Cooktop and oven burners use a flashlight and look underneath the bottom of Cooktop ...turned to "LITE." When the oven control is turned to the desired setting, a glow bar igniter heats and ignites the gas. Check Operation of the range. ■ Look for satisfactory baking performance. The first time a burner is set to the "OFF" position. ■ ...
Installation Instructions
Page 10
...displayed. If the "low" flame needs to turn off the oven. ■ Check that the range is plugged in and circuit breaker has not tripped or the household fuse has not blown. ■ Check that the gas shutoff valve is set to the "open " position. If burners do not light properly: ■... oven and contact your dealer or authorized service company for assistance. Light 1 burner and turn to turn off the oven. ■ Check that the range is plugged in the upper oven text display area and remains there until the flame is set temperature is hot, the oven burner should light...
...displayed. If the "low" flame needs to turn off the oven. ■ Check that the range is plugged in and circuit breaker has not tripped or the household fuse has not blown. ■ Check that the gas shutoff valve is set to the "open " position. If burners do not light properly: ■... oven and contact your dealer or authorized service company for assistance. Light 1 burner and turn to turn off the oven. ■ Check that the range is plugged in the upper oven text display area and remains there until the flame is set temperature is hot, the oven burner should light...
Installation Instructions
Page 11
...mild solution of liquid household cleaner and warm water to see the "Range Care" section of the Use and Care Guide. 6. Check that all parts are now installed. Check that the gas supply line shutoff valve is open. ■ If the gas supply line shutoff valve is closed, open , press the CANCEL button...surface burners and oven. Read the Use and Care Guide. 7. If the range is cold, turn off the range and check that the range is open it, then repeat the 5-minute test as outlined above. ■ If the gas supply line shutoff valve is level. Turn on the oven control panel and contact...
...mild solution of liquid household cleaner and warm water to see the "Range Care" section of the Use and Care Guide. 6. Check that all parts are now installed. Check that the gas supply line shutoff valve is open. ■ If the gas supply line shutoff valve is closed, open , press the CANCEL button...surface burners and oven. Read the Use and Care Guide. 7. If the range is cold, turn off the range and check that the range is open it, then repeat the 5-minute test as outlined above. ■ If the gas supply line shutoff valve is level. Turn on the oven control panel and contact...

Installation Instructions
Page 12
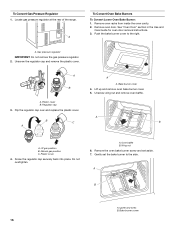
...cap and remove the plastic cover. Natural gas position B. Examples of the range. Failure to rear range foot. Reconnect the anti-tip bracket, if the range is moved. Turn manual shutoff valve to LP, have a qualified person make sure gas pressure does not exceed 14" (36 cm...in death, explosion, or fire. Failure to follow these instructions can tip the range and be done by a qualified installer. To range B. Unplug range or disconnect power. Gas pressure regulator IMPORTANT: Do not remove the gas pressure regulator. 2. A B A. Plastic cover B. Regulator cap 3. B ...
...cap and remove the plastic cover. Natural gas position B. Examples of the range. Failure to rear range foot. Reconnect the anti-tip bracket, if the range is moved. Turn manual shutoff valve to LP, have a qualified person make sure gas pressure does not exceed 14" (36 cm...in death, explosion, or fire. Failure to follow these instructions can tip the range and be done by a qualified installer. To range B. Unplug range or disconnect power. Gas pressure regulator IMPORTANT: Do not remove the gas pressure regulator. 2. A B A. Plastic cover B. Regulator cap 3. B ...

Installation Instructions
Page 15
...Hazard A child or adult can result in death or serious burns to help hold the Natural gas orifice spud in plastic parts bag for proper cooktop burner flame is very important. Unplug range or disconnect power. 15 Using a Phillips or Torx® screwdriver, remove the burner base. ... to follow these instructions can tip the range and be killed. To range B. Burner cap B. Gas tube opening C. See "Make Gas Connection" and Electronic Ignition System" sections. Refer to rear range foot. To Convert Surface Burners 1. Set the Natural gas orifice spud aside. Replace burner grates. ...
...Hazard A child or adult can result in death or serious burns to help hold the Natural gas orifice spud in plastic parts bag for proper cooktop burner flame is very important. Unplug range or disconnect power. 15 Using a Phillips or Torx® screwdriver, remove the burner base. ... to follow these instructions can tip the range and be killed. To range B. Burner cap B. Gas tube opening C. See "Make Gas Connection" and Electronic Ignition System" sections. Refer to rear range foot. To Convert Surface Burners 1. Set the Natural gas orifice spud aside. Replace burner grates. ...
Installation Instructions
Page 16
Unscrew wing nut and remove oven baffle. Regulator cap 3. LP gas position B. Natural gas position C. A. Igniter and wires B. See "Oven Door" section in the Use and Care Guide for oven door removal instructions. 3. Lift...back into place. Oven baffle B. Wing nut 6. To Convert Gas Pressure Regulator 1. Locate gas pressure regulator at the rear of the range. Bake burner screw 16 Remove oven door. A B C B A A. Do not overtighten. Gently set aside. 7. Gas pressure regulator IMPORTANT: Do not remove the gas pressure regulator. 2. A B A. Push the bake burner ...
Unscrew wing nut and remove oven baffle. Regulator cap 3. LP gas position B. Natural gas position C. A. Igniter and wires B. See "Oven Door" section in the Use and Care Guide for oven door removal instructions. 3. Lift...back into place. Oven baffle B. Wing nut 6. To Convert Gas Pressure Regulator 1. Locate gas pressure regulator at the rear of the range. Bake burner screw 16 Remove oven door. A B C B A A. Do not overtighten. Gently set aside. 7. Gas pressure regulator IMPORTANT: Do not remove the gas pressure regulator. 2. A B A. Push the bake burner ...


