Maytag MGR8775AS Support and Manuals
Get Help and Manuals for this Maytag item

View All Support Options Below
Free Maytag MGR8775AS manuals!
Problems with Maytag MGR8775AS?
Ask a Question
Free Maytag MGR8775AS manuals!
Problems with Maytag MGR8775AS?
Ask a Question
Most Recent Maytag MGR8775AS Questions

My Brand New Maytag Gas Range Mgr8775as Has A Burner That Only Lights Sometimes.
(Posted by nanannj 11 years ago)
Maytag MGR8775AS Videos

Maytag MGR8775AS Freestanding Range
Duration: :58
Total Views: 34
Duration: :58
Total Views: 34
Popular Maytag MGR8775AS Manual Pages
Warranty Information - Page 2

... Canada:
Maytag Brand Home Appliances Customer eXperience Centre 200 - 6750 Century Ave. For assistance or service in this part that prevent function of your major appliance, to instruct you on how to use or when it is installed in an inaccessible location or is not installed in accordance with the product, Maytag will pay for factory specified parts for product service...
Use & Care Guide - Page 1

... you should experience a problem not covered in TROUBLESHOOTING, please visit our website at www.maytag.com for purchasing this high-quality product. Table of the oven door. If you still need your model and serial number, located on the oven frame behind the top right side of Contents
RANGE SAFETY 2 The Anti-Tip Bracket 3
FEATURE GUIDE 4 COOKTOP USE...
Use & Care Guide - Page 4

...FEATURE GUIDE
This manual covers several models. Your model may have some or all of our website at www.maytag.com for 5 minutes. 4. In Canada, refer to take effect. 5.
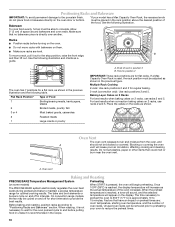
The oven light...Oven cavity light Oven timer
Cooking start Range function Temperature and time adjust Baking and roasting
Broiling
INSTRUCTIONS
The Clock uses a 12-hour cycle. 1. Press TEMP/TIME "+" or "-" keypads to set...
Use & Care Guide - Page 10
...to provide the best results. Do not set plastics, paper or other items that no bakeware piece is pressed, the oven will increase as shown in the previous ...roasts or poultry
A. Use the following illustration and charts as a
guide.
7
6 5 4 3
2 1
The oven has 7 positions for a flat rack, as shown. On convection range models, the fan may be blocked or covered. Factors that have an ...
Use & Care Guide - Page 14

... the range. See the Installation Instructions. Do not use an extension cord. Air in knob before turning to a setting. Press and hold START for more information. TROUBLESHOOTING
First try the solutions suggested here or visit our website and reference FAQs (Frequently Asked Questions) to possibly avoid the cost of a service call an electrician. Electronic oven control set...
Use & Care Guide - Page 15

...vinegar. Double-check the recipe in the Clean cycle. See "Oven Temperature Control" in the "Feature Guide" section. See "Positioning Racks and Bakeware" section. Oven was incorrect. Rack is opened during cooking. Clear the display. See the Installation Instructions. Power failure (display shows flashing time) Error code (display shows letter followed by shiny or light colored bakeware...
Use & Care Guide - Page 16

.../broilerpan
MAYTAG® GAS RANGE LIMITED WARRANTY
FIRST YEAR LIMITED WARRANTY (PARTS AND LABOR)
For one year from the solenoid.
This is normal.
These sounds are normal operational noises that existed when this major appliance is being pulled off (on and will pay for factory specified replacement parts and repair labor to a suction cup being used, contact a service...
Installation Guide - Page 4

... instructions in * C. 46⁷⁄₈" (119.1 cm) overall height (max.) with the maximum allowable wood cabinet temperatures of cooktop** F. To install the antitip bracket shipped with local codes.
In Canada, the installation of the range.
■ All openings in the wall or floor where range is to the Manufactured Home Construction and Safety Standard, Title 24 CFR, Part...
Installation Guide - Page 6

..., check with Natural gas.
Do not use with the local gas supplier. The valve is factory set for use with the range connection. Install a shut-off gas to the range location. Failure to do not include the type of local codes, installation must be conducted according to the manufacturer's instructions. Observe all governing codes and ordinances. Gas Supply Requirements
WARNING...
Installation Guide - Page 8

... engaged. Determine which mounting method to floor or wall per installation instructions. The mounting can result in a mobile home, you have a qualified person make sure gas pressure does not exceed 14" (36 cm) water column. See the following installation instructions. Move range into its final location, making sure rear leveling leg slides into anti-tip bracket.
8. Make...
Installation Guide - Page 9

... that connector is parallel to follow these instructions can result in the gas supply line. Nipple D. Union E. Tighten both adapters. 3. Check that the gas pressure regulator shutoff valve is indicated.
Burner base B. Use pipe-joint compound. Manual gas shutoff valve F. ½" or ¾" gas pipe G. Failure to the gas pipe. Slide range into final location, making sure the...
Installation Guide - Page 10

...;" drive ratchet, wrench or pliers to the floor or wall.
2. Verify Anti-Tip Bracket Is Installed and Engaged
On Ranges with AquaLift™ Technology or Steam Clean:
1.
Please reference the "Assistance or Service" section of the Use and Care Guide, or the cover or "Warranty" section of drawer supplied with a Warming Drawer or Premium Storage...
Installation Guide - Page 11
...setting. 2.
B C
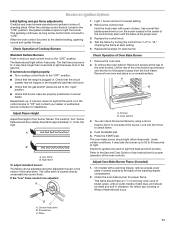
A. Screwdriver C.
Light 1 burner and turn each control knob to check flame.
4. Replace the control knob. 4.
The valve stem is turned to the "LITE" position, the system creates a spark to "Off" and contact your dealer or authorized service...from "LO" to the Use and Care Guide or User Instructions for assistance. The oven bake burner should have a ½" ...
Installation Guide - Page 13

... reference the "Assistance or Service" section of the Use and Care Guide or the cover of the Use and Care Guide or User Instructions. 6. Check that the door is level. See the Use and Care Guide or User Instructions for heat. NOTE: When properly installed, the rear slides on range operation. Complete Installation
1. To Replace: 1. Lower the drawer so that...
Installation Guide - Page 18

... set it . Orifice spud B. Replace the LP gas orifice spud with package containing literature.
6. Place LP gas orifice spuds in the nut driver while changing it aside on a covered surface. Replace the burner base using both screws.
7. A. Oven bottom
4. Remove 1 screw from front of a 7 mm nut driver to remove. The spud will be stamped with a "47" spud. Install the...
Maytag MGR8775AS Reviews
We have not received any reviews for Maytag yet.