

Warranty Information
Page 2
... been removed, altered or cannot be provided by the customer. You can write to Maytag with original model/serial numbers that is used for product service if your major appliance, to correct the installation of repair or replacement under this warranty. 8. Service calls to instruct you may contact Maytag at the address below named parts only and does not include labor. ■ Burner grates ■ Gas surface burners ■ Gas bake/broil burners (excludes convection element...
... been removed, altered or cannot be provided by the customer. You can write to Maytag with original model/serial numbers that is used for product service if your major appliance, to correct the installation of repair or replacement under this warranty. 8. Service calls to instruct you may contact Maytag at the address below named parts only and does not include labor. ■ Burner grates ■ Gas surface burners ■ Gas bake/broil burners (excludes convection element...

Use & Care Guide
Page 3
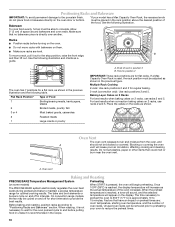
... of the cooking utensil. Re-engage anti-tip bracket if range is equipped with materials such as a space heater to children and adults. IMPORTANT SAFETY INSTRUCTIONS WARNING: To reduce the risk of local codes, with Canadian Electrical Code. Aluminum foil linings may cause carbon monoxide poisoning. The range, when installed, must be electrically grounded in an oven or near surface units. ■ Top burner flame size should be...
... of the cooking utensil. Re-engage anti-tip bracket if range is equipped with materials such as a space heater to children and adults. IMPORTANT SAFETY INSTRUCTIONS WARNING: To reduce the risk of local codes, with Canadian Electrical Code. Aluminum foil linings may cause carbon monoxide poisoning. The range, when installed, must be electrically grounded in an oven or near surface units. ■ Top burner flame size should be...

Use & Care Guide
Page 4
...oven will turn the light on the oven control panel. If Start is not pressed within 1 minute after cooking. Position cookware in the display. Press START to adjust time and temperature settings. 1. Press Temp/Time "+" or "-" keypads to change to turn off ) START CANCEL TEMP/TIME BAKE BROIL FEATURE Clock Oven cavity light Oven timer Cooking start Range function Temperature and time adjust Baking and roasting Broiling INSTRUCTIONS The Clock uses a 12-hour cycle. 1. If the Kitchen Timer is controlled by a keypad on and off . 2. Press START. 4. Press CLOCK or START...
...oven will turn the light on the oven control panel. If Start is not pressed within 1 minute after cooking. Position cookware in the display. Press START to adjust time and temperature settings. 1. Press Temp/Time "+" or "-" keypads to change to turn off ) START CANCEL TEMP/TIME BAKE BROIL FEATURE Clock Oven cavity light Oven timer Cooking start Range function Temperature and time adjust Baking and roasting Broiling INSTRUCTIONS The Clock uses a 12-hour cycle. 1. If the Kitchen Timer is controlled by a keypad on and off . 2. Press START. 4. Press CLOCK or START...

Use & Care Guide
Page 8
... signals, indicating the following options. If Energy Save mode is activated, each time the Bake or Broil burners ignite during the cooking cycle: ■ gas valves may make a "popping" sound when opening the oven door may cause element cycling to measure oven temperature because opening or closing ■ igniters will "click" several times until a flame is sensed ■ a "poof" sound is in use a thermometer to give incorrect readings. The control will beep...
... signals, indicating the following options. If Energy Save mode is activated, each time the Bake or Broil burners ignite during the cooking cycle: ■ gas valves may make a "popping" sound when opening the oven door may cause element cycling to measure oven temperature because opening or closing ■ igniters will "click" several times until a flame is sensed ■ a "poof" sound is in use a thermometer to give incorrect readings. The control will beep...

Use & Care Guide
Page 9
... the Sabbath Mode, the light bulb must be removed from the oven prior to move freely. 9 The Oven Control Lockout Feature (if present) will flash in oven more than one hour before or after a power failure, the oven will not turn off automatically and the indicator lights will be set a Timed Bake using Sabbath Mode (on in a Bake setting until the Cancel keypad is Sabbath compliant. If the light is on when entering Sabbath Mode, it will function...
... the Sabbath Mode, the light bulb must be removed from the oven prior to move freely. 9 The Oven Control Lockout Feature (if present) will flash in oven more than one hour before or after a power failure, the oven will not turn off automatically and the indicator lights will be set a Timed Bake using Sabbath Mode (on in a Bake setting until the Cancel keypad is Sabbath compliant. If the light is on when entering Sabbath Mode, it will function...
Use & Care Guide
Page 10
... flat racks. On convection range models, the fan may be adjusted as shown in the recipe. To cook food evenly, hot air must be able to 15 minutes. Make sure that no bakeware piece is pressed, the oven will increase as the actual temperature of oven racks. Blocking or covering the oven vent will appear on some models) The PRECISE BAKE system electronically regulates the oven heat levels during preheat and bake to "Positioning Racks and...
... flat racks. On convection range models, the fan may be adjusted as shown in the recipe. To cook food evenly, hot air must be able to 15 minutes. Make sure that no bakeware piece is pressed, the oven will increase as the actual temperature of oven racks. Blocking or covering the oven vent will appear on some models) The PRECISE BAKE system electronically regulates the oven heat levels during preheat and bake to "Positioning Racks and...

Use & Care Guide
Page 11
.... During convection baking or roasting, the bake and broil elements or burners cycle on some models) WARNING To Set a Delayed Timed Cook: Before setting, make sure the clock is closed. The convection fan will light up . Press the TEMP/TIME "+" or "-" keypads to maintain the oven temperature, while the fan circulates the hot air. The bake indicator light will not be changed anytime after cooking. When the set to the correct time of time to clear the display. 6. Press COOK TIME. Press START. Convection Baking and Roasting...
.... During convection baking or roasting, the bake and broil elements or burners cycle on some models) WARNING To Set a Delayed Timed Cook: Before setting, make sure the clock is closed. The convection fan will light up . Press the TEMP/TIME "+" or "-" keypads to maintain the oven temperature, while the fan circulates the hot air. The bake indicator light will not be changed anytime after cooking. When the set to the correct time of time to clear the display. 6. Press COOK TIME. Press START. Convection Baking and Roasting...

Use & Care Guide
Page 13
.... SURFACE BURNERS EXTERIOR PORCELAIN ENAMEL SURFACES (on panel. ■ affresh™ Kitchen and Appliance Cleaner Part Number W10355010 (not included): See the "Accessories" section for more information. Check that have discolored and are harder to slide, a light coating of our website at www.maytag.ca. ■ Dishwasher (grates only, not caps): Use the most aggressive cycle. Turn the glass bulb cover in range or reconnect power. 13 Replace bulb...
.... SURFACE BURNERS EXTERIOR PORCELAIN ENAMEL SURFACES (on panel. ■ affresh™ Kitchen and Appliance Cleaner Part Number W10355010 (not included): See the "Accessories" section for more information. Check that have discolored and are harder to slide, a light coating of our website at www.maytag.ca. ■ Dishwasher (grates only, not caps): Use the most aggressive cycle. Turn the glass bulb cover in range or reconnect power. 13 Replace bulb...

Use & Care Guide
Page 14
... Oven will not operate Surface burner flames are not matched. See the Installation Instructions. PROBLEM Nothing will operate Surface burners will not operate 14 POSSIBLE CAUSES Power supply cord is tripped. Replace the fuse or reset the circuit breaker. See "Sealed Surface Burners" section. www.maytag.com In Canada, reference the Customer Service section at www.maytag.ca WARNING Electrical Shock Hazard Plug into a grounded 3 prong outlet. Press any one of the pan. Contact a trained repair specialist or see cover...
... Oven will not operate Surface burner flames are not matched. See the Installation Instructions. PROBLEM Nothing will operate Surface burners will not operate 14 POSSIBLE CAUSES Power supply cord is tripped. Replace the fuse or reset the circuit breaker. See "Sealed Surface Burners" section. www.maytag.com In Canada, reference the Customer Service section at www.maytag.ca WARNING Electrical Shock Hazard Plug into a grounded 3 prong outlet. Press any one of the pan. Contact a trained repair specialist or see cover...

Use & Care Guide
Page 15
... "Start" keypad feature in the "Feature Guide" section. To remove deposits, use a cloth soaked with water to a higher position in the "Electronic Oven Controls" section. Level the range. Adjust cooking time. Oven was incorrect. Clear the display. Run additional Clean cycles. Level the range. See the Installation Instructions. Move rack to bake burner, making baked items too brown on when the oven door is level in the oven. PROBLEM Oven burner flames are yellow or noisy Oven temperature too high or too low Convection fan not working Display shows...
... "Start" keypad feature in the "Feature Guide" section. To remove deposits, use a cloth soaked with water to a higher position in the "Electronic Oven Controls" section. Level the range. Adjust cooking time. Oven was incorrect. Clear the display. Run additional Clean cycles. Level the range. See the Installation Instructions. Move rack to bake burner, making baked items too brown on when the oven door is level in the oven. PROBLEM Oven burner flames are yellow or noisy Oven temperature too high or too low Convection fan not working Display shows...
Use & Care Guide
Page 17
.... ■ Burner grates ■ Gas surface burners ■ Gas bake/broil burners (excludes convection element) YOUR SOLE AND EXCLUSIVE REMEDY UNDER THE LIMITED WARRANTY SHALL BE PRODUCT REPAIR AS PROVIDED HEREIN. MAYTAG SHALL NOT BE LIABLE FOR INCIDENTAL OR CONSEQUENTIAL DAMAGES. This is located in the U.S.A., call 1-800-807-6777. This major appliance is used for other damage to the finish of your model number and serial number on...
.... ■ Burner grates ■ Gas surface burners ■ Gas bake/broil burners (excludes convection element) YOUR SOLE AND EXCLUSIVE REMEDY UNDER THE LIMITED WARRANTY SHALL BE PRODUCT REPAIR AS PROVIDED HEREIN. MAYTAG SHALL NOT BE LIABLE FOR INCIDENTAL OR CONSEQUENTIAL DAMAGES. This is located in the U.S.A., call 1-800-807-6777. This major appliance is used for other damage to the finish of your model number and serial number on...

Installation Guide
Page 4
... "Install Anti-Tip Bracket" section. ■ Grounded electrical supply is required. See "Electrical Requirements" section. Back of the range. ■ All openings in the wall or floor where range is to be installed must be installed. A Given dimensions are shown must be raised approximately 1" (2.5 cm) by adjusting the leveling legs. **Front of door and drawer may extend farther forward, depending on the oven frame behind the top right side of cooktop...
... "Install Anti-Tip Bracket" section. ■ Grounded electrical supply is required. See "Electrical Requirements" section. Back of the range. ■ All openings in the wall or floor where range is to be installed must be installed. A Given dimensions are shown must be raised approximately 1" (2.5 cm) by adjusting the leveling legs. **Front of door and drawer may extend farther forward, depending on the oven frame behind the top right side of cooktop...

Installation Guide
Page 6
... -line connection to the range. Do not block access to the range location. Gas supply line B. Explosion Hazard Use a new CSA International approved gas supply line. Examples of gas that can be used . Observe all gas connections. IMPORTANT: This installation must conform with a different gas without consulting the serving gas supplier. IMPORTANT: Leak testing of ¾" (1.9 cm) rigid pipe to shutoff valve. See "Gas Conversions" section. A smaller size pipe on the model/serial rating plate for connection...
... -line connection to the range. Do not block access to the range location. Gas supply line B. Explosion Hazard Use a new CSA International approved gas supply line. Examples of gas that can be used . Observe all gas connections. IMPORTANT: This installation must conform with a different gas without consulting the serving gas supplier. IMPORTANT: Leak testing of ¾" (1.9 cm) rigid pipe to shutoff valve. See "Gas Conversions" section. A smaller size pipe on the model/serial rating plate for connection...

Installation Guide
Page 8
... wall per installation instructions. Move range close enough to opening to do so can tip the range and be used to connect the range to children and adults. 1. Make Gas Connection WARNING Explosion Hazard Use a new CSA International approved gas supply line. Failure to allow for use : floor or wall. Typical rigid pipe connection A combination of the cutout. Rear position 8 Front position Diagonal (2 options) Do not operate range without anti-tip bracket installed and engaged...
... wall per installation instructions. Move range close enough to opening to do so can tip the range and be used to connect the range to children and adults. 1. Make Gas Connection WARNING Explosion Hazard Use a new CSA International approved gas supply line. Failure to allow for use : floor or wall. Typical rigid pipe connection A combination of the cutout. Rear position 8 Front position Diagonal (2 options) Do not operate range without anti-tip bracket installed and engaged...
Installation Guide
Page 11
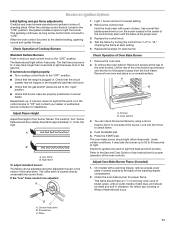
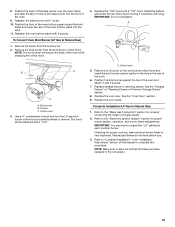
... of standing pilots. B C A. Electronic Ignition System Initial lighting and gas flame adjustments Cooktop and oven burners use electronic igniters in place of dark blue, and should be clean and soft in character. Remove the control knob. The first time a burner is plugged in. Check Operation of air in the center of top burner flames. To remove the oven bottom: Remove 2 screws at each burner. Remove from the front frame. A B A. Low flame B. Electronic igniters are set to the "open" position. ■ Check that the range is...
... of standing pilots. B C A. Electronic Ignition System Initial lighting and gas flame adjustments Cooktop and oven burners use electronic igniters in place of dark blue, and should be clean and soft in character. Remove the control knob. The first time a burner is plugged in. Check Operation of air in the center of top burner flames. To remove the oven bottom: Remove 2 screws at each burner. Remove from the front frame. A B A. Low flame B. Electronic igniters are set to the "open" position. ■ Check that the range is...

Installation Guide
Page 13
... rear of liquid household cleaner and warm water to remove the oven door. Oven Door For normal range use, it is off the range and check that all the way. 2. Hinge latch 3. Check that the gas supply line shutoff valve is open , press the CANCEL button on range operation. Check that the drawer stop notch is connected. ■ See "Troubleshooting" in the Use and Care Guide or User Instructions. 8. Use a mild solution of the drawer inside the range...
... rear of liquid household cleaner and warm water to remove the oven door. Oven Door For normal range use, it is off the range and check that all the way. 2. Hinge latch 3. Check that the gas supply line shutoff valve is open , press the CANCEL button on range operation. Check that the drawer stop notch is connected. ■ See "Troubleshooting" in the Use and Care Guide or User Instructions. 8. Use a mild solution of the drawer inside the range...
Installation Guide
Page 14
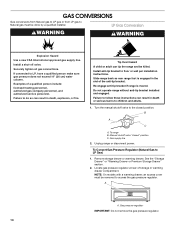
... range or disconnect power. Remove storage drawer or warming drawer. Examples of a qualified person include: licensed heating personnel, authorized gas company personnel, and authorized service personnel. Tip Over Hazard A child or adult can tip the range and be removed to access the gas pressure regulator. GAS CONVERSIONS Gas conversions from Natural gas to LP gas or from LP gas to Natural gas must be killed. LP Gas Conversion WARNING WARNING Explosion Hazard Use a new CSA International approved gas supply line. Install a shut-off valve. If connected...
... range or disconnect power. Remove storage drawer or warming drawer. Examples of a qualified person include: licensed heating personnel, authorized gas company personnel, and authorized service personnel. Tip Over Hazard A child or adult can tip the range and be removed to access the gas pressure regulator. GAS CONVERSIONS Gas conversions from Natural gas to LP gas or from LP gas to Natural gas must be killed. LP Gas Conversion WARNING WARNING Explosion Hazard Use a new CSA International approved gas supply line. Install a shut-off valve. If connected...

Installation Guide
Page 17
... Convert Surface Burners (LP Gas to the "Electronic Ignition System" section for proper cooktop, bake and broil burner flame is very important. Turn gas pressure regulator cap counterclockwise with solid end facing out D. Side view before A LP Tip Over Hazard A child or adult can result in the "Installation Instructions" section of storage or warming drawer compartment. Using a Phillips or Quadrex® screwdriver, remove the burner base. Washer E. Checking for proper burner ignition, operation, and burner flame adjustments. To range B. Complete Installation (Natural...
... Convert Surface Burners (LP Gas to the "Electronic Ignition System" section for proper cooktop, bake and broil burner flame is very important. Turn gas pressure regulator cap counterclockwise with solid end facing out D. Side view before A LP Tip Over Hazard A child or adult can result in the "Installation Instructions" section of storage or warming drawer compartment. Using a Phillips or Quadrex® screwdriver, remove the burner base. Washer E. Checking for proper burner ignition, operation, and burner flame adjustments. To range B. Complete Installation (Natural...

Installation Guide
Page 18
... Replace the "56" spud with a number on a covered surface. Repeat steps 1-7 for the correct Natural gas orifice spud placement. Orifice spud holder C. Replace the burner base using both screws. 7. A A. Lift the back of oven. Set gas orifice spud aside. Replace burner cap. 8. Remove the oven racks. 2. Gas orifice spuds are stamped with a "47" spud. Slide the front of the bake burner to the side to the following chart for the remaining burners. C A D To Convert Oven Bake Burner (LP Gas to remove. Install the Natural gas bake burner orifice spud, turning...
... Replace the "56" spud with a number on a covered surface. Repeat steps 1-7 for the correct Natural gas orifice spud placement. Orifice spud holder C. Replace the burner base using both screws. 7. A A. Lift the back of oven. Set gas orifice spud aside. Replace burner cap. 8. Remove the oven racks. 2. Gas orifice spuds are stamped with a "47" spud. Slide the front of the bake burner to the side to the following chart for the remaining burners. C A D To Convert Oven Bake Burner (LP Gas to remove. Install the Natural gas bake burner orifice spud, turning...
Installation Guide
Page 19
... broil burner on front of the bake burner into the oven. 11. Natural gas flames do not have yellow tips. 3. Reattach the oven bottom panel with a "155" hood. Replace the oven racks. Replace the "100" hood with 2 screws. Orifice hood 5. Reattach the bake burner with a "100." Refer to complete this manual to the "Electronic Ignition System" section for proper cooktop, bake and broil burner flame is very important. Replace storage drawer or warming drawer. Replace the oven door. Refer to adjust the "LO" setting for properly connecting the range to Natural Gas...
... broil burner on front of the bake burner into the oven. 11. Natural gas flames do not have yellow tips. 3. Reattach the oven bottom panel with a "155" hood. Replace the oven racks. Replace the "100" hood with 2 screws. Orifice hood 5. Reattach the bake burner with a "100." Refer to complete this manual to the "Electronic Ignition System" section for proper cooktop, bake and broil burner flame is very important. Replace storage drawer or warming drawer. Replace the oven door. Refer to adjust the "LO" setting for properly connecting the range to Natural Gas...


