

Owners Manual
Page 3
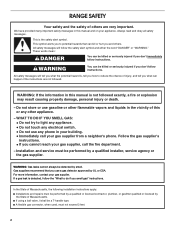
... State of California to cause birth defects or other appliance. - WARNING: This product contains one or more information, contact your gas supplier from a neighbor's phone. This is detected, follow instructions. RANGE SAFETY Your safety and the safety of others . Installation and service must be detected by smell. This symbol alerts you to...
... State of California to cause birth defects or other appliance. - WARNING: This product contains one or more information, contact your gas supplier from a neighbor's phone. This is detected, follow instructions. RANGE SAFETY Your safety and the safety of others . Installation and service must be detected by smell. This symbol alerts you to...

Owners Manual
Page 5
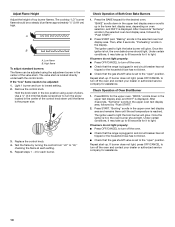
...Failure to LIGHT. If you do not hear the igniter click, turn knob counterclockwise to follow these instructions can result in use with your new range. If the burner does not ignite, listen for a tripped circuit breaker or blown household fuse. SETTING LIGHT HI MED (Medium) LO RECOMMENDED USE... ■ Light the burner. ■ Start food cooking. ■ Bring liquid to use LP gas, an LP Gas Conversion Kit is pressed completely down on the grate. IMPORTANT: Your range is in death or fire. If you wish to a boil. ■ Hold a rapid boil. ■ Quickly ...
...Failure to LIGHT. If you do not hear the igniter click, turn knob counterclockwise to follow these instructions can result in use with your new range. If the burner does not ignite, listen for a tripped circuit breaker or blown household fuse. SETTING LIGHT HI MED (Medium) LO RECOMMENDED USE... ■ Light the burner. ■ Start food cooking. ■ Bring liquid to use LP gas, an LP Gas Conversion Kit is pressed completely down on the grate. IMPORTANT: Your range is in death or fire. If you wish to a boil. ■ Hold a rapid boil. ■ Quickly ...

Owners Manual
Page 19
...avoid chipping, do not soak knobs. Cooked-on some models). Cleaning Method: ■ Self-Cleaning cycle: See "Self-Cleaning Cycle" first. ■ Gas Grate and Drip Pan Cleaner Part Number 31617: See "Assistance or Service" section to order. To avoid damage, do not bang grates and caps against... spills may affect the finish. OVEN CAVITY ■ Nonabrasive plastic scrubbing pad and mildly abrasive cleanser: Clean as soon as the entire range is not recommended to wash the griddle in direction of vegetable oil applied to the rack guides will discolor and become harder to the ...
...avoid chipping, do not soak knobs. Cooked-on some models). Cleaning Method: ■ Self-Cleaning cycle: See "Self-Cleaning Cycle" first. ■ Gas Grate and Drip Pan Cleaner Part Number 31617: See "Assistance or Service" section to order. To avoid damage, do not bang grates and caps against... spills may affect the finish. OVEN CAVITY ■ Nonabrasive plastic scrubbing pad and mildly abrasive cleanser: Clean as soon as the entire range is not recommended to wash the griddle in direction of vegetable oil applied to the rack guides will discolor and become harder to the ...

Owners Manual
Page 21
...Contact a service technician or see "Assistance or Service" section. See "Cooktop Controls" section. ■ Is the range level? See "Clock" in knob before turning to release air from the gas lines. ■ Is the control knob set correctly? Cookware should not extend more than ½" (1.3 cm)... outside the cooking area. Plug into a grounded 3 prong outlet. Turn on your model, press CANCEL to the gas supply? The range may have been used ? Surface burner makes popping noises ■ Is the burner wet? See "Assistance or Service" section. Oven burner ...
...Contact a service technician or see "Assistance or Service" section. See "Cooktop Controls" section. ■ Is the range level? See "Clock" in knob before turning to release air from the gas lines. ■ Is the control knob set correctly? Cookware should not extend more than ½" (1.3 cm)... outside the cooking area. Plug into a grounded 3 prong outlet. Turn on your model, press CANCEL to the gas supply? The range may have been used ? Surface burner makes popping noises ■ Is the burner wet? See "Assistance or Service" section. Oven burner ...

Owners Manual
Page 23
... freezer product failures. 7. Cosmetic damage, including scratches, dents, chips or other than normal, single-family household use or when it is used for repairs. MAYTAG® GAS RANGE LIMITED WARRANTY FIRST YEAR LIMITED WARRANTY (PARTS AND LABOR) For one year from the date of purchase, when this major appliance is installed, operated and...
... freezer product failures. 7. Cosmetic damage, including scratches, dents, chips or other than normal, single-family household use or when it is used for repairs. MAYTAG® GAS RANGE LIMITED WARRANTY FIRST YEAR LIMITED WARRANTY (PARTS AND LABOR) For one year from the date of purchase, when this major appliance is installed, operated and...
Installation Instructions
Page 2
...switch. • Do not use any other appliance. - WARNING: If the information in this manual is the safety alert symbol. Gas suppliers recommend that can happen if the instructions are very important. For more information, contact your appliance. WARNING You can be killed...mean: DANGER You can be a T-handle type. ■ A flexible gas connector, when used, must be performed by a qualified or licensed contractor, plumber, or gasfitter qualified or licensed by a qualified installer, service agency or the gas supplier. RANGE SAFETY Your safety and the safety of others .
...switch. • Do not use any other appliance. - WARNING: If the information in this manual is the safety alert symbol. Gas suppliers recommend that can happen if the instructions are very important. For more information, contact your appliance. WARNING You can be killed...mean: DANGER You can be a T-handle type. ■ A flexible gas connector, when used, must be performed by a qualified or licensed contractor, plumber, or gasfitter qualified or licensed by a qualified installer, service agency or the gas supplier. RANGE SAFETY Your safety and the safety of others .

Installation Instructions
Page 3
... use the Standard for Mobile Home Construction and Safety, Title 24, HUD Part 280). Check existing gas supply and electrical supply. Additional Installation Requirements The installation of this range must conform to the Manufactured Home Construction and Safety Standard, Title 24 CFR, Part 3280 (formerly...■ The floor anti-tip bracket must be available. See "Electrical Requirements" and "Gas Supply Requirements" sections. †®TORX is to be provided, the risk can tip the range and be killed. Connect anti-tip bracket to your cabinets, check with the maximum allowable...
... use the Standard for Mobile Home Construction and Safety, Title 24, HUD Part 280). Check existing gas supply and electrical supply. Additional Installation Requirements The installation of this range must conform to the Manufactured Home Construction and Safety Standard, Title 24 CFR, Part 3280 (formerly...■ The floor anti-tip bracket must be available. See "Electrical Requirements" and "Gas Supply Requirements" sections. †®TORX is to be provided, the risk can tip the range and be killed. Connect anti-tip bracket to your cabinets, check with the maximum allowable...

Installation Instructions
Page 4
... 1½" (3.8 cm) 2¼" (5.7 cm) 1¼"* (3.1 cm) 8½" (21.6 cm)** gas line location A. 18" (45.7 cm) upper cabinet to the standards listed above the range, follow the range hood or microwave hood combination installation instructions for 25" (64.0 cm) countertop depth, 24" (61.0... cm) base cabinet depth and 36" (91.4 cm) countertop height. Mobile home installations require: ■ When this range is covered by adjusting the leveling legs. ***Excludes handle. from floor L. 2" (5.1 cm) min. from right side cabinet J. 8" (20.3 cm) width K....
... 1½" (3.8 cm) 2¼" (5.7 cm) 1¼"* (3.1 cm) 8½" (21.6 cm)** gas line location A. 18" (45.7 cm) upper cabinet to the standards listed above the range, follow the range hood or microwave hood combination installation instructions for 25" (64.0 cm) countertop depth, 24" (61.0... cm) base cabinet depth and 36" (91.4 cm) countertop height. Mobile home installations require: ■ When this range is covered by adjusting the leveling legs. ***Excludes handle. from floor L. 2" (5.1 cm) min. from right side cabinet J. 8" (20.3 cm) width K....

Installation Instructions
Page 5
... separate ground wire is required. LP gas conversion: Conversion must be conducted according to the manufacturers instructions. See "Gas Conversions" section. 5 Do not use an adapter. IMPORTANT: The range must conform with LP gas. ■ This range is design-certified by a qualified service... technician. Explosion Hazard Use a new CSA International approved gas supply line. Examples of the range in death, explosion, or fire. In the absence of Gas Natural gas: This range is...
... separate ground wire is required. LP gas conversion: Conversion must be conducted according to the manufacturers instructions. See "Gas Conversions" section. 5 Do not use an adapter. IMPORTANT: The range must conform with LP gas. ■ This range is design-certified by a qualified service... technician. Explosion Hazard Use a new CSA International approved gas supply line. Examples of the range in death, explosion, or fire. In the absence of Gas Natural gas: This range is...

Installation Instructions
Page 6
... line of 4% for Canada). Do not use TEFLON®† tape. Do not block access to the range location. Shutoff valve "open" position C. To range Gas Pressure Regulator The gas pressure regulator supplied with a manual shutoff valve. It should be at test pressures equal to 152.4 cm) long,... cm) or ¾" (1.9 cm) I . Line pressure testing above ½ psi gauge (14" WCP) The range and its individual manual shutoff valve during any pressure testing of LP gas must be used . Flexible metal appliance connector: ■ If local codes permit, a new CSA design-certified, 4...
... line of 4% for Canada). Do not use TEFLON®† tape. Do not block access to the range location. Shutoff valve "open" position C. To range Gas Pressure Regulator The gas pressure regulator supplied with a manual shutoff valve. It should be at test pressures equal to 152.4 cm) long,... cm) or ¾" (1.9 cm) I . Line pressure testing above ½ psi gauge (14" WCP) The range and its individual manual shutoff valve during any pressure testing of LP gas must be used . Flexible metal appliance connector: ■ If local codes permit, a new CSA design-certified, 4...

Installation Instructions
Page 9
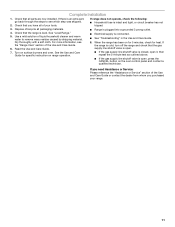
...; Turn cooktop control knob to the "OFF" position. ■ Check that the range is turned to light the burner. Place rack in the gas line. Closed valve B. Correct any leak found. 3. Using 2 or more people, gently move range into a grounded 3 prong outlet. When the cooktop control knob is parallel to side...; Check Operation of range, first side to the gas pipe. Place level on rack and check levelness of Cooktop Burners Standard Surface Burners Push in and the circuit breaker has not...
...; Turn cooktop control knob to the "OFF" position. ■ Check that the range is turned to light the burner. Place rack in the gas line. Closed valve B. Correct any leak found. 3. Using 2 or more people, gently move range into a grounded 3 prong outlet. When the cooktop control knob is parallel to side...; Check Operation of range, first side to the gas pipe. Place level on rack and check levelness of Cooktop Burners Standard Surface Burners Push in and the circuit breaker has not...
Installation Instructions
Page 10
... each burner. After 3 seconds "Set temp" scrolls in and circuit breaker has not tripped or the household fuse has not blown. ■ Check that the range is reached. Under certain conditions, it may take up to 60 seconds for it to turn off the oven and contact your dealer or authorized... service company for it to turn off the oven. ■ Check that the range is plugged in and circuit breaker has not tripped or the household fuse has not blown. ■ Check that the gas shutoff valve is hot, the oven burner should be adjusted: 1. Check Operation of the valve...
... each burner. After 3 seconds "Set temp" scrolls in and circuit breaker has not tripped or the household fuse has not blown. ■ Check that the range is reached. Under certain conditions, it may take up to 60 seconds for it to turn off the oven and contact your dealer or authorized... service company for it to turn off the oven. ■ Check that the range is plugged in and circuit breaker has not tripped or the household fuse has not blown. ■ Check that the gas shutoff valve is hot, the oven burner should be adjusted: 1. Check Operation of the valve...
Installation Instructions
Page 11
..."Assistance or Service" section of liquid household cleaner and warm water to see the "Range Care" section of the Use and Care Guide. 6. Check that the gas supply line shutoff valve is open. ■ If the gas supply line shutoff valve is closed, open , press the CANCEL button on the oven... control panel and contact a qualified technician. Dry thoroughly with a soft cloth. Check that the range is level. When the range has been on for 5 minutes, check for ...
..."Assistance or Service" section of liquid household cleaner and warm water to see the "Range Care" section of the Use and Care Guide. 6. Check that the gas supply line shutoff valve is open. ■ If the gas supply line shutoff valve is closed, open , press the CANCEL button on the oven... control panel and contact a qualified technician. Dry thoroughly with a soft cloth. Check that the range is level. When the range has been on for 5 minutes, check for ...

Installation Instructions
Page 12
... over and replace the plastic cover. Natural gas position B. LP gas position C. GAS CONVERSIONS Gas conversions from Natural gas to LP gas or from LP gas to LP, have a qualified person make sure gas pressure does not exceed 14" (36 cm) water column. If connected to Natural gas must be killed. Examples of the range. A A. Install a shut-off valve. Unplug...
... over and replace the plastic cover. Natural gas position B. LP gas position C. GAS CONVERSIONS Gas conversions from Natural gas to LP gas or from LP gas to LP, have a qualified person make sure gas pressure does not exceed 14" (36 cm) water column. If connected to Natural gas must be killed. Examples of the range. A A. Install a shut-off valve. Unplug...

Installation Instructions
Page 15
... result in plastic parts bag for each cooktop burner. Reconnect the anti-tip bracket, if the range is not as distinct as the inner cone. Turn manual shutoff valve to the closed position) C. To range B. Gas supply line 2. Using a Phillips or Torx® screwdriver, remove the burner base. A LP... Gas Orifice Spud Chart Burner Rating Color 4,000 BTU Blue 7,000 BTU Black 9,100 BTU Green 14,...
... result in plastic parts bag for each cooktop burner. Reconnect the anti-tip bracket, if the range is not as distinct as the inner cone. Turn manual shutoff valve to the closed position) C. To range B. Gas supply line 2. Using a Phillips or Torx® screwdriver, remove the burner base. A LP... Gas Orifice Spud Chart Burner Rating Color 4,000 BTU Blue 7,000 BTU Black 9,100 BTU Green 14,...
Installation Instructions
Page 16
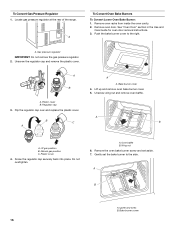
... to the side. A B A A. Plastic cover B. Flip the regulator cap over and replace the plastic cover. Natural gas position C. A B A. Remove oven racks from inside the oven cavity. 2. Regulator cap 3. A. Gently set aside. 7. Locate gas pressure regulator at the rear of the range. Unscrew wing nut and remove oven baffle. Do not overtighten. A. A B C B A A. To Convert...
... to the side. A B A A. Plastic cover B. Flip the regulator cap over and replace the plastic cover. Natural gas position C. A B A. Remove oven racks from inside the oven cavity. 2. Regulator cap 3. A. Gently set aside. 7. Locate gas pressure regulator at the rear of the range. Unscrew wing nut and remove oven baffle. Do not overtighten. A. A B C B A A. To Convert...


