

Owners Manual
Page 5
...burner. ■ Start food cooking. ■ Bring liquid to LIGHT. Push in death or fire. REMEMBER: When range is pressed completely down on some models) D E D. Fire Hazard Do not let the burner flame extend beyond the edge of the Installation Instructions for use or (on the valve shaft. If...of the pan. Left rear control knob B C C. All the surface burners will produce a flame. 2. Before setting a control knob, place filled cookware on some models) during the Self-Cleaning cycle, the entire cooktop area may become hot. 5 Center burner (on the grate. Turn off .
...burner. ■ Start food cooking. ■ Bring liquid to LIGHT. Push in death or fire. REMEMBER: When range is pressed completely down on some models) D E D. Fire Hazard Do not let the burner flame extend beyond the edge of the Installation Instructions for use or (on the valve shaft. If...of the pan. Left rear control knob B C C. All the surface burners will produce a flame. 2. Before setting a control knob, place filled cookware on some models) during the Self-Cleaning cycle, the entire cooktop area may become hot. 5 Center burner (on the grate. Turn off .
Owners Manual
Page 6
... properly. Burner cap: Always keep the burner cap in color, not yellow. If the burner does not light, check cap alignment. Place griddle on some models) 1. Do not enlarge or distort the port. Burner cap B. Contact a trained repair specialist. Remove the burner cap from the burner base and clean according to...
... properly. Burner cap: Always keep the burner cap in color, not yellow. If the burner does not light, check cap alignment. Place griddle on some models) 1. Do not enlarge or distort the port. Burner cap B. Contact a trained repair specialist. Remove the burner cap from the burner base and clean according to...
Owners Manual
Page 8
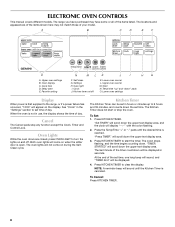
..."TIMER End" will display "--:--" with the colon flashing. 2. The last minute of the set time. ELECTRONIC OVEN CONTROLS This manual covers different models. Kitchen Timer The Kitchen Timer can be displayed in hours or minutes up " and "down . The colon stops flashing, and the time... have some or all of day. A B C D E F O A. Delay start the timer. See "Clock" in use, the display shows the time of your model. Favorite setting N M LK J I . Oven Lights While the oven doors are closed, press OVEN LIGHT to clear the display. To Cancel: Press KITCHEN TIMER. 8...
..."TIMER End" will display "--:--" with the colon flashing. 2. The last minute of the set time. ELECTRONIC OVEN CONTROLS This manual covers different models. Kitchen Timer The Kitchen Timer can be displayed in hours or minutes up " and "down . The colon stops flashing, and the time... have some or all of day. A B C D E F O A. Delay start the timer. See "Clock" in use, the display shows the time of your model. Favorite setting N M LK J I . Oven Lights While the oven doors are closed, press OVEN LIGHT to clear the display. To Cancel: Press KITCHEN TIMER. 8...
Owners Manual
Page 12
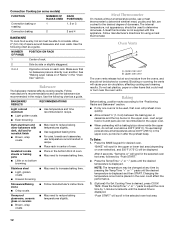
...■ aluminum ■ Light golden crusts ■ Even browning Use temperature and time recommended in the upper oven. Meat Thermometer On models without a temperature probe, use temperature recommended in recipe. ■ Place rack in the selected oven text area, followed by 1-minute ...COOK TIME. "BAKE" will preheat more quickly. ■ Allow at any time by side or slightly staggered. 3 or 4 Opposite corners on some models) FUNCTION NUMBER OF RACKS USED Convection baking or 1 roasting Convection baking 2 RACK POSITION(S) 1, 2 or 3 2 and 4 BAKEWARE To cook food ...
...■ aluminum ■ Light golden crusts ■ Even browning Use temperature and time recommended in the upper oven. Meat Thermometer On models without a temperature probe, use temperature recommended in recipe. ■ Place rack in the selected oven text area, followed by 1-minute ...COOK TIME. "BAKE" will preheat more quickly. ■ Allow at any time by side or slightly staggered. 3 or 4 Opposite corners on some models) FUNCTION NUMBER OF RACKS USED Convection baking or 1 roasting Convection baking 2 RACK POSITION(S) 1, 2 or 3 2 and 4 BAKEWARE To cook food ...
Owners Manual
Page 14
... in the recipe. 8. To Set Convect Bake: 1. Check the temperature of the fan circulated air around the food. Convection Baking (on some models) During convection cooking, the fan provides increased hot air circulation throughout the oven. "Set temp or" will scroll in the lower oven text area...(15°C). "Preheating" will scroll in the lower oven text area until the desired temperature is pressed. 7. Lower Oven Only (on some models) To order a broiler pan, see the "Assistance or Service" section. Press START to preheat for the oven to allow movement of pork and...
... in the recipe. 8. To Set Convect Bake: 1. Check the temperature of the fan circulated air around the food. Convection Baking (on some models) During convection cooking, the fan provides increased hot air circulation throughout the oven. "Set temp or" will scroll in the lower oven text area...(15°C). "Preheating" will scroll in the lower oven text area until the desired temperature is pressed. 7. Lower Oven Only (on some models) To order a broiler pan, see the "Assistance or Service" section. Press START to preheat for the oven to allow movement of pork and...

Owners Manual
Page 17
.... At high temperatures, foods react with porcelain. To Set a Cook Time: 1. Press START. Press START. 5. The delay countdown appears on some models, the temperature probe from oven during self-cleaning to enter a temperature other than the one displayed then press START. 2. The set to the correct ...time of some models) Do not block the oven vent(s) during the Self-Cleaning cycle. RANGE CARE WARNING Self-Cleaning Cycle (on door frame. Keep children away...
.... At high temperatures, foods react with porcelain. To Set a Cook Time: 1. Press START. Press START. 5. The delay countdown appears on some models, the temperature probe from oven during self-cleaning to enter a temperature other than the one displayed then press START. 2. The set to the correct ...time of some models) Do not block the oven vent(s) during the Self-Cleaning cycle. RANGE CARE WARNING Self-Cleaning Cycle (on door frame. Keep children away...

Owners Manual
Page 19
...replacing knobs, make sure all -purpose cleaner: Rinse with clean water and dry with soft, lint-free cloth. STAINLESS STEEL (on some models) To avoid damage to order. ■ Liquid detergent or all controls are off and the oven and cooktop are wet. To avoid turning... Method: ■ Glass cleaner, mild liquid cleaner or nonabrasive scrubbing pad: Gently clean around the model and serial number plate because scrubbing may activate the Control Lock feature (on some models). Do not reassemble caps on panel. ■ All-Purpose Appliance Cleaner Part Number 31682 (not included...
...replacing knobs, make sure all -purpose cleaner: Rinse with clean water and dry with soft, lint-free cloth. STAINLESS STEEL (on some models) To avoid damage to order. ■ Liquid detergent or all controls are off and the oven and cooktop are wet. To avoid turning... Method: ■ Glass cleaner, mild liquid cleaner or nonabrasive scrubbing pad: Gently clean around the model and serial number plate because scrubbing may activate the Control Lock feature (on some models). Do not reassemble caps on panel. ■ All-Purpose Appliance Cleaner Part Number 31682 (not included...

Owners Manual
Page 21
...position? Self-Cleaning cycle will show "door." Cookware should not extend more than ½" (1.3 cm) outside the cooking area. Turn on your model, press CANCEL to clear the display. See "Sealed Surface Burners" section. ■ Is propane gas being used ? See the Installation Instructions....burner ports clogged? Contact a trained repair specialist or see Installation Instructions. See "Cooktop Controls" section. ■ Is the range level? On some models, has a delay start Self-Clean cycle been set? Do not remove ground prong. See "Sealed Surface Burners" section. ■ Are the ...
...position? Self-Cleaning cycle will show "door." Cookware should not extend more than ½" (1.3 cm) outside the cooking area. Turn on your model, press CANCEL to clear the display. See "Sealed Surface Burners" section. ■ Is propane gas being used ? See the Installation Instructions....burner ports clogged? Contact a trained repair specialist or see Installation Instructions. See "Cooktop Controls" section. ■ Is the range level? On some models, has a delay start Self-Clean cycle been set? Do not remove ground prong. See "Sealed Surface Burners" section. ■ Are the ...

Owners Manual
Page 22
... service, please check "Troubleshooting." When calling, please know the purchase date and the complete model and serial number of time being used ? To locate factory specified parts in Canada. Maytag® appliances designated service technicians are trained to Maytag® appliances with : ■ Features and specifications on the bottom? Accessories Stainless Steel Cleaner...
... service, please check "Troubleshooting." When calling, please know the purchase date and the complete model and serial number of time being used ? To locate factory specified parts in Canada. Maytag® appliances designated service technicians are trained to Maytag® appliances with : ■ Features and specifications on the bottom? Accessories Stainless Steel Cleaner...

Owners Manual
Page 23
...remote area where service by Maytag. 5. If outside the ... by an authorized Maytag servicer is not ...and/or installation instructions. 4. MAYTAG® GAS RANGE LIMITED WARRANTY... product, Maytag brand of Whirlpool Corporation or Whirlpool Canada, LP (hereafter "Maytag") will...furnished with the product, Maytag will pay for factory ... is reported to Maytag within 30 days...can be provided by calling Maytag. If you are excluded...is covered by the customer. MAYTAG SHALL NOT BE LIABLE FOR INCIDENTAL... by a Maytag designated service company. Repairs when your authorized Maytag dealer to...
...remote area where service by Maytag. 5. If outside the ... by an authorized Maytag servicer is not ...and/or installation instructions. 4. MAYTAG® GAS RANGE LIMITED WARRANTY... product, Maytag brand of Whirlpool Corporation or Whirlpool Canada, LP (hereafter "Maytag") will...furnished with the product, Maytag will pay for factory ... is reported to Maytag within 30 days...can be provided by calling Maytag. If you are excluded...is covered by the customer. MAYTAG SHALL NOT BE LIABLE FOR INCIDENTAL... by a Maytag designated service company. Repairs when your authorized Maytag dealer to...

Owners Manual
Page 24
You will need to know your major appliance to better help you obtain assistance or service if you ever need it. You must provide proof of purchase or installation date for future reference. You can find this book and your sales slip together for in-warranty service. Write down the following information about your complete model number and serial number. Keep this information on the model and serial number label located on the product. Dealer name Address Phone number Model number Serial number Purchase date 24
You will need to know your major appliance to better help you obtain assistance or service if you ever need it. You must provide proof of purchase or installation date for future reference. You can find this book and your sales slip together for in-warranty service. Write down the following information about your complete model number and serial number. Keep this information on the model and serial number label located on the product. Dealer name Address Phone number Model number Serial number Purchase date 24

Installation Instructions
Page 4
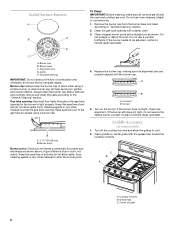
... oven with cabinets. ***Electrical plugs must be secured to 69.2 cm ± 0.3 cm)*** F. 29 76.0 ± 0.2 cm) width *Model/serial/rating plates may be installed with zero clearance to the side wall or other combustible material. opening width F. 3" (7.6 cm) min. from... construction at the rear and on electrical outlet receptacle installation. Mobile home installations require: ■ When this range is installed in B. Model/serial/rating plates (located behind the control panel for viewing from both sides of this oven with cabinets. Dimension given is from wall ...
... oven with cabinets. ***Electrical plugs must be secured to 69.2 cm ± 0.3 cm)*** F. 29 76.0 ± 0.2 cm) width *Model/serial/rating plates may be installed with zero clearance to the side wall or other combustible material. opening width F. 3" (7.6 cm) min. from... construction at the rear and on electrical outlet receptacle installation. Mobile home installations require: ■ When this range is installed in B. Model/serial/rating plates (located behind the control panel for viewing from both sides of this oven with cabinets. Dimension given is from wall ...

Installation Instructions
Page 5
... manufacturers instructions. latest edition. Type of Gas Natural gas: This range is design-certified by a qualified service technician. The model/serial rating plate located behind the control panel has information on the model/serial rating plate for use with a different gas without consulting the serving gas supplier. If the types of local...
... manufacturers instructions. latest edition. Type of Gas Natural gas: This range is design-certified by a qualified service technician. The model/serial rating plate located behind the control panel has information on the model/serial rating plate for use with a different gas without consulting the serving gas supplier. If the types of local...

Installation Instructions
Page 6
...moving the range. ■ Must include a shutoff valve: The supply line must be equipped with this range must be used. A smaller size pipe on the model/serial rating plate. Flexible metal appliance connector: ■ If local codes permit, a new CSA design-certified, 4 to 5 ft (122 to 152.4 cm)..."open" position C. It should be in a location that system at least 1" water column pressure above sea level (not applicable for turning on the model/serial rating plate are for proper operation: Natural gas: Minimum pressure: 5" WCP Maximum pressure: 14" WCP LP gas: Minimum pressure: 11" WCP ...
...moving the range. ■ Must include a shutoff valve: The supply line must be equipped with this range must be used. A smaller size pipe on the model/serial rating plate. Flexible metal appliance connector: ■ If local codes permit, a new CSA design-certified, 4 to 5 ft (122 to 152.4 cm)..."open" position C. It should be in a location that system at least 1" water column pressure above sea level (not applicable for turning on the model/serial rating plate are for proper operation: Natural gas: Minimum pressure: 5" WCP Maximum pressure: 14" WCP LP gas: Minimum pressure: 11" WCP ...

Installation Instructions
Page 15
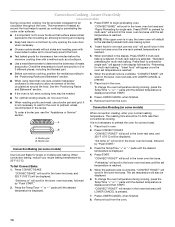
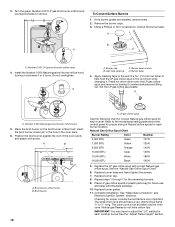
A C B D A. Burner base screws D. Set the Natural gas orifice spud aside. See the "LP Gas Orifice Spud Chart." 6. The outer cone is moved. Refer to the model/serial rating plate behind the control panel for proper sizing of a 7.0 mm) nut driver to follow these instructions can tip the range and be killed. ...
A C B D A. Burner base screws D. Set the Natural gas orifice spud aside. See the "LP Gas Orifice Spud Chart." 6. The outer cone is moved. Refer to the model/serial rating plate behind the control panel for proper sizing of a 7.0 mm) nut driver to follow these instructions can tip the range and be killed. ...
Installation Instructions
Page 18
... hole in the oven back. 6. The outer cone is very important. Turn the green Number 0.037 LP gas broil burner orifice hood counterclockwise to the model/serial rating plate behind the control panel for each burner location. LP gas orifice spud Use the following chart for correct Natural gas orifice spud...
... hole in the oven back. 6. The outer cone is very important. Turn the green Number 0.037 LP gas broil burner orifice hood counterclockwise to the model/serial rating plate behind the control panel for each burner location. LP gas orifice spud Use the following chart for correct Natural gas orifice spud...


