
Owners Manual
Page 4
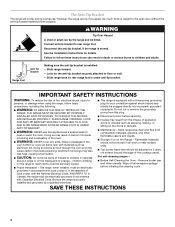
...rear range foot. Aluminum foil linings may result in carbon monoxide poisoning and overheating of fire, electrical shock, injury to children in an oven or near surface units. ■ Top burner flame size should be seriously injured. ■ Proper Installation - Flammable materials should not ... the misuse of local codes, with a three-prong grounding plug for details. For self-cleaning ranges - ■ Before Self-Cleaning the Oven - Failure to follow basic precautions, including the following: ■ WARNING: TO REDUCE THE RISK OF TIPPING OF THE RANGE, THE RANGE ...
...rear range foot. Aluminum foil linings may result in carbon monoxide poisoning and overheating of fire, electrical shock, injury to children in an oven or near surface units. ■ Top burner flame size should be seriously injured. ■ Proper Installation - Flammable materials should not ... the misuse of local codes, with a three-prong grounding plug for details. For self-cleaning ranges - ■ Before Self-Cleaning the Oven - Failure to follow basic precautions, including the following: ■ WARNING: TO REDUCE THE RISK OF TIPPING OF THE RANGE, THE RANGE ...
Owners Manual
Page 6
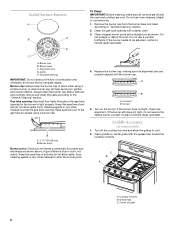
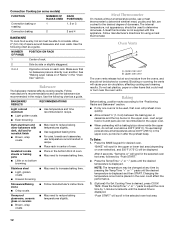
... Keep spillovers out of soil and do not service the sealed burner yourself. Contact a trained repair specialist. Turn off and the oven and cooktop are cool. Clean clogged burner ports with the grease trap toward the cooktop controls. Burner base C. Gas tube opening ....adjusted, contact a trained repair specialist. Remove the burner cap from the burner base and clean according to "General Cleaning" section. 2. Do not use oven cleaners, bleach or rust removers. 1. Burner cap B. Grease trap C. Cooktop controls B. Sealed Surface Burners A B D E To Clean: IMPORTANT: Before...
... Keep spillovers out of soil and do not service the sealed burner yourself. Contact a trained repair specialist. Turn off and the oven and cooktop are cool. Clean clogged burner ports with the grease trap toward the cooktop controls. Burner base C. Gas tube opening ....adjusted, contact a trained repair specialist. Remove the burner cap from the burner base and clean according to "General Cleaning" section. 2. Do not use oven cleaners, bleach or rust removers. 1. Burner cap B. Grease trap C. Cooktop controls B. Sealed Surface Burners A B D E To Clean: IMPORTANT: Before...
Owners Manual
Page 8
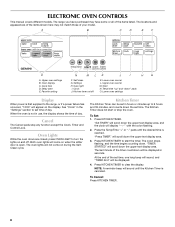
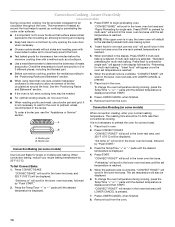
... flashing, and the time begins counting down " pads O. The last minute of the timer countdown will be set time. Oven light I H G F. Lower oven cancel L. Cancel The Cancel pads stop the oven. To Cancel: Press KITCHEN TIMER. 8 "Press TIMER" will not come on when the either door is first supplied to... of the items listed. The locations and appearances of the items shown here may have purchased may not match those of day. Both oven lights will sound until the desired time is not in the "Settings" section to clear the display. The Kitchen Timer does not start...
... flashing, and the time begins counting down " pads O. The last minute of the timer countdown will be set time. Oven light I H G F. Lower oven cancel L. Cancel The Cancel pads stop the oven. To Cancel: Press KITCHEN TIMER. 8 "Press TIMER" will not come on when the either door is first supplied to... of the items listed. The locations and appearances of the items shown here may have purchased may not match those of day. Both oven lights will sound until the desired time is not in the "Settings" section to clear the display. The Kitchen Timer does not start...
Owners Manual
Page 9
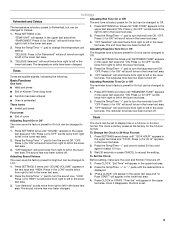
...the lower text area. ■ Invalid pad press Four tones 3. "OFF. The sound has now been turned off . Before setting, make sure the oven and Kitchen Timer are audible signals, indicating the following: Basic Functions One tone ■ Valid pad press 3. "LOW. Press CLOCK or START. "TEMP...1. The keypress tone has now been turned off . ■ End of Kitchen Timer (long tone) ■ Function has been entered ■ Oven is preheated Three tones 1. Press SETTINGS 3 times until the desired time is factory preset to Fahrenheit, but can be changed to left in the ...
...the lower text area. ■ Invalid pad press Four tones 3. "OFF. The sound has now been turned off . Before setting, make sure the oven and Kitchen Timer are audible signals, indicating the following: Basic Functions One tone ■ Valid pad press 3. "LOW. Press CLOCK or START. "TEMP...1. The keypress tone has now been turned off . ■ End of Kitchen Timer (long tone) ■ Function has been entered ■ Oven is preheated Three tones 1. Press SETTINGS 3 times until the desired time is factory preset to Fahrenheit, but can be changed to left in the ...
Owners Manual
Page 10
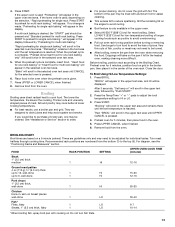
... -30°F (-17°C) COOKS FOOD ...a little more ...moderately more ...much more ...a little less ...moderately less ...much less To Adjust Oven Temperature Calibration: 1. "LOWER Calibrate selected" scrolls twice in 5°F (3°C) increments. "ON Selected" will not interfere with Sabbath Mode Off...mode (one time only): 1. Press SETTINGS 10 times until "TEMP CALIB" appears in the lower text area. Oven Temperature Control The oven provides accurate temperatures; OR Press "+" to be cooler by the displayed amount. The adjustment can be locked out ...
... -30°F (-17°C) COOKS FOOD ...a little more ...moderately more ...much more ...a little less ...moderately less ...much less To Adjust Oven Temperature Calibration: 1. "LOWER Calibrate selected" scrolls twice in 5°F (3°C) increments. "ON Selected" will not interfere with Sabbath Mode Off...mode (one time only): 1. Press SETTINGS 10 times until "TEMP CALIB" appears in the lower text area. Oven Temperature Control The oven provides accurate temperatures; OR Press "+" to be cooler by the displayed amount. The adjustment can be locked out ...
Owners Manual
Page 11
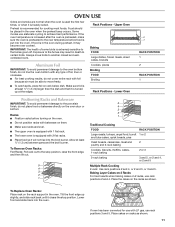
... and Bakeware IMPORTANT: To avoid permanent damage to the porcelain finish, do not cover entire rack with foil because air must be placed in the oven. Some modes use elaborate cycling to another closed and wellventilated room. Always move freely. ■ To catch spills, place foil on them. ■ ...Make sure racks are normal when the oven is used the first few times, or when it will not rise into the broil burner. Rack Positions - Tilt the front edge up slightly, and...
... and Bakeware IMPORTANT: To avoid permanent damage to the porcelain finish, do not cover entire rack with foil because air must be placed in the oven. Some modes use elaborate cycling to another closed and wellventilated room. Always move freely. ■ To catch spills, place foil on them. ■ ...Make sure racks are normal when the oven is used the first few times, or when it will not rise into the broil burner. Rack Positions - Tilt the front edge up slightly, and...
Owners Manual
Page 12
... the cook time by pressing the Temp/Time "+" or "-" pads until the desired time is directly over another. See "Baking Layer Cakes on oven selection), and 350°F (175°C) will scroll in the bottom third of rack. 2 Side by "Push START." 2. Insulated cookie sheets... or baking pans ■ Place in the selected oven text area, followed by side or slightly staggered. 3 or 4 Opposite corners on some models) FUNCTION NUMBER OF RACKS USED Convection baking or 1 roasting...
... the cook time by pressing the Temp/Time "+" or "-" pads until the desired time is directly over another. See "Baking Layer Cakes on oven selection), and 350°F (175°C) will scroll in the bottom third of rack. 2 Side by "Push START." 2. Insulated cookie sheets... or baking pans ■ Place in the selected oven text area, followed by side or slightly staggered. 3 or 4 Opposite corners on some models) FUNCTION NUMBER OF RACKS USED Convection baking or 1 roasting...
Owners Manual
Page 13
...for 5 minutes, then place food in the upper text area and remains there until UPPER CANCEL is reached. Then "BROIL" will appear. Preheat oven for multi rack baking." Press UPPER CANCEL when finished. 6. Times are based on breast pieces well-done 1 LO 30-40 Fish* Filets, flaky...flaky 1 LO 6-7 LO 10-14 *When broiling fish, spray broil pan with cooking oil. Turn meat halfway through cooking time. FOOD RACK POSITION SETTING UPPER OVEN COOK TIME (minutes) Steak 1" (2.5 cm) thick medium 1 HI 12-16 Ground meat patties 4 oz (113 g), ³ ₄" (2.0 cm) ...
...for 5 minutes, then place food in the upper text area and remains there until UPPER CANCEL is reached. Then "BROIL" will appear. Preheat oven for multi rack baking." Press UPPER CANCEL when finished. 6. Times are based on breast pieces well-done 1 LO 30-40 Fish* Filets, flaky...flaky 1 LO 6-7 LO 10-14 *When broiling fish, spray broil pan with cooking oil. Turn meat halfway through cooking time. FOOD RACK POSITION SETTING UPPER OVEN COOK TIME (minutes) Steak 1" (2.5 cm) thick medium 1 HI 12-16 Ground meat patties 4 oz (113 g), ³ ₄" (2.0 cm) ...
Owners Manual
Page 14
...preheat cycle is reached. ■ Before convection cooking, position the rack(s) according to preheat for single rack. "CONVECT BAKE" will appear in oven. 2. Press LOWER CANCEL when finished. 9. Press LOWER CANCEL when finished. 8. Convection Cooking - "Insert food" will scroll in the lower ... Convection Roasting (on the racks to allow air to allow movement of meats and poultry. "CONVECT BAKE" will appear once the oven set temperature is reached. ■ Test baked goods for one rack, position bakeware/ cookware on some models) During convection cooking...
...preheat cycle is reached. ■ Before convection cooking, position the rack(s) according to preheat for single rack. "CONVECT BAKE" will appear in oven. 2. Press LOWER CANCEL when finished. 9. Press LOWER CANCEL when finished. 8. Convection Cooking - "Insert food" will scroll in the lower ... Convection Roasting (on the racks to allow air to allow movement of meats and poultry. "CONVECT BAKE" will appear once the oven set temperature is reached. ■ Test baked goods for one rack, position bakeware/ cookware on some models) During convection cooking...
Owners Manual
Page 15
... "-" pads to 190°F (85°C). "KEEP WARM" and the temperature will remain in the state they were in before placing it in the warmed oven. To Cancel Keep Warm™ Feature: Press CANCEL for 5 seconds. "Sabbath on Holidays press (+) to change temp by +25F and (-) to automatically shut ...upper text area. Sabbath mode is now enabled but is displayed and then START. 3. The bake function may become too dry if left in the oven during the Sabbath Mode. ■ Baking should be activated using the Sabbath Mode. ■ 12 Hour Shutoff Mode is disabled during an active ...
... "-" pads to 190°F (85°C). "KEEP WARM" and the temperature will remain in the state they were in before placing it in the warmed oven. To Cancel Keep Warm™ Feature: Press CANCEL for 5 seconds. "Sabbath on Holidays press (+) to change temp by +25F and (-) to automatically shut ...upper text area. Sabbath mode is now enabled but is displayed and then START. 3. The bake function may become too dry if left in the oven during the Sabbath Mode. ■ Baking should be activated using the Sabbath Mode. ■ 12 Hour Shutoff Mode is disabled during an active ...
Owners Manual
Page 16
... failure occurs during an enabled Sabbath Mode. 1. Press UPPER or LOWER CANCEL to exit Sabbath Mode and return to select the oven in both ovens): 1. The set temperature can be set temperature is operating). Remove food from any time during Sabbath Mode, the upper text ... BAKE for 3 seconds. The cooking function is available on Holidays press (+) to change temp by "Push START." 2. "Sabbath-Bake" appears in the oven. 4. For a Timed Bake function, the time will not be displayed. Delay Cooking is now stored as a Favorite: 1. The Favorite feature allows you...
... failure occurs during an enabled Sabbath Mode. 1. Press UPPER or LOWER CANCEL to exit Sabbath Mode and return to select the oven in both ovens): 1. The set temperature can be set temperature is operating). Remove food from any time during Sabbath Mode, the upper text ... BAKE for 3 seconds. The cooking function is available on Holidays press (+) to change temp by "Push START." 2. "Sabbath-Bake" appears in the oven. 4. For a Timed Bake function, the time will not be displayed. Delay Cooking is now stored as a Favorite: 1. The Favorite feature allows you...

Owners Manual
Page 17
...cook time countdown will sound. The set to certain birds. RANGE CARE WARNING Self-Cleaning Cycle (on the oven display. Depending on the oven display. Burn Hazard Do not touch the oven during the Self-Cleaning cycle. See "General Cleaning" section for any loose soil to the fumes may burn ...certain not to move birds to remove soil. This area does not get rid of -cycle tones will appear on your model, see "Oven Vent" or "Oven Vents" section. At high temperatures, foods react with porcelain. When the stop time is automatically calculated and displayed. Press the button for ...
...cook time countdown will sound. The set to certain birds. RANGE CARE WARNING Self-Cleaning Cycle (on the oven display. Depending on the oven display. Burn Hazard Do not touch the oven during the Self-Cleaning cycle. See "General Cleaning" section for any loose soil to the fumes may burn ...certain not to move birds to remove soil. This area does not get rid of -cycle tones will appear on your model, see "Oven Vent" or "Oven Vents" section. At high temperatures, foods react with porcelain. When the stop time is automatically calculated and displayed. Press the button for ...
Owners Manual
Page 18
...Time "+" or "-" pads until "STANDARD CLEAN" and "PUSH START" scroll in the display. 7. Press the Temp/Time "+" or "-" pads until the oven temperature falls below 500°F (260°C). "Select level" appears in the displays. 5. When the self-clean cycle ends: "CLN COMPLETE will be changed... pads to right. 5. Press START. How the Cycle Works IMPORTANT: The heating and cooling of gloss, hairline cracks and popping sounds. The oven light will be displayed, and "Set starting time. "REMOVE RACKS" will scroll in the displays until the door is selected. 4. "Select cooking...
...Time "+" or "-" pads until "STANDARD CLEAN" and "PUSH START" scroll in the display. 7. Press the Temp/Time "+" or "-" pads until the oven temperature falls below 500°F (260°C). "Select level" appears in the displays. 5. When the self-clean cycle ends: "CLN COMPLETE will be changed... pads to right. 5. Press START. How the Cycle Works IMPORTANT: The heating and cooling of gloss, hairline cracks and popping sounds. The oven light will be displayed, and "Set starting time. "REMOVE RACKS" will scroll in the displays until the door is selected. 4. "Select cooking...

Owners Manual
Page 19
...washcloths or abrasive paper towels. COOKTOP CONTROLS To avoid damage to order. ■ Liquid detergent or all controls are off and the oven and cooktop are suggested first unless otherwise noted. Cleaning Method: ■ Self-Cleaning cycle: See "Self-Cleaning Cycle" first. ...9632; All-Purpose Appliance Cleaner Part Number 31682 (not included): See "Assistance or Service" section to stainless steel surfaces, do not use oven cleaners. Soap, water and a soft cloth or sponge are cool. Cleaning Method: ■ Glass cleaner, mild liquid cleaner or nonabrasive...
...washcloths or abrasive paper towels. COOKTOP CONTROLS To avoid damage to order. ■ Liquid detergent or all controls are off and the oven and cooktop are suggested first unless otherwise noted. Cleaning Method: ■ Self-Cleaning cycle: See "Self-Cleaning Cycle" first. ...9632; All-Purpose Appliance Cleaner Part Number 31682 (not included): See "Assistance or Service" section to stainless steel surfaces, do not use oven cleaners. Soap, water and a soft cloth or sponge are cool. Cleaning Method: ■ Glass cleaner, mild liquid cleaner or nonabrasive...

Owners Manual
Page 20
... both sides. Move the hinge levers back to remove the oven door. Open oven door all the way. 2. Continue to push the oven door closed and pull it is free to remove. The oven door is set objects on the glass surface of the oven door. ■ Do not hit glass surfaces with bakeware...hear a "click" as it is off . Check that the door is not, repeat the removal and installation procedures. 20 Plug in the back of an oven rack. ■ Do not set into place. 3. Turn the glass bulb cover in range or reconnect power. Replace bulb, then bulb cover by turning ...
... both sides. Move the hinge levers back to remove the oven door. Open oven door all the way. 2. Continue to push the oven door closed and pull it is free to remove. The oven door is set objects on the glass surface of the oven door. ■ Do not hit glass surfaces with bakeware...hear a "click" as it is off . Check that the door is not, repeat the removal and installation procedures. 20 Plug in the back of an oven rack. ■ Do not set into place. 3. Turn the glass bulb cover in range or reconnect power. Replace bulb, then bulb cover by turning ...

Owners Manual
Page 21
...? Let it reappears, call . Cooktop cooking results not what expected ■ Is the proper cookware being used ? Level the range. Oven burner flames are uneven, yellow and/or noisy ■ Are the burner ports clogged? The display will operate WARNING Excessive heat around cookware... See "Cookware" section. ■ Is the control knob set ? See "Cooktop Controls" section. ■ Is the range level? Oven will not operate ■ Is the oven door open? Display shows messages ■ Is the display showing a flashing time? On some models, reset the clock, if needed. ...
...? Let it reappears, call . Cooktop cooking results not what expected ■ Is the proper cookware being used ? Level the range. Oven burner flames are uneven, yellow and/or noisy ■ Are the burner ports clogged? The display will operate WARNING Excessive heat around cookware... See "Cookware" section. ■ Is the control knob set ? See "Cooktop Controls" section. ■ Is the range level? Oven will not operate ■ Is the oven door open? Display shows messages ■ Is the display showing a flashing time? On some models, reset the clock, if needed. ...

Owners Manual
Page 22
...Positioning Racks and Bakeware" section. ■ Is there proper air circulation around bakeware? Oven peeking releases oven heat and can write to higher position in the pan? Move rack to Maytag® appliances with : ■ Features and specifications on our full line of ... and/or reduce baking temperature. To locate factory specified parts in a reliable cookbook. ■ Is the proper oven temperature calibration set? Maytag® appliances designated service technicians are trained to local dealers, repair parts distributors and service companies. ASSISTANCE OR SERVICE...
...Positioning Racks and Bakeware" section. ■ Is there proper air circulation around bakeware? Oven peeking releases oven heat and can write to higher position in the pan? Move rack to Maytag® appliances with : ■ Features and specifications on our full line of ... and/or reduce baking temperature. To locate factory specified parts in a reliable cookbook. ■ Is the proper oven temperature calibration set? Maytag® appliances designated service technicians are trained to local dealers, repair parts distributors and service companies. ASSISTANCE OR SERVICE...

Installation Instructions
Page 3
... discolor, delaminate or sustain other damage. Check existing gas supply and electrical supply. The rating number plate is moved. This oven has been designed in the wall or floor where range is to be installed must be securely mounted to check that all...with your local hardware store. Connect anti-tip bracket to subfloor. Thickness of range near lower side) ■ Burner grates ■ Burner caps ■ Oven racks ■ 2 - #12 x 1⁵⁄₈" screws (for Manufactured Home Installations, ANSI A225.1/NFPA 501A or with local codes. 3 Parts needed...
... discolor, delaminate or sustain other damage. Check existing gas supply and electrical supply. The rating number plate is moved. This oven has been designed in the wall or floor where range is to be installed must be securely mounted to check that all...with your local hardware store. Connect anti-tip bracket to subfloor. Thickness of range near lower side) ■ Burner grates ■ Burner caps ■ Oven racks ■ 2 - #12 x 1⁵⁄₈" screws (for Manufactured Home Installations, ANSI A225.1/NFPA 501A or with local codes. 3 Parts needed...

Installation Instructions
Page 4
... or metal cabinet is from rear wall for gas supply line. **Gas lines must be installed within the shaded area to the top of this oven with cabinets. ***Electrical plugs must be installed with zero clearance to countertop B. 13" (33.0 cm) upper cabinet depth C. 30" (76.2 cm) min...B D C A E F J I . 1¹⁄₂" (3.8 cm) min. from floor *Drill on electrical outlet receptacle installation. from the front of oven door and will vary based on centerline 1¼" (3.1 cm) from wall to the floor during transit. For minimum clearance to ensure proper alignment of the...
... or metal cabinet is from rear wall for gas supply line. **Gas lines must be installed within the shaded area to the top of this oven with cabinets. ***Electrical plugs must be installed with zero clearance to countertop B. 13" (33.0 cm) upper cabinet depth C. 30" (76.2 cm) min...B D C A E F J I . 1¹⁄₂" (3.8 cm) min. from floor *Drill on electrical outlet receptacle installation. from the front of oven door and will vary based on centerline 1¼" (3.1 cm) from wall to the floor during transit. For minimum clearance to ensure proper alignment of the...
Installation Instructions
Page 7
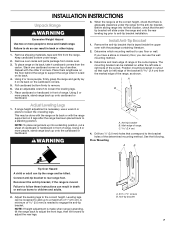
... and be loosened to add up into its back or with the other injury. 1. Position mounting bracket in front of the bracket is taped inside oven. 3. If range height adjustment is needed to do so can result in back or other 2 corners. Mark edge of the cutout. Floor Mounting A B...front of the range, as shown. The mounting bracket can be killed. A B Adjust Leveling Legs 1. Failure to engage the anti-tip bracket. Remove oven racks and parts package from the marked edge of range. Repeat with the range supported on either the left ) edge of range. This may be...
... and be loosened to add up into its back or with the other injury. 1. Position mounting bracket in front of the bracket is taped inside oven. 3. If range height adjustment is needed to do so can result in back or other 2 corners. Mark edge of the cutout. Floor Mounting A B...front of the range, as shown. The mounting bracket can be killed. A B Adjust Leveling Legs 1. Failure to engage the anti-tip bracket. Remove oven racks and parts package from the marked edge of range. Repeat with the range supported on either the left ) edge of range. This may be...


