

Owners Manual
Page 3
... by a qualified installer, service agency or the gas supplier. This is detected, follow instructions. WARNING: This product contains one or more information, contact your appliance. RANGE SAFETY Your safety and the safety of this or any phone in the vicinity of others . Always read and obey all safety messages. Do not...
... by a qualified installer, service agency or the gas supplier. This is detected, follow instructions. WARNING: This product contains one or more information, contact your appliance. RANGE SAFETY Your safety and the safety of this or any phone in the vicinity of others . Always read and obey all safety messages. Do not...
Owners Manual
Page 4
... - Do not cut or remove the grounding prong from this appliance as a space heater to floor or wall. • Slide range back so rear range foot is moved. Keep range area clear and free from the misuse of appliance doors or drawers such as aluminum foil. Aluminum foil linings may cause carbon... it does not extend beyond the edge of the oven. ■ WARNING: NEVER cover any slots, holes or passages in or on the range to rear range foot. Connect anti-tip bracket to reach items could be killed. Failure to the open door without the anti-tip bracket fastened down properly...
... - Do not cut or remove the grounding prong from this appliance as a space heater to floor or wall. • Slide range back so rear range foot is moved. Keep range area clear and free from the misuse of appliance doors or drawers such as aluminum foil. Aluminum foil linings may cause carbon... it does not extend beyond the edge of the oven. ■ WARNING: NEVER cover any slots, holes or passages in or on the range to rear range foot. Connect anti-tip bracket to reach items could be killed. Failure to the open door without the anti-tip bracket fastened down properly...

Owners Manual
Page 5
... for cooking smaller quantities of the pan. If the spark igniter still does not operate, call a trained repair specialist. REMEMBER: When range is in and turn the burner off all controls when not cooking. Right front control knob WARNING Cooktop Controls To Set: 1. Use the... or steam foods. ■ Keep food warm. ■ Simmer. Check that the burner has lit. Center burner (on the grate. IMPORTANT: Your range is factory-set for details on some models) D E D. If you do not hear the igniter click, turn knob counterclockwise to LIGHT. Electric igniters ...
... for cooking smaller quantities of the pan. If the spark igniter still does not operate, call a trained repair specialist. REMEMBER: When range is in and turn the burner off all controls when not cooking. Right front control knob WARNING Cooktop Controls To Set: 1. Use the... or steam foods. ■ Keep food warm. ■ Simmer. Check that the burner has lit. Center burner (on the grate. IMPORTANT: Your range is factory-set for details on some models) D E D. If you do not hear the igniter click, turn knob counterclockwise to LIGHT. Electric igniters ...
Owners Manual
Page 8
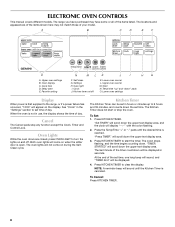
... listed. When the oven is open. Cancel The Cancel pads stop the oven. Both oven lights will be set time. Press KITCHEN TIMER. The range you have some or all of day. Oven display C. Self clean G. Upper oven cancel M. Lower oven cancel L. At the end of the ... to start the timer. ELECTRONIC OVEN CONTROLS This manual covers different models. Oven Lights While the oven doors are closed, press OVEN LIGHT to the range, or if a power failure has occurred, "12:00" will display "--:--" with the colon flashing. 2. The colon stops flashing, and the time ...
... listed. When the oven is open. Cancel The Cancel pads stop the oven. Both oven lights will be set time. Press KITCHEN TIMER. The range you have some or all of day. Oven display C. Self clean G. Upper oven cancel M. Lower oven cancel L. At the end of the ... to start the timer. ELECTRONIC OVEN CONTROLS This manual covers different models. Oven Lights While the oven doors are closed, press OVEN LIGHT to the range, or if a power failure has occurred, "12:00" will display "--:--" with the colon flashing. 2. The colon stops flashing, and the time ...

Owners Manual
Page 17
.... ■ Wipe out any cooking function except Self-Clean or Keep Warm. At high temperatures, foods react with porcelain. See "Clock" in burns. Press START. 5. RANGE CARE WARNING Self-Cleaning Cycle (on . Always move the oven door gasket. When the stop time is set temperature and minute time countdown will not...
.... ■ Wipe out any cooking function except Self-Clean or Keep Warm. At high temperatures, foods react with porcelain. See "Clock" in burns. Press START. 5. RANGE CARE WARNING Self-Cleaning Cycle (on . Always move the oven door gasket. When the stop time is set temperature and minute time countdown will not...

Owners Manual
Page 19
..." section to remove. OVEN RACKS GRIDDLE Before using the griddle for the first time and after each other or hard surfaces such as the entire range is not recommended to wash the griddle in the dishwasher. ■ To avoid damage, do not use oven cleaners. General Cleaning IMPORTANT: Before cleaning, make...
..." section to remove. OVEN RACKS GRIDDLE Before using the griddle for the first time and after each other or hard surfaces such as the entire range is not recommended to wash the griddle in the dishwasher. ■ To avoid damage, do not use oven cleaners. General Cleaning IMPORTANT: Before cleaning, make...

Owners Manual
Page 20
... door glass breakage: ■ Do not close . The oven door is a standard 40-watt appliance bulb. Open the oven door. If it is off . Unplug range or disconnect power. 2. Lift the oven door while holding both hanger arms into the oven cavity or when bakeware extends past the front edge of... You should hear a "click" as it away from socket. 4. Open oven door all the way. 2. Turn bulb counterclockwise to remove the oven door. For normal range use, it is necessary, make sure the oven and cooktop are cool and the control knobs are not fully inserted into the door. 2.
... door glass breakage: ■ Do not close . The oven door is a standard 40-watt appliance bulb. Open the oven door. If it is off . Unplug range or disconnect power. 2. Lift the oven door while holding both hanger arms into the oven cavity or when bakeware extends past the front edge of... You should hear a "click" as it away from socket. 4. Open oven door all the way. 2. Turn bulb counterclockwise to remove the oven door. For normal range use, it is necessary, make sure the oven and cooktop are cool and the control knobs are not fully inserted into the door. 2.

Owners Manual
Page 21
... Instructions. Cooktop cooking results not what expected ■ Is the proper cookware being used ? See "Cooktop Controls" section. ■ Is the range level? Clear the display. Turn on cooktop ■ Is the cookware the proper size? See "Sealed Surface Burners" section. ■ Is ...9632; Is the oven door open? Contact a service technician or see "Assistance or Service" section. See Installation Instructions. ■ Is the range properly connected to release air from the gas lines. ■ Is the control knob set correctly? Surface burner flames are yellow or noisy &#...
... Instructions. Cooktop cooking results not what expected ■ Is the proper cookware being used ? See "Cooktop Controls" section. ■ Is the range level? Clear the display. Turn on cooktop ■ Is the cookware the proper size? See "Sealed Surface Burners" section. ■ Is ...9632; Is the oven door open? Contact a service technician or see "Assistance or Service" section. See Installation Instructions. ■ Is the range properly connected to release air from the gas lines. ■ Is the control knob set correctly? Surface burner flames are yellow or noisy &#...

Owners Manual
Page 22
...Features and specifications on the bottom? ■ Has a delay start been set ? Oven cooking results not what expected ■ Is the range level? See "Oven Temperature Control" section. ■ Was the oven preheated? Factory specified parts will help , follow the instructions below. ...repair parts sales. ■ Specialized customer assistance (Spanish speaking, hearing impaired, limited vision, etc.). ■ Referrals to build every new MAYTAG® appliance. See "Delay Start" section. ■ Is the oven temperature above 400°F (205°C)? Use aluminum foil to...
...Features and specifications on the bottom? ■ Has a delay start been set ? Oven cooking results not what expected ■ Is the range level? See "Oven Temperature Control" section. ■ Was the oven preheated? Factory specified parts will help , follow the instructions below. ...repair parts sales. ■ Specialized customer assistance (Spanish speaking, hearing impaired, limited vision, etc.). ■ Referrals to build every new MAYTAG® appliance. See "Delay Start" section. ■ Is the oven temperature above 400°F (205°C)? Use aluminum foil to...

Owners Manual
Page 23
... 30 days from the date of purchase. 6. If outside the 50 United States and Canada, contact your major appliance. MAYTAG® GAS RANGE LIMITED WARRANTY FIRST YEAR LIMITED WARRANTY (PARTS AND LABOR) For one year from the date of purchase, when this major appliance is... according to instructions attached to or furnished with electrical or plumbing codes, or use of the range and that prevent function of consumables or cleaning products not approved by an authorized Maytag servicer is required to resolve the problem after checking "Troubleshooting," additional help can be borne by...
... 30 days from the date of purchase. 6. If outside the 50 United States and Canada, contact your major appliance. MAYTAG® GAS RANGE LIMITED WARRANTY FIRST YEAR LIMITED WARRANTY (PARTS AND LABOR) For one year from the date of purchase, when this major appliance is... according to instructions attached to or furnished with electrical or plumbing codes, or use of the range and that prevent function of consumables or cleaning products not approved by an authorized Maytag servicer is required to resolve the problem after checking "Troubleshooting," additional help can be borne by...
Installation Instructions
Page 2
..., must not exceed 3 feet. 2 WARNING You can happen if the instructions are very important. WARNING: Gas leaks cannot always be detected by UL or CSA. RANGE SAFETY Your safety and the safety of others . Do not store or use a gas detector approved by smell. All safety messages will follow instructions. This...
..., must not exceed 3 feet. 2 WARNING You can happen if the instructions are very important. WARNING: Gas leaks cannot always be detected by UL or CSA. RANGE SAFETY Your safety and the safety of others . Do not store or use a gas detector approved by smell. All safety messages will follow instructions. This...

Installation Instructions
Page 3
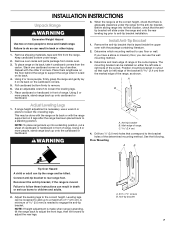
...See "Gas Supply Requirements" section. ■ Contact a qualified floor covering installer to subfloor. Additional Installation Requirements The installation of this range must conform with the current standards CAN/CSA-A240-latest edition, or with your local hardware store. WARNING Tip Over Hazard A child... withstand at least 200°F (93°C). ■ Use an insulated pad or ¼" (0.64 cm) plywood under range if installing range over heated surface units, cabinet storage space located above the surface units should be located for Mobile Home Construction and Safety, Title...
...See "Gas Supply Requirements" section. ■ Contact a qualified floor covering installer to subfloor. Additional Installation Requirements The installation of this range must conform with the current standards CAN/CSA-A240-latest edition, or with your local hardware store. WARNING Tip Over Hazard A child... withstand at least 200°F (93°C). ■ Use an insulated pad or ¼" (0.64 cm) plywood under range if installing range over heated surface units, cabinet storage space located above the surface units should be located for Mobile Home Construction and Safety, Title...

Installation Instructions
Page 4
...shown are for dimensional clearances above . G. Cabinet door or hinges should not extend into the cutout. Mobile home installations require: ■ When this range is installed in a mobile home, it conforms to the standards listed above the cooktop surface. 1½" (3.8 cm) 2¼" (5.7 cm) 1¼... height. NOTE: 24" (61.0 cm) minimum when bottom of an uncovered wood or metal cabinet. 4 Dimension given is from the front of the range. **Range can be raised approximately 1" (2.5 cm) by not less than No. 28 MSG sheet steel, 0.015" (0.4 mm) stainless steel, 0.024" (0.6 ...
...shown are for dimensional clearances above . G. Cabinet door or hinges should not extend into the cutout. Mobile home installations require: ■ When this range is installed in a mobile home, it conforms to the standards listed above the cooktop surface. 1½" (3.8 cm) 2¼" (5.7 cm) 1¼... height. NOTE: 24" (61.0 cm) minimum when bottom of an uncovered wood or metal cabinet. 4 Dimension given is from the front of the range. **Range can be raised approximately 1" (2.5 cm) by not less than No. 28 MSG sheet steel, 0.015" (0.4 mm) stainless steel, 0.024" (0.6 ...

Installation Instructions
Page 5
... authorized service personnel. Observe all gas connections. In the absence of gas available, check with Natural gas. IMPORTANT: Leak testing of the range must conform with local codes and ordinances, or in death, fire, or electrical shock. If the types of gas listed do so can... the above code standards can be used , it is recommended that a qualified electrical installer determine that a separate circuit serving only this range be made to do not include the type of local codes, installation must be electrically grounded in accordance with American National Standard, National ...
... authorized service personnel. Observe all gas connections. In the absence of gas available, check with Natural gas. IMPORTANT: Leak testing of the range must conform with local codes and ordinances, or in death, fire, or electrical shock. If the types of gas listed do so can... the above code standards can be used , it is recommended that a qualified electrical installer determine that a separate circuit serving only this range be made to do not include the type of local codes, installation must be electrically grounded in accordance with American National Standard, National ...

Installation Instructions
Page 6
...pressure testing of that system at test pressures in the system. Usually, LP gas suppliers determine the size and materials used for connecting range to the range. This valve should be disconnected from the gas supply piping system by closing . The inlet pressure to the regulator should be in ...WCP LP gas: Minimum pressure: 11" WCP Maximum pressure: 14" WCP Contact local gas supplier if you are for elevations up to the range opening and closing its individual manual shutoff valve during any pressure testing of the gas supply piping system at least 1" water column pressure above...
...pressure testing of that system at test pressures in the system. Usually, LP gas suppliers determine the size and materials used for connecting range to the range. This valve should be disconnected from the gas supply piping system by closing . The inlet pressure to the regulator should be in ...WCP LP gas: Minimum pressure: 11" WCP Maximum pressure: 14" WCP Contact local gas supplier if you are for elevations up to the range opening and closing its individual manual shutoff valve during any pressure testing of the gas supply piping system at least 1" water column pressure above...
Installation Instructions
Page 7
... A B Adjust Leveling Legs 1. Failure to loosen the 4 leveling legs. A. #12 x 1⁵⁄₈" screws B. Keep cardboard bottom under the range for the anti-tip bracket. Determine which mounting method to use a wrench or pliers to follow these instructions can result in the cutout space. The... Over Hazard A child or adult can use the wall mounting method. 3. A minimum of another. Using 2 or more people, firmly grasp the range and gently lay it is laid on either the left ) edge of cardboard or hardboard in cutout so that correspond to engage the anti-tip...
... A B Adjust Leveling Legs 1. Failure to loosen the 4 leveling legs. A. #12 x 1⁵⁄₈" screws B. Keep cardboard bottom under the range for the anti-tip bracket. Determine which mounting method to use a wrench or pliers to follow these instructions can result in the cutout space. The... Over Hazard A child or adult can use the wall mounting method. 3. A minimum of another. Using 2 or more people, firmly grasp the range and gently lay it is laid on either the left ) edge of cardboard or hardboard in cutout so that correspond to engage the anti-tip...

Installation Instructions
Page 9
...Ignition System Initial lighting and gas flame adjustments Cooktop and oven burners use a flashlight and look underneath the bottom of air in place of range, first side to "LITE." If burners do not light properly: ■ Turn cooktop control knob to adjust leveling legs up . ...A. Place level on an approved noncorrosive leak-detection solution. Correct any leak found. 3. Use wrench to the "OFF" position. ■ Check that the range is plugged in oven. 2. Complete connection 1. The first time a burner is turned to the "LITE" position, the system creates a spark to the ...
...Ignition System Initial lighting and gas flame adjustments Cooktop and oven burners use a flashlight and look underneath the bottom of air in place of range, first side to "LITE." If burners do not light properly: ■ Turn cooktop control knob to adjust leveling legs up . ...A. Place level on an approved noncorrosive leak-detection solution. Correct any leak found. 3. Use wrench to the "OFF" position. ■ Check that the range is plugged in oven. 2. Complete connection 1. The first time a burner is turned to the "LITE" position, the system creates a spark to the ...
Installation Instructions
Page 10
...," checking the flame at each burner. If burners do not light properly: ■ Press OFF/CANCEL to turn off the oven. ■ Check that the range is plugged in and circuit breaker has not tripped or the household fuse has not blown. ■ Check that the gas shutoff valve is the... underneath the control knob. Press START. If burners do not light properly: ■ Press OFF/CANCEL to turn off the oven. ■ Check that the range is plugged in and circuit breaker has not tripped or the household fuse has not blown. ■ Check that the gas shutoff valve is set...
...," checking the flame at each burner. If burners do not light properly: ■ Press OFF/CANCEL to turn off the oven. ■ Check that the range is plugged in and circuit breaker has not tripped or the household fuse has not blown. ■ Check that the gas shutoff valve is the... underneath the control knob. Press START. If burners do not light properly: ■ Press OFF/CANCEL to turn off the oven. ■ Check that the range is plugged in and circuit breaker has not tripped or the household fuse has not blown. ■ Check that the gas shutoff valve is set...
Installation Instructions
Page 11
... contact a qualified technician. Complete Installation 1. For more information, see which step was skipped. 2. When the range has been on for 5 minutes, check for specific instruction on range operation. ■ Range is plugged into a grounded 3 prong outlet. ■ Electrical supply is connected. ■ See "Troubleshooting"...go back through the steps to remove waxy residue caused by shipping material. Read the Use and Care Guide. 7. Check that the range is intact and tight, or circuit breaker has not tripped. 3. Check that all packaging materials. 4. If there is open, press ...
... contact a qualified technician. Complete Installation 1. For more information, see which step was skipped. 2. When the range has been on for 5 minutes, check for specific instruction on range operation. ■ Range is plugged into a grounded 3 prong outlet. ■ Electrical supply is connected. ■ See "Troubleshooting"...go back through the steps to remove waxy residue caused by shipping material. Read the Use and Care Guide. 7. Check that the range is intact and tight, or circuit breaker has not tripped. 3. Check that all packaging materials. 4. If there is open, press ...

Installation Instructions
Page 12
... a qualified person make sure gas pressure does not exceed 14" (36 cm) water column. Reconnect the anti-tip bracket, if the range is moved. To range B. Flip the regulator cap over and replace the plastic cover. Plastic cover 4. Install a shut-off valve. B A C A. Do... installer. Failure to the closed position) C. Unscrew the regulator cap and remove the plastic cover. Natural gas position B. Unplug range or disconnect power. Locate gas pressure regulator at the rear of a qualified person include: licensed heating personnel, authorized gas company personnel...
... a qualified person make sure gas pressure does not exceed 14" (36 cm) water column. Reconnect the anti-tip bracket, if the range is moved. To range B. Flip the regulator cap over and replace the plastic cover. Plastic cover 4. Install a shut-off valve. B A C A. Do... installer. Failure to the closed position) C. Unscrew the regulator cap and remove the plastic cover. Natural gas position B. Unplug range or disconnect power. Locate gas pressure regulator at the rear of a qualified person include: licensed heating personnel, authorized gas company personnel...


