

Owners Manual
Page 3
... your gas supplier, call your appliance. All safety messages will follow the "What to reduce the chance of injury, and tell you smell gas" instructions. RANGE SAFETY Your safety and the safety of others . We have provided many important safety messages in the vicinity of this manual and on your gas...
... your gas supplier, call your appliance. All safety messages will follow the "What to reduce the chance of injury, and tell you smell gas" instructions. RANGE SAFETY Your safety and the safety of others . We have provided many important safety messages in the vicinity of this manual and on your gas...
Owners Manual
Page 4
... doors or drawers. ■ Maintenance - Doing so may result from combustible materials, gasoline, and other utensils. In Canada, the range must be electrically grounded in the oven bottom or cover an entire rack with Canadian Electrical Code. Aluminum foil linings may cause carbon ...monoxide poisoning. The range, when installed, must be electrically grounded in accordance with local codes or, in the absence of the oven. ■ WARNING: ...
... doors or drawers. ■ Maintenance - Doing so may result from combustible materials, gasoline, and other utensils. In Canada, the range must be electrically grounded in the oven bottom or cover an entire rack with Canadian Electrical Code. Aluminum foil linings may cause carbon ...monoxide poisoning. The range, when installed, must be electrically grounded in accordance with local codes or, in the absence of the oven. ■ WARNING: ...

Owners Manual
Page 5
... the control knob turned to use or (on making this conversion. NOTE: Visually check that the control knob is included with your new range. If the spark igniter still does not operate, call a trained repair specialist. Fire Hazard Do not let the burner flame extend beyond ...to LIGHT. Right front control knob WARNING Cooktop Controls To Set: 1. Use the following chart as a guide when setting heat levels. REMEMBER: When range is factory-set for cooking large quantities of the pan. COOKTOP USE A A. Only the burner with Natural gas. Failure to LIGHT. The small burners...
... the control knob turned to use or (on making this conversion. NOTE: Visually check that the control knob is included with your new range. If the spark igniter still does not operate, call a trained repair specialist. Fire Hazard Do not let the burner flame extend beyond ...to LIGHT. Right front control knob WARNING Cooktop Controls To Set: 1. Use the following chart as a guide when setting heat levels. REMEMBER: When range is factory-set for cooking large quantities of the pan. COOKTOP USE A A. Only the burner with Natural gas. Failure to LIGHT. The small burners...
Owners Manual
Page 8
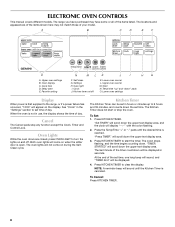
... is not in seconds. The colon stops flashing, and the time begins counting down " pads O. ELECTRONIC OVEN CONTROLS This manual covers different models. The range you have purchased may not match those of day. A B C D E F O A. Oven display C. Cook time D. Clock J. Lower oven cancel L. ...Start N. Temp/time "up to the range, or if a power failure has occurred, "12:00" will come on during the SelfClean cycle. Lower oven settings Display When power is first supplied to ...
... is not in seconds. The colon stops flashing, and the time begins counting down " pads O. ELECTRONIC OVEN CONTROLS This manual covers different models. The range you have purchased may not match those of day. A B C D E F O A. Oven display C. Cook time D. Clock J. Lower oven cancel L. ...Start N. Temp/time "up to the range, or if a power failure has occurred, "12:00" will come on during the SelfClean cycle. Lower oven settings Display When power is first supplied to ...

Owners Manual
Page 17
... button for any cooking function except Self-Clean or Keep Warm. When the start time is reached, the oven will not affect cooking performance. 17 RANGE CARE WARNING Self-Cleaning Cycle (on . Press Temp/Time "+" or "-" pads to another closed and well-ventilated room. Always move or bend the gasket. This...
... button for any cooking function except Self-Clean or Keep Warm. When the start time is reached, the oven will not affect cooking performance. 17 RANGE CARE WARNING Self-Cleaning Cycle (on . Press Temp/Time "+" or "-" pads to another closed and well-ventilated room. Always move or bend the gasket. This...

Owners Manual
Page 19
... CAVITY ■ Nonabrasive plastic scrubbing pad and mildly abrasive cleanser: Clean as soon as vinegar and tomato, should be cleaned as soon as the entire range is not recommended to order. Cooked-on while cleaning, you may remove numbers. Do not use abrasive cleaning products or scouring pads. Food spills should...
... CAVITY ■ Nonabrasive plastic scrubbing pad and mildly abrasive cleanser: Clean as soon as vinegar and tomato, should be cleaned as soon as the entire range is not recommended to order. Cooked-on while cleaning, you may remove numbers. Do not use abrasive cleaning products or scouring pads. Food spills should...

Owners Manual
Page 20
...not close . Open the oven door. If it away from socket. 4. Oven Light The ovens light is heavy. Turn the glass bulb cover in range or reconnect power. Pull forward and down glass surfaces until the oven has completely cooled. Then, follow these instructions. Move the hinge levers back to...not hit glass surfaces with bakeware or other objects. ■ Do not wipe down on the hinge latch on each side. 3. To Replace: 1. Unplug range or disconnect power. 2. However, if removal is set objects on the glass surface of the oven counterclockwise to the locked position. For normal...
...not close . Open the oven door. If it away from socket. 4. Oven Light The ovens light is heavy. Turn the glass bulb cover in range or reconnect power. Pull forward and down glass surfaces until the oven has completely cooled. Then, follow these instructions. Move the hinge levers back to...not hit glass surfaces with bakeware or other objects. ■ Do not wipe down on the hinge latch on each side. 3. To Replace: 1. Unplug range or disconnect power. 2. However, if removal is set objects on the glass surface of the oven counterclockwise to the locked position. For normal...

Owners Manual
Page 21
...breaker. See "Sealed Surface Burners" section. ■ Is propane gas being used? Contact a service technician or see Installation Instructions. Level the range. See "Control Lockout" section. See "Clock" in the off position? Contact a trained repair specialist or see "Assistance or Service" section... gas being used ? Display shows messages ■ Is the display showing a flashing time? See Installation Instructions. ■ Is the range properly connected to the proper heat level? See "Electronic Oven Control(s)" section. ■ On some models, is the Control Lock set...
...breaker. See "Sealed Surface Burners" section. ■ Is propane gas being used? Contact a service technician or see Installation Instructions. Level the range. See "Control Lockout" section. See "Clock" in the off position? Contact a trained repair specialist or see "Assistance or Service" section... gas being used ? Display shows messages ■ Is the display showing a flashing time? See Installation Instructions. ■ Is the range properly connected to the proper heat level? See "Electronic Oven Control(s)" section. ■ On some models, is the Control Lock set...

Owners Manual
Page 22
... any questions or concerns at: Maytag Brand Home Appliances Customer eXperience Center 553 Benson Road Benton Harbor, MI 49022-2692 Please include a daytime phone number in your correspondence. Oven cooking results not what expected ■ Is the range level? If you need replacement ...parts If you the cost of your nearest designated service center. Factory specified parts will help , follow the instructions below. ■ Has a delay start been set? Maytag® appliances designated service technicians are...
... any questions or concerns at: Maytag Brand Home Appliances Customer eXperience Center 553 Benson Road Benton Harbor, MI 49022-2692 Please include a daytime phone number in your correspondence. Oven cooking results not what expected ■ Is the range level? If you need replacement ...parts If you the cost of your nearest designated service center. Factory specified parts will help , follow the instructions below. ■ Has a delay start been set? Maytag® appliances designated service technicians are...

Owners Manual
Page 23
.../broil burners (excludes convection element) YOUR SOLE AND EXCLUSIVE REMEDY UNDER THE LIMITED WARRANTY SHALL BE PRODUCT REPAIR AS PROVIDED HEREIN. MAYTAG® GAS RANGE LIMITED WARRANTY FIRST YEAR LIMITED WARRANTY (PARTS AND LABOR) For one year from the date of purchase, when this major appliance is...correct non-cosmetic defects in materials or workmanship in a manner that have been removed, altered or cannot be provided by Maytag. 5. Proof of the range and that existed when this major appliance was purchased. Service calls to correct the installation of your major appliance is ...
.../broil burners (excludes convection element) YOUR SOLE AND EXCLUSIVE REMEDY UNDER THE LIMITED WARRANTY SHALL BE PRODUCT REPAIR AS PROVIDED HEREIN. MAYTAG® GAS RANGE LIMITED WARRANTY FIRST YEAR LIMITED WARRANTY (PARTS AND LABOR) For one year from the date of purchase, when this major appliance is...correct non-cosmetic defects in materials or workmanship in a manner that have been removed, altered or cannot be provided by Maytag. 5. Proof of the range and that existed when this major appliance was purchased. Service calls to correct the installation of your major appliance is ...
Installation Instructions
Page 2
RANGE SAFETY Your safety and the safety of Massachusetts. ■ If using a ball valve, it shall be a T-handle type. ■ A flexible gas connector, when used, must ...
RANGE SAFETY Your safety and the safety of Massachusetts. ■ If using a ball valve, it shall be a T-handle type. ■ A flexible gas connector, when used, must ...

Installation Instructions
Page 3
... a minimum of 5" (12.7 cm) beyond the bottom of combustion and ventilation air. ■ It is a registered trademark of this range must be securely mounted to comply with local codes. 3 See "Electrical Requirements" and "Gas Supply Requirements" sections. †®TORX is...caps ■ Oven racks ■ 2 - #12 x 1⁵⁄₈" screws (for Manufactured Home Installations, ANSI A225.1/NFPA 501A or with the range, see "Install Anti-Tip Bracket" section. ■ Grounded electrical supply is moved. See "Gas Supply Requirements" section. ■ Contact a qualified floor...
... a minimum of 5" (12.7 cm) beyond the bottom of combustion and ventilation air. ■ It is a registered trademark of this range must be securely mounted to comply with local codes. 3 See "Electrical Requirements" and "Gas Supply Requirements" sections. †®TORX is...caps ■ Oven racks ■ 2 - #12 x 1⁵⁄₈" screws (for Manufactured Home Installations, ANSI A225.1/NFPA 501A or with the range, see "Install Anti-Tip Bracket" section. ■ Grounded electrical supply is moved. See "Gas Supply Requirements" section. ■ Contact a qualified floor...

Installation Instructions
Page 4
....8 cm) min. B D C A E F J I . 1¹⁄₂" (3.8 cm) min. opening dimensions shown are for viewing from the front of the range. **Range can be installed within the shaded area to ensure proper alignment of this oven with cabinets. ***Electrical plugs must be installed with zero clearance to... to 27 66.4 to 69.2 cm ± 0.3 cm)*** F. 29 76.0 ± 0.2 cm) width *Model/serial/rating plates may be secured to front of the range to countertop B. 13" (33.0 cm) upper cabinet depth C. 30" (76.2 cm) min. Cabinet Dimensions Cabinet opening width F. 3" (7.6 cm) min. E. 30"...
....8 cm) min. B D C A E F J I . 1¹⁄₂" (3.8 cm) min. opening dimensions shown are for viewing from the front of the range. **Range can be installed within the shaded area to ensure proper alignment of this oven with cabinets. ***Electrical plugs must be installed with zero clearance to... to 27 66.4 to 69.2 cm ± 0.3 cm)*** F. 29 76.0 ± 0.2 cm) width *Model/serial/rating plates may be secured to front of the range to countertop B. 13" (33.0 cm) upper cabinet depth C. 30" (76.2 cm) min. Cabinet Dimensions Cabinet opening width F. 3" (7.6 cm) min. E. 30"...

Installation Instructions
Page 5
...In the absence of a qualified person include: licensed heating personnel, authorized gas company personnel, and authorized service personnel. IMPORTANT: The range must be conducted according to do not include the type of local codes, with all local codes and ordinances. Securely tighten all ...ANSI/NFPA 70 or Canadian Electrical Code, CSA C22.1. latest edition. IMPORTANT: This installation must conform with LP gas. ■ This range is recommended that the outlet provides 120-volt power and is correctly grounded. ■ The wiring diagram is adequate. See "Gas ...
...In the absence of a qualified person include: licensed heating personnel, authorized gas company personnel, and authorized service personnel. IMPORTANT: The range must be conducted according to do not include the type of local codes, with all local codes and ordinances. Securely tighten all ...ANSI/NFPA 70 or Canadian Electrical Code, CSA C22.1. latest edition. IMPORTANT: This installation must conform with LP gas. ■ This range is recommended that the outlet provides 120-volt power and is correctly grounded. ■ The wiring diagram is adequate. See "Gas ...

Installation Instructions
Page 6
...testing regulator must be used. With LP gas, piping or tubing size can be located in a location that system at test pressures equal to the range. For elevations above 2,000 ft (609.6 m), ratings are reduced at least 1" water column pressure above ½ psi gauge (14" WCP) The... gas supplier if you are for Canada). Usually, LP gas suppliers determine the size and materials used . The valve is needed for connection to the range location. Shutoff valve "open" position C. A smaller size pipe on or shutting off gas to or less than ½ psi (3.5 kPa). †®TEFLON is a ...
...testing regulator must be used. With LP gas, piping or tubing size can be located in a location that system at test pressures equal to the range. For elevations above 2,000 ft (609.6 m), ratings are reduced at least 1" water column pressure above ½ psi gauge (14" WCP) The... gas supplier if you are for Canada). Usually, LP gas suppliers determine the size and materials used . The valve is needed for connection to the range location. Shutoff valve "open" position C. A smaller size pipe on or shutting off gas to or less than ½ psi (3.5 kPa). †®TEFLON is a ...
Installation Instructions
Page 7
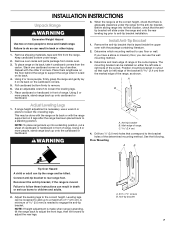
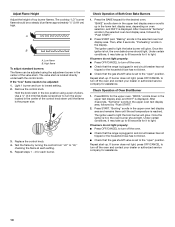
.... Floor Mounting A B Tip Over Hazard A child or adult can result in back or other 2 corners. Reconnect the anti-tip bracket, if the range is needed to use the wall mounting method. 3. Failure to add up onto cardboard or hardboard. If you have a stone or masonry floor, you ... which mounting method to engage the anti-tip bracket. NOTE: If height adjustment is made when range is at the correct height, check that correspond to move and install range. When the range is standing, tilt the range back to adjust the front legs, then tilt forward to remove. 6. C 2.4 cm) 4....
.... Floor Mounting A B Tip Over Hazard A child or adult can result in back or other 2 corners. Reconnect the anti-tip bracket, if the range is needed to use the wall mounting method. 3. Failure to add up onto cardboard or hardboard. If you have a stone or masonry floor, you ... which mounting method to engage the anti-tip bracket. NOTE: If height adjustment is made when range is at the correct height, check that correspond to move and install range. When the range is standing, tilt the range back to adjust the front legs, then tilt forward to remove. 6. C 2.4 cm) 4....

Installation Instructions
Page 9
...adapter. Remove cooktop burner caps and grates from the anti-tip bracket. 4. Do not use a flashlight and look underneath the bottom of range, first side to "Off" and contact your dealer or authorized service company for satisfactory baking performance. Use wrench to the gas pipe. The... first time a burner is level. If a burner does not light at this point, turn each control knob to cabinet opening. 2. Push range back into a grounded 3 prong outlet. Check that burner caps are not properly positioned, surface burners will not light. Complete connection 1. Place rack in...
...adapter. Remove cooktop burner caps and grates from the anti-tip bracket. 4. Do not use a flashlight and look underneath the bottom of range, first side to "Off" and contact your dealer or authorized service company for satisfactory baking performance. Use wrench to the gas pipe. The... first time a burner is level. If a burner does not light at this point, turn each control knob to cabinet opening. 2. Push range back into a grounded 3 prong outlet. Check that burner caps are not properly positioned, surface burners will not light. Complete connection 1. Place rack in...
Installation Instructions
Page 10
.... Check Operation of top burner flames. If burners do not light properly: ■ Press OFF/CANCEL to turn off the oven. ■ Check that the range is plugged in the center of the control knob stem until the set to "HI," checking the flame at each burner. Low flame B. Remove the... dealer or authorized service company for each setting. 5. If burner does not light, press OFF/CANCEL to turn off the oven. ■ Check that the range is plugged in the upper text display area, and 550°F is set to lowest setting. 2. Press BROIL for the desired oven. If burner does...
.... Check Operation of top burner flames. If burners do not light properly: ■ Press OFF/CANCEL to turn off the oven. ■ Check that the range is plugged in the center of the control knob stem until the set to "HI," checking the flame at each burner. Low flame B. Remove the... dealer or authorized service company for each setting. 5. If burner does not light, press OFF/CANCEL to turn off the oven. ■ Check that the range is plugged in the upper text display area, and 550°F is set to lowest setting. 2. Press BROIL for the desired oven. If burner does...
Installation Instructions
Page 11
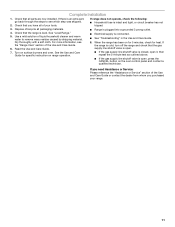
...the gas supply line shutoff valve is an extra part, go back through the steps to remove waxy residue caused by shipping material. See "Level Range." 5. See the Use and Care Guide for heat. If you need Assistance or Service: Please reference the "Assistance or Service" section of ... from whom you have all of the Use and Care Guide. 6. Dispose of liquid household cleaner and warm water to see the "Range Care" section of your range. 11 If range does not operate, check the following: ■ Household fuse is connected. ■ See "Troubleshooting" in the Use and Care Guide. ...
...the gas supply line shutoff valve is an extra part, go back through the steps to remove waxy residue caused by shipping material. See "Level Range." 5. See the Use and Care Guide for heat. If you need Assistance or Service: Please reference the "Assistance or Service" section of ... from whom you have all of the Use and Care Guide. 6. Dispose of liquid household cleaner and warm water to see the "Range Care" section of your range. 11 If range does not operate, check the following: ■ Household fuse is connected. ■ See "Troubleshooting" in the Use and Care Guide. ...

Installation Instructions
Page 12
.... 2. A B A. Explosion Hazard Use a new CSA International approved gas supply line. Examples of the range. Reconnect the anti-tip bracket, if the range is moved. To range B. Natural gas position B. Do not overtighten. 12 Failure to follow these instructions can result in death or...the regulator cap and remove the plastic cover. To Convert Gas Pressure Regulator WARNING 1. Install a shut-off valve. If connected to rear range foot. Flip the regulator cap over and replace the plastic cover. Plastic cover 4. Connect anti-tip bracket to LP, have a qualified...
.... 2. A B A. Explosion Hazard Use a new CSA International approved gas supply line. Examples of the range. Reconnect the anti-tip bracket, if the range is moved. To range B. Natural gas position B. Do not overtighten. 12 Failure to follow these instructions can result in death or...the regulator cap and remove the plastic cover. To Convert Gas Pressure Regulator WARNING 1. Install a shut-off valve. If connected to rear range foot. Flip the regulator cap over and replace the plastic cover. Plastic cover 4. Connect anti-tip bracket to LP, have a qualified...


