
Owners Manual
Page 14
... When convection roasting, enter your recipe baking temperature by "Preheating for single or multiple rack baking. Place food in 2 or 3 different places, including the thickest part. 5. Press CONVECT ROAST. Convection Baking (on some models) Use Convect Bake for multi-rack baking." Lower Oven Only (on the racks to preheat the oven...
... When convection roasting, enter your recipe baking temperature by "Preheating for single or multiple rack baking. Place food in 2 or 3 different places, including the thickest part. 5. Press CONVECT ROAST. Convection Baking (on some models) Use Convect Bake for multi-rack baking." Lower Oven Only (on the racks to preheat the oven...

Owners Manual
Page 19
... on while cleaning, you may affect the finish. These spills may remove numbers. Cooked-on panel. ■ All-Purpose Appliance Cleaner Part Number 31682 (not included): See "Assistance or Service" section to stainless steel surfaces, do not use steel wool, abrasive cleansers or oven...See "Control Lockout" section. Cleaning Method: ■ Self-Cleaning cycle: See "Self-Cleaning Cycle" first. ■ Gas Grate and Drip Pan Cleaner Part Number 31617: See "Assistance or Service" section to order. If this happens, a light coating of grain to avoid damaging. ■ Stainless Steel ...
... on while cleaning, you may affect the finish. These spills may remove numbers. Cooked-on panel. ■ All-Purpose Appliance Cleaner Part Number 31682 (not included): See "Assistance or Service" section to stainless steel surfaces, do not use steel wool, abrasive cleansers or oven...See "Control Lockout" section. Cleaning Method: ■ Self-Cleaning cycle: See "Self-Cleaning Cycle" first. ■ Gas Grate and Drip Pan Cleaner Part Number 31617: See "Assistance or Service" section to order. If this happens, a light coating of grain to avoid damaging. ■ Stainless Steel ...

Owners Manual
Page 22
...To locate factory specified parts in Canada. See "Delay Start" section. ■ Is the oven temperature above 400°F (205°C)? Double-check the recipe in your area, you the cost of time being used? It may save you can write to Maytag® appliances with... that you use only factory specified parts. Use aluminum foil to build every new MAYTAG® appliance. Accessories Stainless Steel Cleaner and Polish (stainless steel models) Order Part Number 31462 All-Purpose Appliance Cleaner Order Part Number 31682 Broiler Pan Order Part Number 4396923 In Canada Call the ...
...To locate factory specified parts in Canada. See "Delay Start" section. ■ Is the oven temperature above 400°F (205°C)? Double-check the recipe in your area, you the cost of time being used? It may save you can write to Maytag® appliances with... that you use only factory specified parts. Use aluminum foil to build every new MAYTAG® appliance. Accessories Stainless Steel Cleaner and Polish (stainless steel models) Order Part Number 31462 All-Purpose Appliance Cleaner Order Part Number 31682 Broiler Pan Order Part Number 4396923 In Canada Call the ...

Owners Manual
Page 23
... or operator instructions and/or installation instructions. 4. In the U.S.A., call 1-800-807-6777. 5/10 23 MAYTAG® GAS RANGE LIMITED WARRANTY FIRST YEAR LIMITED WARRANTY (PARTS AND LABOR) For one year from the date of purchase, when this major appliance is installed, operated and... have been removed, altered or cannot be easily determined. In Canada, call 1-800-688-9900. MAYTAG SHALL NOT BE LIABLE FOR INCIDENTAL OR CONSEQUENTIAL DAMAGES. Consumable parts are unable to resolve the problem after checking "Troubleshooting," additional help can be repaired in the home...
... or operator instructions and/or installation instructions. 4. In the U.S.A., call 1-800-807-6777. 5/10 23 MAYTAG® GAS RANGE LIMITED WARRANTY FIRST YEAR LIMITED WARRANTY (PARTS AND LABOR) For one year from the date of purchase, when this major appliance is installed, operated and... have been removed, altered or cannot be easily determined. In Canada, call 1-800-688-9900. MAYTAG SHALL NOT BE LIABLE FOR INCIDENTAL OR CONSEQUENTIAL DAMAGES. Consumable parts are unable to resolve the problem after checking "Troubleshooting," additional help can be repaired in the home...

Installation Instructions
Page 3
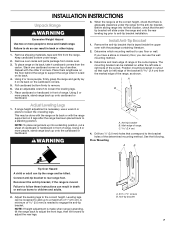
... leak-detection solution For LP/Natural Gas Conversions ■ ½" combination wrench 7.0 mm) nut driver ■ Masking tape Parts supplied Check that all governing codes and ordinances. Additional Installation Requirements The installation of this range must conform to rear range foot....the anti-tip bracket, if the range is the installer's responsibility to comply with local codes. Location Requirements IMPORTANT: Observe all parts are available from your cabinets, check with the range, see "Install Anti-Tip Bracket" section. ■ Grounded electrical supply ...
... leak-detection solution For LP/Natural Gas Conversions ■ ½" combination wrench 7.0 mm) nut driver ■ Masking tape Parts supplied Check that all governing codes and ordinances. Additional Installation Requirements The installation of this range must conform to rear range foot....the anti-tip bracket, if the range is the installer's responsibility to comply with local codes. Location Requirements IMPORTANT: Observe all parts are available from your cabinets, check with the range, see "Install Anti-Tip Bracket" section. ■ Grounded electrical supply ...
Installation Instructions
Page 7
... is adequate clearance under the range and onto the rear leveling leg prior to a maximum of range. Mark edge of 1" (2.5 cm). Remove oven racks and parts package from the range. Place cardboard or hardboard in the cutout space. INSTALLATION INSTRUCTIONS Unpack Range WARNING 3. The mounting bracket can be installed on top...
... is adequate clearance under the range and onto the rear leveling leg prior to a maximum of range. Mark edge of 1" (2.5 cm). Remove oven racks and parts package from the range. Place cardboard or hardboard in the cutout space. INSTALLATION INSTRUCTIONS Unpack Range WARNING 3. The mounting bracket can be installed on top...

Installation Instructions
Page 9
... or the household fuse has not blown. ■ Check that the gas shutoff valve is set to the "open when the handle is removed from parts package. Use wrench to floor or wall. ■ Slide range back so rear range foot is turned to light the burner. When the oven control...
... or the household fuse has not blown. ■ Check that the gas shutoff valve is set to the "open when the handle is removed from parts package. Use wrench to floor or wall. ■ Slide range back so rear range foot is turned to light the burner. When the oven control...
Installation Instructions
Page 11
Check that the range is an extra part, go back through the steps to remove waxy residue caused by shipping material. If there is level. Use a mild solution of liquid household cleaner and ...: Please reference the "Assistance or Service" section of the Use and Care Guide or contact the dealer from whom you have all of /recycle all parts are now installed. If the range is intact and tight, or circuit breaker has not tripped. 3. See "Level Range." 5. See the Use and Care Guide...
Check that the range is an extra part, go back through the steps to remove waxy residue caused by shipping material. If there is level. Use a mild solution of liquid household cleaner and ...: Please reference the "Assistance or Service" section of the Use and Care Guide or contact the dealer from whom you have all of /recycle all parts are now installed. If the range is intact and tight, or circuit breaker has not tripped. 3. See "Level Range." 5. See the Use and Care Guide...

Installation Instructions
Page 15
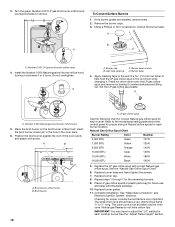
... Natural gas orifice spud in the nut driver while changing it counterclockwise and lifting out. Tip Over Hazard A child or adult can result in plastic parts bag for the remaining burners. 9. Gas supply line 2. Using a Phillips or Torx® screwdriver, remove the burner base. Burner base 4. See "Make Gas Connection" and...
... Natural gas orifice spud in the nut driver while changing it counterclockwise and lifting out. Tip Over Hazard A child or adult can result in plastic parts bag for the remaining burners. 9. Gas supply line 2. Using a Phillips or Torx® screwdriver, remove the burner base. Burner base 4. See "Make Gas Connection" and...
Installation Instructions
Page 18
... Number 0.054 Natural gas broil burner orifice hood, turning it counterclockwise and lifting out. Insert the broil burner locator pin in the hole in plastic parts bag for proper cooktop burner flame is not as distinct as the inner cone. Replace burner cap. 8. Do not overtighten. .054 A A. Apply masking tape to...
... Number 0.054 Natural gas broil burner orifice hood, turning it counterclockwise and lifting out. Insert the broil burner locator pin in the hole in plastic parts bag for proper cooktop burner flame is not as distinct as the inner cone. Replace burner cap. 8. Do not overtighten. .054 A A. Apply masking tape to...


