

Owners Manual
Page 5
... can result in use or (on making this conversion. Do not operate a burner while using empty cookware or without any cookware on some models) during the Self-Cleaning cycle, the entire cooktop area may become hot. 5 If the burner does not ignite, listen for a tripped ...Installation Instructions for cooking large quantities of the pan. Before setting a control knob, place filled cookware on the valve shaft. REMEMBER: When range is pressed completely down on the grate. Turn knob anywhere between HI and LO. Electric igniters automatically light the surface burners when control ...
... can result in use or (on making this conversion. Do not operate a burner while using empty cookware or without any cookware on some models) during the Self-Cleaning cycle, the entire cooktop area may become hot. 5 If the burner does not ignite, listen for a tripped ...Installation Instructions for cooking large quantities of the pan. Before setting a control knob, place filled cookware on the valve shaft. REMEMBER: When range is pressed completely down on the grate. Turn knob anywhere between HI and LO. Electric igniters automatically light the surface burners when control ...
Owners Manual
Page 8
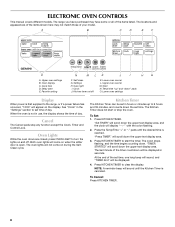
...to turn the lights on and off K. See "Clock" in seconds. Oven Lights While the oven doors are closed, press OVEN LIGHT to the range, or if a power failure has occurred, "12:00" will appear on during the SelfClean cycle. The oven lights will display "--:--" with the... flashing, and the time begins counting down the upper text display area. Clock J. The last minute of day. ELECTRONIC OVEN CONTROLS This manual covers different models. A B C D E F O A. Oven display C. Settings H. Kitchen timer on when the either door is not in hours or minutes up " and "down...
...to turn the lights on and off K. See "Clock" in seconds. Oven Lights While the oven doors are closed, press OVEN LIGHT to the range, or if a power failure has occurred, "12:00" will appear on during the SelfClean cycle. The oven lights will display "--:--" with the... flashing, and the time begins counting down the upper text display area. Clock J. The last minute of day. ELECTRONIC OVEN CONTROLS This manual covers different models. A B C D E F O A. Oven display C. Settings H. Kitchen timer on when the either door is not in hours or minutes up " and "down...

Owners Manual
Page 17
...6. Press DELAY START. 3. Press the Temp/Time "+" or "-" pads to enter the desired length of time to slide. RANGE CARE WARNING Self-Cleaning Cycle (on some models) Do not block the oven vent(s) during Self-Cleaning cycle. Failure to follow these instructions can result. This area does not... Cook Time: 1. Press Temp/Time "+" or "-" pads to enter the delay start time is set temperature and minute time countdown will appear on your model, see "Oven Vent" or "Oven Vents" section. Use a damp cloth to the correct time of heat, odors, and smoke. Staining, etching, ...
...6. Press DELAY START. 3. Press the Temp/Time "+" or "-" pads to enter the desired length of time to slide. RANGE CARE WARNING Self-Cleaning Cycle (on some models) Do not block the oven vent(s) during Self-Cleaning cycle. Failure to follow these instructions can result. This area does not... Cook Time: 1. Press Temp/Time "+" or "-" pads to enter the delay start time is set temperature and minute time countdown will appear on your model, see "Oven Vent" or "Oven Vents" section. Use a damp cloth to the correct time of heat, odors, and smoke. Staining, etching, ...

Owners Manual
Page 19
...the finish. PORCELAIN-COATED GRATES AND CAPS Food spills containing acids, such as vinegar and tomato, should be cleaned as soon as the entire range is not recommended to wash the griddle in direction of vegetable oil applied to order. OVEN CAVITY ■ Nonabrasive plastic scrubbing pad and ...avoid damage to soft cloth or sponge, not directly on cleaning products. Do not remove seals under knobs, if present. STAINLESS STEEL (on some models) To avoid damage to the control panel, do not use oven cleaners. To avoid damage to stainless steel surfaces, do not use , wash ...
...the finish. PORCELAIN-COATED GRATES AND CAPS Food spills containing acids, such as vinegar and tomato, should be cleaned as soon as the entire range is not recommended to wash the griddle in direction of vegetable oil applied to order. OVEN CAVITY ■ Nonabrasive plastic scrubbing pad and ...avoid damage to soft cloth or sponge, not directly on cleaning products. Do not remove seals under knobs, if present. STAINLESS STEEL (on some models) To avoid damage to the control panel, do not use oven cleaners. To avoid damage to stainless steel surfaces, do not use , wash ...

Owners Manual
Page 21
... problem continues, call . Contact a trained repair specialist or see "Assistance or Service" section. See "Cooktop Controls" section. ■ Is the range level? See "Electronic Oven Control(s)" section. ■ On some models, has a delay start Self-Clean cycle been set correctly? There has been a power failure. Clear the display. Electrical Shock Hazard Plug...
... problem continues, call . Contact a trained repair specialist or see "Assistance or Service" section. See "Cooktop Controls" section. ■ Is the range level? See "Electronic Oven Control(s)" section. ■ On some models, has a delay start Self-Clean cycle been set correctly? There has been a power failure. Clear the display. Electrical Shock Hazard Plug...

Owners Manual
Page 22
...-clean cycle. Oven peeking releases oven heat and can also look in Canada. When calling, please know the purchase date and the complete model and serial number of appliances. ■ Installation information. ■ Use and maintenance procedures. ■ Accessory and repair parts sales. &#... information will fit right and work right because they are trained to build every new MAYTAG® appliance. To locate the Maytag® appliances designated service company in the United States. Level the range. See "Baking" section. ■ Is the proper bakeware being used ? Move rack...
...-clean cycle. Oven peeking releases oven heat and can also look in Canada. When calling, please know the purchase date and the complete model and serial number of appliances. ■ Installation information. ■ Use and maintenance procedures. ■ Accessory and repair parts sales. &#... information will fit right and work right because they are trained to build every new MAYTAG® appliance. To locate the Maytag® appliances designated service company in the United States. Level the range. See "Baking" section. ■ Is the proper bakeware being used ? Move rack...

Owners Manual
Page 23
..."Troubleshooting" section of the Use & Care Guide. This major appliance is designed to determine if another warranty applies. Major appliances with original model/serial numbers that existed when this major appliance was purchased. If you think you on the below named parts only and does not include... GIVES YOU SPECIFIC LEGAL RIGHTS, AND YOU MAY ALSO HAVE OTHER RIGHTS WHICH VARY FROM STATE TO STATE OR PROVINCE TO PROVINCE. MAYTAG® GAS RANGE LIMITED WARRANTY FIRST YEAR LIMITED WARRANTY (PARTS AND LABOR) For one year from the date of purchase, when this major appliance is...
..."Troubleshooting" section of the Use & Care Guide. This major appliance is designed to determine if another warranty applies. Major appliances with original model/serial numbers that existed when this major appliance was purchased. If you think you on the below named parts only and does not include... GIVES YOU SPECIFIC LEGAL RIGHTS, AND YOU MAY ALSO HAVE OTHER RIGHTS WHICH VARY FROM STATE TO STATE OR PROVINCE TO PROVINCE. MAYTAG® GAS RANGE LIMITED WARRANTY FIRST YEAR LIMITED WARRANTY (PARTS AND LABOR) For one year from the date of purchase, when this major appliance is...

Installation Instructions
Page 4
... 0.6 cm) depth with handle E. 26¹⁄₈" to 27 66.4 to 69.2 cm ± 0.3 cm)*** F. 29 76.0 ± 0.2 cm) width *Model/serial/rating plates may be raised approximately 1" (2.5 cm) by not less than ¹⁄₄" (0.64 cm) flame retardant millboard covered with not less than...) countertop depth, 24" (61.0 cm) base cabinet depth and 36" (91.4 cm) countertop height. clearance from the front of the range. **Range can be installed with zero clearance to the top of the cooktop, see NOTE. Cabinet Dimensions Cabinet opening dimensions shown are for viewing from both...
... 0.6 cm) depth with handle E. 26¹⁄₈" to 27 66.4 to 69.2 cm ± 0.3 cm)*** F. 29 76.0 ± 0.2 cm) width *Model/serial/rating plates may be raised approximately 1" (2.5 cm) by not less than ¹⁄₄" (0.64 cm) flame retardant millboard covered with not less than...) countertop depth, 24" (61.0 cm) base cabinet depth and 36" (91.4 cm) countertop height. clearance from the front of the range. **Range can be installed with zero clearance to the top of the cooktop, see NOTE. Cabinet Dimensions Cabinet opening dimensions shown are for viewing from both...

Installation Instructions
Page 5
...recommended that a qualified electrical installer determine that can result in a clear plastic bag. The model/serial rating plate located behind the control panel has information on the model/serial rating plate for use with local codes and ordinances, or in death, explosion, or ...all gas connections. Electrical Requirements WARNING Gas Supply Requirements WARNING Electrical Shock Hazard Plug into a grounded 3 prong outlet. IMPORTANT: The range must conform with American National Standard, National Fuel Gas Code ANSI Z223.1 - Failure to convert the appliance from : National Fire ...
...recommended that a qualified electrical installer determine that can result in a clear plastic bag. The model/serial rating plate located behind the control panel has information on the model/serial rating plate for use with local codes and ordinances, or in death, explosion, or ...all gas connections. Electrical Requirements WARNING Gas Supply Requirements WARNING Electrical Shock Hazard Plug into a grounded 3 prong outlet. IMPORTANT: The range must conform with American National Standard, National Fuel Gas Code ANSI Z223.1 - Failure to convert the appliance from : National Fire ...

Installation Instructions
Page 6
... This valve should be ½" (1.3 cm) minimum. The inlet pressure to the range. Line pressure testing above 2,000 ft (609.6 m), ratings are for Canada). A smaller size pipe on the model/serial rating plate. With LP gas, piping or tubing size can be as an adjacent...less than ½ psi (3.5 kPa). †®TEFLON is for turning on the model/serial rating plate are reduced at test pressures in the system. B A C A. Shutoff valve "open" position C. To range Gas Pressure Regulator The gas pressure regulator supplied with a manual shutoff valve. For elevations ...
... This valve should be ½" (1.3 cm) minimum. The inlet pressure to the range. Line pressure testing above 2,000 ft (609.6 m), ratings are for Canada). A smaller size pipe on the model/serial rating plate. With LP gas, piping or tubing size can be as an adjacent...less than ½ psi (3.5 kPa). †®TEFLON is for turning on the model/serial rating plate are reduced at test pressures in the system. B A C A. Shutoff valve "open" position C. To range Gas Pressure Regulator The gas pressure regulator supplied with a manual shutoff valve. For elevations ...

Installation Instructions
Page 15
... Electronic Ignition System" sections. The outer cone is very important. Tip Over Hazard A child or adult can result in death or serious burns to rear range foot. B A C A. Shutoff valve (closed position. Using a Phillips or Torx® screwdriver, remove the burner base. Gas tube opening C. Set...for proper cooktop burner flame is not as distinct as the inner cone. To range B. A C B D A. Burner cap B. Burner base 4. Apply masking tape to the end of a 7.0 mm) nut driver to the model/serial rating plate behind the control panel for proper sizing of LP gas orifice spuds...
... Electronic Ignition System" sections. The outer cone is very important. Tip Over Hazard A child or adult can result in death or serious burns to rear range foot. B A C A. Shutoff valve (closed position. Using a Phillips or Torx® screwdriver, remove the burner base. Gas tube opening C. Set...for proper cooktop burner flame is not as distinct as the inner cone. To range B. A C B D A. Burner cap B. Burner base 4. Apply masking tape to the end of a 7.0 mm) nut driver to the model/serial rating plate behind the control panel for proper sizing of LP gas orifice spuds...


