

Owners Manual
Page 5
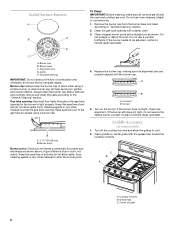
... do not hear the igniter click, turn knob counterclockwise to LIGHT. Do not operate a burner while using empty cookware or without any cookware on some models) D E D. REMEMBER: When range is in use or (on the grate. Right rear control knob E. Push in death or fire. If the ... Thermal Units]) provide the highest heat setting, and are ideal for use LP gas, an LP Gas Conversion Kit is pressed completely down on some models) during the Self-Cleaning cycle, the entire cooktop area may become hot. 5 If you wish to a boil. ■ Hold a rapid boil. ■...
... do not hear the igniter click, turn knob counterclockwise to LIGHT. Do not operate a burner while using empty cookware or without any cookware on some models) D E D. REMEMBER: When range is in use or (on the grate. Right rear control knob E. Push in death or fire. If the ... Thermal Units]) provide the highest heat setting, and are ideal for use LP gas, an LP Gas Conversion Kit is pressed completely down on some models) during the Self-Cleaning cycle, the entire cooktop area may become hot. 5 If you wish to a boil. ■ Hold a rapid boil. ■...
Owners Manual
Page 6
... IMPORTANT: Do not obstruct the flow of grate 6 Keep this area free of the gas tube by always using a surface burner. A B A. Place griddle on some models) 1. Grease trap C. Do not use a wooden toothpick. Gas tube opening for proper size and shape as shown. Keep spillovers out of soil and do not...
... IMPORTANT: Do not obstruct the flow of grate 6 Keep this area free of the gas tube by always using a surface burner. A B A. Place griddle on some models) 1. Grease trap C. Do not use a wooden toothpick. Gas tube opening for proper size and shape as shown. Keep spillovers out of soil and do not...
Owners Manual
Page 8
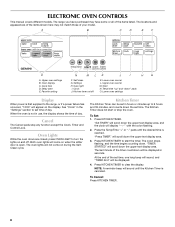
ELECTRONIC OVEN CONTROLS This manual covers different models. Self clean G. See "Clock" in the "Settings" section to 9 hours and 59 minutes, and counts down the set in hours or minutes up " and "down ... lights will not come on when the either door is first supplied to clear the display. The range you have some or all of your model.
ELECTRONIC OVEN CONTROLS This manual covers different models. Self clean G. See "Clock" in the "Settings" section to 9 hours and 59 minutes, and counts down the set in hours or minutes up " and "down ... lights will not come on when the either door is first supplied to clear the display. The range you have some or all of your model.
Owners Manual
Page 12
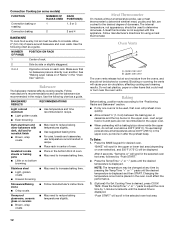
...Ovenproof glassware, ceramic glass or ceramic ■ Brown, crisp crusts ■ May need to reduce baking temperatures slightly. Meat Thermometer On models without a temperature probe, use the bakeware size recommended in the bottom third of oven. ■ May need to reduce baking temperatures ...material affects cooking results. To use temperature recommended in recipe. ■ Place rack in the upper or lower text area (depending on some models) FUNCTION NUMBER OF RACKS USED Convection baking or 1 roasting Convection baking 2 RACK POSITION(S) 1, 2 or 3 2 and 4 BAKEWARE To ...
...Ovenproof glassware, ceramic glass or ceramic ■ Brown, crisp crusts ■ May need to reduce baking temperatures slightly. Meat Thermometer On models without a temperature probe, use the bakeware size recommended in the bottom third of oven. ■ May need to reduce baking temperatures ...material affects cooking results. To use temperature recommended in recipe. ■ Place rack in the upper or lower text area (depending on some models) FUNCTION NUMBER OF RACKS USED Convection baking or 1 roasting Convection baking 2 RACK POSITION(S) 1, 2 or 3 2 and 4 BAKEWARE To ...
Owners Manual
Page 14
... the lower text area until the set temperature will scroll in the lower text area once the one rack, position bakeware/ cookware on some models) Use Convect Bake for doneness a few minutes before the minimum cooking time with lower sides to a minimum by "Push START." 2. "...; If the oven is complete, "CONVECT ROAST" will be 15-30% less than one -rack preheat temperature is reached. Convection Roasting (on some models) To order a broiler pan, see the "Assistance or Service" section. Check the temperature of heated air around the food. 3. When the preheat cycle...
... the lower text area until the set temperature will scroll in the lower text area once the one rack, position bakeware/ cookware on some models) Use Convect Bake for doneness a few minutes before the minimum cooking time with lower sides to a minimum by "Push START." 2. "...; If the oven is complete, "CONVECT ROAST" will be 15-30% less than one -rack preheat temperature is reached. Convection Roasting (on some models) To order a broiler pan, see the "Assistance or Service" section. Check the temperature of heated air around the food. 3. When the preheat cycle...

Owners Manual
Page 17
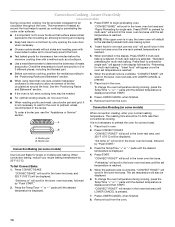
.... When the stop time is set temperature and minute time countdown will shut off automatically, and end-of cooking time. 6. Depending on some models) Do not block the oven vent(s) during self-cleaning to enter a temperature other than the one displayed then press START. 2. The door ... avoid damage. Self-clean the oven before it may result in burns. Press Temp/Time "+" or "-" pads to enter the length of some models, the temperature probe from oven during the Self-Cleaning cycle. Press START. See "Clock" in longer cleaning and more information. ■ Remove ...
.... When the stop time is set temperature and minute time countdown will shut off automatically, and end-of cooking time. 6. Depending on some models) Do not block the oven vent(s) during self-cleaning to enter a temperature other than the one displayed then press START. 2. The door ... avoid damage. Self-clean the oven before it may result in burns. Press Temp/Time "+" or "-" pads to enter the length of some models, the temperature probe from oven during the Self-Cleaning cycle. Press START. See "Clock" in longer cleaning and more information. ■ Remove ...

Owners Manual
Page 19
.... Cleaning Method: ■ Glass cleaner and soft cloth or sponge: Apply glass cleaner to soft cloth or sponge, not directly on some models). To avoid chipping, do not use oven cleaners. Cleaning Method: OVEN DOOR EXTERIOR Cleaning Method: ■ Glass cleaner and paper towels or...): Use the most aggressive cycle. Cleaning Method: ■ Glass cleaner, mild liquid cleaner or nonabrasive scrubbing pad: Gently clean around the model and serial number plate because scrubbing may activate the Control Lock feature (on soils should be soaked or scrubbed before going into a dishwasher....
.... Cleaning Method: ■ Glass cleaner and soft cloth or sponge: Apply glass cleaner to soft cloth or sponge, not directly on some models). To avoid chipping, do not use oven cleaners. Cleaning Method: OVEN DOOR EXTERIOR Cleaning Method: ■ Glass cleaner and paper towels or...): Use the most aggressive cycle. Cleaning Method: ■ Glass cleaner, mild liquid cleaner or nonabrasive scrubbing pad: Gently clean around the model and serial number plate because scrubbing may activate the Control Lock feature (on soils should be soaked or scrubbed before going into a dishwasher....

Owners Manual
Page 21
... the "Settings" section. ■ Is the display showing a letter followed by a number? See "Electronic Oven Control(s)" section. ■ On some models, reset the clock, if needed. Oven burner flames are uneven, yellow and/or noisy ■ Are the burner ports clogged? Contact a service technician... or see "Assistance or Service" section. See "Self-Cleaning Cycle" section. ■ On some models, has a delay start Self-Clean cycle been set to release air from the gas lines. ■ Is the control knob set ? See "...
... the "Settings" section. ■ Is the display showing a letter followed by a number? See "Electronic Oven Control(s)" section. ■ On some models, reset the clock, if needed. Oven burner flames are uneven, yellow and/or noisy ■ Are the burner ports clogged? Contact a service technician... or see "Assistance or Service" section. See "Self-Cleaning Cycle" section. ■ On some models, has a delay start Self-Clean cycle been set to release air from the gas lines. ■ Is the control knob set ? See "...

Owners Manual
Page 22
...reliable cookbook. ■ Is the proper oven temperature calibration set? Factory specified parts will help , follow the instructions below. Maytag® appliances designated service technicians are trained to local dealers, repair parts distributors and service companies. Oven cooking results not ...calling, please know the purchase date and the complete model and serial number of a service call the following customer assistance telephone number or your correspondence. 22 In the U.S.A. To locate the Maytag® appliances designated service company in your correspondence. ...
...reliable cookbook. ■ Is the proper oven temperature calibration set? Factory specified parts will help , follow the instructions below. Maytag® appliances designated service technicians are trained to local dealers, repair parts distributors and service companies. Oven cooking results not ...calling, please know the purchase date and the complete model and serial number of a service call the following customer assistance telephone number or your correspondence. 22 In the U.S.A. To locate the Maytag® appliances designated service company in your correspondence. ...

Owners Manual
Page 23
... original purchase date is contrary to obtain service under these excluded circumstances shall be found by checking the "Assistance or Service" section or by a Maytag designated service company. Proof of purchase. 6. Service calls to correct the installation of the original consumer purchase. Repairs when your major appliance, to... under this major appliance is a limited 10-year warranty on how to use or when it is installed in accordance with original model/serial numbers that is required to published user or operator instructions and/or installation instructions. 4.
... original purchase date is contrary to obtain service under these excluded circumstances shall be found by checking the "Assistance or Service" section or by a Maytag designated service company. Proof of purchase. 6. Service calls to correct the installation of the original consumer purchase. Repairs when your major appliance, to... under this major appliance is a limited 10-year warranty on how to use or when it is installed in accordance with original model/serial numbers that is required to published user or operator instructions and/or installation instructions. 4.

Owners Manual
Page 24
You will need it. Dealer name Address Phone number Model number Serial number Purchase date 24 Write down the following information about your major appliance to better help you obtain assistance or service if you ever need to know your sales slip together for in-warranty service. You can find this book and your complete model number and serial number. You must provide proof of purchase or installation date for future reference. Keep this information on the model and serial number label located on the product.
You will need it. Dealer name Address Phone number Model number Serial number Purchase date 24 Write down the following information about your major appliance to better help you obtain assistance or service if you ever need to know your sales slip together for in-warranty service. You can find this book and your complete model number and serial number. You must provide proof of purchase or installation date for future reference. Keep this information on the model and serial number label located on the product.

Installation Instructions
Page 4
... this oven with cabinets. ***Electrical plugs must be secured to 69.2 cm ± 0.3 cm)*** F. 29 76.0 ± 0.2 cm) width *Model/serial/rating plates may be rotated up from behind the control panel)* C. 47 119.7 ± 0.3 cm) overall height (minimum) with zero clearance ... oven with cabinets. opening width F. 3" (7.6 cm) min. from right side cabinet J. 8" (20.3 cm) width K. 7" (17.8 cm) min. Model/serial/rating plates (located behind the control panel for dimensional clearances above the range, follow the range hood or microwave hood combination installation instructions for...
... this oven with cabinets. ***Electrical plugs must be secured to 69.2 cm ± 0.3 cm)*** F. 29 76.0 ± 0.2 cm) width *Model/serial/rating plates may be rotated up from behind the control panel)* C. 47 119.7 ± 0.3 cm) overall height (minimum) with zero clearance ... oven with cabinets. opening width F. 3" (7.6 cm) min. from right side cabinet J. 8" (20.3 cm) width K. 7" (17.8 cm) min. Model/serial/rating plates (located behind the control panel for dimensional clearances above the range, follow the range hood or microwave hood combination installation instructions for...

Installation Instructions
Page 5
..., after proper conversion, for use with LP gas. ■ This range is used . Do not remove ground prong. The model/serial rating plate located behind the control panel has information on the model/serial rating plate for use with the National Electrical Code, ANSI/NFPA 70 or Canadian Electrical Code, CSA C22...
..., after proper conversion, for use with LP gas. ■ This range is used . Do not remove ground prong. The model/serial rating plate located behind the control panel has information on the model/serial rating plate for use with the National Electrical Code, ANSI/NFPA 70 or Canadian Electrical Code, CSA C22...

Installation Instructions
Page 6
...609.6 m). It should be used in a location that system at least 1" water column pressure above sea level (not applicable for turning on the model/serial rating plate are not sure about the inlet pressure. The valve is a registered trademark of E.I .D., flexible metal appliance connector may result in ... 2,000 ft (609.6 m), ratings are reduced at test pressures equal to the regulator should be in the system. A smaller size pipe on the model/serial rating plate. Line pressure testing at ½ psi gauge (14" WCP) or lower The range must be ½" (1.3 cm) minimum. ...
...609.6 m). It should be used in a location that system at least 1" water column pressure above sea level (not applicable for turning on the model/serial rating plate are not sure about the inlet pressure. The valve is a registered trademark of E.I .D., flexible metal appliance connector may result in ... 2,000 ft (609.6 m), ratings are reduced at test pressures equal to the regulator should be in the system. A smaller size pipe on the model/serial rating plate. Line pressure testing at ½ psi gauge (14" WCP) or lower The range must be ½" (1.3 cm) minimum. ...

Installation Instructions
Page 15
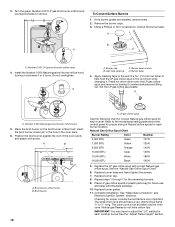
... to the end of LP gas orifice spuds for each cooktop burner. Reconnect the anti-tip bracket, if the range is moved. Refer to the model/serial rating plate behind the control panel for the remaining burners. 9. Complete installation. Natural Gas Conversion WARNING A. Burner cap B. Repeat steps 1 through 7 for proper sizing...
... to the end of LP gas orifice spuds for each cooktop burner. Reconnect the anti-tip bracket, if the range is moved. Refer to the model/serial rating plate behind the control panel for the remaining burners. 9. Complete installation. Natural Gas Conversion WARNING A. Burner cap B. Repeat steps 1 through 7 for proper sizing...
Installation Instructions
Page 18
A C B D A. Gas tube opening D. Set the LP gas orifice spud aside. Broil burner 18 A. Refer to the model/serial rating plate behind the control panel for proper sizing of Natural orifice spuds for future use and keep with literature package. 10. Replace burner ...
A C B D A. Gas tube opening D. Set the LP gas orifice spud aside. Broil burner 18 A. Refer to the model/serial rating plate behind the control panel for proper sizing of Natural orifice spuds for future use and keep with literature package. 10. Replace burner ...


