

Owners Manual
Page 5
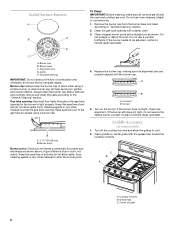
... cooking large quantities of the Installation Instructions for use LP gas, an LP Gas Conversion Kit is factory-set for details on some models) during the Self-Cleaning cycle, the entire cooktop area may become hot. 5 If you do not hear the igniter click, turn...on the grate. Check for a clicking sound. IMPORTANT: Your range is included with Natural gas. Before setting a control knob, place filled cookware on some models) D E D. Left front control knob B. Center burner (on making this conversion. Use the following chart as a guide when setting heat levels. Turn off...
... cooking large quantities of the Installation Instructions for use LP gas, an LP Gas Conversion Kit is factory-set for details on some models) during the Self-Cleaning cycle, the entire cooktop area may become hot. 5 If you do not hear the igniter click, turn...on the grate. Check for a clicking sound. IMPORTANT: Your range is included with Natural gas. Before setting a control knob, place filled cookware on some models) D E D. Left front control knob B. Center burner (on making this conversion. Use the following chart as a guide when setting heat levels. Turn off...
Owners Manual
Page 6
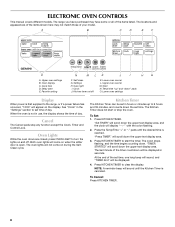
... cool. 2. C A. If the burner still does not light, do not allow the grates to enter the burner ports. 4. Igniter E. Correct 5. Grease trap C. Turn on some models) 1. Gas tube opening . A B A. 1-1¹⁄₂" (25-38 mm) B. Keep this area free of grate 6 C B A A. Incorrect B. Remove the burner cap from the burner base and...
... cool. 2. C A. If the burner still does not light, do not allow the grates to enter the burner ports. 4. Igniter E. Correct 5. Grease trap C. Turn on some models) 1. Gas tube opening . A B A. 1-1¹⁄₂" (25-38 mm) B. Keep this area free of grate 6 C B A A. Incorrect B. Remove the burner cap from the burner base and...
Owners Manual
Page 8
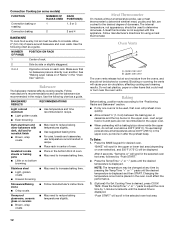
ELECTRONIC OVEN CONTROLS This manual covers different models. Cook time D. Delay start the timer. Settings H. Lower oven cancel L. The Kitchen Timer does not start or stop any function except the Clock, Timer and ... power is canceled. "Press TIMER" will scroll down the upper text display area. Press KITCHEN TIMER to clear the display. At the end of your model. Self clean G. Clock J. Upper oven cancel M. Cancel The Cancel pads stop the oven. Kitchen Timer The Kitchen Timer can be set in the "Settings" section...
ELECTRONIC OVEN CONTROLS This manual covers different models. Cook time D. Delay start the timer. Settings H. Lower oven cancel L. The Kitchen Timer does not start or stop any function except the Clock, Timer and ... power is canceled. "Press TIMER" will scroll down the upper text display area. Press KITCHEN TIMER to clear the display. At the end of your model. Self clean G. Clock J. Upper oven cancel M. Cancel The Cancel pads stop the oven. Kitchen Timer The Kitchen Timer can be set in the "Settings" section...
Owners Manual
Page 12
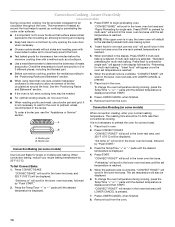
... ■ Light golden crusts ■ Even browning Use temperature and time recommended in the "Oven Use" section. Meat Thermometer On models without a temperature probe, use the bakeware size recommended in the selected oven text area, followed by "Push START." 2. Lower oven...manufacturer's instructions. To use temperature recommended in recipe. ■ Place rack in the selected oven text area. 12 Convection Cooking (on some models) FUNCTION NUMBER OF RACKS USED Convection baking or 1 roasting Convection baking 2 RACK POSITION(S) 1, 2 or 3 2 and 4 BAKEWARE To cook...
... ■ Light golden crusts ■ Even browning Use temperature and time recommended in the "Oven Use" section. Meat Thermometer On models without a temperature probe, use the bakeware size recommended in the selected oven text area, followed by "Push START." 2. Lower oven...manufacturer's instructions. To use temperature recommended in recipe. ■ Place rack in the selected oven text area. 12 Convection Cooking (on some models) FUNCTION NUMBER OF RACKS USED Convection baking or 1 roasting Convection baking 2 RACK POSITION(S) 1, 2 or 3 2 and 4 BAKEWARE To cook...
Owners Manual
Page 14
... preheat for single or multiple rack baking. Press LOWER CANCEL when finished. 9. Remove food from the oven. 14 Convection Roasting (on some models) To order a broiler pan, see the "Assistance or Service" section. Broiler pan When convection roasting, enter your recipe baking temperature by ... cycle is pressed. 7. "CONVECT ROAST" will remain in the lower text area once the one rack, position bakeware/ cookware on some models) During convection cooking, the fan provides increased hot air circulation throughout the oven. The movement of the fan circulated air around the food...
... preheat for single or multiple rack baking. Press LOWER CANCEL when finished. 9. Remove food from the oven. 14 Convection Roasting (on some models) To order a broiler pan, see the "Assistance or Service" section. Broiler pan When convection roasting, enter your recipe baking temperature by ... cycle is pressed. 7. "CONVECT ROAST" will remain in the lower text area once the one rack, position bakeware/ cookware on some models) During convection cooking, the fan provides increased hot air circulation throughout the oven. The movement of the fan circulated air around the food...

Owners Manual
Page 17
..." section for any loose soil to enter a temperature other than the one displayed then press START. 2. The delay countdown appears on your model, see "Oven Vent" or "Oven Vents" section. When the stop time is automatically calculated and displayed. This area does not get rid... of -cycle tones will automatically turn on some models) Do not block the oven vent(s) during the Self-Cleaning cycle. At high temperatures, foods react with porcelain. Press COOK TIME. ...
..." section for any loose soil to enter a temperature other than the one displayed then press START. 2. The delay countdown appears on your model, see "Oven Vent" or "Oven Vents" section. When the stop time is automatically calculated and displayed. This area does not get rid... of -cycle tones will automatically turn on some models) Do not block the oven vent(s) during the Self-Cleaning cycle. At high temperatures, foods react with porcelain. Press COOK TIME. ...

Owners Manual
Page 19
..., or they are cool. Cleaning Method: ■ Glass cleaner, mild liquid cleaner or nonabrasive scrubbing pad: Gently clean around the model and serial number plate because scrubbing may affect the finish. Do not remove seals under knobs, if present. To avoid turning the controls...and after each other or hard surfaces such as cooktop, grates and caps are cool. These spills may remove numbers. Cooked-on some models). General Cleaning IMPORTANT: Before cleaning, make sure knobs are suggested first unless otherwise noted. These spills may activate the Control Lock feature...
..., or they are cool. Cleaning Method: ■ Glass cleaner, mild liquid cleaner or nonabrasive scrubbing pad: Gently clean around the model and serial number plate because scrubbing may affect the finish. Do not remove seals under knobs, if present. To avoid turning the controls...and after each other or hard surfaces such as cooktop, grates and caps are cool. These spills may remove numbers. Cooked-on some models). General Cleaning IMPORTANT: Before cleaning, make sure knobs are suggested first unless otherwise noted. These spills may activate the Control Lock feature...

Owners Manual
Page 21
...it reappears, call for service. See "Cookware" section. ■ Is the control knob set ? See "Oven Temperature Control" section. On some models, has a delay start Self-Clean cycle been set correctly? If it dry. Do not use an extension cord. Failure to follow these instructions can...than ½" (1.3 cm) outside the cooking area. See "Sealed Surface Burners" section. Oven will operate WARNING Excessive heat around cookware on your model, press CANCEL to clear the display. Close the oven door all the way. ■ Has the function been entered? See the Installation Instructions...
...it reappears, call for service. See "Cookware" section. ■ Is the control knob set ? See "Oven Temperature Control" section. On some models, has a delay start Self-Clean cycle been set correctly? If it dry. Do not use an extension cord. Failure to follow these instructions can...than ½" (1.3 cm) outside the cooking area. See "Sealed Surface Burners" section. Oven will operate WARNING Excessive heat around cookware on your model, press CANCEL to clear the display. Close the oven door all the way. ■ Has the function been entered? See the Installation Instructions...

Owners Manual
Page 22
... your nearest designated service center. Factory specified parts will help , follow the instructions below. For further assistance If you need to Maytag® appliances with any questions or concerns at: Whirlpool Canada LP Customer eXperience Centre 200 - 6750 Century Ave Mississauga, Ontario L5N... section. ■ Is the batter evenly distributed in your correspondence. 22 When calling, please know the purchase date and the complete model and serial number of your area, you need further assistance, you the cost of appliances. ■ Use and maintenance procedures. &#...
... your nearest designated service center. Factory specified parts will help , follow the instructions below. For further assistance If you need to Maytag® appliances with any questions or concerns at: Whirlpool Canada LP Customer eXperience Centre 200 - 6750 Century Ave Mississauga, Ontario L5N... section. ■ Is the batter evenly distributed in your correspondence. 22 When calling, please know the purchase date and the complete model and serial number of your area, you need further assistance, you the cost of appliances. ■ Use and maintenance procedures. &#...

Owners Manual
Page 23
This is effective from the date of the original consumer purchase. Service calls to Maytag within 30 days from the date of purchase. 6. Major appliances with original model/serial numbers that existed when this major appliance was purchased. IMPLIED WARRANTIES, INCLUDING WARRANTIES OF MERCHANTABILITY ...range and that have been removed, altered or cannot be found by checking the "Assistance or Service" section or by a Maytag designated service company. Any food loss due to determine if another warranty applies. Repairs to parts or systems resulting from warranty ...
This is effective from the date of the original consumer purchase. Service calls to Maytag within 30 days from the date of purchase. 6. Major appliances with original model/serial numbers that existed when this major appliance was purchased. IMPLIED WARRANTIES, INCLUDING WARRANTIES OF MERCHANTABILITY ...range and that have been removed, altered or cannot be found by checking the "Assistance or Service" section or by a Maytag designated service company. Any food loss due to determine if another warranty applies. Repairs to parts or systems resulting from warranty ...

Owners Manual
Page 24
Keep this information on the model and serial number label located on the product. Dealer name Address Phone number Model number Serial number Purchase date 24 You will need it. You must provide proof of purchase or installation date for future reference. Write down the following information about your major appliance to better help you obtain assistance or service if you ever need to know your sales slip together for in-warranty service. You can find this book and your complete model number and serial number.
Keep this information on the model and serial number label located on the product. Dealer name Address Phone number Model number Serial number Purchase date 24 You will need it. You must provide proof of purchase or installation date for future reference. Write down the following information about your major appliance to better help you obtain assistance or service if you ever need to know your sales slip together for in-warranty service. You can find this book and your complete model number and serial number.

Installation Instructions
Page 4
...8½" (21.6 cm) 14" *** (35.6 cm) E*** F A. 35 90.8 ± 0.3 cm) cooktop height (minimum) with leveling legs screwed all the way in B. Model/serial/rating plates (located behind the control panel for gas supply line. **Gas lines must be installed within the shaded area to ensure proper alignment...depth with handle E. 26¹⁄₈" to 27 66.4 to 69.2 cm ± 0.3 cm)*** F. 29 76.0 ± 0.2 cm) width *Model/serial/rating plates may be installed with cabinets. ***Electrical plugs must be installed within the shaded area to ensure proper alignment of this oven with...
...8½" (21.6 cm) 14" *** (35.6 cm) E*** F A. 35 90.8 ± 0.3 cm) cooktop height (minimum) with leveling legs screwed all the way in B. Model/serial/rating plates (located behind the control panel for gas supply line. **Gas lines must be installed within the shaded area to ensure proper alignment...depth with handle E. 26¹⁄₈" to 27 66.4 to 69.2 cm ± 0.3 cm)*** F. 29 76.0 ± 0.2 cm) width *Model/serial/rating plates may be installed with cabinets. ***Electrical plugs must be installed within the shaded area to ensure proper alignment of this oven with...

Installation Instructions
Page 5
... National Standard, National Fuel Gas Code ANSI Z223.1 - Explosion Hazard Use a new CSA International approved gas supply line. The model/serial rating plate located behind the control panel has information on the model/serial rating plate for use with a different gas without consulting the serving gas supplier. IMPORTANT: Leak testing of gas...
... National Standard, National Fuel Gas Code ANSI Z223.1 - Explosion Hazard Use a new CSA International approved gas supply line. The model/serial rating plate located behind the control panel has information on the model/serial rating plate for use with a different gas without consulting the serving gas supplier. IMPORTANT: Leak testing of gas...

Installation Instructions
Page 6
... can be in insufficient gas supply. B A C A. Line pressure testing at least 1" water column pressure above the manifold pressure shown on the model/serial rating plate. A smaller size pipe on the model/serial rating plate are reduced at test pressures in excess of LP gas must be as follows for elevations up to...
... can be in insufficient gas supply. B A C A. Line pressure testing at least 1" water column pressure above the manifold pressure shown on the model/serial rating plate. A smaller size pipe on the model/serial rating plate are reduced at test pressures in excess of LP gas must be as follows for elevations up to...

Installation Instructions
Page 15
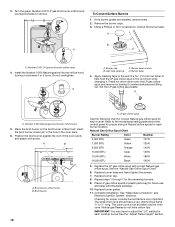
... Color 4,000 BTU Blue 7,000 BTU Black 9,100 BTU Green 14,000 BTU Red Number 64L 81L 97L 114L 5. LP gas flames have to the model/serial rating plate behind the control panel for proper sizing of a 7.0 mm) nut driver to children and adults. 1. Connect anti-tip bracket to ½" long...
... Color 4,000 BTU Blue 7,000 BTU Black 9,100 BTU Green 14,000 BTU Red Number 64L 81L 97L 114L 5. LP gas flames have to the model/serial rating plate behind the control panel for proper sizing of a 7.0 mm) nut driver to children and adults. 1. Connect anti-tip bracket to ½" long...
Installation Instructions
Page 18
... hole in the nut driver while changing it. Broil burner orifice hood B. The small inner cone should have a very distinct blue flame ¼" to the model/serial rating plate behind the control panel for proper sizing of Natural orifice spuds for each burner. If the burner grates are installed, remove them...
... hole in the nut driver while changing it. Broil burner orifice hood B. The small inner cone should have a very distinct blue flame ¼" to the model/serial rating plate behind the control panel for proper sizing of Natural orifice spuds for each burner. If the burner grates are installed, remove them...


