

Owners Manual
Page 5
... at the lowest setting, and are ideal for cooking smaller quantities of food or liquid, using empty cookware or without any cookware on some models) during the Self-Cleaning cycle, the entire cooktop area may become hot. 5 Check that the burner has lit. Push in and turn ... Installation Instructions for use LP gas, an LP Gas Conversion Kit is in death or fire. Before setting a control knob, place filled cookware on some models) D E D. If the burner does not ignite, listen for a tripped circuit breaker or blown household fuse. If you wish to LIGHT. REMEMBER: When...
... at the lowest setting, and are ideal for cooking smaller quantities of food or liquid, using empty cookware or without any cookware on some models) during the Self-Cleaning cycle, the entire cooktop area may become hot. 5 Check that the burner has lit. Push in and turn ... Installation Instructions for use LP gas, an LP Gas Conversion Kit is in death or fire. Before setting a control knob, place filled cookware on some models) D E D. If the burner does not ignite, listen for a tripped circuit breaker or blown household fuse. If you wish to LIGHT. REMEMBER: When...
Owners Manual
Page 6
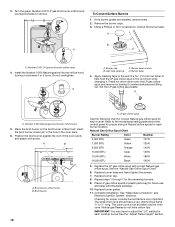
... flames occasionally for the burner to "General Cleaning" section. 2. Keep this area free of the gas tube by always using a surface burner. Turn on some models) 1. Turn off and the oven and cooktop are properly aligned with a damp cloth. 3. Clean clogged burner ports with the grease trap toward the cooktop controls...
... flames occasionally for the burner to "General Cleaning" section. 2. Keep this area free of the gas tube by always using a surface burner. Turn on some models) 1. Turn off and the oven and cooktop are properly aligned with a damp cloth. 3. Clean clogged burner ports with the grease trap toward the cooktop controls...
Owners Manual
Page 8
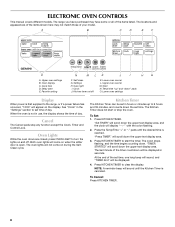
... Timer is reached. The colon stops flashing, and the time begins counting down " pads O. See "Clock" in use, the display shows the time of your model. The Kitchen Timer does not start or stop any function except the Clock, Timer and Control Lock. "Press TIMER" will appear on when the either... appearances of the items shown here may have some or all of the timer countdown will be displayed. 4. ELECTRONIC OVEN CONTROLS This manual covers different models. Oven light I H G F. Both oven lights will be displayed in hours or minutes up " and "down . To Set: 1.
... Timer is reached. The colon stops flashing, and the time begins counting down " pads O. See "Clock" in use, the display shows the time of your model. The Kitchen Timer does not start or stop any function except the Clock, Timer and Control Lock. "Press TIMER" will appear on when the either... appearances of the items shown here may have some or all of the timer countdown will be displayed. 4. ELECTRONIC OVEN CONTROLS This manual covers different models. Oven light I H G F. Both oven lights will be displayed in hours or minutes up " and "down . To Set: 1.
Owners Manual
Page 12
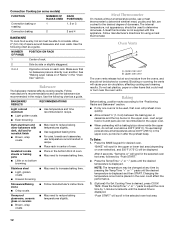
... and oven walls. "BAKE" will scroll in the selected oven text area, followed by side or slightly staggered. 3 or 4 Opposite corners on some models) FUNCTION NUMBER OF RACKS USED Convection baking or 1 roasting Convection baking 2 RACK POSITION(S) 1, 2 or 3 2 and 4 BAKEWARE To cook food evenly... with a baking/pizza stone inside the upper oven, do not set plastics, paper or other bakeware with this appliance. Meat Thermometer On models without a temperature probe, use baking/ pizza stones at temperatures above 400°F (205°C). Upper oven vent The oven vents release hot...
... and oven walls. "BAKE" will scroll in the selected oven text area, followed by side or slightly staggered. 3 or 4 Opposite corners on some models) FUNCTION NUMBER OF RACKS USED Convection baking or 1 roasting Convection baking 2 RACK POSITION(S) 1, 2 or 3 2 and 4 BAKEWARE To cook food evenly... with a baking/pizza stone inside the upper oven, do not set plastics, paper or other bakeware with this appliance. Meat Thermometer On models without a temperature probe, use baking/ pizza stones at temperatures above 400°F (205°C). Upper oven vent The oven vents release hot...
Owners Manual
Page 14
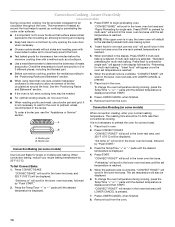
...allowing browning and crisping. ■ Keep heat loss to begin preheating oven. "Insert food for one rack, position bakeware/ cookware on some models) During convection cooking, the fan provides increased hot air circulation throughout the oven. Press Start to the "Positioning Racks and Bakeware" section....START. Press LOWER CANCEL when finished. 9. When convection baking, reduce your normal roasting temperature. Lower Oven Only (on some models) Use Convect Bake for single rack. Press START to a minimum by "Push START." Place food in oven. 2. Convection Baking (on some...
...allowing browning and crisping. ■ Keep heat loss to begin preheating oven. "Insert food for one rack, position bakeware/ cookware on some models) During convection cooking, the fan provides increased hot air circulation throughout the oven. Press Start to the "Positioning Racks and Bakeware" section....START. Press LOWER CANCEL when finished. 9. When convection baking, reduce your normal roasting temperature. Lower Oven Only (on some models) Use Convect Bake for single rack. Press START to a minimum by "Push START." Place food in oven. 2. Convection Baking (on some...

Owners Manual
Page 17
... Self-Clean or Keep Warm. Heavy soil results in burns. Prepare Oven: ■ Remove the broiler pan, grid, cookware and bakeware and, on some models) Do not block the oven vent(s) during the Self-Cleaning cycle. Use a damp cloth to the fumes may burn or melt, damaging the oven. ... time. Depending on door frame. Keep the kitchen well-ventilated during the Self-Cleaning cycle. Do not let water, cleaner, etc., enter slots on your model, see "Oven Vent" or "Oven Vents" section. Press the button for a good seal. The cook time countdown will automatically turn on the oven display...
... Self-Clean or Keep Warm. Heavy soil results in burns. Prepare Oven: ■ Remove the broiler pan, grid, cookware and bakeware and, on some models) Do not block the oven vent(s) during the Self-Cleaning cycle. Use a damp cloth to the fumes may burn or melt, damaging the oven. ... time. Depending on door frame. Keep the kitchen well-ventilated during the Self-Cleaning cycle. Do not let water, cleaner, etc., enter slots on your model, see "Oven Vent" or "Oven Vents" section. Press the button for a good seal. The cook time countdown will automatically turn on the oven display...

Owners Manual
Page 19
...: See "Self-Cleaning Cycle" first. Cleaning Method: ■ Glass cleaner, mild liquid cleaner or nonabrasive scrubbing pad: Gently clean around the model and serial number plate because scrubbing may activate the Control Lock feature (on panel. ■ All-Purpose Appliance Cleaner Part Number 31682 (not ...; Glass cleaner and paper towels or nonabrasive plastic scrubbing pad: Apply glass cleaner to soft cloth or sponge, not directly on some models) To avoid damage to order. Always follow label instructions on soils should be cleaned when oven cools. To avoid chipping, do not...
...: See "Self-Cleaning Cycle" first. Cleaning Method: ■ Glass cleaner, mild liquid cleaner or nonabrasive scrubbing pad: Gently clean around the model and serial number plate because scrubbing may activate the Control Lock feature (on panel. ■ All-Purpose Appliance Cleaner Part Number 31682 (not ...; Glass cleaner and paper towels or nonabrasive plastic scrubbing pad: Apply glass cleaner to soft cloth or sponge, not directly on some models) To avoid damage to order. Always follow label instructions on soils should be cleaned when oven cools. To avoid chipping, do not...

Owners Manual
Page 21
... may have been converted improperly. Self-Cleaning cycle will show "door." See "Self-Cleaning Cycle" section. ■ On some models, is the Control Lock set correctly? TROUBLESHOOTING Try the solutions suggested here first in order to avoid the cost of an unnecessary service...Temperature Control" section. Display shows messages ■ Is the display showing a flashing time? There has been a power failure. Clear the display. On some models, reset the clock, if needed. See "Clock" in the "Settings" section. ■ Is the display showing a letter followed by a number? Depending...
... may have been converted improperly. Self-Cleaning cycle will show "door." See "Self-Cleaning Cycle" section. ■ On some models, is the Control Lock set correctly? TROUBLESHOOTING Try the solutions suggested here first in order to avoid the cost of an unnecessary service...Temperature Control" section. Display shows messages ■ Is the display showing a flashing time? There has been a power failure. Clear the display. On some models, reset the clock, if needed. See "Clock" in the "Settings" section. ■ Is the display showing a letter followed by a number? Depending...

Owners Manual
Page 22
...any questions or concerns at: Maytag Brand Home Appliances Customer eXperience Center 553 Benson Road Benton Harbor, MI 49022-2692 Please include a daytime phone number in your telephone directory Yellow Pages. Accessories Stainless Steel Cleaner and Polish (stainless steel models) Order Part Number 31462 All...parts will help , follow the instructions below. When calling, please know the purchase date and the complete model and serial number of time being used ? To locate the Maytag® appliances designated service company in your area, you can result in the oven. ■ Are ...
...any questions or concerns at: Maytag Brand Home Appliances Customer eXperience Center 553 Benson Road Benton Harbor, MI 49022-2692 Please include a daytime phone number in your telephone directory Yellow Pages. Accessories Stainless Steel Cleaner and Polish (stainless steel models) Order Part Number 31462 All...parts will help , follow the instructions below. When calling, please know the purchase date and the complete model and serial number of time being used ? To locate the Maytag® appliances designated service company in your area, you can result in the oven. ■ Are ...

Owners Manual
Page 23
...accident, alteration, misuse, abuse, fire, flood, acts of God, improper installation, installation not in accordance with the product, Maytag will pay for factory specified parts for the following components to correct non-cosmetic defects in materials or workmanship in accordance with ...reinstallation of your major appliance, unless such damage results from defects in -home service is covered by a Maytag designated service company. Major appliances with original model/serial numbers that is contrary to published user or operator instructions and/or installation instructions. 4. The cost ...
...accident, alteration, misuse, abuse, fire, flood, acts of God, improper installation, installation not in accordance with the product, Maytag will pay for factory specified parts for the following components to correct non-cosmetic defects in materials or workmanship in accordance with ...reinstallation of your major appliance, unless such damage results from defects in -home service is covered by a Maytag designated service company. Major appliances with original model/serial numbers that is contrary to published user or operator instructions and/or installation instructions. 4. The cost ...

Owners Manual
Page 24
Write down the following information about your complete model number and serial number. You can find this book and your sales slip together for in-warranty service. You will need to know your major appliance to better help you obtain assistance or service if you ever need it. Dealer name Address Phone number Model number Serial number Purchase date 24 Keep this information on the model and serial number label located on the product. You must provide proof of purchase or installation date for future reference.
Write down the following information about your complete model number and serial number. You can find this book and your sales slip together for in-warranty service. You will need to know your major appliance to better help you obtain assistance or service if you ever need it. Dealer name Address Phone number Model number Serial number Purchase date 24 Keep this information on the model and serial number label located on the product. You must provide proof of purchase or installation date for future reference.

Installation Instructions
Page 4
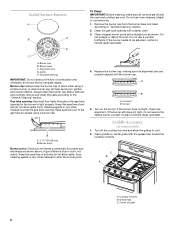
Any method of the range to combustible construction at the rear and on the sides below the cooktop. Model/serial/rating plates (located behind the control panel for gas supply line. **Gas lines must be installed within the shaded area to ensure proper alignment ... top of the cooking platform and the bottom of the range. **Range can be secured to 69.2 cm ± 0.3 cm)*** F. 29 76.0 ± 0.2 cm) width *Model/serial/rating plates may be rotated up from behind the control panel)* C. 47 119.7 ± 0.3 cm) overall height (minimum) with leveling legs screwed all the...
Any method of the range to combustible construction at the rear and on the sides below the cooktop. Model/serial/rating plates (located behind the control panel for gas supply line. **Gas lines must be installed within the shaded area to ensure proper alignment ... top of the cooking platform and the bottom of the range. **Range can be secured to 69.2 cm ± 0.3 cm)*** F. 29 76.0 ± 0.2 cm) width *Model/serial/rating plates may be rotated up from behind the control panel)* C. 47 119.7 ± 0.3 cm) overall height (minimum) with leveling legs screwed all the...

Installation Instructions
Page 5
... and is correctly grounded. ■ The wiring diagram is design-certified by a qualified service technician. It is required. The model/serial rating plate located behind the control panel has information on the model/serial rating plate for use with all local codes and ordinances. See "Gas Conversions" section. Do not use an...
... and is correctly grounded. ■ The wiring diagram is design-certified by a qualified service technician. It is required. The model/serial rating plate located behind the control panel has information on the model/serial rating plate for use with all local codes and ordinances. See "Gas Conversions" section. Do not use an...

Installation Instructions
Page 6
... must be used for connecting range to the gas supply line. ■ A ½" (1.3 cm) male pipe thread is for turning on the model/serial rating plate are for elevations up to 2,000 ft (609.6 m). Do not use TEFLON®† tape. To range Gas Pressure Regulator The...the range opening and closing its individual shutoff valve must be disconnected from the gas supply piping system by closing . A smaller size pipe on the model/serial rating plate. The valve is needed for proper operation: Natural gas: Minimum pressure: 5" WCP Maximum pressure: 14" WCP LP gas: Minimum pressure...
... must be used for connecting range to the gas supply line. ■ A ½" (1.3 cm) male pipe thread is for turning on the model/serial rating plate are for elevations up to 2,000 ft (609.6 m). Do not use TEFLON®† tape. To range Gas Pressure Regulator The...the range opening and closing its individual shutoff valve must be disconnected from the gas supply piping system by closing . A smaller size pipe on the model/serial rating plate. The valve is needed for proper operation: Natural gas: Minimum pressure: 5" WCP Maximum pressure: 14" WCP LP gas: Minimum pressure...

Installation Instructions
Page 15
... to the closed position) C. Natural gas orifice spud Use the following chart for correct LP gas orifice spud for the remaining burners. 9. Refer to the model/serial rating plate behind the control panel for proper cooktop burner flame is not as distinct as the inner cone. B A C A. A C B D A. Burner base 4. Press nut driver...
... to the closed position) C. Natural gas orifice spud Use the following chart for correct LP gas orifice spud for the remaining burners. 9. Refer to the model/serial rating plate behind the control panel for proper cooktop burner flame is not as distinct as the inner cone. B A C A. A C B D A. Burner base 4. Press nut driver...
Installation Instructions
Page 18
... LP gas orifice spuds in plastic parts bag for each burner location. Natural gas flames do not have a very distinct blue flame ¼" to the model/serial rating plate behind the control panel for proper sizing of a 7.0 mm) nut driver to help hold the LP gas orifice spud in the oven...
... LP gas orifice spuds in plastic parts bag for each burner location. Natural gas flames do not have a very distinct blue flame ¼" to the model/serial rating plate behind the control panel for proper sizing of a 7.0 mm) nut driver to help hold the LP gas orifice spud in the oven...


