
Owners Manual
Page 14
... Roasting (on some models) To order a broiler pan, see the "Assistance or Service" section. Broiler grid B. Place food in 2 or 3 different places, including the thickest part. 5. "Set temp or" will be displayed. "CONVECT BAKE" will scroll in the lower text area, and 325°F (163°C) will scroll in the lower...
... Roasting (on some models) To order a broiler pan, see the "Assistance or Service" section. Broiler grid B. Place food in 2 or 3 different places, including the thickest part. 5. "Set temp or" will be displayed. "CONVECT BAKE" will scroll in the lower text area, and 325°F (163°C) will scroll in the lower...

Owners Manual
Page 19
... water and dry with soft, lint-free cloth. These spills may affect the finish. Cooked-on panel. ■ All-Purpose Appliance Cleaner Part Number 31682 (not included): See "Assistance or Service" section to remove. At high temperatures, foods react with mild dishwashing detergent and warm...on cleaning products. Cleaning Method: ■ Self-Cleaning cycle: See "Self-Cleaning Cycle" first. ■ Gas Grate and Drip Pan Cleaner Part Number 31617: See "Assistance or Service" section to stainless steel surfaces, do not soak knobs. Always follow label instructions on panel. ■ ...
... water and dry with soft, lint-free cloth. These spills may affect the finish. Cooked-on panel. ■ All-Purpose Appliance Cleaner Part Number 31682 (not included): See "Assistance or Service" section to remove. At high temperatures, foods react with mild dishwashing detergent and warm...on cleaning products. Cleaning Method: ■ Self-Cleaning cycle: See "Self-Cleaning Cycle" first. ■ Gas Grate and Drip Pan Cleaner Part Number 31617: See "Assistance or Service" section to stainless steel surfaces, do not soak knobs. Always follow label instructions on panel. ■ ...

Owners Manual
Page 22
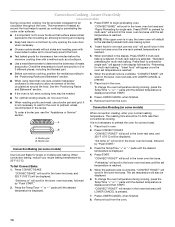
... fulfill the product warranty and provide after -warranty service, anywhere in your appliance. To locate factory specified parts in Canada. In the U.S.A. Maytag® appliances designated service technicians are trained to fulfill the product warranty and provide after -warranty service, ...Features and specifications on our full line of appliances. ■ Use and maintenance procedures. ■ Accessory and repair parts sales. ■ Referrals to Maytag® appliances with any questions or concerns at : Whirlpool Canada LP Customer eXperience Centre 200 - 6750 Century Ave...
... fulfill the product warranty and provide after -warranty service, anywhere in your appliance. To locate factory specified parts in Canada. In the U.S.A. Maytag® appliances designated service technicians are trained to fulfill the product warranty and provide after -warranty service, ...Features and specifications on our full line of appliances. ■ Use and maintenance procedures. ■ Accessory and repair parts sales. ■ Referrals to Maytag® appliances with any questions or concerns at : Whirlpool Canada LP Customer eXperience Centre 200 - 6750 Century Ave...

Owners Manual
Page 23
...to the finish of your major appliance, unless such damage results from the date of purchase. 6. MAYTAG® GAS RANGE LIMITED WARRANTY FIRST YEAR LIMITED WARRANTY (PARTS AND LABOR) For one year from the date of purchase, when this major appliance is installed, ... service, first see the "Troubleshooting" section of consumables or cleaning products not approved by calling Maytag. SECOND THROUGH TENTH YEAR LIMITED WARRANTY (CERTAIN COMPONENT PARTS ONLY - Consumable parts are unable to obtain service under these excluded circumstances shall be provided by this major appliance was...
...to the finish of your major appliance, unless such damage results from the date of purchase. 6. MAYTAG® GAS RANGE LIMITED WARRANTY FIRST YEAR LIMITED WARRANTY (PARTS AND LABOR) For one year from the date of purchase, when this major appliance is installed, ... service, first see the "Troubleshooting" section of consumables or cleaning products not approved by calling Maytag. SECOND THROUGH TENTH YEAR LIMITED WARRANTY (CERTAIN COMPONENT PARTS ONLY - Consumable parts are unable to obtain service under these excluded circumstances shall be provided by this major appliance was...

Installation Instructions
Page 3
... - #12 x 1⁵⁄₈" screws (for Mobile Home Construction and Safety, Title 24, HUD Part 280). INSTALLATION REQUIREMENTS Tools and Parts Gather the required tools and parts before starting installation. Do not obstruct flow of Saturn Fasteners, Inc. See "Electrical Requirements" section. ■.... Thickness of this range must be located for Manufactured Home Installations, ANSI A225.1/NFPA 501A or with your local hardware store. Parts needed ■ Tape measure 3.2 mm) drill bit ■ Phillips screwdriver ■ Marker or pencil ■ Torx†...
... - #12 x 1⁵⁄₈" screws (for Mobile Home Construction and Safety, Title 24, HUD Part 280). INSTALLATION REQUIREMENTS Tools and Parts Gather the required tools and parts before starting installation. Do not obstruct flow of Saturn Fasteners, Inc. See "Electrical Requirements" section. ■.... Thickness of this range must be located for Manufactured Home Installations, ANSI A225.1/NFPA 501A or with your local hardware store. Parts needed ■ Tape measure 3.2 mm) drill bit ■ Phillips screwdriver ■ Marker or pencil ■ Torx†...
Installation Instructions
Page 7
...-tip bracket to remove. 6. Adjust the leveling legs to a maximum of cardboard or hardboard in cutout so that there is moved. Remove oven racks and parts package from the range. Place them lengthwise on the floor behind the range to move and install range. Using 2 or more people to support the...
...-tip bracket to remove. 6. Adjust the leveling legs to a maximum of cardboard or hardboard in cutout so that there is moved. Remove oven racks and parts package from the range. Place them lengthwise on the floor behind the range to move and install range. Using 2 or more people to support the...

Installation Instructions
Page 9
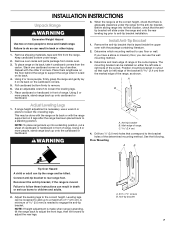
... leg is indicated. Place rack in death, fire, or electrical shock. 4. WARNING Electrical Shock Hazard Plug into its final location. 3. Remove cardboard or hardboard from parts package. NOTE: Range must be level when properly positioned. When the cooktop control knob is turned to the "LITE" position. This sparking continues, as long...
... leg is indicated. Place rack in death, fire, or electrical shock. 4. WARNING Electrical Shock Hazard Plug into its final location. 3. Remove cardboard or hardboard from parts package. NOTE: Range must be level when properly positioned. When the cooktop control knob is turned to the "LITE" position. This sparking continues, as long...
Installation Instructions
Page 11
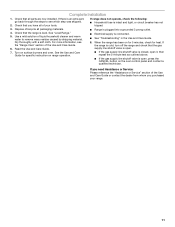
... solution of liquid household cleaner and warm water to see the "Range Care" section of the Use and Care Guide. 6. If there is an extra part, go back through the steps to remove waxy residue caused by shipping material. Check that the range is open it, then repeat the 5-minute test... Check that you purchased your tools. Read the Use and Care Guide. 7. If the range is cold, turn off the range and check that all parts are now installed. Dispose of/recycle all of the Use and Care Guide or contact the dealer from whom you have all packaging materials. 4. Check...
... solution of liquid household cleaner and warm water to see the "Range Care" section of the Use and Care Guide. 6. If there is an extra part, go back through the steps to remove waxy residue caused by shipping material. Check that the range is open it, then repeat the 5-minute test... Check that you purchased your tools. Read the Use and Care Guide. 7. If the range is cold, turn off the range and check that all parts are now installed. Dispose of/recycle all of the Use and Care Guide or contact the dealer from whom you have all packaging materials. 4. Check...

Installation Instructions
Page 15
... the correct LP gas orifice spud. The small inner cone should have to ½" long. Tip Over Hazard A child or adult can result in plastic parts bag for proper cooktop burner flame is very important. Shutoff valve (closed position. If the burner grates are installed, remove them. 2. Set the Natural gas...
... the correct LP gas orifice spud. The small inner cone should have to ½" long. Tip Over Hazard A child or adult can result in plastic parts bag for proper cooktop burner flame is very important. Shutoff valve (closed position. If the burner grates are installed, remove them. 2. Set the Natural gas...
Installation Instructions
Page 18
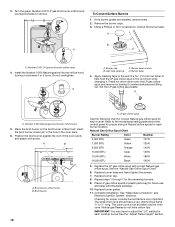
...® screwdriver, remove the burner base. Number 0.037 LP gas broil burner orifice hood 4. Insert the broil burner locator pin in the hole in plastic parts bag for each cooktop burner See the "Adjust Flame Height" section. Position the broil burner against the roof of a 7.0 mm) nut driver to ½" long...
...® screwdriver, remove the burner base. Number 0.037 LP gas broil burner orifice hood 4. Insert the broil burner locator pin in the hole in plastic parts bag for each cooktop burner See the "Adjust Flame Height" section. Position the broil burner against the roof of a 7.0 mm) nut driver to ½" long...


