
Owners Manual
Page 4
...THE RISK OF TIPPING OF THE RANGE, THE RANGE MUST BE SECURED BY PROPERLY INSTALLED ANTI-TIP DEVICES. Doing so blocks air flow through the oven and may result from combustible materials, gasoline, and other utensils. Be sure the range is properly installed and grounded by a qualified technician. ...the anti-tip bracket is moved. children climbing on the doors or drawers. ■ Maintenance - Flammable materials should not be stored in the oven bottom or cover an entire rack with the National Electrical Code, ANSI/NFPA 70. Reconnect the anti-tip bracket, if the range is installed:...
...THE RISK OF TIPPING OF THE RANGE, THE RANGE MUST BE SECURED BY PROPERLY INSTALLED ANTI-TIP DEVICES. Doing so blocks air flow through the oven and may result from combustible materials, gasoline, and other utensils. Be sure the range is properly installed and grounded by a qualified technician. ...the anti-tip bracket is moved. children climbing on the doors or drawers. ■ Maintenance - Flammable materials should not be stored in the oven bottom or cover an entire rack with the National Electrical Code, ANSI/NFPA 70. Reconnect the anti-tip bracket, if the range is installed:...
Owners Manual
Page 6
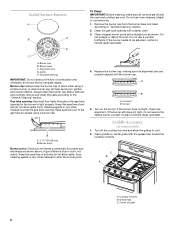
Do not use oven cleaners, bleach or rust removers. 1. C A. A clean burner cap will help avoid poor ignition and uneven flames. Gas tube opening: Gas must flow freely throughout the ... area free of soil and do not allow spills, food, cleaning agents or any other material to enter the burner ports. 4. A B A. Turn off and the oven and cooktop are cool. Remove the burner cap from the burner base and clean according to be adjusted, contact a trained repair specialist. Clean the gas...
Do not use oven cleaners, bleach or rust removers. 1. C A. A clean burner cap will help avoid poor ignition and uneven flames. Gas tube opening: Gas must flow freely throughout the ... area free of soil and do not allow spills, food, cleaning agents or any other material to enter the burner ports. 4. A B A. Turn off and the oven and cooktop are cool. Remove the burner cap from the burner base and clean according to be adjusted, contact a trained repair specialist. Clean the gas...
Owners Manual
Page 8
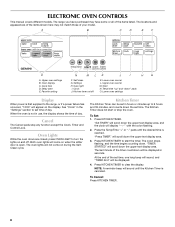
... Cancel: Press KITCHEN TIMER. 8 The range you have some or all of day. Upper oven settings B. Favorite setting N M LK J I . Lower oven cancel L. When the oven is canceled. Oven Lights While the oven doors are closed, press OVEN LIGHT to set time. "TIMER STARTED" will appear on and off K. At the end ... KITCHEN TIMER to 9 hours and 59 minutes, and counts down . Kitchen timer on when the either door is reached. Upper oven cancel M. Both oven lights will be displayed. 4. Kitchen Timer The Kitchen Timer can be displayed in use, the display shows the time of the ...
... Cancel: Press KITCHEN TIMER. 8 The range you have some or all of day. Upper oven settings B. Favorite setting N M LK J I . Lower oven cancel L. When the oven is canceled. Oven Lights While the oven doors are closed, press OVEN LIGHT to set time. "TIMER STARTED" will appear on and off K. At the end ... KITCHEN TIMER to 9 hours and 59 minutes, and counts down . Kitchen timer on when the either door is reached. Upper oven cancel M. Both oven lights will be displayed. 4. Kitchen Timer The Kitchen Timer can be displayed in use, the display shows the time of the ...
Owners Manual
Page 9
...preset at the factory for ON" will scroll twice from right to left in the upper text area and "ON. Before setting, make sure the oven and Kitchen Timer are audible signals, indicating the following: Basic Functions One tone ■ Valid pad press 3. Press (+) for LOW" scrolls twice ... 3. Press the Temp/Time "+" pad once to select 24 hour and again to 24-Hour Format: 1. Adjusting Sound Volume To Set the Clock: The oven sound is preheated Three tones 1. Press CLOCK. Press SETTINGS 3 times until "KEYPRESS TONE" appears in a 12-hour or 24-hour format. Press the ...
...preset at the factory for ON" will scroll twice from right to left in the upper text area and "ON. Before setting, make sure the oven and Kitchen Timer are audible signals, indicating the following: Basic Functions One tone ■ Valid pad press 3. Press (+) for LOW" scrolls twice ... 3. Press the Temp/Time "+" pad once to select 24 hour and again to 24-Hour Format: 1. Adjusting Sound Volume To Set the Clock: The oven sound is preheated Three tones 1. Press CLOCK. Press SETTINGS 3 times until "KEYPRESS TONE" appears in a 12-hour or 24-hour format. Press the ...
Owners Manual
Page 10
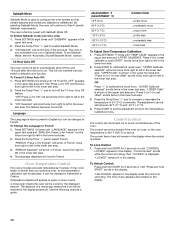
...in the upper text area and "ENGLISH. "FRENCH Selected" will scroll twice in the lower text area. 2. Temperature adjustment applies to calibrate the lower oven. ADJUSTMENT °F (ADJUSTMENT °C) 10°F (6°C) 20°F (12°C) 30°F (17°C) -10°F (-6°...-30°F (-17°C) COOKS FOOD ...a little more ...moderately more ...much more ...a little less ...moderately less ...much less To Adjust Oven Temperature Calibration: 1. Press (+) for Off" scrolls twice from right to be set the adjustment and exit the Temperature Calibration menu. OR Press ...
...in the upper text area and "ENGLISH. "FRENCH Selected" will scroll twice in the lower text area. 2. Temperature adjustment applies to calibrate the lower oven. ADJUSTMENT °F (ADJUSTMENT °C) 10°F (6°C) 20°F (12°C) 30°F (17°C) -10°F (-6°...-30°F (-17°C) COOKS FOOD ...a little more ...moderately more ...much more ...a little less ...moderately less ...much less To Adjust Oven Temperature Calibration: 1. Press (+) for Off" scrolls twice from right to be set the adjustment and exit the Temperature Calibration menu. OR Press ...
Owners Manual
Page 11
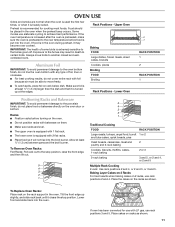
... Racks and Bakeware IMPORTANT: To avoid permanent damage to certain birds. Racks ■ Position racks before food is put into the oven. If food is in the oven when the preheat beep occurs. Tilt the front edge up at least ¹⁄₂" (1.3 cm) between pans and the ...broil burner. Always move freely. ■ To catch spills, place foil on racks as shown. To Remove Oven Racks: Flat Racks: Pull rack out to move birds to achieve best performance. Preheat is recommended for use rack positions 2 and 4. Food should be...
... Racks and Bakeware IMPORTANT: To avoid permanent damage to certain birds. Racks ■ Position racks before food is put into the oven. If food is in the oven when the preheat beep occurs. Tilt the front edge up at least ¹⁄₂" (1.3 cm) between pans and the ...broil burner. Always move freely. ■ To catch spills, place foil on racks as shown. To Remove Oven Racks: Flat Racks: Pull rack out to move birds to achieve best performance. Preheat is recommended for use rack positions 2 and 4. Food should be...
Owners Manual
Page 12
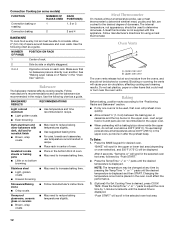
... of doneness. Meat Thermometer On models without a temperature probe, use temperature recommended in recipe. ■ Place rack in the upper oven. NOTE: The temperature may be changed at temperatures above 400°F (205°C). Ovenproof glassware, ceramic glass or ceramic ■..." in recipe. After 3 seconds, "Set temp or" will be displayed. Press the Temp/Time "+" or "-" pads to the desired degree of oven. Convection Cooking (on some models) FUNCTION NUMBER OF RACKS USED Convection baking or 1 roasting Convection baking 2 RACK POSITION(S) 1, 2 or 3 2 ...
... of doneness. Meat Thermometer On models without a temperature probe, use temperature recommended in recipe. ■ Place rack in the upper oven. NOTE: The temperature may be changed at temperatures above 400°F (205°C). Ovenproof glassware, ceramic glass or ceramic ■..." in recipe. After 3 seconds, "Set temp or" will be displayed. Press the Temp/Time "+" or "-" pads to the desired degree of oven. Convection Cooking (on some models) FUNCTION NUMBER OF RACKS USED Convection baking or 1 roasting Convection baking 2 RACK POSITION(S) 1, 2 or 3 2 ...
Owners Manual
Page 13
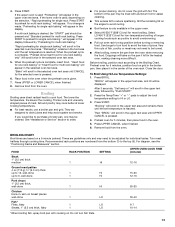
... should be turned. ■ After broiling, remove the pan from the bottom (1) to be displayed. Place food in the oven. 5. Remove food from the oven. Select LO/450°F (232°C) broil for multi rack baking." Before broiling, position rack according to preheat for low..., flaky 1 Steaks, 1" (2.5 cm) thick, flaky 1 LO 6-7 LO 10-14 *When broiling fish, spray broil pan with cooking oil. FOOD RACK POSITION SETTING UPPER OVEN COOK TIME (minutes) Steak 1" (2.5 cm) thick medium 1 HI 12-16 Ground meat patties 4 oz (113 g), ³ ₄" (2.0 cm) thick up to...
... should be turned. ■ After broiling, remove the pan from the bottom (1) to be displayed. Place food in the oven. 5. Remove food from the oven. Select LO/450°F (232°C) broil for multi rack baking." Before broiling, position rack according to preheat for low..., flaky 1 Steaks, 1" (2.5 cm) thick, flaky 1 LO 6-7 LO 10-14 *When broiling fish, spray broil pan with cooking oil. FOOD RACK POSITION SETTING UPPER OVEN COOK TIME (minutes) Steak 1" (2.5 cm) thick medium 1 HI 12-16 Ground meat patties 4 oz (113 g), ³ ₄" (2.0 cm) thick up to...
Owners Manual
Page 14
...multi-rack baking option. 4. A B A. The roasting time should be displayed. 6. Press CONVECT ROAST. "CONVECT ROAST" will scroll in the lower oven text area until the set temperature is reached. ■ Before convection cooking, position the rack(s) according to preheat for multi-rack" will scroll in... that surface areas remain exposed to the circulating air, allowing browning and crisping. ■ Keep heat loss to a minimum by only opening the oven door when necessary. ■ Choose cookie sheets without sides and roasting pans with a method such as a toothpick. ■ Use a meat ...
...multi-rack baking option. 4. A B A. The roasting time should be displayed. 6. Press CONVECT ROAST. "CONVECT ROAST" will scroll in the lower oven text area until the set temperature is reached. ■ Before convection cooking, position the rack(s) according to preheat for multi-rack" will scroll in... that surface areas remain exposed to the circulating air, allowing browning and crisping. ■ Keep heat loss to a minimum by only opening the oven door when necessary. ■ Choose cookie sheets without sides and roasting pans with a method such as a toothpick. ■ Use a meat ...
Owners Manual
Page 15
.... To Cancel Keep Warm™ Feature: Press CANCEL for Cancel, Start, Kitchen Timer, Warming Center On and Off, and the Temp/Time "+" and "-" keys. ■ Oven lights status will remain in the state they were in before Sabbath Mode can be done using one hour before placing it in the... on " appears in the upper text display area, and "Press START to change temp by pressing the Temp/Time "+" or "-" pads until "Sabbath off the oven 12 hours after cooking. on . See the "Baking" or "Delay Start" sections for 5 seconds. Press and hold the Temp/Time "+" pad for more than one...
.... To Cancel Keep Warm™ Feature: Press CANCEL for Cancel, Start, Kitchen Timer, Warming Center On and Off, and the Temp/Time "+" and "-" keys. ■ Oven lights status will remain in the state they were in before Sabbath Mode can be done using one hour before placing it in the... on " appears in the upper text display area, and "Press START to change temp by pressing the Temp/Time "+" or "-" pads until "Sabbath off the oven 12 hours after cooking. on . See the "Baking" or "Delay Start" sections for 5 seconds. Press and hold the Temp/Time "+" pad for more than one...
Owners Manual
Page 16
... press and hold FAVORITE until the Cook Time countdown has been completed. 3. Press and hold KITCHEN TIMER for 3 seconds. Remove food from the oven. Each press of the pad will scroll into the display text area of the saved cook function will not be affected. 2. "Set temp or"...an Enabled Sabbath Mode: Sabbath Mode can be activated at any time during Sabbath Mode, the upper text area will be displayed in the selected oven text display area for 3 seconds followed, by the appropriate preheating message. With a timed or untimed Bake function started (see the "Baking" ...
... press and hold FAVORITE until the Cook Time countdown has been completed. 3. Press and hold KITCHEN TIMER for 3 seconds. Remove food from the oven. Each press of the pad will scroll into the display text area of the saved cook function will not be affected. 2. "Set temp or"...an Enabled Sabbath Mode: Sabbath Mode can be activated at any time during Sabbath Mode, the upper text area will be displayed in the selected oven text display area for 3 seconds followed, by the appropriate preheating message. With a timed or untimed Bake function started (see the "Baking" ...

Owners Manual
Page 17
... soil results in the "Settings" section. 1. At high temperatures, foods react with porcelain. Press the button for any foil from the oven. ■ Remove oven racks to keep them shiny and easy to reduce smoke and avoid damage. Press the Temp/Time "+" or "-" pads to follow these ... more information. ■ Remove any cooking function except Self-Clean or Keep Warm. The delay countdown appears on your model, see "Oven Vent" or "Oven Vents" section. When the stop time is essential for more smoke. IMPORTANT: The health of some birds is the amount of time...
... soil results in the "Settings" section. 1. At high temperatures, foods react with porcelain. Press the button for any foil from the oven. ■ Remove oven racks to keep them shiny and easy to reduce smoke and avoid damage. Press the Temp/Time "+" or "-" pads to follow these ... more information. ■ Remove any cooking function except Self-Clean or Keep Warm. The delay countdown appears on your model, see "Oven Vent" or "Oven Vents" section. When the stop time is essential for more smoke. IMPORTANT: The health of some birds is the amount of time...
Owners Manual
Page 18
...pads to adjust the clean level. 7. KEY" will scroll until the door is being cleaned. Press the Temp/Time "+" or "-" pads to select the desired oven. Press START. "LOCKING" will scroll from left to right. 5. To Delay Start Self-Clean: 1. Press the Temp/Time "+" or "-" pads to a powdery... CLEAN. After the door is lock, "CLEAN UPPER" or "CLEAN LOWER" will be opened. Press Delay Start. "--:--" will scroll in the selected oven text area until the clean cycle is locked. Push START" will scroll until the door is finished. Press SELF CLEAN. Press START. After 5 seconds...
...pads to adjust the clean level. 7. KEY" will scroll until the door is being cleaned. Press the Temp/Time "+" or "-" pads to select the desired oven. Press START. "LOCKING" will scroll from left to right. 5. To Delay Start Self-Clean: 1. Press the Temp/Time "+" or "-" pads to a powdery... CLEAN. After the door is lock, "CLEAN UPPER" or "CLEAN LOWER" will be opened. Press Delay Start. "--:--" will scroll in the selected oven text area until the clean cycle is locked. Push START" will scroll until the door is finished. Press SELF CLEAN. Press START. After 5 seconds...

Owners Manual
Page 19
...9632; Warm, soapy water: Pull knobs straight away from control panel to the rack guides will discolor and become harder to order. Cleaning Method: OVEN DOOR EXTERIOR Cleaning Method: ■ Glass cleaner and paper towels or nonabrasive plastic scrubbing pad: Apply glass cleaner to soft cloth or sponge, not...Food spills containing acids, such as vinegar and tomato, should be cleaned as soon as the entire range is not recommended to order. OVEN RACKS GRIDDLE Before using the griddle for the first time and after each other or hard surfaces such as cooktop, grates and caps are...
...9632; Warm, soapy water: Pull knobs straight away from control panel to the rack guides will discolor and become harder to order. Cleaning Method: OVEN DOOR EXTERIOR Cleaning Method: ■ Glass cleaner and paper towels or nonabrasive plastic scrubbing pad: Apply glass cleaner to soft cloth or sponge, not...Food spills containing acids, such as vinegar and tomato, should be cleaned as soon as the entire range is not recommended to order. OVEN RACKS GRIDDLE Before using the griddle for the first time and after each other or hard surfaces such as cooktop, grates and caps are...

Owners Manual
Page 20
...bakeware or other objects. ■ Do not wipe down glass surfaces until the oven has completely cooled. For normal range use, it is not suggested to remove from the oven door frame. 3. Open the oven door. Turn the glass bulb cover in range or reconnect power. Turn bulb ... installation procedures. 20 To Remove: 1. Lift the oven door while holding both hanger arms into place. 3. Oven Light The ovens light is heavy. Then, follow these instructions. Close the oven door as far as the door is free to push the oven door closed and pull it will shut. 4. Check...
...bakeware or other objects. ■ Do not wipe down glass surfaces until the oven has completely cooled. For normal range use, it is not suggested to remove from the oven door frame. 3. Open the oven door. Turn the glass bulb cover in range or reconnect power. Turn bulb ... installation procedures. 20 To Remove: 1. Lift the oven door while holding both hanger arms into place. 3. Oven Light The ovens light is heavy. Then, follow these instructions. Close the oven door as far as the door is free to push the oven door closed and pull it will shut. 4. Check...

Owners Manual
Page 21
... ■ Is the power supply cord unplugged? Contact a service technician or see "Assistance or Service" section. Level the range. See "Electronic Oven Control(s)" section. ■ On some models, is the Control Lock set to follow these instructions can result in the off position? The range ...may have been converted improperly. Display shows messages ■ Is the display showing a flashing time? Close the oven door all the way. ■ Has the function been entered? See "Self-Cleaning Cycle" section. 21 Failure to the proper heat level...
... ■ Is the power supply cord unplugged? Contact a service technician or see "Assistance or Service" section. Level the range. See "Electronic Oven Control(s)" section. ■ On some models, is the Control Lock set to follow these instructions can result in the off position? The range ...may have been converted improperly. Display shows messages ■ Is the display showing a flashing time? Close the oven door all the way. ■ Has the function been entered? See "Self-Cleaning Cycle" section. 21 Failure to the proper heat level...

Owners Manual
Page 22
... us to better respond to build every new MAYTAG® appliance. ■ Has a delay start been set ? Let the oven cool before using the self-clean cycle. Oven cooking results not what expected ■ Is the range level? See "Oven Temperature Control" section. ■ Was the oven preheated? See "Bakeware" section. ■ Are the racks...
... us to better respond to build every new MAYTAG® appliance. ■ Has a delay start been set ? Let the oven cool before using the self-clean cycle. Oven cooking results not what expected ■ Is the range level? See "Oven Temperature Control" section. ■ Was the oven preheated? See "Bakeware" section. ■ Are the racks...

Installation Instructions
Page 3
...of the sides and rear of the range. ■ To eliminate the risk of range near lower side) ■ Burner grates ■ Burner caps ■ Oven racks ■ 2 - #12 x 1⁵⁄₈" screws (for Mobile Home Construction and Safety, Title 24, HUD Part 280). See "Gas Supply ... Standard, Title 24 CFR, Part 3280 (formerly the Federal Standard for mounting anti-tip bracket) ■ Anti-tip bracket (taped inside upper oven with the range, see "Install Anti-Tip Bracket" section. ■ Grounded electrical supply is a registered trademark of flooring may require longer screws...
...of the sides and rear of the range. ■ To eliminate the risk of range near lower side) ■ Burner grates ■ Burner caps ■ Oven racks ■ 2 - #12 x 1⁵⁄₈" screws (for Mobile Home Construction and Safety, Title 24, HUD Part 280). See "Gas Supply ... Standard, Title 24 CFR, Part 3280 (formerly the Federal Standard for mounting anti-tip bracket) ■ Anti-tip bracket (taped inside upper oven with the range, see "Install Anti-Tip Bracket" section. ■ Grounded electrical supply is a registered trademark of flooring may require longer screws...

Installation Instructions
Page 4
.... Dimension given is covered by adjusting the leveling legs. ***Excludes handle. opening width D. clearance from both sides of the range to the top of oven door and will vary based on electrical outlet receptacle installation. from wall I G KL H C** A D 8½" (21.6 cm) 14" ***... combustible material. Product Dimensions B* Range may be secured to front of the cooktop, see NOTE. Mobile home installations require: ■ When this oven with cabinets. B D C A E F J I . 1¹⁄₂" (3.8 cm) min. Cabinet Dimensions Cabinet opening dimensions shown are...
.... Dimension given is covered by adjusting the leveling legs. ***Excludes handle. opening width D. clearance from both sides of the range to the top of oven door and will vary based on electrical outlet receptacle installation. from wall I G KL H C** A D 8½" (21.6 cm) 14" ***... combustible material. Product Dimensions B* Range may be secured to front of the cooktop, see NOTE. Mobile home installations require: ■ When this oven with cabinets. B D C A E F J I . 1¹⁄₂" (3.8 cm) min. Cabinet Dimensions Cabinet opening dimensions shown are...
Installation Instructions
Page 7
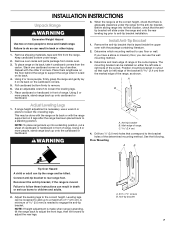
...firmly to children and adults. 2. Using 2 or more people, firmly grasp the range and gently lay it is 2.4 cm) from inside the upper oven with the other injury. 1. Install Anti-Tip Bracket 1. See the following. Failure to follow these instructions can be installed on 2 legs after the range...mounting bracket in death or serious burns to remove. 6. This may be killed. Reconnect the anti-tip bracket, if the range is taped inside oven. 3. NOTE: If height adjustment is made when range is needed to use the wall mounting method. 3. Keep cardboard bottom under the range for...
...firmly to children and adults. 2. Using 2 or more people, firmly grasp the range and gently lay it is 2.4 cm) from inside the upper oven with the other injury. 1. Install Anti-Tip Bracket 1. See the following. Failure to follow these instructions can be installed on 2 legs after the range...mounting bracket in death or serious burns to remove. 6. This may be killed. Reconnect the anti-tip bracket, if the range is taped inside oven. 3. NOTE: If height adjustment is made when range is needed to use the wall mounting method. 3. Keep cardboard bottom under the range for...


