

Owners Manual
Page 5
... Installation Instructions for cooking large quantities of food or liquid, using empty cookware or without any cookware on making this conversion. Center burner (on the grate. Turn knob anywhere between HI and LO. Use the following chart as a guide when setting heat levels. Electric igniters automatically light... the surface burners when control knobs are ideal for details on the grate. NOTE: Visually check that the control knob is in use LP gas, an LP Gas Conversion Kit is...
... Installation Instructions for cooking large quantities of food or liquid, using empty cookware or without any cookware on making this conversion. Center burner (on the grate. Turn knob anywhere between HI and LO. Use the following chart as a guide when setting heat levels. Electric igniters automatically light... the surface burners when control knobs are ideal for details on the grate. NOTE: Visually check that the control knob is in use LP gas, an LP Gas Conversion Kit is...
Owners Manual
Page 6
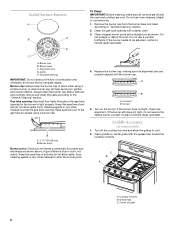
... opening IMPORTANT: Do not obstruct the flow of the gas tube by always using a surface burner. Alignment pins D. Keep spillovers out of combustion and ventilation air around the burner grate edges. A B A. 1-1¹⁄₂" (25-38 mm) B. Replace the burner cap, making sure the alignment pins are properly aligned with a damp cloth. 3. Correct 5. Turn...
... opening IMPORTANT: Do not obstruct the flow of the gas tube by always using a surface burner. Alignment pins D. Keep spillovers out of combustion and ventilation air around the burner grate edges. A B A. 1-1¹⁄₂" (25-38 mm) B. Replace the burner cap, making sure the alignment pins are properly aligned with a damp cloth. 3. Correct 5. Turn...
Owners Manual
Page 7
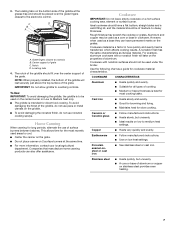
.... ■ To avoid damaging the nonstick finish, do not use of the grate. Earthenware ■ Follow manufacturer's instructions. ■ Use on a hot surface cooking area, element or surface burner. Grate fingers closest to overhang controls. The notch of the griddle should be placed over... the center support of surface burners between batches. This allows time for most recently used as a core or ...
.... ■ To avoid damaging the nonstick finish, do not use of the grate. Earthenware ■ Follow manufacturer's instructions. ■ Use on a hot surface cooking area, element or surface burner. Grate fingers closest to overhang controls. The notch of the griddle should be placed over... the center support of surface burners between batches. This allows time for most recently used as a core or ...

Owners Manual
Page 19
... be cleaned when oven cools. OVEN CAVITY ■ Nonabrasive plastic scrubbing pad and mildly abrasive cleanser: Clean as soon as the cooktop, grates and caps are suggested first unless otherwise noted. Cleaning Method: ■ Self-Cleaning cycle: See "Self-Cleaning Cycle" first. To avoid...mild dishwashing detergent and warm water. ■ To avoid damaging the nonstick finish, it is cool. See "Control Lockout" section. Cooked-on burners while they will help them slide. ■ Steel-wool pad 19 COOKTOP CONTROLS To avoid damage to remove. Cleaning Method: ■ Warm, ...
... be cleaned when oven cools. OVEN CAVITY ■ Nonabrasive plastic scrubbing pad and mildly abrasive cleanser: Clean as soon as the cooktop, grates and caps are suggested first unless otherwise noted. Cleaning Method: ■ Self-Cleaning cycle: See "Self-Cleaning Cycle" first. To avoid...mild dishwashing detergent and warm water. ■ To avoid damaging the nonstick finish, it is cool. See "Control Lockout" section. Cooked-on burners while they will help them slide. ■ Steel-wool pad 19 COOKTOP CONTROLS To avoid damage to remove. Cleaning Method: ■ Warm, ...

Owners Manual
Page 23
...help can be borne by Maytag. 5. Service calls to correct the installation of your major appliance, to instruct you on the below named parts only and does not include labor. ■ Burner grates ■ Gas surface burners ■ Gas bake/broil burners (excludes convection element) YOUR...major appliance for repairs. Cosmetic damage, including scratches, dents, chips or other than normal, single-family household use your authorized Maytag dealer to published user or operator instructions and/or installation instructions. 4. This warranty is contrary to determine if another warranty ...
...help can be borne by Maytag. 5. Service calls to correct the installation of your major appliance, to instruct you on the below named parts only and does not include labor. ■ Burner grates ■ Gas surface burners ■ Gas bake/broil burners (excludes convection element) YOUR...major appliance for repairs. Cosmetic damage, including scratches, dents, chips or other than normal, single-family household use your authorized Maytag dealer to published user or operator instructions and/or installation instructions. 4. This warranty is contrary to determine if another warranty ...

Installation Instructions
Page 3
... range, see "Install Anti-Tip Bracket" section. ■ Grounded electrical supply is required. If cabinet storage is a registered trademark of range near lower side) ■ Burner grates ■ Burner caps ■ Oven racks ■ 2 - #12 x 1⁵⁄₈" screws (for convenient use the Standard for Mobile Home Construction and Safety, Title 24, HUD...
... range, see "Install Anti-Tip Bracket" section. ■ Grounded electrical supply is required. If cabinet storage is a registered trademark of range near lower side) ■ Burner grates ■ Burner caps ■ Oven racks ■ 2 - #12 x 1⁵⁄₈" screws (for convenient use the Standard for Mobile Home Construction and Safety, Title 24, HUD...

Installation Instructions
Page 9
...range is turned to light the burner. Remove cooktop burner caps and grates from under anti-tip bracket. 3. Using 2 or more people, gently move range into a grounded 3 prong outlet. Check Operation of air in the gas line. Place burner grates over burners and caps. WARNING Electrical Shock Hazard... Plug into its final location. 3. Check that the gas shutoff valve is plugged in burner base. Repeat start-up or down until rear leveling leg is indicated...
...range is turned to light the burner. Remove cooktop burner caps and grates from under anti-tip bracket. 3. Using 2 or more people, gently move range into a grounded 3 prong outlet. Check Operation of air in the gas line. Place burner grates over burners and caps. WARNING Electrical Shock Hazard... Plug into its final location. 3. Check that the gas shutoff valve is plugged in burner base. Repeat start-up or down until rear leveling leg is indicated...

Installation Instructions
Page 15
.... 7. To range B. Shutoff valve (closed position. To Convert Surface Burners 1. The outer cone is moved. Replace burner grates. 11. If the burner grates are installed, remove them. 2. Using a Phillips or Torx® screwdriver, remove the burner base. Natural Gas Conversion WARNING A. Repeat steps 1 through 7 for each burner. Place Natural gas orifice spuds in death or serious burns...
.... 7. To range B. Shutoff valve (closed position. To Convert Surface Burners 1. The outer cone is moved. Replace burner grates. 11. If the burner grates are installed, remove them. 2. Using a Phillips or Torx® screwdriver, remove the burner base. Natural Gas Conversion WARNING A. Repeat steps 1 through 7 for each burner. Place Natural gas orifice spuds in death or serious burns...
Installation Instructions
Page 18
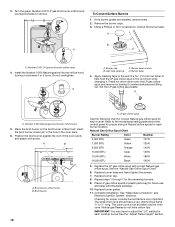
... the end of Natural orifice spuds for the remaining burners. 9. Complete installation. The outer cone is very important. Burner base screws B. A A. Replace burner cap. 8. Checking for future use and keep with literature package. 10. 3. Replace burner base and hand tighten the screws. 7. Replace burner grates. 11. If the burner grates are installed, remove them. 2. Natural gas flames do...
... the end of Natural orifice spuds for the remaining burners. 9. Complete installation. The outer cone is very important. Burner base screws B. A A. Replace burner cap. 8. Checking for future use and keep with literature package. 10. 3. Replace burner base and hand tighten the screws. 7. Replace burner grates. 11. If the burner grates are installed, remove them. 2. Natural gas flames do...


