
Owners Manual
Page 7
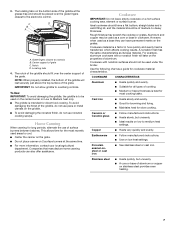
... and evenly. Stainless steel ■ Heats quickly, but unevenly. ■ Ideal results on Low to medium heat settings. The notch of the griddle should be used on the center burner on low to Medium heat only. ■ The griddle is transferred, which affects cooking results. IMPORTANT:...cast iron ■ See stainless steel or cast iron. This allows time for the most cooking tasks. Cookware IMPORTANT: Do not leave empty cookware on low heat settings. C D B A A. To avoid damaging the finish of the griddle, do not use pans or metal utensils on the grates. ...
... and evenly. Stainless steel ■ Heats quickly, but unevenly. ■ Ideal results on Low to medium heat settings. The notch of the griddle should be used on the center burner on low to Medium heat only. ■ The griddle is transferred, which affects cooking results. IMPORTANT:...cast iron ■ See stainless steel or cast iron. This allows time for the most cooking tasks. Cookware IMPORTANT: Do not leave empty cookware on low heat settings. C D B A A. To avoid damaging the finish of the griddle, do not use pans or metal utensils on the grates. ...
Owners Manual
Page 9
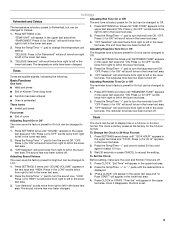
... text area. 3. Tones 2. Press (+) for Fahrenheit" will scroll twice from right to left in the lower text area. The clock can be set . 9 "LOW. "Time Set" will appear in the lower text area. 3. Press (+) for OFF" scrolls twice from right to left in the upper text area. 1. Press ...the Temp/Time "+" pad once to select 24 hour and again to accept the setting. "Set Time" will appear in the lower text area. "Low Selected" scrolls twice from right to left in the lower text area. The temperature units have been changed . 2. Press (+) for OFF" scrolls twice...
... text area. 3. Tones 2. Press (+) for Fahrenheit" will scroll twice from right to left in the lower text area. The clock can be set . 9 "LOW. "Time Set" will appear in the lower text area. 3. Press (+) for OFF" scrolls twice from right to left in the upper text area. 1. Press ...the Temp/Time "+" pad once to select 24 hour and again to accept the setting. "Set Time" will appear in the lower text area. "Low Selected" scrolls twice from right to left in the lower text area. The temperature units have been changed . 2. Press (+) for OFF" scrolls twice...
Owners Manual
Page 13
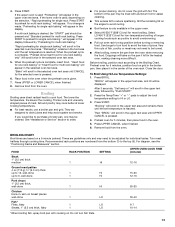
... rack baking" or "Insert food for multi rack baking" will scroll in the text area until the set temperature is reached. To Broil Using Hi/Low Temperature Settings: 1. Press BROIL. After 3 seconds, "Set temp or" will be turned. ■ After broiling, remove the pan from the bottom (1) to ... displayed. Turn meat halfway through cooking time. will scroll in the upper oven. ■ Select HI/550°F (288°C) broil for low-temperature broiling of meat, fish and poultry may need to stop position before turning or removing food. Select LO/450°F (232°C) broil...
... rack baking" or "Insert food for multi rack baking" will scroll in the text area until the set temperature is reached. To Broil Using Hi/Low Temperature Settings: 1. Press BROIL. After 3 seconds, "Set temp or" will be turned. ■ After broiling, remove the pan from the bottom (1) to ... displayed. Turn meat halfway through cooking time. will scroll in the upper oven. ■ Select HI/550°F (288°C) broil for low-temperature broiling of meat, fish and poultry may need to stop position before turning or removing food. Select LO/450°F (232°C) broil...

Owners Manual
Page 21
... the burner caps positioned properly? See the Installation Instructions. Turn on your model, press CANCEL to clear the display. Oven temperature too high or too low ■ Does the oven temperature calibration need adjustment? Display shows messages ■ Is the display showing a flashing time? See "Self-Cleaning Cycle" section. 21 Let...
... the burner caps positioned properly? See the Installation Instructions. Turn on your model, press CANCEL to clear the display. Oven temperature too high or too low ■ Does the oven temperature calibration need adjustment? Display shows messages ■ Is the display showing a flashing time? See "Self-Cleaning Cycle" section. 21 Let...
Installation Instructions
Page 10
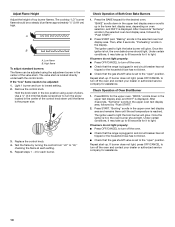
Hold the knob stem in the low position using the adjustment screw in the upper text display area, and 550°F is hot, the oven bake burner should light. Check Operation of ... set to light the broil burner will glow. The cooktop "LO" burner flame should be adjusted: 1. Low flame B. After 3 seconds "Set temp" scrolls in the upper text display area or scrolls up . If the "low" flame needs to "HI," checking the flame at each burner. Check Operation of the control knob stem...
Hold the knob stem in the low position using the adjustment screw in the upper text display area, and 550°F is hot, the oven bake burner should light. Check Operation of ... set to light the broil burner will glow. The cooktop "LO" burner flame should be adjusted: 1. Low flame B. After 3 seconds "Set temp" scrolls in the upper text display area or scrolls up . If the "low" flame needs to "HI," checking the flame at each burner. Check Operation of the control knob stem...


