
User's Guide
Page 4
2 MarkVision 25 MarkVision Printer Management Software 25 Operating Systems Supported 25 Introducing MarkVision 25 MarkVision for Intranet Servers 26 Introducing MarkVision for Intranet Servers 26 MarkVision for UNIX Networks 27 Lexmark MarkTrack 28 Lexmark NetPnP 29 Software Installation and Distribution Tools 29 Optra Forms 30 Solaris Ready Printers for Sun Customers 31 3 Using the Operator Panel and...
2 MarkVision 25 MarkVision Printer Management Software 25 Operating Systems Supported 25 Introducing MarkVision 25 MarkVision for Intranet Servers 26 Introducing MarkVision for Intranet Servers 26 MarkVision for UNIX Networks 27 Lexmark MarkTrack 28 Lexmark NetPnP 29 Software Installation and Distribution Tools 29 Optra Forms 30 Solaris Ready Printers for Sun Customers 31 3 Using the Operator Panel and...

User's Guide
Page 24
... an IEEE 1284-compliant parallel cable that supports bidirectional communication. Caution! To avoid electrical shock hazards, make sure your computer power is Off (O) and unplug all of your printer functions. 1 Turn the printer power Off (O) and unplug the printer power cord from the electrical outlet. We recommend Lexmark part number 1329605 (10 ft) or 1427498...
... an IEEE 1284-compliant parallel cable that supports bidirectional communication. Caution! To avoid electrical shock hazards, make sure your computer power is Off (O) and unplug all of your printer functions. 1 Turn the printer power Off (O) and unplug the printer power cord from the electrical outlet. We recommend Lexmark part number 1329605 (10 ft) or 1427498...
User's Guide
Page 37
... MarkVision, refer to the online Help or the documentation on the Drivers, MarkVision and Utilities CD that comes with your printer: • Introduction to MarkVision • Installation Tips Operating Systems Supported MarkVision for Lexmark printers connected locally or attached directly to increase productivity: • Centralized setup capabilities let you set up and configure MarkVision...
... MarkVision, refer to the online Help or the documentation on the Drivers, MarkVision and Utilities CD that comes with your printer: • Introduction to MarkVision • Installation Tips Operating Systems Supported MarkVision for Lexmark printers connected locally or attached directly to increase productivity: • Centralized setup capabilities let you set up and configure MarkVision...
User's Guide
Page 41
...Lexmark's allin-one software installation utility provides IT administrators with time-saving installation and distribution tools that enable printing to workstations across the network. • Provides huge productivity gains when rolling out large numbers of network printers. • Supports a wide range of printer... installation options for printing. This ensures that the printer is attached to include the end user by installing all necessary components ...
...Lexmark's allin-one software installation utility provides IT administrators with time-saving installation and distribution tools that enable printing to workstations across the network. • Provides huge productivity gains when rolling out large numbers of network printers. • Supports a wide range of printer... installation options for printing. This ensures that the printer is attached to include the end user by installing all necessary components ...
User's Guide
Page 42
ers on their workstations with the least amount of drivers with custom settings to users. Optra Forms Optra Forms combines data from any platform, mainframe, AS/400, UNIX or workstation. - Support for the specific printer location. For example, the same purchase order information can remotely install, update, and distribute drivers with custom settings to different...
ers on their workstations with the least amount of drivers with custom settings to users. Optra Forms Optra Forms combines data from any platform, mainframe, AS/400, UNIX or workstation. - Support for the specific printer location. For example, the same purchase order information can remotely install, update, and distribute drivers with custom settings to different...
User's Guide
Page 43
... easily over the LAN. • Provides support for bar codes, color, duplex, multipage form sets, and more. • Stores forms as MarkVision for Sun Systems and Intranet Servers. These applications provide seamless installation in flash. • Works with Optra M410 and M412 printers and the Optra T and Optra W laser printer families using the Optra Forms™ 1, 2, 4, 8, and 16MB Flash...
... easily over the LAN. • Provides support for bar codes, color, duplex, multipage form sets, and more. • Stores forms as MarkVision for Sun Systems and Intranet Servers. These applications provide seamless installation in flash. • Works with Optra M410 and M412 printers and the Optra T and Optra W laser printer families using the Optra Forms™ 1, 2, 4, 8, and 16MB Flash...
User's Guide
Page 55
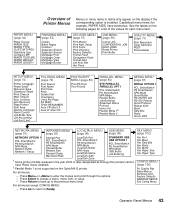
...STANDARD USB USB OPTION 1 PCL SmartSwitch PS SmartSwitch NPA Mode USB Buffer Job Buffering LocalTalk Zone 1 Some printer models released in italics only appear on the display if the corresponding option is not supported on the following pages for example, PAPER SIZE) have Power Saver disabled. 2 Parallel Mode 1 is ...Size Configure MP PAPER TEXTURE PAPER WEIGHT PAPER LENGTH Overview of the values for each menu item. See the tables on the Optra M412 printer. Capitalized menu items (for a list of Printer Menus Menus or menu items in the year 2000 or later designated as Energy Star...
...STANDARD USB USB OPTION 1 PCL SmartSwitch PS SmartSwitch NPA Mode USB Buffer Job Buffering LocalTalk Zone 1 Some printer models released in italics only appear on the display if the corresponding option is not supported on the following pages for example, PAPER SIZE) have Power Saver disabled. 2 Parallel Mode 1 is ...Size Configure MP PAPER TEXTURE PAPER WEIGHT PAPER LENGTH Overview of the values for each menu item. See the tables on the Optra M412 printer. Capitalized menu items (for a list of Printer Menus Menus or menu items in the year 2000 or later designated as Energy Star...
User's Guide
Page 57
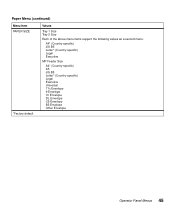
Paper Menu (continued) Menu Item PAPER SIZE *Factory default Values Tray 1 Size Tray 2 Size Each of the above menu items support the following values as a second menu: A4* (Country specific) JIS B5 Letter* (Country specific) Legal Executive MP Feeder Size A4* (Country specific) A5 JIS B5 Letter* (Country specific) Legal Executive Universal 7 ¾ Envelope 9 Envelope 10 Envelope DL Envelope C5 Envelope B5 Envelope Other Envelope Operator Panel Menus 45
Paper Menu (continued) Menu Item PAPER SIZE *Factory default Values Tray 1 Size Tray 2 Size Each of the above menu items support the following values as a second menu: A4* (Country specific) JIS B5 Letter* (Country specific) Legal Executive MP Feeder Size A4* (Country specific) A5 JIS B5 Letter* (Country specific) Legal Executive Universal 7 ¾ Envelope 9 Envelope 10 Envelope DL Envelope C5 Envelope B5 Envelope Other Envelope Operator Panel Menus 45

User's Guide
Page 59
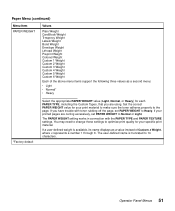
... Menus 47 Paper Menu (continued) Menu Item PAPER TYPE *Factory default Values Tray 1 Type Tray 2 Type Manual Pap Type Each of the above menu items support the following values as a second menu: Plain Paper* Card Stock Transparency Labels Bond Letterhead Preprinted Colored Paper Custom Type 1 Custom Type 2* Custom Type 3 Custom Type...
... Menus 47 Paper Menu (continued) Menu Item PAPER TYPE *Factory default Values Tray 1 Type Tray 2 Type Manual Pap Type Each of the above menu items support the following values as a second menu: Plain Paper* Card Stock Transparency Labels Bond Letterhead Preprinted Colored Paper Custom Type 1 Custom Type 2* Custom Type 3 Custom Type...
User's Guide
Page 62
... Texture Ltrhead Texture Preprint Texture Colored Texture Custom 1 Texture Custom 2 Texture Custom 3 Texture Custom 4 Texture Custom 5 Texture Custom 6 Texture Each of the above menu items support the following three values as a value instead of Custom x Texture, where x represents a number 1 through 6. If a user-defined texture is available, its name displays as a second...
... Texture Ltrhead Texture Preprint Texture Colored Texture Custom 1 Texture Custom 2 Texture Custom 3 Texture Custom 4 Texture Custom 5 Texture Custom 6 Texture Each of the above menu items support the following three values as a value instead of Custom x Texture, where x represents a number 1 through 6. If a user-defined texture is available, its name displays as a second...
User's Guide
Page 63
... Weight Ltrhead Weight Preprint Weight Colored Weight Custom 1 Weight Custom 2 Weight Custom 3 Weight Custom 4 Weight Custom 5 Weight Custom 6 Weight Each of the above menu items support the following three values as a value instead of Custom x Weight, where x represents a number 1 through 6. If your printed pages are using. Operator Panel Menus 51 You...
... Weight Ltrhead Weight Preprint Weight Colored Weight Custom 1 Weight Custom 2 Weight Custom 3 Weight Custom 4 Weight Custom 5 Weight Custom 6 Weight Each of the above menu items support the following three values as a value instead of Custom x Weight, where x represents a number 1 through 6. If your printed pages are using. Operator Panel Menus 51 You...
User's Guide
Page 64
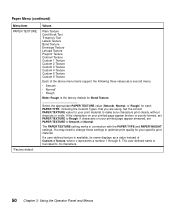
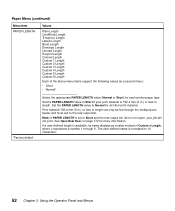
...exit to Normal for all other print material. If a user-defined length is available, its name displays as a value instead of the above menu items support the following values as a second menu: • Short • Normal* *Factory default Select the appropriate PAPER LENGTH value (Normal or Short) for more... information. See Open Rear Door on page 172 for each printer paper type. Note: If PAPER LENGTH is set to Short and the rear output bin door is not open, your print material is truncated ...
...exit to Normal for all other print material. If a user-defined length is available, its name displays as a value instead of the above menu items support the following values as a second menu: • Short • Normal* *Factory default Select the appropriate PAPER LENGTH value (Normal or Short) for more... information. See Open Rear Door on page 172 for each printer paper type. Note: If PAPER LENGTH is set to Short and the rear output bin door is not open, your print material is truncated ...
User's Guide
Page 92
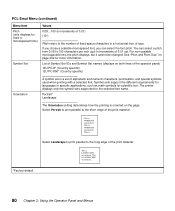
See "Pitch and Point Size" on page 232 for scientific text. Symbol sets support the different requirements for languages or specific applications, such as math symbols for more information. Portrait* Landscape The Orientation setting determines how the printing is ... fixed or monospaced fonts) Symbol Set Values 0.08...100 (in increments of 0.01) (10*) Pitch refers to the short edge of the print material. The printer displays only the symbol sets supported for the selected font name.
See "Pitch and Point Size" on page 232 for scientific text. Symbol sets support the different requirements for languages or specific applications, such as math symbols for more information. Portrait* Landscape The Orientation setting determines how the printing is ... fixed or monospaced fonts) Symbol Set Values 0.08...100 (in increments of 0.01) (10*) Pitch refers to the short edge of the print material. The printer displays only the symbol sets supported for the selected font name.
User's Guide
Page 94
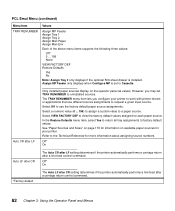
... to use different source assignments to request a given input source. Off* On Auto LF after CR The Auto CR after LF setting determines if the printer automatically performs a carriage return after a carriage return control command. 82 Chapter 3: Using the Operator Panel and Menus Select a numeric value (0 ... 199...Menu Item TRAY RENUMBER Values Assign MP Feeder Assign Tray 1 Assign Tray 2 Assign Man Paper Assign Man Env Each of the above menu items supports the following three values: Off* 0 ... 199 None VIEW FACTORY DEF Restore Defaults Yes No Note: Assign Tray 2 only displays if the ...
... to use different source assignments to request a given input source. Off* On Auto LF after CR The Auto CR after LF setting determines if the printer automatically performs a carriage return after a carriage return control command. 82 Chapter 3: Using the Operator Panel and Menus Select a numeric value (0 ... 199...Menu Item TRAY RENUMBER Values Assign MP Feeder Assign Tray 1 Assign Tray 2 Assign Man Paper Assign Man Env Each of the above menu items supports the following three values: Off* 0 ... 199 None VIEW FACTORY DEF Restore Defaults Yes No Note: Assign Tray 2 only displays if the ...
User's Guide
Page 100
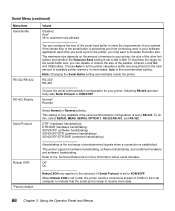
... the serial port if Serial Protocol is set to XON/XOFF. If the limited size of the serial buffer is the exchange of available printer memory. DTR* (hardware handshaking) DTR/DSR (hardware handshaking) XON/XOFF (software handshaking) XON/XOFF/DTR (combined handshaking) XON/XOFF/DTR...-422 Polarity Choose the serial communication configuration for more data. 88 Chapter 3: Using the Operator Panel and Menus This printer supports hardware handshaking, software handshaking, and combined hardware and software handshaking. When Robust XON is established. Choose Auto to let the...
... the serial port if Serial Protocol is set to XON/XOFF. If the limited size of the serial buffer is the exchange of available printer memory. DTR* (hardware handshaking) DTR/DSR (hardware handshaking) XON/XOFF (software handshaking) XON/XOFF/DTR (combined handshaking) XON/XOFF/DTR...-422 Polarity Choose the serial communication configuration for more data. 88 Chapter 3: Using the Operator Panel and Menus This printer supports hardware handshaking, software handshaking, and combined hardware and software handshaking. When Robust XON is established. Choose Auto to let the...
User's Guide
Page 119
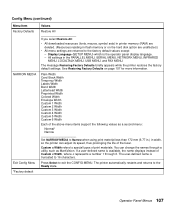
... on the hard disk option are unaffected.) • All menu settings are returned to special types of the above menu items support the following values as MarkVision. Operator Panel Menus 107 Plain Width Card Stock Width Trnsprncy Width Labels Width Bond Width Letterhead Width ... Envelope Width Custom 1 Width Custom 2 Width Custom 3 Width Custom 4 Width Custom 5 Width Custom 6 Width Each of print materials. The printer automatically restarts and returns to exit the CONFIG MENU. Config Menu (continued) Menu Item Factory Defaults Values Restore All NARROW MEDIA If you select ...
... on the hard disk option are unaffected.) • All menu settings are returned to special types of the above menu items support the following values as MarkVision. Operator Panel Menus 107 Plain Width Card Stock Width Trnsprncy Width Labels Width Bond Width Letterhead Width ... Envelope Width Custom 1 Width Custom 2 Width Custom 3 Width Custom 4 Width Custom 5 Width Custom 6 Width Each of print materials. The printer automatically restarts and returns to exit the CONFIG MENU. Config Menu (continued) Menu Item Factory Defaults Values Restore All NARROW MEDIA If you select ...
User's Guide
Page 128
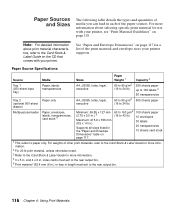
... Minimum: 69.85 x 127 mm (2.75 x 5.0 in.) 5 Maximum: 215.9 x 356 mm (8.5 x 14 in.) Supports all sizes listed in the "Paper and Envelope Dimensions" table on the CD that comes with your printer, see "Print Material Guidelines" on page 117 for a list of the paper sources. Paper Source Specifications Source...5 Print material 152.4 mm (6 in.) or less in length must exit to the Card Stock & Label Guide for use with your printer supports. Paper Sources and Sizes The following table details the types and quantities of media you can load in each of the print material and envelope...
... Minimum: 69.85 x 127 mm (2.75 x 5.0 in.) 5 Maximum: 215.9 x 356 mm (8.5 x 14 in.) Supports all sizes listed in the "Paper and Envelope Dimensions" table on the CD that comes with your printer, see "Print Material Guidelines" on page 117 for a list of the paper sources. Paper Source Specifications Source...5 Print material 152.4 mm (6 in.) or less in length must exit to the Card Stock & Label Guide for use with your printer supports. Paper Sources and Sizes The following table details the types and quantities of media you can load in each of the print material and envelope...
User's Guide
Page 136
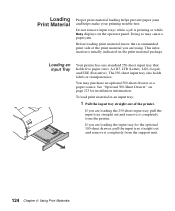
...-Sheet Drawer" on the print material package. Before loading print material, know the recommended print side of the printer. The 250-sheet input tray also holds labels or transparencies. If you are loading the 250-sheet input tray..., pull the input tray straight out and remove it completely from the printer. Loading an Input Tray Your printer has one standard 250-sheet input tray that holds five paper sizes: A4, B5, LTR (Letter... pull the input tray straight out and remove it completely from the support unit. 124 Chapter 4: Using Print Materials
...-Sheet Drawer" on the print material package. Before loading print material, know the recommended print side of the printer. The 250-sheet input tray also holds labels or transparencies. If you are loading the 250-sheet input tray..., pull the input tray straight out and remove it completely from the printer. Loading an Input Tray Your printer has one standard 250-sheet input tray that holds five paper sizes: A4, B5, LTR (Letter... pull the input tray straight out and remove it completely from the support unit. 124 Chapter 4: Using Print Materials
User's Guide
Page 141
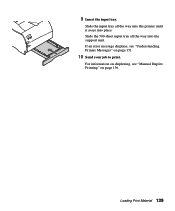
For information on duplexing, see "Understanding Printer Messages" on page 136. Slide the input tray all the way into place. If an error message displays, see "Manual Duplex Printing" on page 151. 10 Send your job to print. Slide the 500-sheet input tray all the way into the printer until it snaps into the support unit. Loading Print Material 129 9 Insert the input tray.
For information on duplexing, see "Understanding Printer Messages" on page 136. Slide the input tray all the way into place. If an error message displays, see "Manual Duplex Printing" on page 151. 10 Send your job to print. Slide the 500-sheet input tray all the way into the printer until it snaps into the support unit. Loading Print Material 129 9 Insert the input tray.
User's Guide
Page 181
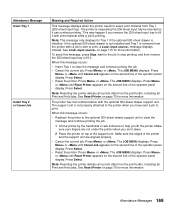
... message, press Stop, wait for the job to stop printing, and then remove the 250-sheet input tray to fill it can continue printing. The printer is installed. See Load on page 170 for Tray 1 if the optional 500-sheet drawer is requesting the 250-sheet input tray be inserted so... it . Attendance Message Insert Tray 1 Install Tray 2 or Cancel Job Meaning and Required Action This message displays when the printer needs to select print material from the...
... message, press Stop, wait for the job to stop printing, and then remove the 250-sheet input tray to fill it can continue printing. The printer is installed. See Load on page 170 for Tray 1 if the optional 500-sheet drawer is requesting the 250-sheet input tray be inserted so... it . Attendance Message Insert Tray 1 Install Tray 2 or Cancel Job Meaning and Required Action This message displays when the printer needs to select print material from the...


