User's Guide
Page 10
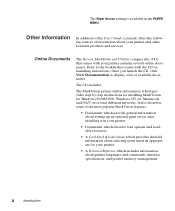
... installing MarkVision for Windows 95/98/2000, Windows NT 4.0, Macintosh, and OS/2 on several online documents. The CD includes: The MarkVision printer utility information, which includes information about selecting print material appropriate for launching instructions. Other Information In addition to the booklet that comes with the CD for your printer and other Lexmark products and...
... installing MarkVision for Windows 95/98/2000, Windows NT 4.0, Macintosh, and OS/2 on several online documents. The CD includes: The MarkVision printer utility information, which includes information about selecting print material appropriate for launching instructions. Other Information In addition to the booklet that comes with the CD for your printer and other Lexmark products and...
User's Guide
Page 26
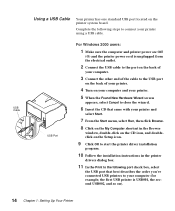
.... Complete the following port check box, select the USB port that came with your printer and select Start. 7 From the Start menu, select Run, then click Browse. 8 Click on the My Computer shortcut in the Browse window, double-click on the CD icon, and doubleclick on the Setup icon. 9 Click... OK to start the printer driver installation program. 10 Follow the installation instructions in the printer drivers dialog box. 11 In the Print to the following steps...
.... Complete the following port check box, select the USB port that came with your printer and select Start. 7 From the Start menu, select Run, then click Browse. 8 Click on the My Computer shortcut in the Browse window, double-click on the CD icon, and doubleclick on the Setup icon. 9 Click... OK to start the printer driver installation program. 10 Follow the installation instructions in the printer drivers dialog box. 11 In the Print to the following steps...
User's Guide
Page 27
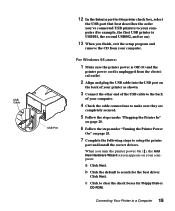
...they are completely secured. 5 Follow the steps under "Plugging the Printer In" on page 20. 6 Follow the steps under "Turning the Printer Power On" on your computer. For Windows 98 users: 1 Make sure the printer power is Off (O) and the printer power cord is USB001, the second USB002, and so on). 13... When you turn the printer power On (|), the Add New Hardware Wizard screen ...
...they are completely secured. 5 Follow the steps under "Plugging the Printer In" on page 20. 6 Follow the steps under "Turning the Printer Power On" on your computer. For Windows 98 users: 1 Make sure the printer power is Off (O) and the printer power cord is USB001, the second USB002, and so on). 13... When you turn the printer power On (|), the Add New Hardware Wizard screen ...

User's Guide
Page 29
...Computer 17 r Click the Add button. u Scroll to USB001 in the bottom window of the screen and select LPT1 for the PostScript language. Connecting Your Printer to restart Windows. s Click Next. w Scroll to USB001 in the bottom window of the screen and select it . z Click OK. Wait as the information... processes. v Return to the box on the right of the screen for the PCL language. The name of your printer moves to the top window of the screen and select it...
...Computer 17 r Click the Add button. u Scroll to USB001 in the bottom window of the screen and select LPT1 for the PostScript language. Connecting Your Printer to restart Windows. s Click Next. w Scroll to USB001 in the bottom window of the screen and select it . z Click OK. Wait as the information... processes. v Return to the box on the right of the screen for the PCL language. The name of your printer moves to the top window of the screen and select it...
User's Guide
Page 31
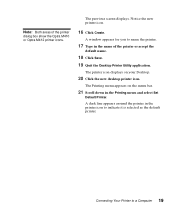
... as the default printer. A window appears for you to name the printer. 17 Type in the Printing menu and select Set Default Printer. The printer icon displays on the menu bar. 21 Scroll down in the name of the printer dialog box show the Optra M410 or Optra M412 printer icons. Note: ...Both areas of the printer or accept the default name. 18 Click Save. 19 Quit the Desktop Printer Utility application. The previous screen displays. Notice the new printer icon. 16 Click Create. A ...
... as the default printer. A window appears for you to name the printer. 17 Type in the Printing menu and select Set Default Printer. The printer icon displays on the menu bar. 21 Scroll down in the name of the printer dialog box show the Optra M410 or Optra M412 printer icons. Note: ...Both areas of the printer or accept the default name. 18 Click Save. 19 Quit the Desktop Printer Utility application. The previous screen displays. Notice the new printer icon. 16 Click Create. A ...
User's Guide
Page 37
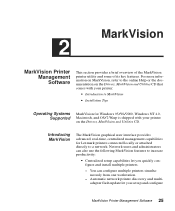
...management capabilities for Windows 95/98/2000, Windows NT 4.0, Macintosh, and OS/2 Warp is shipped with your printer on the Drivers, MarkVision and Utilities CD. You can also use the following MarkVision features to a network. Automatic network printer discovery and multiadapter... documentation on the Drivers, MarkVision and Utilities CD that comes with your printer: • Introduction to MarkVision • Installation Tips Operating Systems Supported MarkVision for Lexmark printers connected locally or attached directly to increase productivity: • Centralized setup capabilities...
...management capabilities for Windows 95/98/2000, Windows NT 4.0, Macintosh, and OS/2 Warp is shipped with your printer on the Drivers, MarkVision and Utilities CD. You can also use the following MarkVision features to a network. Automatic network printer discovery and multiadapter... documentation on the Drivers, MarkVision and Utilities CD that comes with your printer: • Introduction to MarkVision • Installation Tips Operating Systems Supported MarkVision for Lexmark printers connected locally or attached directly to increase productivity: • Centralized setup capabilities...

User's Guide
Page 39
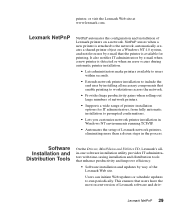
... MarkVision for UNIX Networks MarkVision for devices using criteria such as printer status and installed features. Maps Locate printers quickly in your existing intranet infrastructure using : • Centralized Lexmark printer setup capabilities. • Remote monitoring and management. • ...Proactive status alerts on real-time status information. MarkVision for Windows and UNIX users. • Lets you easily set up, manage, and maintain printers across networks. Remote...
... MarkVision for UNIX Networks MarkVision for devices using criteria such as printer status and installed features. Maps Locate printers quickly in your existing intranet infrastructure using : • Centralized Lexmark printer setup capabilities. • Remote monitoring and management. • ...Proactive status alerts on real-time status information. MarkVision for Windows and UNIX users. • Lets you easily set up, manage, and maintain printers across networks. Remote...
User's Guide
Page 41
... schedule updates to prompted confirmations. • Lets you customize network printer installation in the process. Lexmark NetPnP 29 Lexmark NetPnP NetPnP automates the configuration and installation of Lexmark network printers, eliminating more than a dozen steps in Windows NT environments running TCP/IP. • Automates the setup of Lexmark printers on a Windows NT 4.0 system, and notifies users by way of...
... schedule updates to prompted confirmations. • Lets you customize network printer installation in the process. Lexmark NetPnP 29 Lexmark NetPnP NetPnP automates the configuration and installation of Lexmark network printers, eliminating more than a dozen steps in Windows NT environments running TCP/IP. • Automates the setup of Lexmark printers on a Windows NT 4.0 system, and notifies users by way of...
User's Guide
Page 55
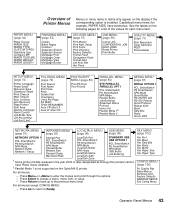
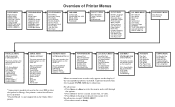
... JOBS Reset Printer Print Buffer QUALITY MENU (page 71) Print Resolution Toner Darkness PQET PictureGrade SETUP MENU (page 73) Printer Power SLaavnegru1age... Setup Infrared Port PCL SmartSwitch PS SmartSwitch NPA Mode Infrared Buffer Window Size Transmit Delay Max Baud Rate LocalTalk Port PCL SmartSwitch PS ... PS SmartSwitch NPA Mode USB Buffer Job Buffering LocalTalk Zone 1 Some printer models released in italics only appear on the following pages for a list...LENGTH Overview of Printer Menus Menus or menu items in the year 2000 or later designated as Energy Star printers cannot have ...
... JOBS Reset Printer Print Buffer QUALITY MENU (page 71) Print Resolution Toner Darkness PQET PictureGrade SETUP MENU (page 73) Printer Power SLaavnegru1age... Setup Infrared Port PCL SmartSwitch PS SmartSwitch NPA Mode Infrared Buffer Window Size Transmit Delay Max Baud Rate LocalTalk Port PCL SmartSwitch PS ... PS SmartSwitch NPA Mode USB Buffer Job Buffering LocalTalk Zone 1 Some printer models released in italics only appear on the following pages for a list...LENGTH Overview of Printer Menus Menus or menu items in the year 2000 or later designated as Energy Star printers cannot have ...

User's Guide
Page 106
...recommended setting. If the limited size of the other link buffers, and whether Resource Save is set the window size during a power on the amount of memory in Network Printing Alliance Protocol, A Printer/Host Control Specification Developed by the NPA. In most cases, Auto is a mode of the print data... time you send a job to increase the buffer size. If you have trouble printing using the infrared port, changing the Window Size setting to 1 may want to the printer, you can receive before it in the INFRARED MENU applies only to the host computer. Choose Auto to let the...
...recommended setting. If the limited size of the other link buffers, and whether Resource Save is set the window size during a power on the amount of memory in Network Printing Alliance Protocol, A Printer/Host Control Specification Developed by the NPA. In most cases, Auto is a mode of the print data... time you send a job to increase the buffer size. If you have trouble printing using the infrared port, changing the Window Size setting to 1 may want to the printer, you can receive before it in the INFRARED MENU applies only to the host computer. Choose Auto to let the...
User's Guide
Page 131
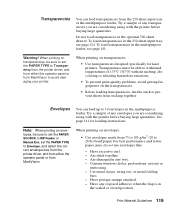
..., avoid getting fingerprints on transparencies: • Use transparencies designed specifically for loading instructions. See page 141 for laser printers. For best performance and fewer paper jams, do not use envelopes that: - Have excessive curl. - Contain windows, holes, perforations, cutouts or embossing. - To load transparencies in the multipurpose feeder, see page 124. Transparencies must...
..., avoid getting fingerprints on transparencies: • Use transparencies designed specifically for loading instructions. See page 141 for laser printers. For best performance and fewer paper jams, do not use envelopes that: - Have excessive curl. - Contain windows, holes, perforations, cutouts or embossing. - To load transparencies in the multipurpose feeder, see page 124. Transparencies must...
User's Guide
Page 159
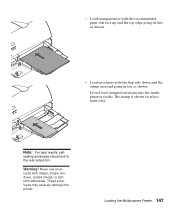
- Do not feed stamped envelopes into the multipurpose feeder. sealing envelopes should exit to the rear output bin. Never use enve- lopes with the recommended print side face up and the top edge going in first as shown. Note: For best results, self- These envelopes may severely damage the printer. Loading the Multipurpose Feeder 147 The stamp is shown for placement only. Warning! Load envelopes with the flap side down and the stamp area end going in last as shown. - Load transparencies with clasps, snaps, windows, coated linings, or selfstick adhesives.
- Do not feed stamped envelopes into the multipurpose feeder. sealing envelopes should exit to the rear output bin. Never use enve- lopes with the recommended print side face up and the top edge going in first as shown. Note: For best results, self- These envelopes may severely damage the printer. Loading the Multipurpose Feeder 147 The stamp is shown for placement only. Warning! Load envelopes with the flap side down and the stamp area end going in last as shown. - Load transparencies with clasps, snaps, windows, coated linings, or selfstick adhesives.
User's Guide
Page 188
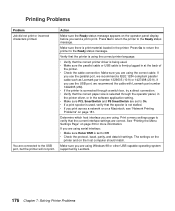
... we recommend a IEEE 1284-compliant parallel cable such as Lexmark part number 1329605 (10 ft) or 1427498 (20 ft). If you use the parallel port, we recommend the cable with Lexmark part number 12A2405 (2M). • If the printer is connected through a switch box, try a direct connection....8226; Make sure the parallel cable or USB cable is not stalled. • If you are using Windows 98 or other USB-capable operating system supported by Lexmark. 176 Chapter 7: Solving Printer Problems If you print across a network or on a Macintosh, see "Network Printing Problems" on the operator...
... we recommend a IEEE 1284-compliant parallel cable such as Lexmark part number 1329605 (10 ft) or 1427498 (20 ft). If you use the parallel port, we recommend the cable with Lexmark part number 12A2405 (2M). • If the printer is connected through a switch box, try a direct connection....8226; Make sure the parallel cable or USB cable is not stalled. • If you are using Windows 98 or other USB-capable operating system supported by Lexmark. 176 Chapter 7: Solving Printer Problems If you print across a network or on a Macintosh, see "Network Printing Problems" on the operator...

User's Guide
Page 295
Fonts that defines a group of the settings available for LocalTalk, serial, and infrared interfaces. You can install inside the printer to select for external devices. type size. typeface. The style that use TrueType fonts in a font. Fonts whose characters are spaced .... The form or shape of a graphic character in .). Universal Serial Bus (USB). USB. Printer setting selected by a user that is chosen. A measurement in pitch or points of the characters in Windows applications and scale them to any height. Set the actual size of serial and parallel ports with...
Fonts that defines a group of the settings available for LocalTalk, serial, and infrared interfaces. You can install inside the printer to select for external devices. type size. typeface. The style that use TrueType fonts in a font. Fonts whose characters are spaced .... The form or shape of a graphic character in .). Universal Serial Bus (USB). USB. Printer setting selected by a user that is chosen. A measurement in pitch or points of the characters in Windows applications and scale them to any height. Set the actual size of serial and parallel ports with...
User's Guide
Page 298
...display 175 Blank Pages (Finishing Menu) 53 Buffered Jobs (Config Menu) 106 Busy, printer state 152 buttons, operator panel 35 C cable parallel, attaching 12 power, attaching 20 USB, attaching Macintosh 18 Windows 2000 14 Windows 98 15 Cancel Job (Job Menu) 60 canceling print job 60 Card Stock & ...Label Guide x, 116, 118, 120 card stock guidelines 122 286 Index CD contents x, 24 MarkVision 25, 26 online documentation x, 24 changing printer settings operator panel 40 software...
...display 175 Blank Pages (Finishing Menu) 53 Buffered Jobs (Config Menu) 106 Busy, printer state 152 buttons, operator panel 35 C cable parallel, attaching 12 power, attaching 20 USB, attaching Macintosh 18 Windows 2000 14 Windows 98 15 Cancel Job (Job Menu) 60 canceling print job 60 Card Stock & ...Label Guide x, 116, 118, 120 card stock guidelines 122 286 Index CD contents x, 24 MarkVision 25, 26 online documentation x, 24 changing printer settings operator panel 40 software...
User's Guide
Page 301
Infrared Menu (continued) PS SmartSwitch 93 Transmit Delay 95 Window Size 94 Infrared Port (Infrared Menu) 93 input source, wrong 177 input tray See tray installing 500-sheet drawer 223 best location 223 printer on top of 225 500-sheet input tray 225 fax 198 flash memory option 207 hard... setting maximum number of jobs 78 storing on disk 78 L labels, guidelines 120 landscape orientation 80 language, changing operator panel display 23, 76 laser notices 247 LCD See liquid crystal display length guide, adjusting 250-sheet input tray 7, 125 500-sheet input tray 126 letterhead guidelines 118 loading ...
Infrared Menu (continued) PS SmartSwitch 93 Transmit Delay 95 Window Size 94 Infrared Port (Infrared Menu) 93 input source, wrong 177 input tray See tray installing 500-sheet drawer 223 best location 223 printer on top of 225 500-sheet input tray 225 fax 198 flash memory option 207 hard... setting maximum number of jobs 78 storing on disk 78 L labels, guidelines 120 landscape orientation 80 language, changing operator panel display 23, 76 laser notices 247 LCD See liquid crystal display length guide, adjusting 250-sheet input tray 7, 125 500-sheet input tray 126 letterhead guidelines 118 loading ...
User's Guide
Page 311
...219 TrueType fonts 234 typeface, description 231 U uneven edges 72, 179 UNIX 27 unpacking print cartridge 2 printer 1 USB Buffer (USB Menu) 100 USB cable attaching Macintosh 18 Windows 2000 14 Windows 98 15 part number 176 USB input buffer size, configuring 100 USB Menu Job Buffering 101 NPA Mode 100...Directory 57 Print Fonts 57 Print Menus 57 Print Net1 Setup 57 V Verify Print job 110 verifying options 229 W Wait Timeout (Setup Menu) 74 Waiting, printer state 157 warning messages 158 Fax 1 158 Infrared 1 158 LocalTalk 1 158 Network 1 158 Parallel 158 Parallel 1 158 Serial 1 158 Tray 1 Missing ...
...219 TrueType fonts 234 typeface, description 231 U uneven edges 72, 179 UNIX 27 unpacking print cartridge 2 printer 1 USB Buffer (USB Menu) 100 USB cable attaching Macintosh 18 Windows 2000 14 Windows 98 15 part number 176 USB input buffer size, configuring 100 USB Menu Job Buffering 101 NPA Mode 100...Directory 57 Print Fonts 57 Print Menus 57 Print Net1 Setup 57 V Verify Print job 110 verifying options 229 W Wait Timeout (Setup Menu) 74 Waiting, printer state 157 warning messages 158 Fax 1 158 Infrared 1 158 LocalTalk 1 158 Network 1 158 Parallel 158 Parallel 1 158 Serial 1 158 Tray 1 Missing ...
Quick Reference Guide
Page 1
... submenus. 1 Some printer models released in the year 2000 or later designated as the value list: PCL SmartSwitch PS SmartSwitch NPA Mode Network Buffer Network 1 Setup INFRARED MENU Infrared Port PCL SmartSwitch PS SmartSwitch NPA Mode Infrared Buffer Window Size Transmit Dela Max... Baud Rate LOCALTALK MENU LocalTalk Port PCL SmartSwitch PS SmartSwitch NPA Mod LocalTalk Buffer NPA Hosts LocalTalk Name LocalTalk Addr LocalTalk Zone Menus or menu items in italics only appear on the display if the corresponding option is not supported on the Optra M412 printer...
... submenus. 1 Some printer models released in the year 2000 or later designated as the value list: PCL SmartSwitch PS SmartSwitch NPA Mode Network Buffer Network 1 Setup INFRARED MENU Infrared Port PCL SmartSwitch PS SmartSwitch NPA Mode Infrared Buffer Window Size Transmit Dela Max... Baud Rate LOCALTALK MENU LocalTalk Port PCL SmartSwitch PS SmartSwitch NPA Mod LocalTalk Buffer NPA Hosts LocalTalk Name LocalTalk Addr LocalTalk Zone Menus or menu items in italics only appear on the display if the corresponding option is not supported on the Optra M412 printer...


