User's Guide
Page 17
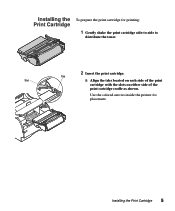
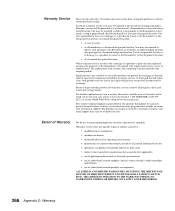
Use the colored arrows inside the printer for printing: 1 Gently shake the print cartridge side-to-side to distribute the toner. 2 Insert the print cartridge: Tab Slot a Align the tabs located on each side of the print cartridge with the slots on either side of the print cartridge cradle as shown. Installing the Print Cartridge 5 Installing the Print Cartridge To prepare the print cartridge for placement.
Use the colored arrows inside the printer for printing: 1 Gently shake the print cartridge side-to-side to distribute the toner. 2 Insert the print cartridge: Tab Slot a Align the tabs located on each side of the print cartridge with the slots on either side of the print cartridge cradle as shown. Installing the Print Cartridge 5 Installing the Print Cartridge To prepare the print cartridge for placement.
User's Guide
Page 190
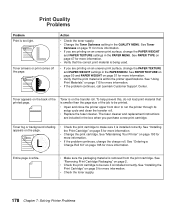
...Toner appears on the back of the job to be printed. • Open and close the printer upper front door to be sure it is removed from the print cartridge. See "Using Print Materials" on page 115 for more information. • If the problem continues, call Lexmark... for more information. • Change the print cartridge. See "Installing the Print Cartridge" on page 51 for more information. • Verify that the correct print material is within the printer specifications. Toner smears or print comes off the page. Toner fog or background shading appears on page 5 for ...
...Toner appears on the back of the job to be printed. • Open and close the printer upper front door to be sure it is removed from the print cartridge. See "Using Print Materials" on page 115 for more information. • If the problem continues, call Lexmark... for more information. • Change the print cartridge. See "Installing the Print Cartridge" on page 51 for more information. • Verify that the correct print material is within the printer specifications. Toner smears or print comes off the page. Toner fog or background shading appears on page 5 for ...

User's Guide
Page 191
...the QUALITY MENU. See "Installing the Print Cartridge" on page 157 for more information. The job prints, but the left and top margins are supported by the printer, the host computer, and the software application. Change the Toner Darkness setting in the PAPER MENU. Image quality...71 for more information. See Toner Darkness on page 195 for more information. • Make sure the margins are set too high in black. • Check the print cartridge to On. Print Quality Problems 179 To utilize the remaining toner, shake the cartridge gently. Resolution was automatically ...
...the QUALITY MENU. See "Installing the Print Cartridge" on page 157 for more information. The job prints, but the left and top margins are supported by the printer, the host computer, and the software application. Change the Toner Darkness setting in the PAPER MENU. Image quality...71 for more information. See Toner Darkness on page 195 for more information. • Make sure the margins are set too high in black. • Check the print cartridge to On. Print Quality Problems 179 To utilize the remaining toner, shake the cartridge gently. Resolution was automatically ...
User's Guide
Page 207
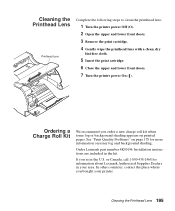
... charge roll kit when toner fog or background shading appears on toner fog and background shading. Order Lexmark part number 4K00196. Cleaning the Printhead Lens Printhead Lens Complete the following steps to clean the printhead lens: 1 Turn the printer power Off (O). 2 Open the upper and lower front doors. 3 Remove the print cartridge. 4 Gently wipe the...
... charge roll kit when toner fog or background shading appears on toner fog and background shading. Order Lexmark part number 4K00196. Cleaning the Printhead Lens Printhead Lens Complete the following steps to clean the printhead lens: 1 Turn the printer power Off (O). 2 Open the upper and lower front doors. 3 Remove the print cartridge. 4 Gently wipe the...
User's Guide
Page 278
... DURATION TO THE WARRANTY PERIOD. Extent of Warranty We do not warrant uninterrupted or error-free operation of original purchase as toner cartridges, inkjet cartridges, and ribbons) • use of other than Lexmark supplies (such as shown on the purchase receipt. NO WARRANTIES, EXPRESS OR IMPLIED, WILL APPLY AFTER THIS PERIOD. 266 Appendix D: Warranty...
... DURATION TO THE WARRANTY PERIOD. Extent of Warranty We do not warrant uninterrupted or error-free operation of original purchase as toner cartridges, inkjet cartridges, and ribbons) • use of other than Lexmark supplies (such as shown on the purchase receipt. NO WARRANTIES, EXPRESS OR IMPLIED, WILL APPLY AFTER THIS PERIOD. 266 Appendix D: Warranty...
User's Guide
Page 289
... in which provides the low-level functions needed to share information. menu. menu item. A Lexmark process established to manually feed print material into the printer one sheet at a time. You can also use the multipurpose feeder to recycle toner cartridges and print units. Glossary 277 See setting. Monarch. non-volatile random access memory (NVRAM...
... in which provides the low-level functions needed to share information. menu. menu item. A Lexmark process established to manually feed print material into the printer one sheet at a time. You can also use the multipurpose feeder to recycle toner cartridges and print units. Glossary 277 See setting. Monarch. non-volatile random access memory (NVRAM...

User's Guide
Page 292
print cartridge. print material. print server. printer driver. See dynamic random access memory (DRAM) or random access memory (RAM). protocol. A print job sent from your software application, stored in printer memory, and accessed at a later time from the CONFIDENTIAL JOB ...toner supply. A device that improves the quality of defined commands (such as paper, card stock, envelopes, labels, and transparencies. Print and Hold job. Any material you connect the printer to which the printer responds. Print Quality Enhancement Technology (PQET). printer language. printer ...
print cartridge. print material. print server. printer driver. See dynamic random access memory (DRAM) or random access memory (RAM). protocol. A print job sent from your software application, stored in printer memory, and accessed at a later time from the CONFIDENTIAL JOB ...toner supply. A device that improves the quality of defined commands (such as paper, card stock, envelopes, labels, and transparencies. Print and Hold job. Any material you connect the printer to which the printer responds. Print Quality Enhancement Technology (PQET). printer language. printer ...

User's Guide
Page 294
Printing on the state of the printer. status message. A time interval allotted for different languages or symbol-intense applications. Token-Ring. toner. SmartSwitch. Standard protocol. symbol set of print material (simplex printing). A unique set . See print cartridge. tray linking. A means of increasing input source capacity by feeding print material from one side of a sheet...
Printing on the state of the printer. status message. A time interval allotted for different languages or symbol-intense applications. Token-Ring. toner. SmartSwitch. Standard protocol. symbol set of print material (simplex printing). A unique set . See print cartridge. tray linking. A means of increasing input source capacity by feeding print material from one side of a sheet...
User's Guide
Page 306
print cartridge installing 5 ordering 193 part numbers 193 removing 2 replacing 194 storage 194 unpacking 2 Print Directory ... 179 print rubs off page 178 print too dark 179 print too light 178 streaks 179 toner fog 178 toner on back of page 178 toner smears 178 uneven edges 179 white page 178 Print Resolution (Quality Menu) 71 print server ...205, 211 online documentation x Print Timeout (Setup Menu) 74 printable area 76 printer alarm 77 attendance messages See attendance messages ...
print cartridge installing 5 ordering 193 part numbers 193 removing 2 replacing 194 storage 194 unpacking 2 Print Directory ... 179 print rubs off page 178 print too dark 179 print too light 178 streaks 179 toner fog 178 toner on back of page 178 toner smears 178 uneven edges 179 white page 178 Print Resolution (Quality Menu) 71 print server ...205, 211 online documentation x Print Timeout (Setup Menu) 74 printable area 76 printer alarm 77 attendance messages See attendance messages ...

User's Guide
Page 308
...settings, no effect 175 Menus Disabled 175 options operating incorrectly 180, 181 quits working 180 paper jams avoiding 137 clearing 183 200 and 201, Remove Cartridge 184 202, Open Rear Door 186 203, Short Paper 190 250, Check MP Feeder 192 print quality background shading 178 incorrect left and top ...rubs off page 178 print too dark 179 print too light 178 streaks 179 toner fog 178 toner on back of page 178 toner smears 178 uneven edges 179 white page 178 printed characters, jagged or uneven edges 72 printer beeping 77 escape codes 182 messages 151 problems 173 settings 33 stops 75 printing...
...settings, no effect 175 Menus Disabled 175 options operating incorrectly 180, 181 quits working 180 paper jams avoiding 137 clearing 183 200 and 201, Remove Cartridge 184 202, Open Rear Door 186 203, Short Paper 190 250, Check MP Feeder 192 print quality background shading 178 incorrect left and top ...rubs off page 178 print too dark 179 print too light 178 streaks 179 toner fog 178 toner on back of page 178 toner smears 178 uneven edges 179 white page 178 printed characters, jagged or uneven edges 72 printer beeping 77 escape codes 182 messages 151 problems 173 settings 33 stops 75 printing...
User's Guide
Page 310
...Jobs 156 Ready 156 Ready Hex 156 Res Reduced 157 Resetting the Printer 157 Restoring Factory Defaults 157 Waiting 157 warning messages 158 status, printer MarkVision 25 298 Index Stop button 36 storing print cartridge 194 print material 123 streaks on page 179 Substitute Size (Paper ... definition 239 system board accessing 201 closing 220 T taking printer offline 35, 36 TCP/IP 29 Technical Reference x timeouts Print Timeout 74 Wait Timeout 74 toner fog 178 on back of page 178 smearing 178 toner cartridge See print cartridge Toner Darkness (Quality Menu) 71 trademarks xi Transmit Delay (Infrared...
...Jobs 156 Ready 156 Ready Hex 156 Res Reduced 157 Resetting the Printer 157 Restoring Factory Defaults 157 Waiting 157 warning messages 158 status, printer MarkVision 25 298 Index Stop button 36 storing print cartridge 194 print material 123 streaks on page 179 Substitute Size (Paper ... definition 239 system board accessing 201 closing 220 T taking printer offline 35, 36 TCP/IP 29 Technical Reference x timeouts Print Timeout 74 Wait Timeout 74 toner fog 178 on back of page 178 smearing 178 toner cartridge See print cartridge Toner Darkness (Quality Menu) 71 trademarks xi Transmit Delay (Infrared...
Service Manual
Page 40
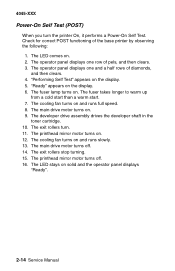
... pels, and then clears. 3. The printhead mirror motor turns on the display. 5. The operator panel displays one and a half rows of the base printer by observing the following: 1. "Performing Self Test" appears on . 12. The fuser lamp turns on and runs slowly. 13. The fuser takes longer... 4045-XXX Power-On Self Test (POST) When you turn . 11. The developer drive assembly drives the developer shaft in the toner cartridge. 10. The exit rollers turn the printer On, it performs a Power-On Self Test. The exit rollers stop turning. 15. The LED stays on solid and the operator...
... pels, and then clears. 3. The printhead mirror motor turns on the display. 5. The operator panel displays one and a half rows of the base printer by observing the following: 1. "Performing Self Test" appears on . 12. The fuser lamp turns on and runs slowly. 13. The fuser takes longer... 4045-XXX Power-On Self Test (POST) When you turn . 11. The developer drive assembly drives the developer shaft in the toner cartridge. 10. The exit rollers turn the printer On, it performs a Power-On Self Test. The exit rollers stop turning. 15. The LED stays on solid and the operator...
Service Manual
Page 45
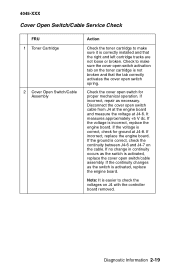
... board removed. 4045-XXX Cover Open Switch/Cable Service Check FRU 1 Toner Cartridge 2 Cover Open Switch/Cable Assembly Action Check the toner cartridge to make sure the cover open switch activation tab on the toner cartridge is not broken and that the right and left cartridge tracks are not loose or broken. Check to check the voltages...
... board removed. 4045-XXX Cover Open Switch/Cable Service Check FRU 1 Toner Cartridge 2 Cover Open Switch/Cable Assembly Action Check the toner cartridge to make sure the cover open switch activation tab on the toner cartridge is not broken and that the right and left cartridge tracks are not loose or broken. Check to check the voltages...
Service Manual
Page 48
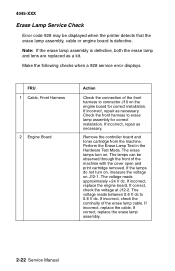
...between 0.6 V dc to erase lamp assembly for correct installation. If correct, replace the erase lamp assembly. 2-22 Service Manual Remove the controller board and toner cartridge from the machine. If incorrect, replace the cable. The erase lamps turn on, measure the voltage on . If the lamps do not turn on ... Service Check Error code 928 may be observed through the front of the machine with the cover open and print cartridge removed. The lamps can be displayed when the printer detects that the erase lamp assembly, cable or engine board is defective, both the erase lamp and lens are ...
...between 0.6 V dc to erase lamp assembly for correct installation. If correct, replace the erase lamp assembly. 2-22 Service Manual Remove the controller board and toner cartridge from the machine. If incorrect, replace the cable. The erase lamps turn on, measure the voltage on . If the lamps do not turn on ... Service Check Error code 928 may be observed through the front of the machine with the cover open and print cartridge removed. The lamps can be displayed when the printer detects that the erase lamp assembly, cable or engine board is defective, both the erase lamp and lens are ...
Service Manual
Page 55
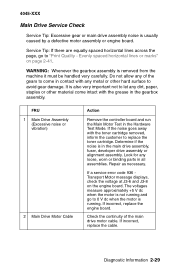
... at J3-6 and J3-8 on page 2-41. Service Tip: If there are equally spaced horizontal lines across the page, go to replace the toner cartridge. FRU 1 Main Drive Assembly (Excessive noise or vibration) 2 Main Drive Motor Cable Action Remove the controller board and run the Main Motor Test... in the main drive assembly, fuser, developer drive assembly or alignment assembly. Look for any loose, worn or binding parts in contact with the toner cartridge removed, inform the customer to 0 V dc when the motor is not running . 4045-XXX Main Drive Service Check Service Tip: Excessive gear ...
... at J3-6 and J3-8 on page 2-41. Service Tip: If there are equally spaced horizontal lines across the page, go to replace the toner cartridge. FRU 1 Main Drive Assembly (Excessive noise or vibration) 2 Main Drive Motor Cable Action Remove the controller board and run the Main Motor Test... in the main drive assembly, fuser, developer drive assembly or alignment assembly. Look for any loose, worn or binding parts in contact with the toner cartridge removed, inform the customer to 0 V dc when the motor is not running . 4045-XXX Main Drive Service Check Service Tip: Excessive gear ...
Service Manual
Page 67
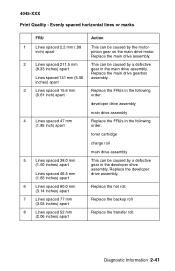
... FRUs in the following order: developer drive assembly 4 Lines spaced 47 mm (1.85 inch) apart main drive assembly Replace the FRUs in the following order: toner cartridge charge roll 5 Lines spaced 38.0 mm (1.50 inches) apart Lines spaced 46.5 mm (1.83 inches) apart 6 Lines spaced 80.0 mm (3.14 inches) apart 7 Lines spaced...
... FRUs in the following order: developer drive assembly 4 Lines spaced 47 mm (1.85 inch) apart main drive assembly Replace the FRUs in the following order: toner cartridge charge roll 5 Lines spaced 38.0 mm (1.50 inches) apart Lines spaced 46.5 mm (1.83 inches) apart 6 Lines spaced 80.0 mm (3.14 inches) apart 7 Lines spaced...
Service Manual
Page 68
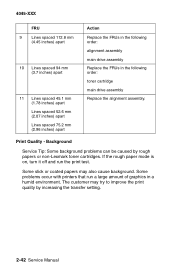
...graphics in the following order: alignment assembly main drive assembly Replace the FRUs in a humid environment. Print Quality - Some problems occur with printers that run the print test. The customer may also cause background. 4045-XXX FRU 9 Lines spaced 112.8 mm (4.45 inches) apart ...spaced 52.6 mm (2.07 inches) apart Lines spaced 75.2 mm (2.96 inches) apart Action Replace the FRUs in the following order: toner cartridge main drive assembly Replace the alignment assembly. Background Service Tip: Some background problems can be caused by increasing the transfer setting. 2-42 ...
...graphics in the following order: alignment assembly main drive assembly Replace the FRUs in a humid environment. Print Quality - Some problems occur with printers that run the print test. The customer may also cause background. 4045-XXX FRU 9 Lines spaced 112.8 mm (4.45 inches) apart ...spaced 52.6 mm (2.07 inches) apart Lines spaced 75.2 mm (2.96 inches) apart Action Replace the FRUs in the following order: toner cartridge main drive assembly Replace the alignment assembly. Background Service Tip: Some background problems can be caused by increasing the transfer setting. 2-42 ...
Service Manual
Page 76
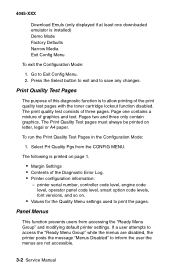
... Quality Test Pages in the Configuration Mode: 1. Select Prt Quality Pgs from accessing the "Ready Menu Group" and modifying default printer settings. Panel Menus This function prevents users from the CONFIG MENU. Print Quality Test Pages The purpose of this diagnostic function is...Media Exit Config Menu To exit the Configuration Mode: 1. Go to allow printing of the print quality test pages with the toner cartridge lockout function disabled. printer serial number, controller code level, engine code level, operator panel code level, smart option code levels, font versions, and so...
... Quality Test Pages in the Configuration Mode: 1. Select Prt Quality Pgs from accessing the "Ready Menu Group" and modifying default printer settings. Panel Menus This function prevents users from the CONFIG MENU. Print Quality Test Pages The purpose of this diagnostic function is...Media Exit Config Menu To exit the Configuration Mode: 1. Go to allow printing of the print quality test pages with the toner cartridge lockout function disabled. printer serial number, controller code level, engine code level, operator panel code level, smart option code levels, font versions, and so...
Service Manual
Page 81
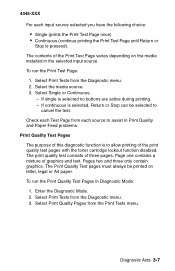
... Page from the Diagnostic menu. 3. The Print Quality Test pages must always be selected to allow printing of the print quality test pages with the toner cartridge lockout function disabled. Diagnostic Aids 3-7 If continuous is to cancel the test. Page one contains a mixture of three pages. Enter the Diagnostic Mode. 2. 4045-XXX...
... Page from the Diagnostic menu. 3. The Print Quality Test pages must always be selected to allow printing of the print quality test pages with the toner cartridge lockout function disabled. Diagnostic Aids 3-7 If continuous is to cancel the test. Page one contains a mixture of three pages. Enter the Diagnostic Mode. 2. 4045-XXX...
Service Manual
Page 101
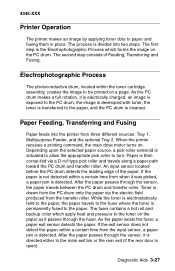
...sources: Tray 1, Multipurpose Feeder, and the optional Tray 2. Paper is divided into the printer from the transfer roller. Electrophotographic Process The photoconductive drum, located within the toner cartridge assembly, creates the image to paper and fusing them in place. If the paper ...is detected. Toner is drawn from the input sensor, a paper jam is not detected within a certain...
...sources: Tray 1, Multipurpose Feeder, and the optional Tray 2. Paper is divided into the printer from the transfer roller. Electrophotographic Process The photoconductive drum, located within the toner cartridge assembly, creates the image to paper and fusing them in place. If the paper ...is detected. Toner is drawn from the input sensor, a paper jam is not detected within a certain...


