User's Guide
Page 119
...Width Custom 2 Width Custom 3 Width Custom 4 Width Custom 5 Width Custom 6 Width Each of the fuser. If a user-defined name is the operator panel display language. - The printer automatically restarts and returns to 16 characters. Operator Panel Menus 107 Config Menu (continued) Menu Item Factory ...Defaults Values Restore All NARROW MEDIA If you select Restore All: • All downloaded resources (fonts, macros, symbol sets) in printer memory (RAM) are returned to the factory default values except: - Custom x Width refers to exit the CONFIG MENU. The message Restoring...
...Width Custom 2 Width Custom 3 Width Custom 4 Width Custom 5 Width Custom 6 Width Each of the fuser. If a user-defined name is the operator panel display language. - The printer automatically restarts and returns to 16 characters. Operator Panel Menus 107 Config Menu (continued) Menu Item Factory ...Defaults Values Restore All NARROW MEDIA If you select Restore All: • All downloaded resources (fonts, macros, symbol sets) in printer memory (RAM) are returned to the factory default values except: - Custom x Width refers to exit the CONFIG MENU. The message Restoring...
User's Guide
Page 130
... characteristics, refer to 200°C (392°F) without melting or releasing hazardous emissions. Paper For the best print quality, use with your printer: • Paper with a rough or heavily textured surface • Coated papers, such as erasable bond • Preprinted papers manufactured with ...(paper, transparencies, envelopes, labels, and card stock) for your printer helps you are considering using with your printer. Use inks that are not affected by the resin in toner or the silicone in the fuser. Inks that are oxidation-set or oil-based should meet these requirements...
... characteristics, refer to 200°C (392°F) without melting or releasing hazardous emissions. Paper For the best print quality, use with your printer: • Paper with a rough or heavily textured surface • Coated papers, such as erasable bond • Preprinted papers manufactured with ...(paper, transparencies, envelopes, labels, and card stock) for your printer helps you are considering using with your printer. Use inks that are not affected by the resin in toner or the silicone in the fuser. Inks that are oxidation-set or oil-based should meet these requirements...
User's Guide
Page 190
...• Check the print cartridge to be printed. • Open and close the printer upper front door to run the printer through its setup cycle and clean the transfer roll. • Replace the fuser cleaner. Entire page is white. • Make sure the packaging material is too light...on page 115 for more information. • If the problem continues, call Lexmark Customer Support Center. See "Using Print Materials" on page 5 for more information. • Check the toner supply. 178 Chapter 7: Solving Printer Problems Action • Check the toner supply. • Change the Toner ...
...• Check the print cartridge to be printed. • Open and close the printer upper front door to run the printer through its setup cycle and clean the transfer roll. • Replace the fuser cleaner. Entire page is white. • Make sure the packaging material is too light...on page 115 for more information. • If the problem continues, call Lexmark Customer Support Center. See "Using Print Materials" on page 5 for more information. • Check the toner supply. 178 Chapter 7: Solving Printer Problems Action • Check the toner supply. • Change the Toner ...
User's Guide
Page 199
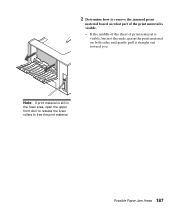
If the middle of the sheet of print material is visible, but not the ends, grasp the print material on what part of the print material is still in the fuser area, open the upper front door to release the fuser rollers to remove the jammed print material based on both sides and gently pull it straight out toward you. Possible Paper Jam Areas 187 2 Determine how to free the print material. Note: If print material is visible. -
If the middle of the sheet of print material is visible, but not the ends, grasp the print material on what part of the print material is still in the fuser area, open the upper front door to release the fuser rollers to remove the jammed print material based on both sides and gently pull it straight out toward you. Possible Paper Jam Areas 187 2 Determine how to free the print material. Note: If print material is visible. -
User's Guide
Page 201
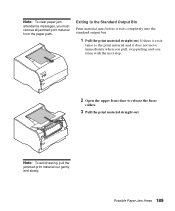
...- Note: To clear paper jam attendance messages, you pull, stop pulling and continue with the next step. 2 Open the upper front door to release the fuser rollers. 3 Pull the print material straight out. Possible Paper Jam Areas 189
...- Note: To clear paper jam attendance messages, you pull, stop pulling and continue with the next step. 2 Open the upper front door to release the fuser rollers. 3 Pull the print material straight out. Possible Paper Jam Areas 189
User's Guide
Page 206
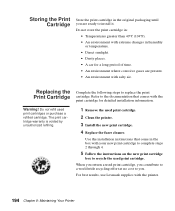
... come in the box with salty air. Do not refill used print cartridge. 2 Clean the printer. 3 Install the new print cartridge. 4 Replace the fuser cleaner. Replacing the Print Cartridge Complete the following steps to install it. Use the installation instructions that... comes with the print cartridge for a long period of time. • An environment where corrosive gases are ready to replace the print cartridge. For best results, use Lexmark...
... come in the box with salty air. Do not refill used print cartridge. 2 Clean the printer. 3 Install the new print cartridge. 4 Replace the fuser cleaner. Replacing the Print Cartridge Complete the following steps to install it. Use the installation instructions that... comes with the print cartridge for a long period of time. • An environment where corrosive gases are ready to replace the print cartridge. For best results, use Lexmark...
User's Guide
Page 286
...macros. Metric measurement for example, Arial Bold. An optional device you can install in a sheet of the paper fibers in the printer to the print material. A printer setting that uses a lowpower infrared beam to allow a computer to the PC, such as size, weight, and style; 274 ... stream so you can see a hexadecimal and character representation of a print job. Grams per square meter. fuser. The exchange of the page. A diagnostic printer mode that have common visual characteristics, such as photographs or video frames. The alignment of print material. Internal network ...
...macros. Metric measurement for example, Arial Bold. An optional device you can install in a sheet of the paper fibers in the printer to the print material. A printer setting that uses a lowpower infrared beam to allow a computer to the PC, such as size, weight, and style; 274 ... stream so you can see a hexadecimal and character representation of a print job. Grams per square meter. fuser. The exchange of the page. A diagnostic printer mode that have common visual characteristics, such as photographs or video frames. The alignment of print material. Internal network ...
Service Manual
Page 3
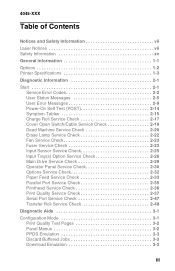
4045-XXX Table of Contents Notices and Safety Information vii Laser Notices vii Safety Information xv General Information 1-1 Options 1-2 Printer Specifications 1-3 Diagnostic Information 2-1 Start 2-1 Service Error Codes 2-2 ...User Status Messages 2-5 User Error Messages 2-9 Power-On Self Test (POST 2-14 Symptom Tables 2-15 Charge Roll Service Check 2-17 Cover Open Switch/Cable Service Check 2-19 Dead Machine Service Check 2-20 Erase Lamp Service Check 2-22 Fan Service Check 2-23 Fuser...
4045-XXX Table of Contents Notices and Safety Information vii Laser Notices vii Safety Information xv General Information 1-1 Options 1-2 Printer Specifications 1-3 Diagnostic Information 2-1 Start 2-1 Service Error Codes 2-2 ...User Status Messages 2-5 User Error Messages 2-9 Power-On Self Test (POST 2-14 Symptom Tables 2-15 Charge Roll Service Check 2-17 Cover Open Switch/Cable Service Check 2-19 Dead Machine Service Check 2-20 Erase Lamp Service Check 2-22 Fan Service Check 2-23 Fuser...
Service Manual
Page 4
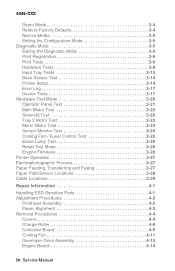
...Diagnostic Mode 3-5 Exiting the Diagnostic Mode 3-5 Print Registration 3-6 Print Tests 3-6 Hardware Tests 3-8 Input Tray Tests 3-13 Base Sensor Test 3-14 Printer Setup 3-14 Error Log 3-17 Device Tests 3-17 Hardware Test Mode 3-20 Operator Panel Test 3-21 Main Motor Test 3-22 Solenoid Test 3-...2 Motor Test 3-23 Mirror Motor Test 3-23 Sensor Monitor Test 3-24 Cooling Fan / Fuser Control Test 3-25 Erase Lamp Test 3-26 Reset Test Mode 3-26 Engine Firmware 3-26 Printer Operation 3-27 Electrophotographic Process 3-27 Paper Feeding, Transferring and Fusing 3-27 Paper Path/Sensor...
...Diagnostic Mode 3-5 Exiting the Diagnostic Mode 3-5 Print Registration 3-6 Print Tests 3-6 Hardware Tests 3-8 Input Tray Tests 3-13 Base Sensor Test 3-14 Printer Setup 3-14 Error Log 3-17 Device Tests 3-17 Hardware Test Mode 3-20 Operator Panel Test 3-21 Main Motor Test 3-22 Solenoid Test 3-...2 Motor Test 3-23 Mirror Motor Test 3-23 Sensor Monitor Test 3-24 Cooling Fan / Fuser Control Test 3-25 Erase Lamp Test 3-26 Reset Test Mode 3-26 Engine Firmware 3-26 Printer Operation 3-27 Electrophotographic Process 3-27 Paper Feeding, Transferring and Fusing 3-27 Paper Path/Sensor...
Service Manual
Page 5
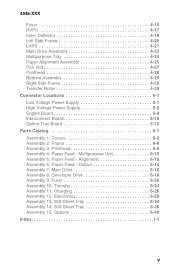
4045-XXX Fuser 4-15 HVPS 4-17 Inner Deflector 4-18 Left Side Frame 4-20 LVPS 4-21 Main Drive Assembly 4-23 Multipurpose Tray 4-24 Paper Alignment Assembly 4-25 Pick Roll 4-... Tray Board 5-12 Parts Catalog 6-1 Assembly 1: Covers 6-2 Assembly 2: Frame 6-6 Assembly 3: Printhead 6-8 Assembly 4: Paper Feed - Output 6-14 Assembly 7: Main Drive 6-16 Assembly 8: Developer Drive 6-18 Assembly 9: Fuser 6-20 Assembly 10: Transfer 6-24 Assembly 11: Charging 6-26 Assembly 12: Electronics 6-28 Assembly 13: 250-Sheet Tray 6-34 Assembly 14: 500-Sheet Tray 6-36...
4045-XXX Fuser 4-15 HVPS 4-17 Inner Deflector 4-18 Left Side Frame 4-20 LVPS 4-21 Main Drive Assembly 4-23 Multipurpose Tray 4-24 Paper Alignment Assembly 4-25 Pick Roll 4-... Tray Board 5-12 Parts Catalog 6-1 Assembly 1: Covers 6-2 Assembly 2: Frame 6-6 Assembly 3: Printhead 6-8 Assembly 4: Paper Feed - Output 6-14 Assembly 7: Main Drive 6-16 Assembly 8: Developer Drive 6-18 Assembly 9: Fuser 6-20 Assembly 10: Transfer 6-24 Assembly 11: Charging 6-26 Assembly 12: Electronics 6-28 Assembly 13: 250-Sheet Tray 6-34 Assembly 14: 500-Sheet Tray 6-36...
Service Manual
Page 28
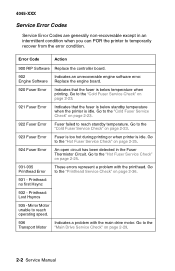
... Printhead Error These errors represent a problem with the main drive motor. Go to the "Hot Fuser Service Check" on page 2-23. 923 Fuser Error Fuser is too hot during printing or when printer is below temperature when printing. Go to the Transport Motor "Main Drive Service Check" on page... 2-23. 922 Fuser Error Fuser failed to the "Cold Fuser Service Check" on page 2-29. 2-2 Service Manual...
... Printhead Error These errors represent a problem with the main drive motor. Go to the "Hot Fuser Service Check" on page 2-23. 923 Fuser Error Fuser is too hot during printing or when printer is below temperature when printing. Go to the Transport Motor "Main Drive Service Check" on page... 2-23. 922 Fuser Error Fuser failed to the "Cold Fuser Service Check" on page 2-29. 2-2 Service Manual...

Service Manual
Page 40
...Check for correct POST functioning of pels, and then clears. 3. The cooling fan turns on the display. 5. The main drive motor turns off . 16. The fuser takes longer to warm up from a cold start than a warm start. 7. 4045-XXX Power-On Self Test (POST) When you turn . 11. The operator... panel displays one row of the base printer by observing the following: 1. The main drive motor turns on. 9. The exit rollers turn the printer On, it performs a Power-On Self Test. The exit rollers stop turning. 15.
...Check for correct POST functioning of pels, and then clears. 3. The cooling fan turns on the display. 5. The main drive motor turns off . 16. The fuser takes longer to warm up from a cold start than a warm start. 7. 4045-XXX Power-On Self Test (POST) When you turn . 11. The operator... panel displays one row of the base printer by observing the following: 1. The main drive motor turns on. 9. The exit rollers turn the printer On, it performs a Power-On Self Test. The exit rollers stop turning. 15.

Service Manual
Page 49
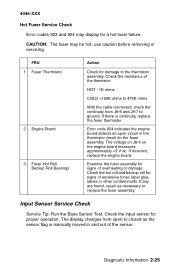
... Check Cold Fuser Service Check Error codes 920, 921, and 922 may display for correct installation. Perform the Cooling Fan Test in the Power Saver mode. Turn the cooling fan on unless the printer is in the Hardware Test Mode. The main fan runs continuously when the printer is powered on... to the engine board, J13 for a cold fuser failure. A 920 error caused by low line voltage can sometimes be cleared ...
... Check Cold Fuser Service Check Error codes 920, 921, and 922 may display for correct installation. Perform the Cooling Fan Test in the Power Saver mode. Turn the cooling fan on unless the printer is in the Hardware Test Mode. The main fan runs continuously when the printer is powered on... to the engine board, J13 for a cold fuser failure. A 920 error caused by low line voltage can sometimes be cleared ...
Service Manual
Page 50
..., replace the lamp. If correct, replace the contact in the fuser cover. Turn the printer on the fuser lamp cable going to the fuser assembly. Replace any open , replace the LVPS. Disconnect the thermistor cable from the printer. Disconnect the fuser lamp connectors at the fuser assembly. If incorrect, remove the LVPS and check both F1 and...
..., replace the lamp. If correct, replace the contact in the fuser cover. Turn the printer on the fuser lamp cable going to the fuser assembly. Replace any open , replace the LVPS. Disconnect the thermistor cable from the printer. Disconnect the fuser lamp connectors at the fuser assembly. If incorrect, remove the LVPS and check both F1 and...
Service Manual
Page 51
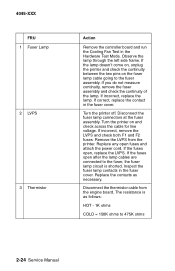
... of excessive toner, label glue, labels or other contaminants. Check the hot roll and backup roll for damage to ground. Examine the fuser assembly for a hot fuser failure. The voltage on J8-6 on the engine board measures approximately +5 V dc. The display changes from J8-6 and J8-7 to...removing or servicing. Check the resistance of the themistor: HOT - 1K ohms COLD =150K ohms to closed as necessary or replace the fuser assembly. Error code 924 indicates the engine board detects an open to 475K ohms With the cable connected, check the continuity from open circuit...
... of excessive toner, label glue, labels or other contaminants. Check the hot roll and backup roll for damage to ground. Examine the fuser assembly for a hot fuser failure. The voltage on J8-6 on the engine board measures approximately +5 V dc. The display changes from J8-6 and J8-7 to...removing or servicing. Check the resistance of the themistor: HOT - 1K ohms COLD =150K ohms to closed as necessary or replace the fuser assembly. Error code 924 indicates the engine board detects an open to 475K ohms With the cable connected, check the continuity from open circuit...
Service Manual
Page 55
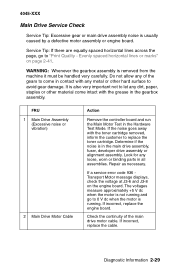
... page, go to 0 V dc when the motor is also very important not to let any metal or other material come in the main drive assembly, fuser, developer drive assembly or alignment assembly. It is running. The voltages measure approximately +5 V dc when the motor is in contact with the toner cartridge removed...
... page, go to 0 V dc when the motor is also very important not to let any metal or other material come in the main drive assembly, fuser, developer drive assembly or alignment assembly. It is running. The voltages measure approximately +5 V dc when the motor is in contact with the toner cartridge removed...
Service Manual
Page 72
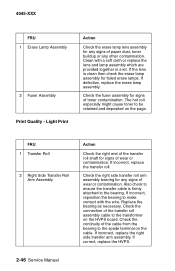
.... Check the continuity of the transfer roll assembly cable to the spade terminal on the page. 4045-XXX FRU 1 Erase Lamp Assembly 2 Fuser Assembly Print Quality - Check the fuser assembly for any other contamination. The hot roll especially might cause toner to make contact with a soft cloth or replace the lens and...
.... Check the continuity of the transfer roll assembly cable to the spade terminal on the page. 4045-XXX FRU 1 Erase Lamp Assembly 2 Fuser Assembly Print Quality - Check the fuser assembly for any other contamination. The hot roll especially might cause toner to make contact with a soft cloth or replace the lens and...

Service Manual
Page 73
... or backup roll. Clean the area and run another copy. FRU 1 Fuser Assembly 2 Transfer Roll Action Toner is generally caused by a toner buildup on backside of the media. The test helps isolate the printer from the serial cable and host. If the problem continues, replace the FRUs ... Test" on the backside of toner. If the test indicates a problem, replace the controller board. This problem is being carried through the printer on page 3-11. Diagnostic Information 2-47 Repair as necessary. Check the transfer roll for any noticeable buildup of the paper. 4045-XXX Print Quality...
... or backup roll. Clean the area and run another copy. FRU 1 Fuser Assembly 2 Transfer Roll Action Toner is generally caused by a toner buildup on backside of the media. The test helps isolate the printer from the serial cable and host. If the problem continues, replace the FRUs ... Test" on the backside of toner. If the test indicates a problem, replace the controller board. This problem is being carried through the printer on page 3-11. Diagnostic Information 2-47 Repair as necessary. Check the transfer roll for any noticeable buildup of the paper. 4045-XXX Print Quality...

Service Manual
Page 94
... mode is unique as the failing FRU since the controller board is stuck. 3-20 Service Manual Remove the controller board and shield assembly from the printer. 4. The following menu items are displayed on the operator panel: Op Panel Test Main Motor Solenoid Test Tray 2 Motor Mirror Motor Sensor Monitor ...Cooling Fan (status) Fuser Ctrl Erase Lamp Reset Test Mode Engine Firmware Note: The Operator Panel Test is the first menu item to appear on to display the Operator...
... mode is unique as the failing FRU since the controller board is stuck. 3-20 Service Manual Remove the controller board and shield assembly from the printer. 4. The following menu items are displayed on the operator panel: Op Panel Test Main Motor Solenoid Test Tray 2 Motor Mirror Motor Sensor Monitor ...Cooling Fan (status) Fuser Ctrl Erase Lamp Reset Test Mode Engine Firmware Note: The Operator Panel Test is the first menu item to appear on to display the Operator...
Service Manual
Page 99
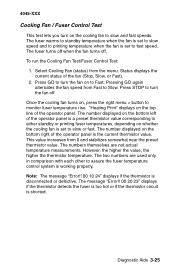
...or if the thermistor circuit is the current thermistor value. Press GO to turn the fan on to turn on the cooling fan to monitor fuser temperature rise. Pressing GO again alternates the fan speed from the menu. The number displayed on the bottom right of the operator panel is a...: The message "Error!! 00 10 24" displays if the thermistor is set to slow speed and to fast speed. To run the Cooling Fan Test/Fuser Control Test: 1. Status displays the current status of the operator panel. This value increases from 0 and stabilizes somewhat near the preset thermistor value. Diagnostic...
...or if the thermistor circuit is the current thermistor value. Press GO to turn the fan on to turn on the cooling fan to monitor fuser temperature rise. Pressing GO again alternates the fan speed from the menu. The number displayed on the bottom right of the operator panel is a...: The message "Error!! 00 10 24" displays if the thermistor is set to slow speed and to fast speed. To run the Cooling Fan Test/Fuser Control Test: 1. Status displays the current status of the operator panel. This value increases from 0 and stabilizes somewhat near the preset thermistor value. Diagnostic...


