
User's Guide
Page 3
... x Online Documents x Trademarks xi 1 Setting Up Your Printer 1 Unpacking Your Printer 1 Removing Print Cartridge Packaging 2 Installing the Print Cartridge 5 Loading the Standard Input Tray 6 Installing the Paper Bail 11 Connecting Your Printer to a Computer 12 Using a Parallel Cable 12 Using ...a USB Cable 14 Plugging the Printer In 20 Turning the Printer Power On 20 Printing the Menu Settings Page 21 Installing the Operator Panel Overlay 22 Changing the Operator Panel Display Language 23 Installing Printer Drivers...
... x Online Documents x Trademarks xi 1 Setting Up Your Printer 1 Unpacking Your Printer 1 Removing Print Cartridge Packaging 2 Installing the Print Cartridge 5 Loading the Standard Input Tray 6 Installing the Paper Bail 11 Connecting Your Printer to a Computer 12 Using a Parallel Cable 12 Using ...a USB Cable 14 Plugging the Printer In 20 Turning the Printer Power On 20 Printing the Menu Settings Page 21 Installing the Operator Panel Overlay 22 Changing the Operator Panel Display Language 23 Installing Printer Drivers...
User's Guide
Page 10
... up an optional print server after installing it in the PAPER MENU. Other Information In addition to this User's Guide, Lexmark offers the following sources of the most popular MarkVision features. • Documents which provide general information about printer languages and commands, interface specification, and printer memory management. Online Documents The Drivers, MarkVision and Utilities...
... up an optional print server after installing it in the PAPER MENU. Other Information In addition to this User's Guide, Lexmark offers the following sources of the most popular MarkVision features. • Documents which provide general information about printer languages and commands, interface specification, and printer memory management. Online Documents The Drivers, MarkVision and Utilities...
User's Guide
Page 26
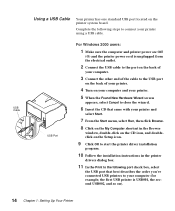
... the back of your computer. 3 Connect the other end of the cable to the USB port on the back of your printer. 4 Turn on your computer and your printer. 5 When the Found New Hardware Wizard screen appears, select Cancel to close the wizard. 6 Insert the CD that best ... on the Setup icon. 9 Click OK to start the printer driver installation program. 10 Follow the installation instructions in the printer drivers dialog box. 11 In the Print to the following steps to your printer using a USB cable. USB Cable Using a USB Cable Your printer has one standard USB port located on ). 14 Chapter 1:...
... the back of your computer. 3 Connect the other end of the cable to the USB port on the back of your printer. 4 Turn on your computer and your printer. 5 When the Found New Hardware Wizard screen appears, select Cancel to close the wizard. 6 Insert the CD that best ... on the Setup icon. 9 Click OK to start the printer driver installation program. 10 Follow the installation instructions in the printer drivers dialog box. 11 In the Print to the following steps to your printer using a USB cable. USB Cable Using a USB Cable Your printer has one standard USB port located on ). 14 Chapter 1:...
User's Guide
Page 34
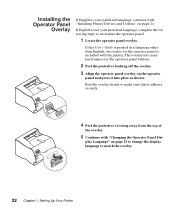
... Operator Panel Dis- If English is not your preferred language, continue with "Installing Printer Drivers and Utilities" on page 23 to change the display language to match the overlay. 22 Chapter 1: Setting Up Your Printer If this User's Guide is printed in a language other than English, an overlay for the operator panel buttons. 2 Peel...
... Operator Panel Dis- If English is not your preferred language, continue with "Installing Printer Drivers and Utilities" on page 23 to change the display language to match the overlay. 22 Chapter 1: Setting Up Your Printer If this User's Guide is printed in a language other than English, an overlay for the operator panel buttons. 2 Peel...
User's Guide
Page 38
Note: Management capabili- Lexmark network printers and change their printing order, and hold or delete specific jobs. - This document is a Web-based printer management utility that comes with the software: • MarkVision for Intranet Servers, refer to ...the documentation installed with your printer. Introducing MarkVision for Intranet Servers MarkVision for multivendor printers are available in some of installed options. - ties for Intranet Servers is also located on the Drivers, MarkVision and Utilities CD that : • Lets you printer capabilities. • MarkVision ...
Note: Management capabili- Lexmark network printers and change their printing order, and hold or delete specific jobs. - This document is a Web-based printer management utility that comes with the software: • MarkVision for Intranet Servers, refer to ...the documentation installed with your printer. Introducing MarkVision for Intranet Servers MarkVision for multivendor printers are available in some of installed options. - ties for Intranet Servers is also located on the Drivers, MarkVision and Utilities CD that : • Lets you printer capabilities. • MarkVision ...
User's Guide
Page 41
... On the Drivers, MarkVision and Utilities CD, Lexmark's allin-one software installation utility provides IT administrators with time-saving installation and distribution tools that enable printing to workstations across the network. • Provides huge productivity gains when rolling out large numbers of network printers. • Supports a wide range of printer installation options for printing. Lexmark NetPnP NetPnP...
... On the Drivers, MarkVision and Utilities CD, Lexmark's allin-one software installation utility provides IT administrators with time-saving installation and distribution tools that enable printing to workstations across the network. • Provides huge productivity gains when rolling out large numbers of network printers. • Supports a wide range of printer installation options for printing. Lexmark NetPnP NetPnP...
User's Guide
Page 42
...driver installation settings in a file. IT administrators can then be sent to produce completed forms such as invoices, statements, pick slips, labels, and purchase orders. For example, the same purchase order information can be used : - Optra Forms Optra Forms combines data from any ASCII text print file from a customer's application with printer...-resident electronic forms to different printers and printed with custom settings to users on...
...driver installation settings in a file. IT administrators can then be sent to produce completed forms such as invoices, statements, pick slips, labels, and purchase orders. For example, the same purchase order information can be used : - Optra Forms Optra Forms combines data from any ASCII text print file from a customer's application with printer...-resident electronic forms to different printers and printed with custom settings to users on...
User's Guide
Page 65
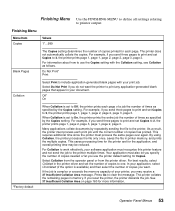
... again. This requires additional time since the printer must process each print job until the correct number of copies printed for Copies. Select Collation from the operator panel or from the printer driver. If you send three pages to print and set to the printer. Do Not Print* Print Collation Select Print to include application-generated blank pages with the...
... again. This requires additional time since the printer must process each print job until the correct number of copies printed for Copies. Select Collation from the operator panel or from the printer driver. If you send three pages to print and set to the printer. Do Not Print* Print Collation Select Print to include application-generated blank pages with the...
User's Guide
Page 72
...in the JOB MENU until you send the job. The Username and Jobname fields are available as defined by the application. The printer delays the printing of the fields is not displayed in this field. Note: In the sub-menu values listed above, the Username field is ... processed at least one or both of your driver. You can change this field to create and send a Confidential Job. If one Confidential Job. Cancel Job displays only when the printer is entered, the following values are truncated to cancel the current print job. See "Entering a Personal Identification Number...
...in the JOB MENU until you send the job. The Username and Jobname fields are available as defined by the application. The printer delays the printing of the fields is not displayed in this field. Note: In the sub-menu values listed above, the Username field is ... processed at least one or both of your driver. You can change this field to create and send a Confidential Job. If one Confidential Job. Cancel Job displays only when the printer is entered, the following values are truncated to cancel the current print job. See "Entering a Personal Identification Number...
User's Guide
Page 77
... stored in memory, you type in to log on the username field in your operating system. Reserve Print jobs are automatically deleted when the printer requires extra memory to your driver. Print All Jobs PRINT A JOB ... For more information about this field. When you send the job. By default, this... field to another name in the driver before you create a Reserve Print job, the job formats, but the printer stores the job in memory so you can print additional copies of the job at a later time. As long as defined by the...
... stored in memory, you type in to log on the username field in your operating system. Reserve Print jobs are automatically deleted when the printer requires extra memory to your driver. Print All Jobs PRINT A JOB ... For more information about this field. When you send the job. By default, this... field to another name in the driver before you create a Reserve Print job, the job formats, but the printer stores the job in memory so you can print additional copies of the job at a later time. As long as defined by the...
User's Guide
Page 78
... copies to an online state, the remaining copies print. Select PRINT A JOB. At the Copies prompt, change the number of copies you want the other copies. Once the printer exits the menus and returns to print from the number set in the printer driver. See DELETE A JOB on page 68 for ...more information, see PRINT COPIES on page 67. Once all jobs • delete a job Press ...
... copies to an online state, the remaining copies print. Select PRINT A JOB. At the Copies prompt, change the number of copies you want the other copies. Once the printer exits the menus and returns to print from the number set in the printer driver. See DELETE A JOB on page 68 for ...more information, see PRINT COPIES on page 67. Once all jobs • delete a job Press ...
User's Guide
Page 120
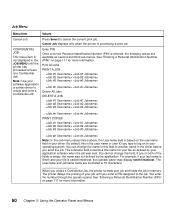
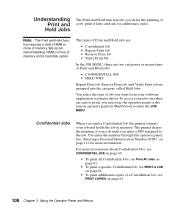
... In the JOB MENU, there are two categories or menu items of Print and Hold jobs: • CONFIDENTIAL JOB • HELD JOBS Repeat Print job, Reserve Print job, and Verify Print job are sent to print, you want from your software application or printer driver. Confidential Jobs When you enter a PIN assigned to enter the JOB MENU...
... In the JOB MENU, there are two categories or menu items of Print and Hold jobs: • CONFIDENTIAL JOB • HELD JOBS Repeat Print job, Reserve Print job, and Verify Print job are sent to print, you want from your software application or printer driver. Confidential Jobs When you enter a PIN assigned to enter the JOB MENU...

User's Guide
Page 122
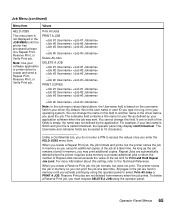
... is satisfactory, you can change the number of copies set in the printer driver. Once all copies are printed, the job is deleted from printer memory. For more information. To change the number of remaining copies to print: 1 Select PRINT COPIES. 2 Select the specific job. 3 At the Copies prompt, change...until you must select the DELETE A JOB value, and select this job to delete it is deleted from printer memory. To print the number of copies to print from the printer driver. Verify Print Job When you to examine the first copy to see if it . See DELETE A JOB on page 68...
... is satisfactory, you can change the number of copies set in the printer driver. Once all copies are printed, the job is deleted from printer memory. For more information. To change the number of remaining copies to print: 1 Select PRINT COPIES. 2 Select the specific job. 3 At the Copies prompt, change...until you must select the DELETE A JOB value, and select this job to delete it is deleted from printer memory. To print the number of copies to print from the printer driver. Verify Print Job When you to examine the first copy to see if it . See DELETE A JOB on page 68...

User's Guide
Page 123
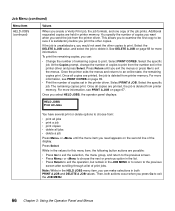
... processed and held in printer memory. If JOB MENU is required to delete or print a Confidential Job. When you have sent a Repeat Print job, a Reserve Print job, or a Verify Print job from your Confidential Job held in lists. Printing and Deleting Held Jobs Once you want to access your software application or printer driver, it is paired with...
... processed and held in printer memory. If JOB MENU is required to delete or print a Confidential Job. When you have sent a Repeat Print job, a Reserve Print job, or a Verify Print job from your Confidential Job held in lists. Printing and Deleting Held Jobs Once you want to access your software application or printer driver, it is paired with...
User's Guide
Page 131
...g/m2 (20 to Transparency from the printer driver, and from either the operator panel or from the 250-sheet input tray or the multipurpose feeder. Are stuck together. - Print Material Guidelines 119 See page 141 for laser printers. Note: When printing on transparencies, be sure to set ...the PAPER TYPE to Envelope, and select the correct envelope size from the printer driver, and from either the operator panel or from...
...g/m2 (20 to Transparency from the printer driver, and from either the operator panel or from the 250-sheet input tray or the multipurpose feeder. Are stuck together. - Print Material Guidelines 119 See page 141 for laser printers. Note: When printing on transparencies, be sure to set ...the PAPER TYPE to Envelope, and select the correct envelope size from the printer driver, and from either the operator panel or from...

User's Guide
Page 132
...paper or transparencies in .) of the printer. Partial sheets will also contaminate your printer and your cartridge with a slick backing material. • Do not print within 1 mm (0.040 in the same paper source. • Do not use with laser printers. See page 147 for an illustration... for use label sheets with adhesive, and could void your printer and cartridge warranties. 120 Chapter 4: Using Print Materials When printing on labels, be able to Labels from the printer driver, and from either the operator...
...paper or transparencies in .) of the printer. Partial sheets will also contaminate your printer and your cartridge with a slick backing material. • Do not print within 1 mm (0.040 in the same paper source. • Do not use with laser printers. See page 147 for an illustration... for use label sheets with adhesive, and could void your printer and cartridge warranties. 120 Chapter 4: Using Print Materials When printing on labels, be able to Labels from the printer driver, and from either the operator...

User's Guide
Page 133
... (0.040 in.) away from edges. Print Material Guidelines 121 Adhesive material will contaminate your printer and could void your warranty. • If zone coating of the adhesive is not possible, a 3 mm (0.125 in.) strip should be removed on the leading and driver edge, and a non-oozing adhesive ...should be used. • Remove a 3 mm (0.125 in.) strip from the leading edge to prevent labels from peeling inside the printer. • Portrait orientation is preferred, especially when printing bar codes. • Do not use...
... (0.040 in.) away from edges. Print Material Guidelines 121 Adhesive material will contaminate your printer and could void your warranty. • If zone coating of the adhesive is not possible, a 3 mm (0.125 in.) strip should be removed on the leading and driver edge, and a non-oozing adhesive ...should be used. • Remove a 3 mm (0.125 in.) strip from the leading edge to prevent labels from peeling inside the printer. • Portrait orientation is preferred, especially when printing bar codes. • Do not use...

User's Guide
Page 134
...the orientation of paper fibers and texture, that can significantly affect the print quality. Try a sample of any card stock you replace the print cartridge), complete the following steps to Card Stock from the printer driver, and from either the operator panel or from MarkVision. Card Stock... Guidelines Card stock is perforated or creased. When printing on the preferred weight of grain short ...
...the orientation of paper fibers and texture, that can significantly affect the print quality. Try a sample of any card stock you replace the print cartridge), complete the following steps to Card Stock from the printer driver, and from either the operator panel or from MarkVision. Card Stock... Guidelines Card stock is perforated or creased. When printing on the preferred weight of grain short ...
User's Guide
Page 188
... as Lexmark part number 1329605 (10 ft) or 1427498 (20 ft). See "Printing the Menu Settings Page" on the operator panel display before you are connected to print. Make sure you send a job to the USB port, but the printer will not print. You are using the correct printer language. • Verify that the correct printer driver is...
... as Lexmark part number 1329605 (10 ft) or 1427498 (20 ft). See "Printing the Menu Settings Page" on the operator panel display before you are connected to print. Make sure you send a job to the USB port, but the printer will not print. You are using the correct printer language. • Verify that the correct printer driver is...

User's Guide
Page 189
Check the Print Timeout setting in the printer driver. See Print Timeout on page 11 for more information. Check the PAPER TYPE setting in the PAPER MENU on page 118 for your printer. Job prints from paper sources. • If there is a recommended print side for more information. Printing Problems 177 See "Installing the Paper Bail" on page 74...
Check the Print Timeout setting in the printer driver. See Print Timeout on page 11 for more information. Check the PAPER TYPE setting in the PAPER MENU on page 118 for your printer. Job prints from paper sources. • If there is a recommended print side for more information. Printing Problems 177 See "Installing the Paper Bail" on page 74...


