
User's Guide
Page 2
...FOR A PARTICULAR PURPOSE. Changes are provided with RESTRICTED RIGHTS. A form for the reader's comments is subject to restrictions as set forth in subparagraph (c)(1)(ii) of the Rights in Technical Data and Computer Software clause at DFARS 252.227-7013 and in..., programs, or services, except those expressly designated by the manufacturer, are the user's responsibility. © Copyright 1999, 2000 Lexmark International, Inc. This publication could include technical inaccuracies or typographical errors. UNITED STATES GOVERNMENT RESTRICTED RIGHTS This software and documentation are ...
...FOR A PARTICULAR PURPOSE. Changes are provided with RESTRICTED RIGHTS. A form for the reader's comments is subject to restrictions as set forth in subparagraph (c)(1)(ii) of the Rights in Technical Data and Computer Software clause at DFARS 252.227-7013 and in..., programs, or services, except those expressly designated by the manufacturer, are the user's responsibility. © Copyright 1999, 2000 Lexmark International, Inc. This publication could include technical inaccuracies or typographical errors. UNITED STATES GOVERNMENT RESTRICTED RIGHTS This software and documentation are ...

User's Guide
Page 3
... ix Other Information x Online Documents x Trademarks xi 1 Setting Up Your Printer 1 Unpacking Your Printer 1 Removing Print Cartridge Packaging 2 Installing the Print Cartridge 5 Loading the Standard Input Tray 6 Installing the Paper Bail 11 Connecting Your Printer to a Computer 12 Using a Parallel Cable 12 Using ...a USB Cable 14 Plugging the Printer In 20 Turning the Printer Power On 20 Printing the Menu Settings Page 21 Installing the Operator Panel Overlay 22 ...
... ix Other Information x Online Documents x Trademarks xi 1 Setting Up Your Printer 1 Unpacking Your Printer 1 Removing Print Cartridge Packaging 2 Installing the Print Cartridge 5 Loading the Standard Input Tray 6 Installing the Paper Bail 11 Connecting Your Printer to a Computer 12 Using a Parallel Cable 12 Using ...a USB Cable 14 Plugging the Printer In 20 Turning the Printer Power On 20 Printing the Menu Settings Page 21 Installing the Operator Panel Overlay 22 ...

User's Guide
Page 4
...for Intranet Servers 26 Introducing MarkVision for Intranet Servers 26 MarkVision for UNIX Networks 27 Lexmark MarkTrack 28 Lexmark NetPnP 29 Software Installation and Distribution Tools 29 Optra Forms 30 Solaris Ready Printers for Sun Customers 31 3 Using the Operator Panel and Menus 33 Using the Operator...Messages 37 Attendance Messages 37 Service Messages 37 Operator Panel Menus 38 Printing the Menu Settings Page 39 Changing Menu Settings 40 Disabling the Operator Panel Menus 41 Overview of Printer Menus 43 Paper Menu 44 Finishing Menu 53 Utilities Menu 57 Job Menu 59 ...
...for Intranet Servers 26 Introducing MarkVision for Intranet Servers 26 MarkVision for UNIX Networks 27 Lexmark MarkTrack 28 Lexmark NetPnP 29 Software Installation and Distribution Tools 29 Optra Forms 30 Solaris Ready Printers for Sun Customers 31 3 Using the Operator Panel and Menus 33 Using the Operator...Messages 37 Attendance Messages 37 Service Messages 37 Operator Panel Menus 38 Printing the Menu Settings Page 39 Changing Menu Settings 40 Disabling the Operator Panel Menus 41 Overview of Printer Menus 43 Paper Menu 44 Finishing Menu 53 Utilities Menu 57 Job Menu 59 ...
User's Guide
Page 7
... 197 Understanding the Fax Port 197 Choosing Hardware 197 Setting Up a Fax Port 198 Resetting a Fax Port 199 Disabling a Fax Port 200 11 Memory and Option Cards 201 Accessing the Printer System Board 201 Understanding Memory Options 206 Printer Memory 206 Flash Memory 206 Installing Memory Options 207 ...212 Hard Disk Option 212 Parallel/USB Interface Option Card 215 Installing an Option Card 216 Removing an Option Card 219 Closing the Printer System Board 220 12 Optional 500-Sheet Drawer 223 Installing the Optional Drawer 223 13 Infrared Adapter 227 Connecting the Cable and ...
... 197 Understanding the Fax Port 197 Choosing Hardware 197 Setting Up a Fax Port 198 Resetting a Fax Port 199 Disabling a Fax Port 200 11 Memory and Option Cards 201 Accessing the Printer System Board 201 Understanding Memory Options 206 Printer Memory 206 Flash Memory 206 Installing Memory Options 207 ...212 Hard Disk Option 212 Parallel/USB Interface Option Card 215 Installing an Option Card 216 Removing an Option Card 219 Closing the Printer System Board 220 12 Optional 500-Sheet Drawer 223 Installing the Optional Drawer 223 13 Infrared Adapter 227 Connecting the Cable and ...

User's Guide
Page 8
Typefaces and Fonts 231 Weight and Style 231 Pitch and Point Size 232 Bitmapped and Scalable Fonts 234 Resident Fonts 235 Symbol Sets 239 Symbol Sets for PCL 6 Emulation 239 Downloadable Fonts 241 Printing a Font Sample List 242 Appendix B: Notices 243 Appendix C: Safety Information 253 Appendix D: Warranty 265 Glossary 269 Index 285 viii Table of Contents
Typefaces and Fonts 231 Weight and Style 231 Pitch and Point Size 232 Bitmapped and Scalable Fonts 234 Resident Fonts 235 Symbol Sets 239 Symbol Sets for PCL 6 Emulation 239 Downloadable Fonts 241 Printing a Font Sample List 242 Appendix B: Notices 243 Appendix C: Safety Information 253 Appendix D: Warranty 265 Glossary 269 Index 285 viii Table of Contents
User's Guide
Page 9
... this book in the left column for the printer and printer options as well as a reference when you have a question about the Lexmark Optra M410 and M412 laser printers. Warning! A warning identifies something that could cause you harm. • Messages, menu names, menu items, and menu settings that could damage your printer hardware or software. • Operator panel buttons...
... this book in the left column for the printer and printer options as well as a reference when you have a question about the Lexmark Optra M410 and M412 laser printers. Warning! A warning identifies something that could cause you harm. • Messages, menu names, menu items, and menu settings that could damage your printer hardware or software. • Operator panel buttons...
User's Guide
Page 10
... provides detailed information about selecting print material appropriate for your printer and other Lexmark products and services. Other Information In addition to this User's Guide, Lexmark offers the following sources of the most popular MarkVision features. • Documents which provide general information about setting up an optional print server after installing it in the...
... provides detailed information about selecting print material appropriate for your printer and other Lexmark products and services. Other Information In addition to this User's Guide, Lexmark offers the following sources of the most popular MarkVision features. • Documents which provide general information about setting up an optional print server after installing it in the...

User's Guide
Page 11
... corresponding to be compatible with the PCL 6 language. Trademarks Lexmark, Lexmark with diamond design, MarkNet, MarkVision, and Optra are trademarks of Lexmark International, Inc., registered in its software products. PCL® is intended to the commands. PostScript® is Hewlett-Packard Company's designations of a set of printer commands (language) and functions included in the United States...
... corresponding to be compatible with the PCL 6 language. Trademarks Lexmark, Lexmark with diamond design, MarkNet, MarkVision, and Optra are trademarks of Lexmark International, Inc., registered in its software products. PCL® is intended to the commands. PostScript® is Hewlett-Packard Company's designations of a set of printer commands (language) and functions included in the United States...
User's Guide
Page 13
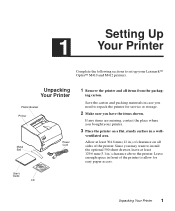
... allow for service or storage. 2 Make sure you bought your Lexmark™ Optra™ M410 and M412 printers. Leave enough space in .) clearance above the printer. ing carton. Setting Up 1 Your Printer Complete the following sections to set up your printer. 3 Place the printer on all items from the packag- Since you need to install the optional 500-sheet drawer...
... allow for service or storage. 2 Make sure you bought your Lexmark™ Optra™ M410 and M412 printers. Leave enough space in .) clearance above the printer. ing carton. Setting Up 1 Your Printer Complete the following sections to set up your printer. 3 Place the printer on all items from the packag- Since you need to install the optional 500-sheet drawer...
User's Guide
Page 14
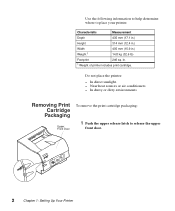
... air conditioners. - Removing Print Cartridge Packaging Upper Front Door To remove the print cartridge packaging: 1 Push the upper release latch to place your printer. Do not place the printer: - In dusty or dirty environments. In direct sunlight. - in .) 14.8 kg (32.6 lb) Footprint 246 sq. Use the following information to help determine...
... air conditioners. - Removing Print Cartridge Packaging Upper Front Door To remove the print cartridge packaging: 1 Push the upper release latch to place your printer. Do not place the printer: - In dusty or dirty environments. In direct sunlight. - in .) 14.8 kg (32.6 lb) Footprint 246 sq. Use the following information to help determine...
User's Guide
Page 16
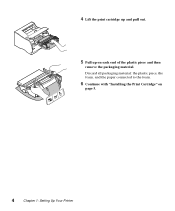
4 Lift the print cartridge up and pull out. 5 Pull up on page 5. 4 Chapter 1: Setting Up Your Printer Discard all packaging material: the plastic piece, the foam, and the paper connected to the foam. 6 Continue with "Installing the Print Cartridge" on each end of the plastic piece and then remove the packaging material.
4 Lift the print cartridge up and pull out. 5 Pull up on page 5. 4 Chapter 1: Setting Up Your Printer Discard all packaging material: the plastic piece, the foam, and the paper connected to the foam. 6 Continue with "Installing the Print Cartridge" on each end of the plastic piece and then remove the packaging material.
User's Guide
Page 18
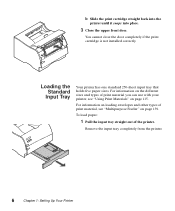
... snaps into place. 3 Close the upper front door. For information on the different sizes and types of print material you can use with your printer, see "Multipurpose Feeder" on page 139. You cannot close the door completely if the print cartridge is not installed correctly. To load paper: ... straight out of print material, see "Using Print Materials" on loading envelopes and other types of the printer. For information on page 115. Loading the Standard Input Tray Your printer has one standard 250-sheet input tray that holds five paper sizes. Remove the input tray completely from ...
... snaps into place. 3 Close the upper front door. For information on the different sizes and types of print material you can use with your printer, see "Multipurpose Feeder" on page 139. You cannot close the door completely if the print cartridge is not installed correctly. To load paper: ... straight out of print material, see "Using Print Materials" on loading envelopes and other types of the printer. For information on page 115. Loading the Standard Input Tray Your printer has one standard 250-sheet input tray that holds five paper sizes. Remove the input tray completely from ...
User's Guide
Page 20
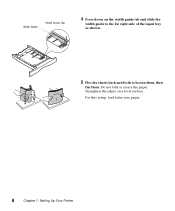
For this setup, load letter-size paper. 8 Chapter 1: Setting Up Your Printer Do not fold or crease the paper. Straighten the edges on the width guide tab and slide the width guide to the far right side of the input tray as shown. 5 Flex the sheets back and forth to loosen them, then fan them. Width Guide Width Guide Tab 4 Press down on a level surface.
For this setup, load letter-size paper. 8 Chapter 1: Setting Up Your Printer Do not fold or crease the paper. Straighten the edges on the width guide tab and slide the width guide to the far right side of the input tray as shown. 5 Flex the sheets back and forth to loosen them, then fan them. Width Guide Width Guide Tab 4 Press down on a level surface.
User's Guide
Page 22
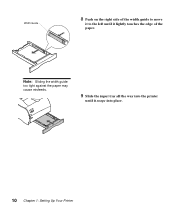
Note: Sliding the width guide too tight against the paper may cause misfeeds. 9 Slide the input tray all the way into the printer until it snaps into place. 10 Chapter 1: Setting Up Your Printer Width Guide 8 Push on the right side of the width guide to move it to the left until it lightly touches the edge of the paper.
Note: Sliding the width guide too tight against the paper may cause misfeeds. 9 Slide the input tray all the way into the printer until it snaps into place. 10 Chapter 1: Setting Up Your Printer Width Guide 8 Push on the right side of the width guide to move it to the left until it lightly touches the edge of the paper.

User's Guide
Page 24
Caution! We recommend Lexmark part number 1329605 (10 ft) or 1427498 (20 ft). To avoid electrical shock hazards, make sure your computer power is Off (O) and unplug all of your printer functions. 1 Turn the printer power Off (O) and unplug the printer power cord from your ...IEEE-compliant cable, you need to connect your printer to your computer, you may not be able to a Computer To print from the electrical outlet. Parallel Cable Parallel Connector 12 Chapter 1: Setting Up Your Printer Connecting Your Printer to access all computer equipment before connecting cables...
Caution! We recommend Lexmark part number 1329605 (10 ft) or 1427498 (20 ft). To avoid electrical shock hazards, make sure your computer power is Off (O) and unplug all of your printer functions. 1 Turn the printer power Off (O) and unplug the printer power cord from your ...IEEE-compliant cable, you need to connect your printer to your computer, you may not be able to a Computer To print from the electrical outlet. Parallel Cable Parallel Connector 12 Chapter 1: Setting Up Your Printer Connecting Your Printer to access all computer equipment before connecting cables...
User's Guide
Page 26
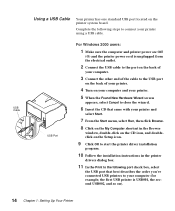
USB Cable Using a USB Cable Your printer has one standard USB port located on ). 14 Chapter 1: Setting Up Your Printer USB Port For Windows 2000 users: 1 Make sure the computer and printer power are Off (O) and the printer power cord is USB001, the second USB002, and so on the printer system board. Complete the following port check...
USB Cable Using a USB Cable Your printer has one standard USB port located on ). 14 Chapter 1: Setting Up Your Printer USB Port For Windows 2000 users: 1 Make sure the computer and printer power are Off (O) and the printer power cord is USB001, the second USB002, and so on the printer system board. Complete the following port check...

User's Guide
Page 28
Double-click to select Optra M410 or Optra M412. A screen displays indicating the application is looking for this CD. l Click Printer Software. The Choose your CD-ROM drive. m Select Install from this laser printer to install the printer driver. g Scroll down ...until you locate your Installation Path screen displays. When the next screen appears that came with your printer. Wait as the default on the left of printers on the next screen. The License Agreement displays. 16 Chapter 1: Setting Up Your Printer...
Double-click to select Optra M410 or Optra M412. A screen displays indicating the application is looking for this CD. l Click Printer Software. The Choose your CD-ROM drive. m Select Install from this laser printer to install the printer driver. g Scroll down ...until you locate your Installation Path screen displays. When the next screen appears that came with your printer. Wait as the default on the left of printers on the next screen. The License Agreement displays. 16 Chapter 1: Setting Up Your Printer...

User's Guide
Page 30
...to install the necessary items. Instructions to process. 18 Chapter 1: Setting Up Your Printer The previous screen displays. USB Cable USB Port For Macintosh users: 1 Make sure the printer power is Off (O) and the printer power cord is unplugged from the list and click OK. 13 In... the USB printer selection area, click Change. Notice the new printer icon. 15 In the PostScript printer description (PPD) file, click Auto Setup. The USB printer dialog box displays. 14 Select Optra M410 or Optra...
...to install the necessary items. Instructions to process. 18 Chapter 1: Setting Up Your Printer The previous screen displays. USB Cable USB Port For Macintosh users: 1 Make sure the printer power is Off (O) and the printer power cord is unplugged from the list and click OK. 13 In... the USB printer selection area, click Change. Notice the new printer icon. 15 In the PostScript printer description (PPD) file, click Auto Setup. The USB printer dialog box displays. 14 Select Optra M410 or Optra...
User's Guide
Page 31
... Printer Utility application. A window appears for you to name the printer. 17 Type in the name of the printer dialog box show the Optra M410 or Optra M412 printer icons. The printer icon displays on the menu bar. 21 Scroll down in the printer ...icon to a Computer 19 The previous screen displays. The Printing menu appears on your Desktop. 20 Click the new desktop printer icon. Connecting Your Printer to indicate it is selected as the default printer. A dark line appears around the printer in the Printing menu and select Set Default Printer. Notice the new printer...
... Printer Utility application. A window appears for you to name the printer. 17 Type in the name of the printer dialog box show the Optra M410 or Optra M412 printer icons. The printer icon displays on the menu bar. 21 Scroll down in the printer ...icon to a Computer 19 The previous screen displays. The Printing menu appears on your Desktop. 20 Click the new desktop printer icon. Connecting Your Printer to indicate it is selected as the default printer. A dark line appears around the printer in the Printing menu and select Set Default Printer. Notice the new printer...
User's Guide
Page 32
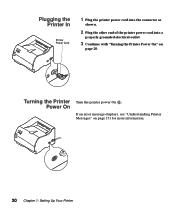
Turning the Printer Power On Turn the printer power On (|). If an error message displays, see "Understanding Printer Messages" on page 20. Plugging the Printer In Printer Power Cord 1 Plug the printer power cord into the connector as shown. 2 Plug the other end of the printer power cord into a properly grounded electrical outlet. 3 Continue with "Turning the Printer Power On" on page 151 for more information. 20 Chapter 1: Setting Up Your Printer
Turning the Printer Power On Turn the printer power On (|). If an error message displays, see "Understanding Printer Messages" on page 20. Plugging the Printer In Printer Power Cord 1 Plug the printer power cord into the connector as shown. 2 Plug the other end of the printer power cord into a properly grounded electrical outlet. 3 Continue with "Turning the Printer Power On" on page 151 for more information. 20 Chapter 1: Setting Up Your Printer


