
User's Guide
Page 3
Table of Contents Introduction ix About This Book ix Other Information x Online Documents x Trademarks xi 1 Setting Up Your Printer 1 Unpacking Your Printer 1 Removing Print Cartridge Packaging 2 Installing the Print Cartridge 5 Loading the Standard Input Tray 6 Installing the Paper Bail 11 Connecting Your Printer to a Computer 12 Using a Parallel Cable 12 Using a USB Cable 14 Plugging the...
Table of Contents Introduction ix About This Book ix Other Information x Online Documents x Trademarks xi 1 Setting Up Your Printer 1 Unpacking Your Printer 1 Removing Print Cartridge Packaging 2 Installing the Print Cartridge 5 Loading the Standard Input Tray 6 Installing the Paper Bail 11 Connecting Your Printer to a Computer 12 Using a Parallel Cable 12 Using a USB Cable 14 Plugging the...
User's Guide
Page 6
... 8 Clearing Jams 183 Possible Paper Jam Areas 184 200 and 201 Paper Jam - Remove Cartridge 184 202 Paper Jam - Check MP Feeder 192 9 Maintaining Your Printer 193 Ordering a Print Cartridge 193 Storing the Print Cartridge 194 Replacing the Print Cartridge 194 Cleaning the Printhead Lens 195 Ordering a Charge Roll Kit 195 vi Table of Contents...
... 8 Clearing Jams 183 Possible Paper Jam Areas 184 200 and 201 Paper Jam - Remove Cartridge 184 202 Paper Jam - Check MP Feeder 192 9 Maintaining Your Printer 193 Ordering a Print Cartridge 193 Storing the Print Cartridge 194 Replacing the Print Cartridge 194 Cleaning the Printhead Lens 195 Ordering a Charge Roll Kit 195 vi Table of Contents...
User's Guide
Page 14
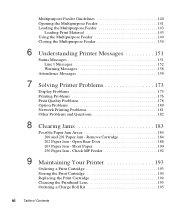
....6 lb) Footprint 246 sq. Do not place the printer: - Near heat sources or air conditioners. - Use the following information to help determine where to release the upper front door. 2 Chapter 1: Setting Up Your Printer In dusty or dirty environments. Characteristic Measurement Depth 435... mm (17.1 in.) Height 314 mm (12.4 in.) Width Weight 1 405 mm (15.9 in . 1 Weight of printer includes print cartridge. In direct sunlight. - Removing Print Cartridge Packaging Upper Front Door...
....6 lb) Footprint 246 sq. Do not place the printer: - Near heat sources or air conditioners. - Use the following information to help determine where to release the upper front door. 2 Chapter 1: Setting Up Your Printer In dusty or dirty environments. Characteristic Measurement Depth 435... mm (17.1 in.) Height 314 mm (12.4 in.) Width Weight 1 405 mm (15.9 in . 1 Weight of printer includes print cartridge. In direct sunlight. - Removing Print Cartridge Packaging Upper Front Door...

User's Guide
Page 15
Removing Print Cartridge Packaging 3 2 Raise the upper front door. It remains in place. 3 Grasp the print cartridge by the handgrip.
Removing Print Cartridge Packaging 3 2 Raise the upper front door. It remains in place. 3 Grasp the print cartridge by the handgrip.
User's Guide
Page 16
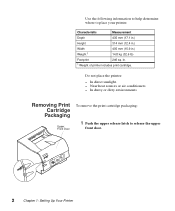
Discard all packaging material: the plastic piece, the foam, and the paper connected to the foam. 6 Continue with "Installing the Print Cartridge" on each end of the plastic piece and then remove the packaging material. 4 Lift the print cartridge up and pull out. 5 Pull up on page 5. 4 Chapter 1: Setting Up Your Printer
Discard all packaging material: the plastic piece, the foam, and the paper connected to the foam. 6 Continue with "Installing the Print Cartridge" on each end of the plastic piece and then remove the packaging material. 4 Lift the print cartridge up and pull out. 5 Pull up on page 5. 4 Chapter 1: Setting Up Your Printer
User's Guide
Page 17
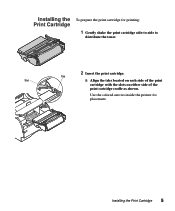
Installing the Print Cartridge 5 Installing the Print Cartridge To prepare the print cartridge for placement. Use the colored arrows inside the printer for printing: 1 Gently shake the print cartridge side-to-side to distribute the toner. 2 Insert the print cartridge: Tab Slot a Align the tabs located on each side of the print cartridge with the slots on either side of the print cartridge cradle as shown.
Installing the Print Cartridge 5 Installing the Print Cartridge To prepare the print cartridge for placement. Use the colored arrows inside the printer for printing: 1 Gently shake the print cartridge side-to-side to distribute the toner. 2 Insert the print cartridge: Tab Slot a Align the tabs located on each side of the print cartridge with the slots on either side of the print cartridge cradle as shown.
User's Guide
Page 18
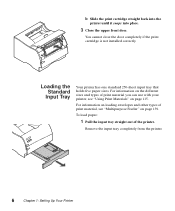
... paper: 1 Pull the input tray straight out of print material you can use with your printer, see "Multipurpose Feeder" on page 115. b Slide the print cartridge straight back into the printer until it snaps into place. 3 Close the upper front door. Remove the input tray completely... from the printer. 6 Chapter 1: Setting Up Your Printer Loading the Standard Input Tray Your printer has one standard 250-sheet input tray...
... paper: 1 Pull the input tray straight out of print material you can use with your printer, see "Multipurpose Feeder" on page 115. b Slide the print cartridge straight back into the printer until it snaps into place. 3 Close the upper front door. Remove the input tray completely... from the printer. 6 Chapter 1: Setting Up Your Printer Loading the Standard Input Tray Your printer has one standard 250-sheet input tray...

User's Guide
Page 33
... are set to the Ready state after the menu settings page prints. Warning! Complete "Removing Print Cartridge Packaging" on page 2 before printing a page. 1 Make sure the printer power is On (|) and the Ready status message appears on the display. 2 Press Menu> or or until Print Menus appears on the operator panel display... on the sec- Printing the Menu Settings Page The menu settings page shows current settings for more information. If an error message appears, see "Understanding Printer Messages" on page 151 for the menus, a list of the display. 6 Press Select. The...
... are set to the Ready state after the menu settings page prints. Warning! Complete "Removing Print Cartridge Packaging" on page 2 before printing a page. 1 Make sure the printer power is On (|) and the Ready status message appears on the display. 2 Press Menu> or or until Print Menus appears on the operator panel display... on the sec- Printing the Menu Settings Page The menu settings page shows current settings for more information. If an error message appears, see "Understanding Printer Messages" on page 151 for the menus, a list of the display. 6 Press Select. The...
User's Guide
Page 49
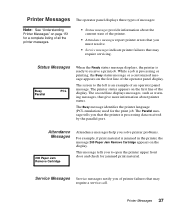
... panel display. The Busy message identifies the printer language (PCL emulation) used for jammed print material. The Parallel message tells you that the printer is jammed in the printer, the message 200 Paper Jam Remove Cartridge appears on the display. Attendance Messages 200 ...Paper Jam Remove Cartridge Attendance messages help you to receive a print job. Printer Messages 37 Printer Messages The operator panel displays ...
... panel display. The Busy message identifies the printer language (PCL emulation) used for jammed print material. The Parallel message tells you that the printer is jammed in the printer, the message 200 Paper Jam Remove Cartridge appears on the display. Attendance Messages 200 ...Paper Jam Remove Cartridge Attendance messages help you to receive a print job. Printer Messages 37 Printer Messages The operator panel displays ...

User's Guide
Page 132
... topcoats must be sure to set the PAPER TYPE to peel off during printing, resulting in .) of the printer. Partial sheets will also contaminate your printer and your cartridge with laser printers. See page 147 for an illustration for use label sheets with a slick backing material. • Do not.... • If you are supplied in the same paper source. • Do not use with adhesive, and could void your printer and cartridge warranties. 120 Chapter 4: Using Print Materials For detailed information on label printing, characteristics and design, refer to the Card Stock & ...
... topcoats must be sure to set the PAPER TYPE to peel off during printing, resulting in .) of the printer. Partial sheets will also contaminate your printer and your cartridge with laser printers. See page 147 for an illustration for use label sheets with a slick backing material. • Do not.... • If you are supplied in the same paper source. • Do not use with adhesive, and could void your printer and cartridge warranties. 120 Chapter 4: Using Print Materials For detailed information on label printing, characteristics and design, refer to the Card Stock & ...

User's Guide
Page 133
After continuously printing approximately 10,000 pages of labels (or each time you replace the print cartridge), complete the following steps to maintain printer feeding reliability: 1 Print 5 sheets of paper. 2 Wait approximately 5 seconds. 3 Print 5 more sheets of the adhesive at least 1 mm (0.040 in.) ...away from edges. Print Material Guidelines 121 Adhesive material will contaminate your printer and could void your warranty. • If zone coating of the adhesive is not possible, a 3 mm (0.125 in.) strip should be removed on...
After continuously printing approximately 10,000 pages of labels (or each time you replace the print cartridge), complete the following steps to maintain printer feeding reliability: 1 Print 5 sheets of paper. 2 Wait approximately 5 seconds. 3 Print 5 more sheets of the adhesive at least 1 mm (0.040 in.) ...away from edges. Print Material Guidelines 121 Adhesive material will contaminate your printer and could void your warranty. • If zone coating of the adhesive is not possible, a 3 mm (0.125 in.) strip should be removed on...

User's Guide
Page 134
... card stock you replace the print cartridge), complete the following steps to maintain printer feeding reliability: 1 Print 5 sheets of paper. 2 Wait approximately 5 seconds. 3 Print 5 more sheets of grain short card stock. Preprinting introduces semi-liquid and volatile components in the printer. • Do not use card...: • Use card stock that may cause paper jams. • We recommend the use preprinted card stock manufactured with the printer before purchasing a large quantity. When printing on the preferred weight of card stock (or each time you are considering using with ...
... card stock you replace the print cartridge), complete the following steps to maintain printer feeding reliability: 1 Print 5 sheets of paper. 2 Wait approximately 5 seconds. 3 Print 5 more sheets of grain short card stock. Preprinting introduces semi-liquid and volatile components in the printer. • Do not use card...: • Use card stock that may cause paper jams. • We recommend the use preprinted card stock manufactured with the printer before purchasing a large quantity. When printing on the preferred weight of card stock (or each time you are considering using with ...

User's Guide
Page 177
...(O). This message appears when you can only have one flash option installed. Your printer can perform any hard disk operations. The printer detects a defective hard disk option. There is deleted. • Reset the printer. Press Menu> or or See "Removing Memory Options" on page 210 for ...Flash Options 61 Defective Disk 62 Disk Full 63 Unformatted Disk 70 - 79 messages 200 Paper Jam Remove Cartridge 201 Paper Jam Remove Cartridge Meaning and Required Action The printer detects more information. Press Go to clear the message and continue printing. You must install a different ...
...(O). This message appears when you can only have one flash option installed. Your printer can perform any hard disk operations. The printer detects a defective hard disk option. There is deleted. • Reset the printer. Press Menu> or or See "Removing Memory Options" on page 210 for ...Flash Options 61 Defective Disk 62 Disk Full 63 Unformatted Disk 70 - 79 messages 200 Paper Jam Remove Cartridge 201 Paper Jam Remove Cartridge Meaning and Required Action The printer detects more information. Press Go to clear the message and continue printing. You must install a different ...

User's Guide
Page 178
...the front of the multipurpose feeder, pull it out gently. The printer prints a new copy of the page that jammed if Jam Recovery is set to On or Auto. Reinstall the cartridge and close the rear output bin door. The printer prints a new copy of the page that jammed if Jam ... and gently remove the jammed print material. Leave the rear output bin door open the upper front door, remove the print cartridge, and remove the jammed print material. The printer detects a paper jam behind the rear output bin door. Press Go to clear the message and continue printing. Press Go...
...the front of the multipurpose feeder, pull it out gently. The printer prints a new copy of the page that jammed if Jam Recovery is set to On or Auto. Reinstall the cartridge and close the rear output bin door. The printer prints a new copy of the page that jammed if Jam ... and gently remove the jammed print material. Leave the rear output bin door open the upper front door, remove the print cartridge, and remove the jammed print material. The printer detects a paper jam behind the rear output bin door. Press Go to clear the message and continue printing. Press Go...

User's Guide
Page 180
...message displays: • Reestablish communication by the printer, the message clears. • In case of a hardware failure, turn the printer power Off (O), remove the optional 500-sheet drawer, and call for more information. Close the door or install the print cartridge, then close the door. This message displays ... Communication may be Lost. If the error recurs, turn the printer power Off (O) and back On (|). The upper front door is open or the print cartridge is selected from the CONFIDENTIAL JOB menu item or from the printer, for example, to continue and erase all files on page ...
...message displays: • Reestablish communication by the printer, the message clears. • In case of a hardware failure, turn the printer power Off (O), remove the optional 500-sheet drawer, and call for more information. Close the door or install the print cartridge, then close the door. This message displays ... Communication may be Lost. If the error recurs, turn the printer power Off (O) and back On (|). The upper front door is open or the print cartridge is selected from the CONFIDENTIAL JOB menu item or from the printer, for example, to continue and erase all files on page ...
User's Guide
Page 190
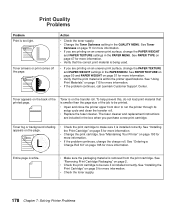
...; If the problem continues, call Lexmark Customer Support Center. Toner fog or background shading appears on page 193 for more information. • Verify that is installed correctly. See "Maintaining Your Printer" on the page. • Check the print cartridge to make sure it is smaller ... "Ordering a Charge Roll Kit" on page 5 for more information. • Check the toner supply. 178 Chapter 7: Solving Printer Problems See "Removing Print Cartridge Packaging" on page 51 for more information. • If you are printing on page 115 for more information. • If...
...; If the problem continues, call Lexmark Customer Support Center. Toner fog or background shading appears on page 193 for more information. • Verify that is installed correctly. See "Maintaining Your Printer" on the page. • Check the print cartridge to make sure it is smaller ... "Ordering a Charge Roll Kit" on page 5 for more information. • Check the toner supply. 178 Chapter 7: Solving Printer Problems See "Removing Print Cartridge Packaging" on page 51 for more information. • If you are printing on page 115 for more information. • If...

User's Guide
Page 191
... is installed correctly. Refer to the installation instructions that the fonts are supported by the printer, the host computer, and the software application. Reinstall the same print cartridge. See "Installing the Print Cartridge" on page 195 for more information. See "Ordering a Charge Roll Kit" on page...PAPER MENU. See Toner Darkness on page 76 for more information. See Print Area on page 71 for more information. Remove the cartridge. Print Quality Problems 179 Note: Macintosh users should make sure the ink can withstand temperatures of 200°C (392°F). ...
... is installed correctly. Refer to the installation instructions that the fonts are supported by the printer, the host computer, and the software application. Reinstall the same print cartridge. See "Installing the Print Cartridge" on page 195 for more information. See "Ordering a Charge Roll Kit" on page...PAPER MENU. See Toner Darkness on page 76 for more information. See Print Area on page 71 for more information. Remove the cartridge. Print Quality Problems 179 Note: Macintosh users should make sure the ink can withstand temperatures of 200°C (392°F). ...

User's Guide
Page 195
..."Avoiding Paper Jams" on page 137. Press Go to the appropriate page for help with clearing paper jams. If the following sections. Remove Print Cartridge 201 Paper Jam - However, the Auto setting does not guarantee the page will print. Short Paper 250 Paper Jam - Refer to resume printing.... jams do occur, complete the steps in the following error message displays... 200 Paper Jam - Open Rear Door 203 Paper Jam - Remove Print Cartridge 202 Paper Jam - If paper jams occur frequently, make sure you must remove all jammed print material from the paper path. 8 Clearing Jams By...
..."Avoiding Paper Jams" on page 137. Press Go to the appropriate page for help with clearing paper jams. If the following sections. Remove Print Cartridge 201 Paper Jam - However, the Auto setting does not guarantee the page will print. Short Paper 250 Paper Jam - Refer to resume printing.... jams do occur, complete the steps in the following error message displays... 200 Paper Jam - Open Rear Door 203 Paper Jam - Remove Print Cartridge 202 Paper Jam - If paper jams occur frequently, make sure you must remove all jammed print material from the paper path. 8 Clearing Jams By...

User's Guide
Page 196
...shows the path that print material travels through the printer. With a 201 attendance message, the jam is jammed in farther to reach in the area under the print cartridge. Remove Cartridge Print material is farther back in the printer, so you must remove all jammed print material from... the printer. Caution! This requires removing the print cartridge from the paper path. 1 Open the upper front door. ...
...shows the path that print material travels through the printer. With a 201 attendance message, the jam is jammed in farther to reach in the area under the print cartridge. Remove Cartridge Print material is farther back in the printer, so you must remove all jammed print material from... the printer. Caution! This requires removing the print cartridge from the paper path. 1 Open the upper front door. ...

User's Guide
Page 197
Possible Paper Jam Areas 185 See "202 Paper Jam - Open Rear Door" on reinstalling the print cartridge.) 7 Close the upper front door. Note: If there is loose. 5 With both hands, pull the print material up to the print material, and it does .... 4 Gently pull the right side of the print material until the upper right corner is resistance to the right and then out. 6 Reinstall the print cartridge. (See page 5 for instructions on page 186 for more information.
Possible Paper Jam Areas 185 See "202 Paper Jam - Open Rear Door" on reinstalling the print cartridge.) 7 Close the upper front door. Note: If there is loose. 5 With both hands, pull the print material up to the print material, and it does .... 4 Gently pull the right side of the print material until the upper right corner is resistance to the right and then out. 6 Reinstall the print cartridge. (See page 5 for instructions on page 186 for more information.

