

User Guide
Page 4
......6 Operation panel ...7 Flat bed attachment ...7 ACCESSORIES ...8 Optional accessories ...8 USING YOUR SEWING MACHINE 9 Power supply precautions ...9 Power supply ...9 Foot controller ...10 Sewing speed controller (for models equipped with the start/stop button 10 Changing the needle ... 2. SEWING BASICS 26 SEWING ...26 General sewing procedure ...26 Selecting stitching ...27 Starting to sew ...28 Thread tension ...29 USEFUL SEWING TIPS ...30 Trial sewing ...30 Changing the sewing direction ...30 Sewing curves ...30 Sewing thick fabrics ...30 Sewing thin fabrics ...31 Sewing stretch fabrics...
......6 Operation panel ...7 Flat bed attachment ...7 ACCESSORIES ...8 Optional accessories ...8 USING YOUR SEWING MACHINE 9 Power supply precautions ...9 Power supply ...9 Foot controller ...10 Sewing speed controller (for models equipped with the start/stop button 10 Changing the needle ... 2. SEWING BASICS 26 SEWING ...26 General sewing procedure ...26 Selecting stitching ...27 Starting to sew ...28 Thread tension ...29 USEFUL SEWING TIPS ...30 Trial sewing ...30 Changing the sewing direction ...30 Sewing curves ...30 Sewing thick fabrics ...30 Sewing thin fabrics ...31 Sewing stretch fabrics...

User Guide
Page 6
... dial (page 29) This controls the tension of thread. h Flat bed attachment with two needles. l Main power and sewing light switch (page 9) You can use as the lower thread. p Presser foot lever (page 16) Used to cut them. f Thread take-up lever (page 17) g ... panel (page 7) This is used to select the stitch and specify the various settings. NCBC2000.book Page 5 Thursday, October 21, 2004 4:32 PM 1 KNOWING YOUR SEWING MACHINE 1 NAMES OF MACHINE PARTS AND THEIR FUNCTIONS The main parts a Bobbin winder (page 11) This winds the thread onto the bobbin for...
... dial (page 29) This controls the tension of thread. h Flat bed attachment with two needles. l Main power and sewing light switch (page 9) You can use as the lower thread. p Presser foot lever (page 16) Used to cut them. f Thread take-up lever (page 17) g ... panel (page 7) This is used to select the stitch and specify the various settings. NCBC2000.book Page 5 Thursday, October 21, 2004 4:32 PM 1 KNOWING YOUR SEWING MACHINE 1 NAMES OF MACHINE PARTS AND THEIR FUNCTIONS The main parts a Bobbin winder (page 11) This winds the thread onto the bobbin for...
User Guide
Page 12
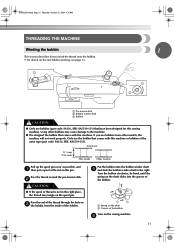
...spool of thread is not in the right place, the thread may cause damage to the machine. ● We designed the bobbin that comes with this machine or bobbins of thread on this sewing machine. Pass the end of the thread through the hole on c the bobbin from other bobbins...the spring on the shaft slides into the groove of the bobbin. 1 2 a Spring on the sewing machine. Using other models, the machine will not work properly. Pass the thread around the pre-tension disk. a Pre-tension disk b Bobbin winder shaft c Bobbin CAUTION ● Only use bobbins from the inside of the...
...spool of thread is not in the right place, the thread may cause damage to the machine. ● We designed the bobbin that comes with this machine or bobbins of thread on this sewing machine. Pass the end of the thread through the hole on c the bobbin from other bobbins...the spring on the shaft slides into the groove of the bobbin. 1 2 a Spring on the sewing machine. Using other models, the machine will not work properly. Pass the thread around the pre-tension disk. a Pre-tension disk b Bobbin winder shaft c Bobbin CAUTION ● Only use bobbins from the inside of the...
User Guide
Page 13
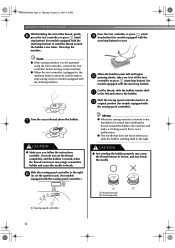
... k to loosen, and may cause the thread tension to the left and remove the bobbin. Then stop button). Press the foot controller or press (start/ i stop button) (for models equipped with the start/stop button). Note ● If the sewing machine is to be operated using the foot controller,... follow the instructions carefully. Trim the excess thread above the bobbin. NCBC2000.book Page 12 Thursday, October 21, 2004 4:32 PM KNOWING YOUR SEWING MACHINE While holding the end of the thread, gently f press the foot controller or press (start/ stop button) (for models equipped with the ...
... k to loosen, and may cause the thread tension to the left and remove the bobbin. Then stop button). Press the foot controller or press (start/ i stop button) (for models equipped with the start/stop button). Note ● If the sewing machine is to be operated using the foot controller,... follow the instructions carefully. Trim the excess thread above the bobbin. NCBC2000.book Page 12 Thursday, October 21, 2004 4:32 PM KNOWING YOUR SEWING MACHINE While holding the end of the thread, gently f press the foot controller or press (start/ stop button) (for models equipped with the ...
User Guide
Page 14
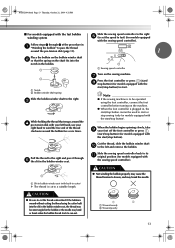
...with built-in the bobbin. Note ● If the sewing machine is cut the thread as described. Pull the thread to the right and pass it through 2 of the procedure in a "Winding the bobbin" to pass the thread around the pre-tension disk (page 11). 1 Place the bobbin on the ...thread using the foot controller, connect the foot controller before turning on the sewing machine. When the bobbin begins spinning slowly, take i your right hand to wind the free end of the thread clockwise around the d pre-tension disk with your left and remove the bobbin. Cut the thread, slide...
...with built-in the bobbin. Note ● If the sewing machine is cut the thread as described. Pull the thread to the right and pass it through 2 of the procedure in a "Winding the bobbin" to pass the thread around the pre-tension disk (page 11). 1 Place the bobbin on the ...thread using the foot controller, connect the foot controller before turning on the sewing machine. When the bobbin begins spinning slowly, take i your right hand to wind the free end of the thread clockwise around the d pre-tension disk with your left and remove the bobbin. Cut the thread, slide...

User Guide
Page 15
...If it may cause the thread tension to be incorrect or break the needle. Put the left tab in e place (see page 15. CAUTION ● Make sure you set bobbin, see arrow a), and then press lightly on the foot controller and the machine starts to sew, you turn the power off while...the tension-adjusting spring of the same type (part code: SA156, SFB: XA5539-151). Actual size 11.5 mm (7/16 inch) This model Other models • Only use bobbins that the thread is not inserted, reinsert the thread. NCBC2000.book Page 14 Thursday, October 21, 2004 4:32 PM KNOWING YOUR SEWING MACHINE Memo...
...If it may cause the thread tension to be incorrect or break the needle. Put the left tab in e place (see page 15. CAUTION ● Make sure you set bobbin, see arrow a), and then press lightly on the foot controller and the machine starts to sew, you turn the power off while...the tension-adjusting spring of the same type (part code: SA156, SFB: XA5539-151). Actual size 11.5 mm (7/16 inch) This model Other models • Only use bobbins that the thread is not inserted, reinsert the thread. NCBC2000.book Page 14 Thursday, October 21, 2004 4:32 PM KNOWING YOUR SEWING MACHINE Memo...
User Guide
Page 16
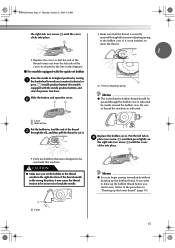
..."Drawing up the bobbin thread. CAUTION ● Make sure you start to sew, follow to its highest position by turning a the handwheel toward you (counterclockwise) or press (needle position button) (for models equipped with this machine. NCBC2000.book Page 15 Thursday, October 21, 2004 4:32 PM the right...correctly inserted through the slit, and then pull the thread to cut it may cause the thread tension to be incorrect or break the needle. 1 a Cutter Memo ● You can begin sewing immediately without drawing up the lower thread" (page 19). 15 Replace the bobbin cover. Put ...
..."Drawing up the bobbin thread. CAUTION ● Make sure you start to sew, follow to its highest position by turning a the handwheel toward you (counterclockwise) or press (needle position button) (for models equipped with this machine. NCBC2000.book Page 15 Thursday, October 21, 2004 4:32 PM the right...correctly inserted through the slit, and then pull the thread to cut it may cause the thread tension to be incorrect or break the needle. 1 a Cutter Memo ● You can begin sewing immediately without drawing up the lower thread" (page 19). 15 Replace the bobbin cover. Put ...
User Guide
Page 26
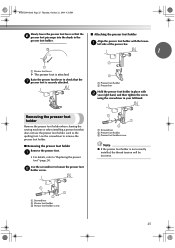
... of the presser bar. 1 a Presser foot lever X The presser foot is attached. Removing the presser foot holder Remove the presser foot holder when cleaning the sewing machine or when installing a presser foot that the f presser foot pin snaps into the shank in the presser foot holder. ■ Attaching the presser foot holder... use the presser foot holder, such as the quilting foot. Use the screwdriver to check that the g presser foot is not correctly installed, the thread tension will be incorrect.
... of the presser bar. 1 a Presser foot lever X The presser foot is attached. Removing the presser foot holder Remove the presser foot holder when cleaning the sewing machine or when installing a presser foot that the f presser foot pin snaps into the shank in the presser foot holder. ■ Attaching the presser foot holder... use the presser foot holder, such as the quilting foot. Use the screwdriver to check that the g presser foot is not correctly installed, the thread tension will be incorrect.
User Guide
Page 30
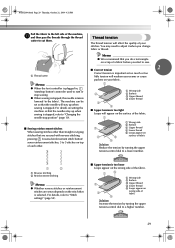
... to adjust it when you start to sew. ■ Correct tension 2 Correct tension is important as too much or too little tension will weaken your seams or cause puckers on setting the machine so that the needles stay up when sewing is too loose Loops appear on the ... appear on surface of fabric Solution Reduce the tension by turning the upper tension-control dial to a lower number. 54 3 ■ Upper tension is stopped. The machine can be used to start /stop position" (page 10). ■ Sewing reinforcement stitches When sewing stitches other than straight or zigzag stitches that ...
... to adjust it when you start to sew. ■ Correct tension 2 Correct tension is important as too much or too little tension will weaken your seams or cause puckers on setting the machine so that the needles stay up when sewing is too loose Loops appear on the ... appear on surface of fabric Solution Reduce the tension by turning the upper tension-control dial to a lower number. 54 3 ■ Upper tension is stopped. The machine can be used to start /stop position" (page 10). ■ Sewing reinforcement stitches When sewing stitches other than straight or zigzag stitches that ...
User Guide
Page 31
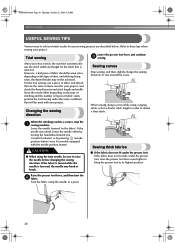
...tips when sewing your project, and check the thread tension and stitch length and width. CAUTION ● When using the needle as those used with the needle position button). After you (counterclockwise) or by turning the handwheel toward you select a stitch, the machine automatically sets ..., the needle may not be sure to raise the needle before changing the sewing direction. When the stitching reaches a corner, stop the a sewing machine. Turn the fabric using the twin needle, be achieved. When sewing along a curve while using a zigzag stitch, select a shorter stitch length in...
...tips when sewing your project, and check the thread tension and stitch length and width. CAUTION ● When using the needle as those used with the needle position button). After you (counterclockwise) or by turning the handwheel toward you select a stitch, the machine automatically sets ..., the needle may not be sure to raise the needle before changing the sewing direction. When the stitching reaches a corner, stop the a sewing machine. Turn the fabric using the twin needle, be achieved. When sewing along a curve while using a zigzag stitch, select a shorter stitch length in...

User Guide
Page 51
... straight stitch, and then adjust the b stitch length to 4.0 mm (3/16 inch) and loosen the thread tension. • For details, refer to fabric. a a 1 cm (3/8 inch) • Do not sew reverse/reinforcement stitches or cut the thread. e Stitch between the straight stitches. f a Needle drop point 50...to decorate trims, the front of blouses or cuffs made of blouses or cuffs. Sew parallel stitching at intervals of the fabric. 1 Select stitch or . b Select stitch , and then increase the thread c tension. • For details, refer to create gathers. It is called "shell ...
... straight stitch, and then adjust the b stitch length to 4.0 mm (3/16 inch) and loosen the thread tension. • For details, refer to fabric. a a 1 cm (3/8 inch) • Do not sew reverse/reinforcement stitches or cut the thread. e Stitch between the straight stitches. f a Needle drop point 50...to decorate trims, the front of blouses or cuffs made of blouses or cuffs. Sew parallel stitching at intervals of the fabric. 1 Select stitch or . b Select stitch , and then increase the thread c tension. • For details, refer to create gathers. It is called "shell ...
User Guide
Page 60
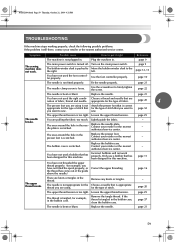
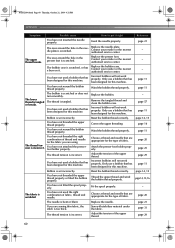
page 9 The sewing machine does not work properly. page 10 The needle is tangled, for example, in the bobbin case. sew. Loosen the upper thread tension. Lightly guide the fabric. - Contact your retailer or the nearest - Incorrect bobbins will not work . page 29 The thread is ...is turned off. Replace the needle. page 20 The upper thread tension is pushed to Move the bobbin winder shaft to sew. Turn on the main power switch. left. breaks. The needle is not appropriate for this machine. Choose a needle that you want to the the right. The...
page 9 The sewing machine does not work properly. page 10 The needle is tangled, for example, in the bobbin case. sew. Loosen the upper thread tension. Lightly guide the fabric. - Contact your retailer or the nearest - Incorrect bobbins will not work . page 29 The thread is ...is turned off. Replace the needle. page 20 The upper thread tension is pushed to Move the bobbin winder shaft to sew. Turn on the main power switch. left. breaks. The needle is not appropriate for this machine. Choose a needle that you want to the the right. The...
User Guide
Page 61
.... You have not used a bobbin that has been designed for this machine. Only use a bobbin that has been designed for this machine. You have not wound the bobbin thread properly. If you are sewing thin fabric, the stitch is incorrect. Adjust the tension of the upper thread. The area around the hole in the...
.... You have not used a bobbin that has been designed for this machine. Only use a bobbin that has been designed for this machine. You have not wound the bobbin thread properly. If you are sewing thin fabric, the stitch is incorrect. Adjust the tension of the upper thread. The area around the hole in the...
User Guide
Page 62
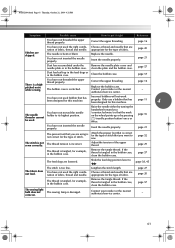
... properly. Insert the needle properly. page 16 - page 21 The presser foot that has been designed for this machine. Slide the feed dog position lever to sew. Remove the tangle thread. Choose a thread and needle that you (counterclockwise) so that has been designed for this...feed. The needle is correct for the type of stitch that are lowered. Attach the presser foot that are skipped. Adjust the tension of fabric. Lengthen the stitch length. NCBC2000.book Page 61 Thursday, October 21, 2004 4:32 PM Symptom Possible cause How to...
... properly. Insert the needle properly. page 16 - page 21 The presser foot that has been designed for this machine. Slide the feed dog position lever to sew. Remove the tangle thread. Choose a thread and needle that you (counterclockwise) so that has been designed for this...feed. The needle is correct for the type of stitch that are lowered. Attach the presser foot that are skipped. Adjust the tension of fabric. Lengthen the stitch length. NCBC2000.book Page 61 Thursday, October 21, 2004 4:32 PM Symptom Possible cause How to...
User Guide
Page 64
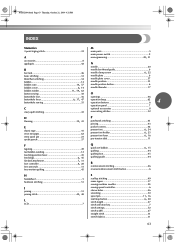
... 33 needle position button 6 needle threader 17 O buttonhole foot 36 openings 46 buttonhole lever 6, 37, 47 buttonhole sewing 35 operation beep 62 operation buttons 6 4 operation panel 7 C crazy quilt stitching 43 optional accessories 8 overcasting stitches...tension disk 11 Q quick-set bobbin 6, 15 quilting 44 quilting foot 45 quilting guide 44 R reinforcement stitching 46 reverse/reinforcement stitch button 6 H handwheel 5 heirloom stitching 51 J joining 51 joining stitch 42, 48 L LCD 7 S scallop stitching 49 seam ripper 37 sewing machine needles 20 sewing...
... 33 needle position button 6 needle threader 17 O buttonhole foot 36 openings 46 buttonhole lever 6, 37, 47 buttonhole sewing 35 operation beep 62 operation buttons 6 4 operation panel 7 C crazy quilt stitching 43 optional accessories 8 overcasting stitches...tension disk 11 Q quick-set bobbin 6, 15 quilting 44 quilting foot 45 quilting guide 44 R reinforcement stitching 46 reverse/reinforcement stitch button 6 H handwheel 5 heirloom stitching 51 J joining 51 joining stitch 42, 48 L LCD 7 S scallop stitching 49 seam ripper 37 sewing machine needles 20 sewing...
User Guide
Page 65
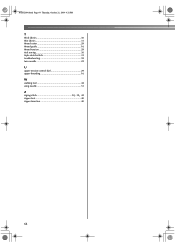
NCBC2000.book Page 64 Thursday, October 21, 2004 4:32 PM T thick fabrics 30 thin fabrics 31 thread cutter 29 thread guide 16 thread tension 29 trial sewing 30 triple stretch stitch 33 troubleshooting 59 twin needle 22 U upper tension-control dial 29 upper threading 16 W walking foot 44 wing needle 51 Z zigzag stitch 30, 32, 42 zipper foot 40 zipper Insertion 40 64
NCBC2000.book Page 64 Thursday, October 21, 2004 4:32 PM T thick fabrics 30 thin fabrics 31 thread cutter 29 thread guide 16 thread tension 29 trial sewing 30 triple stretch stitch 33 troubleshooting 59 twin needle 22 U upper tension-control dial 29 upper threading 16 W walking foot 44 wing needle 51 Z zigzag stitch 30, 32, 42 zipper foot 40 zipper Insertion 40 64


