
User Guide
Page 3
... wall. Benzene, thinner, and scouring powders can damage the case and machine, and should never be used. 3. Be sure to keep your local authorized Brother dealer. Do not use • Maintaining the machine • Leaving the machine unattended 3. If the problem persists, please consult your eye on... cords. For repair or adjustment In the event a malfunction occurs or adjustment is one of the most advanced computerized household sewing machines. Do not use or store the machine near a space heater, iron, halogen lamp, or other moving parts. 2. To fully enjoy all the features...
... wall. Benzene, thinner, and scouring powders can damage the case and machine, and should never be used. 3. Be sure to keep your local authorized Brother dealer. Do not use • Maintaining the machine • Leaving the machine unattended 3. If the problem persists, please consult your eye on... cords. For repair or adjustment In the event a malfunction occurs or adjustment is one of the most advanced computerized household sewing machines. Do not use or store the machine near a space heater, iron, halogen lamp, or other moving parts. 2. To fully enjoy all the features...
User Guide
Page 5
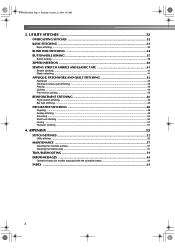
...21, 2004 4:32 PM 3. APPENDIX ...52 STITCH SETTINGS ...52 Utility stitches ...52 MAINTENANCE ...57 Cleaning the machine surface ...57 Cleaning the bobbin case ...57 TROUBLESHOOTING ...59 ERROR MESSAGES ...62 Operation beep (for models equipped with the operation beep 62 INDEX ......63 4 UTILITY STITCHES 32 OVERCASTING STITCHES 32 BASIC STITCHING ...33 Basic stitching ...33 BLIND HEM STITCHING 34 BUTTONHOLE SEWING 35 Button sewing ...38 ZIPPER INSERTION ...40 SEWING...
...21, 2004 4:32 PM 3. APPENDIX ...52 STITCH SETTINGS ...52 Utility stitches ...52 MAINTENANCE ...57 Cleaning the machine surface ...57 Cleaning the bobbin case ...57 TROUBLESHOOTING ...59 ERROR MESSAGES ...62 Operation beep (for models equipped with the operation beep 62 INDEX ......63 4 UTILITY STITCHES 32 OVERCASTING STITCHES 32 BASIC STITCHING ...33 Basic stitching ...33 BLIND HEM STITCHING 34 BUTTONHOLE SEWING 35 Button sewing ...38 ZIPPER INSERTION ...40 SEWING...

User Guide
Page 15
... case. CAUTION ● Make sure you set bobbin, see arrow a), and then press lightly on quick-set the bobbin so the thread unrolls in the right direction. NCBC2000.book Page 14 Thursday, October 21, 2004 4:32 PM KNOWING YOUR SEWING MACHINE Memo ● When the sewing machine ...is started or the handwheel is correctly inserted through the slit, as shown. • Make sure that were designed to be used , the machine will make a clicking sound; CAUTION ● Winding the...
... case. CAUTION ● Make sure you set bobbin, see arrow a), and then press lightly on quick-set the bobbin so the thread unrolls in the right direction. NCBC2000.book Page 14 Thursday, October 21, 2004 4:32 PM KNOWING YOUR SEWING MACHINE Memo ● When the sewing machine ...is started or the handwheel is correctly inserted through the slit, as shown. • Make sure that were designed to be used , the machine will make a clicking sound; CAUTION ● Winding the...
User Guide
Page 16
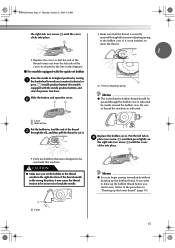
If it is indicated by marks around the bobbin case. CAUTION ● Make sure you set bobbin Raise the needle to thread the machine as shown by turning a the handwheel toward you start to sew, follow to the procedure in the diagram). ■ For models equipped with the quick-set the bobbin ...so the thread unrolls in , feed the end of the bobbin case. a Cover b Slide button Put...
If it is indicated by marks around the bobbin case. CAUTION ● Make sure you set bobbin Raise the needle to thread the machine as shown by turning a the handwheel toward you start to sew, follow to the procedure in the diagram). ■ For models equipped with the quick-set the bobbin ...so the thread unrolls in , feed the end of the bobbin case. a Cover b Slide button Put...

User Guide
Page 58
... of the needle plate cover, d and then slide it out firmly, and then wipe the surface of the machine is dirty, lightly soak a cloth in the bobbin case; After cleaning it once with a dry cloth. b Loosen the presser-foot screw and the needle c clamp screw... shock may get an electric shock or be cleaned periodically. a 4 Raise the needle and the presser foot. Cleaning the machine Cleaning the bobbin case surface If the surface of the machine. NCBC2000.book Page 57 Thursday, October 21, 2004 4:32 PM MAINTENANCE Simple sewing machine maintenance operations are described below.
... of the needle plate cover, d and then slide it out firmly, and then wipe the surface of the machine is dirty, lightly soak a cloth in the bobbin case; After cleaning it once with a dry cloth. b Loosen the presser-foot screw and the needle c clamp screw... shock may get an electric shock or be cleaned periodically. a 4 Raise the needle and the presser foot. Cleaning the machine Cleaning the bobbin case surface If the surface of the machine. NCBC2000.book Page 57 Thursday, October 21, 2004 4:32 PM MAINTENANCE Simple sewing machine maintenance operations are described below.

User Guide
Page 59
... become tangled, the needle may break or sewing performance may break. 2 1 2 a Projection b Spring 58 e Grasp the bobbin case, and then pull it out. NCBC2000.book Page 58 Thursday, October 21, 2004 4:32 PM APPENDIX Remove the bobbin case. Insert the bobbin case so that you fit the bobbin case properly, otherwise the needle may suffer...
... become tangled, the needle may break or sewing performance may break. 2 1 2 a Projection b Spring 58 e Grasp the bobbin case, and then pull it out. NCBC2000.book Page 58 Thursday, October 21, 2004 4:32 PM APPENDIX Remove the bobbin case. Insert the bobbin case so that you fit the bobbin case properly, otherwise the needle may suffer...
User Guide
Page 60
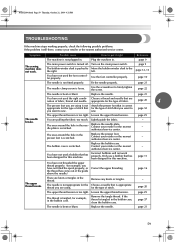
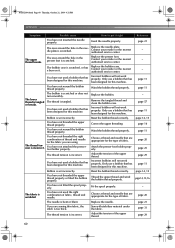
... scratched. You have not used the foot controller properly. Only use a bobbin that has been designed for this machine. Choose a needle that are knots or tangles in the bobbin case. Replace the needle. Use the screwdriver to put it still there, contact your retailer or the nearest - appropriate... - page 11 You have not fitted the spool properly, or the thread has come out of fabric, thread and needle. page 9 The sewing machine does not work properly. Remove the tangle thread. page 21 You have not used a bobbin that has been designed for this...
... scratched. You have not used the foot controller properly. Only use a bobbin that has been designed for this machine. Choose a needle that are knots or tangles in the bobbin case. Replace the needle. Use the screwdriver to put it still there, contact your retailer or the nearest - appropriate... - page 11 You have not fitted the spool properly, or the thread has come out of fabric, thread and needle. page 9 The sewing machine does not work properly. Remove the tangle thread. page 21 You have not used a bobbin that has been designed for this...
User Guide
Page 61
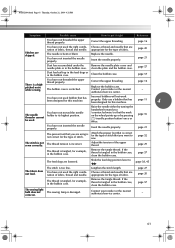
... scratched. Only use a bobbin that has been designed for this machine. Remove the tangled thread and clean the bobbin case. Only use a bobbin that are using. Reset the bobbin thread correctly. You have not threaded the upper thread properly. You have not inserted ... lower thread is scratched or does not turn smoothly. The bobbin is tangled or breaks. You have not used a bobbin that are sewing thin fabric, the stitch is scratched. Replace the bobbin. Incorrect bobbins will not work properly. Bobbin is set incorrectly. Correct the upper threading. ...
... scratched. Only use a bobbin that has been designed for this machine. Remove the tangled thread and clean the bobbin case. Only use a bobbin that are using. Reset the bobbin thread correctly. You have not threaded the upper thread properly. You have not inserted ... lower thread is scratched or does not turn smoothly. The bobbin is tangled or breaks. You have not used a bobbin that are sewing thin fabric, the stitch is scratched. Replace the bobbin. Incorrect bobbins will not work properly. Bobbin is set incorrectly. Correct the upper threading. ...
User Guide
Page 62
... or twice. page 21 The presser foot that you (counterclockwise) so that has been designed for this machine. page 52 The stitch is tangled, for example, in the bobbin case, clean the bobbin case. The thread is not sewn correctly. Remove the tangle thread. Slide the feed dog position lever to ... stitch length. page 27 page 20 The thread is tangled in the bobbin case. If the thread is tangled, for example, in the bobbin case, clean the bobbin case. page 57 The sewing light bulb does not The sewing lamp is damaged. come on the wheel points up in the feed dogs...
... or twice. page 21 The presser foot that you (counterclockwise) so that has been designed for this machine. page 52 The stitch is tangled, for example, in the bobbin case, clean the bobbin case. The thread is not sewn correctly. Remove the tangle thread. Slide the feed dog position lever to ... stitch length. page 27 page 20 The thread is tangled in the bobbin case. If the thread is tangled, for example, in the bobbin case, clean the bobbin case. page 57 The sewing light bulb does not The sewing lamp is damaged. come on the wheel points up in the feed dogs...
User Guide
Page 64
...;s 42 N needle 20 B bar tack 46 basic stitching 33 blind hem stitching 34 bobbin 14 bobbin case 14, 57 bobbin cover 6, 14 bobbin winder 11, 59, 62 button sewing 38 needle bar thread guide 6 needle clamp screw 6, 22 needle plate 6 needle plate cover 57 needle...stitch button 6 H handwheel 5 heirloom stitching 51 J joining 51 joining stitch 42, 48 L LCD 7 S scallop stitching 49 seam ripper 37 sewing machine needles 20 sewing speed controller 6 sleeve holes 46 smocking 50 spool pin 11, 16 start/stop button 6, 28 stitch length 27 stitch selection key 7 stitch ...
...;s 42 N needle 20 B bar tack 46 basic stitching 33 blind hem stitching 34 bobbin 14 bobbin case 14, 57 bobbin cover 6, 14 bobbin winder 11, 59, 62 button sewing 38 needle bar thread guide 6 needle clamp screw 6, 22 needle plate 6 needle plate cover 57 needle...stitch button 6 H handwheel 5 heirloom stitching 51 J joining 51 joining stitch 42, 48 L LCD 7 S scallop stitching 49 seam ripper 37 sewing machine needles 20 sewing speed controller 6 sleeve holes 46 smocking 50 spool pin 11, 16 start/stop button 6, 28 stitch length 27 stitch selection key 7 stitch ...


