

User Guide
Page 1
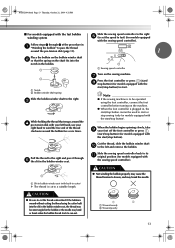
... wrong plate can cause the needle to the symbol "{" position which represents off, then remove plug from outlet. 9. Do not pull or push fabric while stitching. This sewing machine is intended for use as threading needle, changing needle, threading bobbin, or changing presser foot, and the like. 15. SAVE THESE INSTRUCTIONS This machine is not intended for household use outdoors. 7. Keep ventilation openings of the machine and foot control free from the electrical outlet when removing covers, lubricating...
... wrong plate can cause the needle to the symbol "{" position which represents off, then remove plug from outlet. 9. Do not pull or push fabric while stitching. This sewing machine is intended for use as threading needle, changing needle, threading bobbin, or changing presser foot, and the like. 15. SAVE THESE INSTRUCTIONS This machine is not intended for household use outdoors. 7. Keep ventilation openings of the machine and foot control free from the electrical outlet when removing covers, lubricating...
User Guide
Page 3
...; Operation is completed • Replacing or removing the needle or any assemblies, the presser feet, needle, or other moving parts. 2. For a longer service life 1. Do not use • Maintaining the machine • Leaving the machine unattended 3. Use only neutral soaps or detergents to clean the case. Do not drop or hit the machine. 4. For repair or adjustment In the event a malfunction occurs or adjustment is one of the most advanced computerized household sewing machines...
...; Operation is completed • Replacing or removing the needle or any assemblies, the presser feet, needle, or other moving parts. 2. For a longer service life 1. Do not use • Maintaining the machine • Leaving the machine unattended 3. Use only neutral soaps or detergents to clean the case. Do not drop or hit the machine. 4. For repair or adjustment In the event a malfunction occurs or adjustment is one of the most advanced computerized household sewing machines...

User Guide
Page 4
... 5 The main parts ...5 Needle and presser foot section ...6 Operation buttons ...6 Operation panel ...7 Flat bed attachment ...7 ACCESSORIES ...8 Optional accessories ...8 USING YOUR SEWING MACHINE 9 Power supply precautions ...9 Power supply ...9 Foot controller ...10 Sewing speed controller (for models equipped with the start/stop button 10 Changing the needle stop position ...10 THREADING THE MACHINE 11 Winding the bobbin ...11 Lower threading ...14 Upper threading ...16 Drawing up the lower thread ...19 REPLACING THE NEEDLE 20 Needle precautions ...20 Needle types and their uses ...20...
... 5 The main parts ...5 Needle and presser foot section ...6 Operation buttons ...6 Operation panel ...7 Flat bed attachment ...7 ACCESSORIES ...8 Optional accessories ...8 USING YOUR SEWING MACHINE 9 Power supply precautions ...9 Power supply ...9 Foot controller ...10 Sewing speed controller (for models equipped with the start/stop button 10 Changing the needle stop position ...10 THREADING THE MACHINE 11 Winding the bobbin ...11 Lower threading ...14 Upper threading ...16 Drawing up the lower thread ...19 REPLACING THE NEEDLE 20 Needle precautions ...20 Needle types and their uses ...20...

User Guide
Page 6
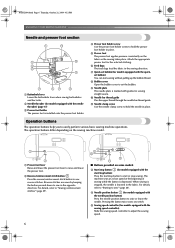
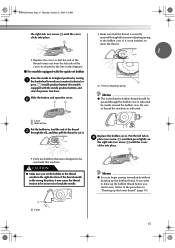
... settings. f Thread take-up lever (page 17) g Thread cutter (page 29) Pass the threads through the thread cutter to raise and lower the presser foot. p Presser foot lever (page 16) Used to cut them. q Foot controller (page 10) You can turn the main power and sewing light switch on the sewing machine model. h Flat bed attachment with two needles. j Operation panel (page 7) This is used to start and stop sewing. 5 k Handwheel Used to lower the feed dogs. o Feed dog position lever (pages 38 and 45) Use the feed dog position lever to manually...
... settings. f Thread take-up lever (page 17) g Thread cutter (page 29) Pass the threads through the thread cutter to raise and lower the presser foot. p Presser foot lever (page 16) Used to cut them. q Foot controller (page 10) You can turn the main power and sewing light switch on the sewing machine model. h Flat bed attachment with two needles. j Operation panel (page 7) This is used to start and stop sewing. 5 k Handwheel Used to lower the feed dogs. o Feed dog position lever (pages 38 and 45) Use the feed dog position lever to manually...
User Guide
Page 7
...You can start or stop button (for sewing straight seams. j Needle bar thread guide Pass the upper thread through the needle bar thread guide. g Quick-set the bobbin. Pressing the button twice sews one stitch. f Feed dogs The feed dogs feed the fabric in place. h Bobbin cover Open the bobbin cover to "Sewing reinforcement stitches" (page 29). ■ Buttons provided on the sewing machine model. The operation buttons differ depending on some models c Start/stop sewing. When sewing is stopped, the needle is depressed. e Presser foot The presser foot applies pressure...
...You can start or stop button (for sewing straight seams. j Needle bar thread guide Pass the upper thread through the needle bar thread guide. g Quick-set the bobbin. Pressing the button twice sews one stitch. f Feed dogs The feed dogs feed the fabric in place. h Bobbin cover Open the bobbin cover to "Sewing reinforcement stitches" (page 29). ■ Buttons provided on the sewing machine model. The operation buttons differ depending on some models c Start/stop sewing. When sewing is stopped, the needle is depressed. e Presser foot The presser foot applies pressure...

User Guide
Page 9
...XC8834-021 131096-121 X59476-021 X55467-021 130920-021 XC8816-021 5.* No. Part Code U.S.A. Others SA132 F016N: XC2215-002 135793-001 We have designed these accessories to carry out most sewing tasks. Part Name 9 Bobbin (4) 10 Needle set 11 Twin needle 12 Cleaning brush 13 Screwdriver 14 Extra spool pin 15 Foot controller Optional accessories 1. 2. 3. 4 Part Code U.S.A. only) ● Foot controller: Model T This foot controller can be used on machine) 6 Blind stitch foot "R" 7 Button fitting foot "M" 8 Seam ripper Part Code U.S.A. Note (For U.S.A.
...XC8834-021 131096-121 X59476-021 X55467-021 130920-021 XC8816-021 5.* No. Part Code U.S.A. Others SA132 F016N: XC2215-002 135793-001 We have designed these accessories to carry out most sewing tasks. Part Name 9 Bobbin (4) 10 Needle set 11 Twin needle 12 Cleaning brush 13 Screwdriver 14 Extra spool pin 15 Foot controller Optional accessories 1. 2. 3. 4 Part Code U.S.A. only) ● Foot controller: Model T This foot controller can be used on machine) 6 Blind stitch foot "R" 7 Button fitting foot "M" 8 Seam ripper Part Code U.S.A. Note (For U.S.A.
User Guide
Page 11
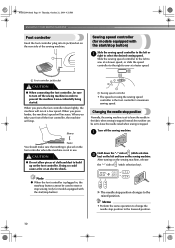
... an electric shock. X The needle stop position Normally, the sewing machine is set using the sewing speed controller is the foot controller's maximum sewing speed. Note ● When the foot controller is stopped. Memo • Perform the same operation to change the needle stop button) Slide the sewing speed controller to the left to sew at a faster speed. NCBC2000.book Page 10 Thursday, October 21, 2004 4:32 PM KNOWING YOUR SEWING MACHINE Foot controller Insert the foot controller plug into its jack...
... an electric shock. X The needle stop position Normally, the sewing machine is set using the sewing speed controller is the foot controller's maximum sewing speed. Note ● When the foot controller is stopped. Memo • Perform the same operation to change the needle stop button) Slide the sewing speed controller to the left to sew at a faster speed. NCBC2000.book Page 10 Thursday, October 21, 2004 4:32 PM KNOWING YOUR SEWING MACHINE Foot controller Insert the foot controller plug into its jack...
User Guide
Page 13
... the needle to start. Slide the sewing speed controller back to its l original position (for models equipped with the start/stop button) to break. CAUTION ● Not winding the bobbin properly may cause the thread tension to be operated using the foot controller, connect the foot controller before turning on the machine. ● When the foot controller is turned after winding the thread around the bobbin, the machine will make a clicking sound; Press the foot controller or press (start/ i stop button) (for models...
... the needle to start. Slide the sewing speed controller back to its l original position (for models equipped with the start/stop button) to break. CAUTION ● Not winding the bobbin properly may cause the thread tension to be operated using the foot controller, connect the foot controller before turning on the machine. ● When the foot controller is turned after winding the thread around the bobbin, the machine will make a clicking sound; Press the foot controller or press (start/ i stop button) (for models...
User Guide
Page 14
... sewing speed controller to the right f (to set the speed to fast) (for models equipped with the start/stop button). c While holding the thread that the spring on the sewing machine. g Press the foot controller or press (start . Note ● If the sewing machine is to be operated using the cutter built into the notch in a "Winding the bobbin" to pass the thread around the pre-tension disk (page 11). 1 Place the bobbin on the bobbin winder...
... sewing speed controller to the right f (to set the speed to fast) (for models equipped with the start/stop button). c While holding the thread that the spring on the sewing machine. g Press the foot controller or press (start . Note ● If the sewing machine is to be operated using the cutter built into the notch in a "Winding the bobbin" to pass the thread around the pre-tension disk (page 11). 1 Place the bobbin on the bobbin winder...

User Guide
Page 15
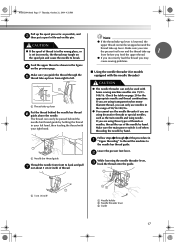
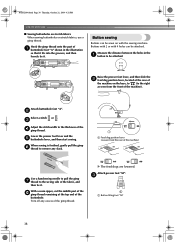
... sewing machine is started or the handwheel is turned after winding the thread around the bobbin, the machine will not operate correctly. this machine. Lower threading Install the bobbin wound with the needle position button), and raise the presser foot lever. 14 1 a Tension-adjusting spring Replace the bobbin cover. If bobbins from other models are used with your finger, and then pass the thread through the slit, as shown. • Make sure that were designed to be used , the machine will make a clicking sound; Use...
... sewing machine is started or the handwheel is turned after winding the thread around the bobbin, the machine will not operate correctly. this machine. Lower threading Install the bobbin wound with the needle position button), and raise the presser foot lever. 14 1 a Tension-adjusting spring Replace the bobbin cover. If bobbins from other models are used with your finger, and then pass the thread through the slit, as shown. • Make sure that were designed to be used , the machine will make a clicking sound; Use...
User Guide
Page 16
... be used with the needle position button), and raise the presser foot lever. Replace the bobbin cover. CAUTION ● Make sure you (counterclockwise) or press (needle position button) (for models equipped with this machine. Slide the button and open the cover. a Cover b Slide button Put the bobbin in the diagram). ■ For models equipped with the quick-set bobbin Raise the needle to its highest position by turning a the handwheel toward you set the bobbin so the thread unrolls in the wrong direction...
... be used with the needle position button), and raise the presser foot lever. Replace the bobbin cover. CAUTION ● Make sure you (counterclockwise) or press (needle position button) (for models equipped with this machine. Slide the button and open the cover. a Cover b Slide button Put the bobbin in the diagram). ■ For models equipped with the quick-set bobbin Raise the needle to its highest position by turning a the handwheel toward you set the bobbin so the thread unrolls in the wrong direction...
User Guide
Page 18
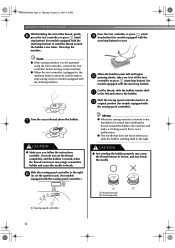
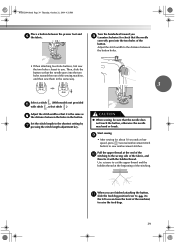
... the figure d on the spool pin and cause the needle to break. b While lowering the needle threader lever, c hook the thread onto the guide. CAUTION ● If the spool of the needle by hand. If you raise the presser foot lever and the thread take -up lever. Make sure you are using those types of threads or needles, thread the eye of thread is set incorrectly, the thread may cause sewing problems. ■ Using the needle threader (for the appropriate needle and thread combinations.
... the figure d on the spool pin and cause the needle to break. b While lowering the needle threader lever, c hook the thread onto the guide. CAUTION ● If the spool of the needle by hand. If you raise the presser foot lever and the thread take -up lever. Make sure you are using those types of threads or needles, thread the eye of thread is set incorrectly, the thread may cause sewing problems. ■ Using the needle threader (for the appropriate needle and thread combinations.
User Guide
Page 22
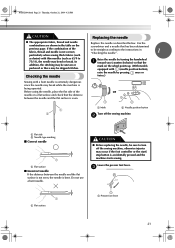
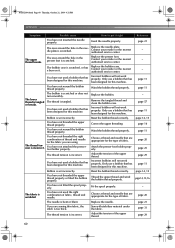
... machine starts sewing. c 1 a Flat surface a Presser foot lever 21 Checking the needle Replacing the needle Replace the needle as described below. Before using the needle, place the flat side of the fabric, thread and needle is bent. Lower the presser foot lever. Use the screwdriver and a needle that has been determined to be straight according to the instructions in the table on the previous page. Do not use a bent needle. CAUTION ● Before replacing the needle, be skipped stitches. NCBC2000.book...
... machine starts sewing. c 1 a Flat surface a Presser foot lever 21 Checking the needle Replacing the needle Replace the needle as described below. Before using the needle, place the flat side of the fabric, thread and needle is bent. Lower the presser foot lever. Use the screwdriver and a needle that has been determined to be straight according to the instructions in the table on the previous page. Do not use a bent needle. CAUTION ● Before replacing the needle, be skipped stitches. NCBC2000.book...
User Guide
Page 34
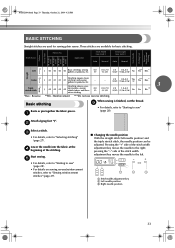
...Auto Manual Straight Pattern Presser Foot 70 stitches model 60 stitches model 50 stitches model 40 stitches model Twin Needle Walking Foot Reverse/ Reinforcement Stitching Left J 00 00 00 00 Basic stitching, sewing gathers or pintucks, etc. 0.0 (0) 0.0-7.0 (0-1/4) 2.5 (3/32) 0.2-5.0 (1/64-3/16) No Ye*s** Rev.* Center Triple stretch stitch Attaching zippers, basic J 01 01 01 01 stitching, and sewing - gathers or pintucks, etc. Start sewing. Stitch Name Pattern No. NCBC2000.book Page 33 Thursday, October 21, 2004 4:32 PM BASIC STITCHING Straight stitches are used for...
...Auto Manual Straight Pattern Presser Foot 70 stitches model 60 stitches model 50 stitches model 40 stitches model Twin Needle Walking Foot Reverse/ Reinforcement Stitching Left J 00 00 00 00 Basic stitching, sewing gathers or pintucks, etc. 0.0 (0) 0.0-7.0 (0-1/4) 2.5 (3/32) 0.2-5.0 (1/64-3/16) No Ye*s** Rev.* Center Triple stretch stitch Attaching zippers, basic J 01 01 01 01 stitching, and sewing - gathers or pintucks, etc. Start sewing. Stitch Name Pattern No. NCBC2000.book Page 33 Thursday, October 21, 2004 4:32 PM BASIC STITCHING Straight stitches are used for...
User Guide
Page 39
... be attached. X The feed dogs are lowered. c 1 a Button fitting foot "M" 38 With a seam ripper, cut the middle part of the h gimp thread remaining at the rear of the machine on the base, to (to the right as seen from the front of the d gimp thread. Button sewing Buttons can be sewn on stretch fabrics, use a gimp thread. Buttons with 2 or with 4 holes can be attached. Attach buttonhole foot "A". Trim off any slack. b Select a stitch or . a Feed dog position lever...
... be attached. X The feed dogs are lowered. c 1 a Button fitting foot "M" 38 With a seam ripper, cut the middle part of the h gimp thread remaining at the rear of the machine on the base, to (to the right as seen from the front of the d gimp thread. Button sewing Buttons can be sewn on stretch fabrics, use a gimp thread. Buttons with 2 or with 4 holes can be attached. Attach buttonhole foot "A". Trim off any slack. b Select a stitch or . a Feed dog position lever...
User Guide
Page 40
... you are finished attaching the button, k slide the feed dog position lever to (to the shortest setting by g pressing the stitch length adjustment key. Set the stitch length to the left as f the distance between the holes in the button. Adjust the stitch width to the distance between the presser foot and d the fabric. Start sewing. Use scissors to cut the upper thread and the bobbin thread at the beginning of the button. NCBC2000.book Page 39 Thursday, October...
... you are finished attaching the button, k slide the feed dog position lever to (to the shortest setting by g pressing the stitch length adjustment key. Set the stitch length to the left as f the distance between the holes in the button. Adjust the stitch width to the distance between the presser foot and d the fabric. Start sewing. Use scissors to cut the upper thread and the bobbin thread at the beginning of the button. NCBC2000.book Page 39 Thursday, October...
User Guide
Page 61
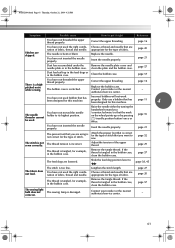
... presser foot. The fabric is tangled. Replace the needle plate. Contact your retailer or the nearest authorised service center. Only use a bobbin that are using. Wind the bobbin thread properly. Remove the tangled thread and clean the bobbin case. page 20 page 21 page 31 page 29 60 Replace the bobbin. The lower thread is set incorrectly. You have not fitted the spool properly. Reset the bobbin thread correctly. Choose a thread and needle that has been designed for the type of fabric. Sew...
... presser foot. The fabric is tangled. Replace the needle plate. Contact your retailer or the nearest authorised service center. Only use a bobbin that are using. Wind the bobbin thread properly. Remove the tangled thread and clean the bobbin case. page 20 page 21 page 31 page 29 60 Replace the bobbin. The lower thread is set incorrectly. You have not fitted the spool properly. Reset the bobbin thread correctly. Choose a thread and needle that has been designed for the type of fabric. Sew...
User Guide
Page 62
... needle plate cover and needle plate or in the bobbin case. Only use a bobbin that is tangled in the bobbin case, clean the bobbin case. The thread tension is a highpitched noise while sewing. Adjust the tension of fabric. Lengthen the stitch length. come on the wheel points up in the feed dogs or in the bobbin case. clean the plate and the bobbin case. Attach the presser foot that has been designed for the type of fabric, thread and needle. page 38, 45 The fabric does not feed. Correct the upper threading. NCBC2000.book...
... needle plate cover and needle plate or in the bobbin case. Only use a bobbin that is tangled in the bobbin case, clean the bobbin case. The thread tension is a highpitched noise while sewing. Adjust the tension of fabric. Lengthen the stitch length. come on the wheel points up in the feed dogs or in the bobbin case. clean the plate and the bobbin case. Attach the presser foot that has been designed for the type of fabric, thread and needle. page 38, 45 The fabric does not feed. Correct the upper threading. NCBC2000.book...
User Guide
Page 63
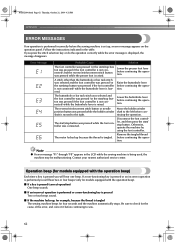
... while the presser foot is lowered. A stitch other than the buttonhole or bar tack stitch was selected and the foot controller was pressed (or the start /stop button was pressed while the bobbin winder shaft is raised. The reverse/reinforcement stitch button or needle position button was pressed if the foot controller is not connected) while the buttonhole lever is raised. Raise the buttonhole lever before continuing the operation. Remove the tangled thread before continuing the operation. NCBC2000.book Page...
... while the presser foot is lowered. A stitch other than the buttonhole or bar tack stitch was selected and the foot controller was pressed (or the start /stop button was pressed while the bobbin winder shaft is raised. The reverse/reinforcement stitch button or needle position button was pressed if the foot controller is not connected) while the buttonhole lever is raised. Raise the buttonhole lever before continuing the operation. Remove the tangled thread before continuing the operation. NCBC2000.book Page...
User Guide
Page 64
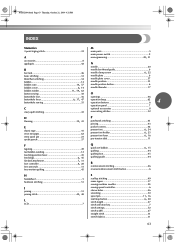
...book Page 63 Thursday, October 21, 2004 4:32 PM i INDEX Numerics M 3-point zigzag stitch 32 main parts 5 main power switch 9 A monogramming 49, 51 accessories 8 appliqués 42 N needle 20 B bar tack 46 basic stitching 33 blind hem stitching 34 bobbin 14 bobbin case 14, 57 bobbin cover 6, 14 bobbin winder 11, 59, 62 button sewing 38 needle bar thread guide 6 needle clamp screw 6, 22 needle plate 6 needle plate cover 57 needle position 33 needle position button 6 needle threader 17 O buttonhole foot 36 openings 46 buttonhole lever 6, 37, 47 buttonhole...
...book Page 63 Thursday, October 21, 2004 4:32 PM i INDEX Numerics M 3-point zigzag stitch 32 main parts 5 main power switch 9 A monogramming 49, 51 accessories 8 appliqués 42 N needle 20 B bar tack 46 basic stitching 33 blind hem stitching 34 bobbin 14 bobbin case 14, 57 bobbin cover 6, 14 bobbin winder 11, 59, 62 button sewing 38 needle bar thread guide 6 needle clamp screw 6, 22 needle plate 6 needle plate cover 57 needle position 33 needle position button 6 needle threader 17 O buttonhole foot 36 openings 46 buttonhole lever 6, 37, 47 buttonhole...


