

User Guide
Page 1
...control free from outlet. 9. To reduce the risk of lint, dust, and loose cloth. 5. Use only accessories recommended by authorized dealer. Never operate the machine with this manual. 3. Keep fingers away from the electrical outlet when removing covers, lubricating, or when making ...42 PM IMPORTANT SAFETY INSTRUCTIONS When using . To unplug, grasp the plug, not the cord. 10. This sewing machine is required around the machine needle. 11. Return the machine to be left unattended while plugged in the instruction manual. 16. Keep ventilation openings of electric shock: 1. ...
...control free from outlet. 9. To reduce the risk of lint, dust, and loose cloth. 5. Use only accessories recommended by authorized dealer. Never operate the machine with this manual. 3. Keep fingers away from the electrical outlet when removing covers, lubricating, or when making ...42 PM IMPORTANT SAFETY INSTRUCTIONS When using . To unplug, grasp the plug, not the cord. 10. This sewing machine is required around the machine needle. 11. Return the machine to be left unattended while plugged in the instruction manual. 16. Keep ventilation openings of electric shock: 1. ...

User Guide
Page 4
... SEWING TIPS ...30 Trial sewing ...30 Changing the sewing direction ...30 Sewing curves ...30 Sewing thick fabrics ...30 Sewing thin fabrics ...31 Sewing stretch fabrics ...31 Using a free-arm style ...31 3 KNOWING YOUR SEWING MACHINE 5 NAMES OF MACHINE PARTS AND THEIR FUNCTIONS 5 The main parts ...5 Needle and presser foot section ...6 Operation buttons ...6 Operation panel ...7 Flat bed attachment ...7 ACCESSORIES ...8 Optional accessories ...8 USING YOUR SEWING MACHINE...
... SEWING TIPS ...30 Trial sewing ...30 Changing the sewing direction ...30 Sewing curves ...30 Sewing thick fabrics ...30 Sewing thin fabrics ...31 Sewing stretch fabrics ...31 Using a free-arm style ...31 3 KNOWING YOUR SEWING MACHINE 5 NAMES OF MACHINE PARTS AND THEIR FUNCTIONS 5 The main parts ...5 Needle and presser foot section ...6 Operation buttons ...6 Operation panel ...7 Flat bed attachment ...7 ACCESSORIES ...8 Optional accessories ...8 USING YOUR SEWING MACHINE...

User Guide
Page 6
... Used to cut them. e Thread guide (pages 11 and 16) This is used when winding the thread onto the bobbin and then threading the machine. m Jack/socket connector (page 9) Insert the plug on the power supply cord into the jack/ socket connector. b Spool pin (pages 11 ...(page 16) Used to start and stop sewing. 5 NCBC2000.book Page 5 Thursday, October 21, 2004 4:32 PM 1 KNOWING YOUR SEWING MACHINE 1 NAMES OF MACHINE PARTS AND THEIR FUNCTIONS The main parts a Bobbin winder (page 11) This winds the thread onto the bobbin for sewing with accessory compartment (pages 7 and 31) i Operation ...
... Used to cut them. e Thread guide (pages 11 and 16) This is used when winding the thread onto the bobbin and then threading the machine. m Jack/socket connector (page 9) Insert the plug on the power supply cord into the jack/ socket connector. b Spool pin (pages 11 ...(page 16) Used to start and stop sewing. 5 NCBC2000.book Page 5 Thursday, October 21, 2004 4:32 PM 1 KNOWING YOUR SEWING MACHINE 1 NAMES OF MACHINE PARTS AND THEIR FUNCTIONS The main parts a Bobbin winder (page 11) This winds the thread onto the bobbin for sewing with accessory compartment (pages 7 and 31) i Operation ...
User Guide
Page 8
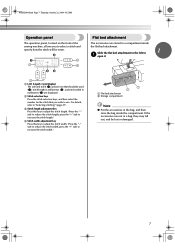
...will be sewn. NCBC2000.book Page 7 Thursday, October 21, 2004 4:32 PM Operation panel The operation panel, located on the front of the sewing machine, allows you wish to use. Slide the flat bed attachment to the left to reduce the stitch width; press the "+" side to increase ...d Stitch width adjustment key Press this key to adjust the stitch length. (Press the "-" side to "Selecting stitching" (page 27). Flat bed attachment The accessories are stored in a bag, they may fall out, and be used (2), stitch length in millimeters (3), and stitch width in millimeters (4) are not in a...
...will be sewn. NCBC2000.book Page 7 Thursday, October 21, 2004 4:32 PM Operation panel The operation panel, located on the front of the sewing machine, allows you wish to use. Slide the flat bed attachment to the left to reduce the stitch width; press the "+" side to increase ...d Stitch width adjustment key Press this key to adjust the stitch length. (Press the "-" side to "Selecting stitching" (page 27). Flat bed attachment The accessories are stored in a bag, they may fall out, and be used (2), stitch length in millimeters (3), and stitch width in millimeters (4) are not in a...

User Guide
Page 9
...Name 1 Buttonhole foot "A" 2 Overcasting foot "G" 3 Monogramming foot "N" 4 Zipper foot "I" 5 Zigzag foot "J" (on the following accessories are stored in the flat bed attachment. Others XC2691-031 XC3098-031 X53840-331 X59370-021 XC3021-031 XC4051-031 X59375-121 X54243-001 ... stitch foot "R" 7 Button fitting foot "M" 8 Seam ripper Part Code U.S.A. NCBC2000.book Page 8 Thursday, October 21, 2004 4:32 PM KNOWING YOUR SEWING MACHINE ACCESSORIES The following machine models: CS-6000, CS-5100, CS-4000, BC-2500, BC-2300, BC-2100, ES-2400, ES-2200, ES-2000, ES-2410, ES-2210, ...
...Name 1 Buttonhole foot "A" 2 Overcasting foot "G" 3 Monogramming foot "N" 4 Zipper foot "I" 5 Zigzag foot "J" (on the following accessories are stored in the flat bed attachment. Others XC2691-031 XC3098-031 X53840-331 X59370-021 XC3021-031 XC4051-031 X59375-121 X54243-001 ... stitch foot "R" 7 Button fitting foot "M" 8 Seam ripper Part Code U.S.A. NCBC2000.book Page 8 Thursday, October 21, 2004 4:32 PM KNOWING YOUR SEWING MACHINE ACCESSORIES The following machine models: CS-6000, CS-5100, CS-4000, BC-2500, BC-2300, BC-2100, ES-2400, ES-2200, ES-2000, ES-2410, ES-2210, ...
User Guide
Page 64
... October 21, 2004 4:32 PM i INDEX Numerics M 3-point zigzag stitch 32 main parts 5 main power switch 9 A monogramming 49, 51 accessories 8 appliqués 42 N needle 20 B bar tack 46 basic stitching 33 blind hem stitching 34 bobbin 14 bobbin case 14, 57 bobbin ... button 6 H handwheel 5 heirloom stitching 51 J joining 51 joining stitch 42, 48 L LCD 7 S scallop stitching 49 seam ripper 37 sewing machine needles 20 sewing speed controller 6 sleeve holes 46 smocking 50 spool pin 11, 16 start/stop button 6, 28 stitch length 27 stitch selection key 7 stitch ...
... October 21, 2004 4:32 PM i INDEX Numerics M 3-point zigzag stitch 32 main parts 5 main power switch 9 A monogramming 49, 51 accessories 8 appliqués 42 N needle 20 B bar tack 46 basic stitching 33 blind hem stitching 34 bobbin 14 bobbin case 14, 57 bobbin ... button 6 H handwheel 5 heirloom stitching 51 J joining 51 joining stitch 42, 48 L LCD 7 S scallop stitching 49 seam ripper 37 sewing machine needles 20 sewing speed controller 6 sleeve holes 46 smocking 50 spool pin 11, 16 start/stop button 6, 28 stitch length 27 stitch selection key 7 stitch ...


