

User Guide
Page 9
...only) ● Foot controller: Model T This foot controller can be used on machine) 6 Blind stitch foot "R" 7 Button fitting foot "M" 8 Seam ripper Part Code U.S.A. Others SA156 XA5539-151 XC8834-021 131096-121 X59476-021 X55467-021 130920-021 XC8816-021 5.* No. Part Name 1 Walking Foot 2 Quilting Foot 3 1/4-Inch Quilting Foot * May be ... XC1948-002 SA125 F001N: XC1944-002 No. NCBC2000.book Page 8 Thursday, October 21, 2004 4:32 PM KNOWING YOUR SEWING MACHINE ACCESSORIES The following machine models: CS-6000, CS-5100, CS-4000, BC-2500, BC-2300, BC-2100, ES-2400, ES-2200,...
...only) ● Foot controller: Model T This foot controller can be used on machine) 6 Blind stitch foot "R" 7 Button fitting foot "M" 8 Seam ripper Part Code U.S.A. Others SA156 XA5539-151 XC8834-021 131096-121 X59476-021 X55467-021 130920-021 XC8816-021 5.* No. Part Name 1 Walking Foot 2 Quilting Foot 3 1/4-Inch Quilting Foot * May be ... XC1948-002 SA125 F001N: XC1944-002 No. NCBC2000.book Page 8 Thursday, October 21, 2004 4:32 PM KNOWING YOUR SEWING MACHINE ACCESSORIES The following machine models: CS-6000, CS-5100, CS-4000, BC-2500, BC-2300, BC-2100, ES-2400, ES-2200,...

User Guide
Page 15
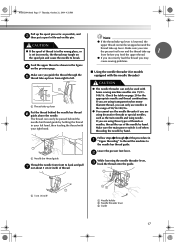
... specifically for models equipped with this machine. Put the left tab in the right direction. this sewing machine. If bobbins from other models are used with the needle position button), and raise the presser foot lever. 14 1 a Tension-adjusting...inch) This model Other models • Only use bobbins that the thread is correctly inserted through the tension-adjusting spring of the bobbin case. Raise the needle to be incorrect or break the needle. NCBC2000.book Page 14 Thursday, October 21, 2004 4:32 PM KNOWING YOUR SEWING MACHINE Memo ● When the sewing machine...
... specifically for models equipped with this machine. Put the left tab in the right direction. this sewing machine. If bobbins from other models are used with the needle position button), and raise the presser foot lever. 14 1 a Tension-adjusting...inch) This model Other models • Only use bobbins that the thread is correctly inserted through the tension-adjusting spring of the bobbin case. Raise the needle to be incorrect or break the needle. NCBC2000.book Page 14 Thursday, October 21, 2004 4:32 PM KNOWING YOUR SEWING MACHINE Memo ● When the sewing machine...
User Guide
Page 18
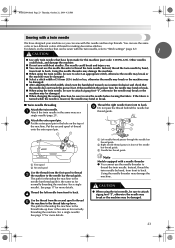
..."Upper threading" to thread the machine to back and pull g out about 5 cm (2 inch) of 90/14-100/16. ● You cannot use the needle threader if you are using transparent nylon monofilament thread, you may tangle on page 20 for models equipped with home sewing machine needles size 75/11100/16. ... in the range of thread. b While lowering the needle threader lever, c hook the thread onto the guide. Make sure you raise the presser foot lever and the thread take -up lever. Make sure you guide the thread through 6 of thread is off when threading the needle by hand....
..."Upper threading" to thread the machine to back and pull g out about 5 cm (2 inch) of 90/14-100/16. ● You cannot use the needle threader if you are using transparent nylon monofilament thread, you may tangle on page 20 for models equipped with home sewing machine needles size 75/11100/16. ... in the range of thread. b While lowering the needle threader lever, c hook the thread onto the guide. Make sure you raise the presser foot lever and the thread take -up lever. Make sure you guide the thread through 6 of thread is off when threading the needle by hand....
User Guide
Page 20
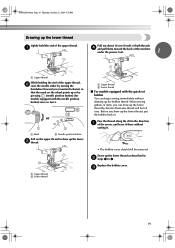
... models equipped with the quick-set bobbin You can draw up the lower thread by turning the handwheel toward the back of the machine under the presser foot. 1 a Upper thread While holding the end of the upper thread. Before you (counterclockwise) so that some thread will be removed...darts, you can begin sewing immediately without cutting it. • The bobbin cover should still be left over. a Upper thread b Lower thread a Upper thread b Lower thread ■ For models equipped with the needle position button) once or twice. a Pull out about 10 cm (4 inch) of both threads d...
... models equipped with the quick-set bobbin You can draw up the lower thread by turning the handwheel toward the back of the machine under the presser foot. 1 a Upper thread While holding the end of the upper thread. Before you (counterclockwise) so that some thread will be removed...darts, you can begin sewing immediately without cutting it. • The bobbin cover should still be left over. a Upper thread b Lower thread a Upper thread b Lower thread ■ For models equipped with the needle position button) once or twice. a Pull out about 10 cm (4 inch) of both threads d...
User Guide
Page 24
... an appropriate stitch, otherwise the needle may break or the machine may be damaged. ● Select a stitch width of 5.0 mm (3/16 inch) or less, otherwise the needle may break or the machine may be damaged. ● When changing the sewing direction, be sure to the thread take -up lever. ... 131096-121). Instead, thread the twin needle by hand, from the first spool to thread c the machine to attach zigzag foot "J", otherwise the needle may break or the machine may damage the machine. ● When using the twin needle, be damaged. 23 Other needles could break and injure you can...
... an appropriate stitch, otherwise the needle may break or the machine may be damaged. ● Select a stitch width of 5.0 mm (3/16 inch) or less, otherwise the needle may break or the machine may be damaged. ● When changing the sewing direction, be sure to the thread take -up lever. ... 131096-121). Instead, thread the twin needle by hand, from the first spool to thread c the machine to attach zigzag foot "J", otherwise the needle may break or the machine may damage the machine. ● When using the twin needle, be damaged. 23 Other needles could break and injure you can...
User Guide
Page 29
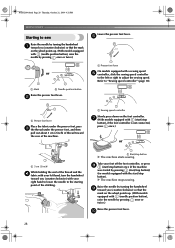
... pressing once or twice.) a Presser foot lever or On models equipped with the start /stop button X The machine starts sewing. X The machine stops sewing. a Start/stop button)) (for models equipped with a sewing speed f controller, slide the sewing speed controller to the left hand,...inch) While holding the end of the thread and the d fabric with your foot off the foot controller, or press h (start/stop button) once (if the machine was started by turning the handwheel a toward you (counterclockwise) so that the mark on the foot controller. Refer to sew Lower the presser foot...
... pressing once or twice.) a Presser foot lever or On models equipped with the start /stop button X The machine starts sewing. X The machine stops sewing. a Start/stop button)) (for models equipped with a sewing speed f controller, slide the sewing speed controller to the left hand,...inch) While holding the end of the thread and the d fabric with your foot off the foot controller, or press h (start/stop button) once (if the machine was started by turning the handwheel a toward you (counterclockwise) so that the mark on the foot controller. Refer to sew Lower the presser foot...
User Guide
Page 32
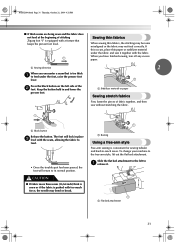
... to feed under the foot, raise the presser foot lever. CAUTION ● If fabric more than 6 mm (15/64 inch) thick is sewn or if the fabric is pushed with the seam, allowing the fabric to the left side of the b foot. To change your machine to -reach areas. a Sewing direction 2 When you... have finished sewing, tear off any excess paper. a Stabilizer material or ...
... to feed under the foot, raise the presser foot lever. CAUTION ● If fabric more than 6 mm (15/64 inch) thick is sewn or if the fabric is pushed with the seam, allowing the fabric to the left side of the b foot. To change your machine to -reach areas. a Sewing direction 2 When you... have finished sewing, tear off any excess paper. a Stabilizer material or ...

User Guide
Page 33
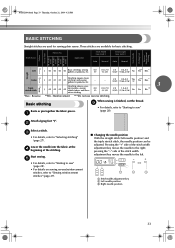
...with the edge of the fabric against the guide of the fabric c against the d presser foot guide. They are also useful for sewing stretch materials. If the needle hits the presser foot, the needle may bend or break. 32 Rfc. ** G 06 06 06 06 Overcasting ... You can use reverse stitching. Application Stitch Width [mm (inch.)] Stitch Length [mm (inch.)] Auto Manual Auto Manual Pattern Presser Foot 70 stitches model 60 stitches model 50 stitches model 40 stitches model Twin Needle Walking Foot Reverse/ Reinforcement Stitching Zigzag stitch 3-point zigzag stitch J 04...
...with the edge of the fabric against the guide of the fabric c against the d presser foot guide. They are also useful for sewing stretch materials. If the needle hits the presser foot, the needle may bend or break. 32 Rfc. ** G 06 06 06 06 Overcasting ... You can use reverse stitching. Application Stitch Width [mm (inch.)] Stitch Length [mm (inch.)] Auto Manual Auto Manual Pattern Presser Foot 70 stitches model 60 stitches model 50 stitches model 40 stitches model Twin Needle Walking Foot Reverse/ Reinforcement Stitching Zigzag stitch 3-point zigzag stitch J 04...
User Guide
Page 34
... "Selecting stitching" (page 27). Application Stitch Width [mm (inch.)] Stitch Length [mm (inch.)] Auto Manual Auto Manual Straight Pattern Presser Foot 70 stitches model 60 stitches model 50 stitches model 40 stitches model Twin Needle Walking Foot Reverse/ Reinforcement Stitching Left J 00 00 00 00 Basic stitching, sewing gathers or pintucks, etc. 0.0 (0) 0.0-7.0 (0-1/4) 2.5 (3/32) 0.2-5.0 (1/64-3/16...
... "Selecting stitching" (page 27). Application Stitch Width [mm (inch.)] Stitch Length [mm (inch.)] Auto Manual Auto Manual Straight Pattern Presser Foot 70 stitches model 60 stitches model 50 stitches model 40 stitches model Twin Needle Walking Foot Reverse/ Reinforcement Stitching Left J 00 00 00 00 Basic stitching, sewing gathers or pintucks, etc. 0.0 (0) 0.0-7.0 (0-1/4) 2.5 (3/32) 0.2-5.0 (1/64-3/16...
User Guide
Page 35
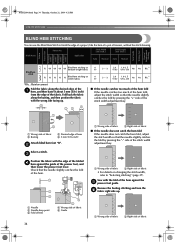
... the hem fold, adjust the stitch width so that the needle slightly catches the fold by pressing the "-" side of the stitch width adjustment key. Sew with the wrong side facing up . NCBC2000.book Page 34 Thursday, October 21, 2004 4:32 PM UTILITY STITCHES BLIND HEM STITCHING You can use the... the stitch width, refer to finish the edge of a project, like the hem of a pair of the hem against the guide of hem d 5 mm (3/16 inch) Attach blind hem foot "R". Fold back the fabric along the desired edge of the a hem, and then baste it about 5 mm (3/16...
... the hem fold, adjust the stitch width so that the needle slightly catches the fold by pressing the "-" side of the stitch width adjustment key. Sew with the wrong side facing up . NCBC2000.book Page 34 Thursday, October 21, 2004 4:32 PM UTILITY STITCHES BLIND HEM STITCHING You can use the... the stitch width, refer to finish the edge of a project, like the hem of a pair of the hem against the guide of hem d 5 mm (3/16 inch) Attach blind hem foot "R". Fold back the fabric along the desired edge of the a hem, and then baste it about 5 mm (3/16...

User Guide
Page 36
... Page 35 Thursday, October 21, 2004 4:32 PM BUTTONHOLE SEWING Pattern Presser Foot 70 stitches model 60 stitches model 50 stitches model 40 stitches model Twin Needle Walking Foot Reverse/ Reinforcement Stitching Buttonholes can be sewn and buttons can...free- A 34 34 - motion quilting, satin stitching, button sewing 3.5 (1/8) 0.0-7.0 (0-1/4) 1.4 (1/16) 0.0-4.0 (0-3/16) No Yes *Auto Rfc.: Automatic Reinforcement **Rfc.: Reinforcement The maximum buttonhole length is about 28 mm (1-1/8 inch) (diameter + thickness of the presser foot to the back, as shown below. medium weight and thick...
... Page 35 Thursday, October 21, 2004 4:32 PM BUTTONHOLE SEWING Pattern Presser Foot 70 stitches model 60 stitches model 50 stitches model 40 stitches model Twin Needle Walking Foot Reverse/ Reinforcement Stitching Buttonholes can be sewn and buttons can...free- A 34 34 - motion quilting, satin stitching, button sewing 3.5 (1/8) 0.0-7.0 (0-1/4) 1.4 (1/16) 0.0-4.0 (0-3/16) No Yes *Auto Rfc.: Automatic Reinforcement **Rfc.: Reinforcement The maximum buttonhole length is about 28 mm (1-1/8 inch) (diameter + thickness of the presser foot to the back, as shown below. medium weight and thick...

User Guide
Page 37
... for sewing buttonholes, are indicated below. 1 2 5 ■ If the button does not fit in the presser foot. 1 X The size of the buttonhole is 5 mm (3/16 inch).) 1 3 4 A a Button guide plate b Presser foot scale c Pin d Marks on buttonhole foot e 5 mm (3/16 inch) Use chalk to 25 mm (1 inch) on the scale. 1 2 a 10 mm (3/8 inch) b 15 mm (9/16 inch) Attach buttonhole foot "A". A 2 3 a Presser foot...
... for sewing buttonholes, are indicated below. 1 2 5 ■ If the button does not fit in the presser foot. 1 X The size of the buttonhole is 5 mm (3/16 inch).) 1 3 4 A a Button guide plate b Presser foot scale c Pin d Marks on buttonhole foot e 5 mm (3/16 inch) Use chalk to 25 mm (1 inch) on the scale. 1 2 a 10 mm (3/8 inch) b 15 mm (9/16 inch) Attach buttonhole foot "A". A 2 3 a Presser foot...
User Guide
Page 41
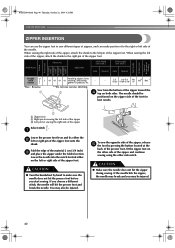
.... Fold the edge of the zipper foot. CAUTION ● Make sure the needle does not hit the zipper during sewing. Application Stitch Width [mm (inch.)] Stitch Length [mm (inch.)] Auto Manual Auto Manual Pattern Presser Foot 70 stitches model 60 stitches model 50... stitches model 40 stitches model Twin Needle Walking Foot Reverse/ Reinforcement Stitching Straight stitch I (center...
.... Fold the edge of the zipper foot. CAUTION ● Make sure the needle does not hit the zipper during sewing. Application Stitch Width [mm (inch.)] Stitch Length [mm (inch.)] Auto Manual Auto Manual Pattern Presser Foot 70 stitches model 60 stitches model 50... stitches model 40 stitches model Twin Needle Walking Foot Reverse/ Reinforcement Stitching Straight stitch I (center...

User Guide
Page 42
... that of the a fabric. Stitch Width [mm (inch.)] Stitch Name Application Auto Manual Stitch Length [mm (inch.)] Auto Manual Pattern Presser Foot 70 stitches model 60 stitches model 50 stitches model 40 stitches model Twin Needle Walking Foot Reverse/ Reinforcement Stitching Stretch stitch J 03 03 03 03 Sewing stretch fabrics and decorative stitching 1.0 1.0-3.0 2.5 1.0-4.0 Yes (1/16...
... that of the a fabric. Stitch Width [mm (inch.)] Stitch Name Application Auto Manual Stitch Length [mm (inch.)] Auto Manual Pattern Presser Foot 70 stitches model 60 stitches model 50 stitches model 40 stitches model Twin Needle Walking Foot Reverse/ Reinforcement Stitching Stretch stitch J 03 03 03 03 Sewing stretch fabrics and decorative stitching 1.0 1.0-3.0 2.5 1.0-4.0 Yes (1/16...
User Guide
Page 43
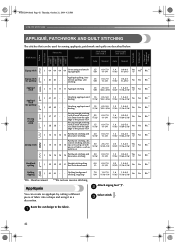
...[mm (inch.)] Stitch Length [mm (inch.)] Auto Manual Auto Manual Zigzag stitch Zigzag stitch (for sewing appliqués, patchwork and quilts are described below. Piecing straight stitching - (with a seam allowance of 6.5mm from the right 1.5 (1/16) edge of the presser foot) 0.0-7.0 ... 1.0-4.0 Yes (3/32) (1/16-3/16) ( J ) No with a seam allowance of 6.5mm from the right 5.5 (7/32) edge of the presser foot) Piecing straight stitching - (with tricot Rfc.* J 16 16 16 16 Patchwork stitching and decorative stitching 5.0 (3/16) 0.0-7.0 (0-1/4) 1.2 0.2-4.0 Yes (1/16...
...[mm (inch.)] Stitch Length [mm (inch.)] Auto Manual Auto Manual Zigzag stitch Zigzag stitch (for sewing appliqués, patchwork and quilts are described below. Piecing straight stitching - (with a seam allowance of 6.5mm from the right 1.5 (1/16) edge of the presser foot) 0.0-7.0 ... 1.0-4.0 Yes (3/32) (1/16-3/16) ( J ) No with a seam allowance of 6.5mm from the right 5.5 (7/32) edge of the presser foot) Piecing straight stitching - (with tricot Rfc.* J 16 16 16 16 Patchwork stitching and decorative stitching 5.0 (3/16) 0.0-7.0 (0-1/4) 1.2 0.2-4.0 Yes (1/16...
User Guide
Page 44
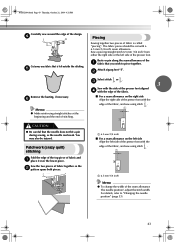
... edge of the top piece of stitching. d Cut away any fabric that is called "piecing". e Piecing Sewing together two pieces of fabric is left side of the presser foot with a 6.5 mm (1/4 inch) seam allowance. f Memo ● Make reinforcing straight stitches at the beginning and the end of fabric and... or pin along the seam allowance of the design. a 6.5 mm (1/4 inch) ■ For a seam allowance on the right side Align the right side of the presser foot with the edge of the fabric, and sew using stitch . 1 a 6.5 mm (1/4 inch) Memo ● To change the width of the fabric, and...
... edge of the top piece of stitching. d Cut away any fabric that is called "piecing". e Piecing Sewing together two pieces of fabric is left side of the presser foot with a 6.5 mm (1/4 inch) seam allowance. f Memo ● Make reinforcing straight stitches at the beginning and the end of fabric and... or pin along the seam allowance of the design. a 6.5 mm (1/4 inch) ■ For a seam allowance on the right side Align the right side of the presser foot with the edge of the fabric, and sew using stitch . 1 a 6.5 mm (1/4 inch) Memo ● To change the width of the fabric, and...

User Guide
Page 47
....: Reinforcement **Auto Rfc.: Automatic Reinforcement Triple stretch stitching Use triple stretch stitching to sew" (page 28). As an example, the procedure for sewing bar tacks at pocket corners is 5 mm (3/16 inch).) 1 2 3 a Presser foot scale b Length of bar tack c 5 mm (3/16 inch) • A bar tack with a maximum length of the bar tack. Determine the desired...
....: Reinforcement **Auto Rfc.: Automatic Reinforcement Triple stretch stitching Use triple stretch stitching to sew" (page 28). As an example, the procedure for sewing bar tacks at pocket corners is 5 mm (3/16 inch).) 1 2 3 a Presser foot scale b Length of bar tack c 5 mm (3/16 inch) • A bar tack with a maximum length of the bar tack. Determine the desired...

User Guide
Page 48
..., refer to its original h position. Memo ● If the fabric does not feed, for example, because it is completed, the machine automatically sews reinforcement stitches, then stops. a Buttonhole lever b Bracket Gently hold the end of the upper thread in front of the pocket opening. ... stitch . Position the fabric so that the needle drops 2 mm (1/16 inch) in f your left hand, and then start sewing. a Buttonhole lever The buttonhole lever is positioned behind the bracket on the buttonhole foot. 1 a 2 mm (1/16 inch) 3 Pass the upper thread down the buttonhole lever as far as e ...
..., refer to its original h position. Memo ● If the fabric does not feed, for example, because it is completed, the machine automatically sews reinforcement stitches, then stops. a Buttonhole lever b Bracket Gently hold the end of the upper thread in front of the pocket opening. ... stitch . Position the fabric so that the needle drops 2 mm (1/16 inch) in f your left hand, and then start sewing. a Buttonhole lever The buttonhole lever is positioned behind the bracket on the buttonhole foot. 1 a 2 mm (1/16 inch) 3 Pass the upper thread down the buttonhole lever as far as e ...

User Guide
Page 49
...sewing machine. thin, medium weight and 5.0 plain weave fabrics, heir- (3/16) 1.5-7.0 (1/16-1/4) 2.0 1.5-4.0 Yes (1/16) (1/16-3/16) ( J ) No loom stitching, etc. *Rfc.: Reinforcement 48 Rfc.* Rfc.* Rfc.* Rfc.* Rfc.* Rfc.* thin, medium weight and 5.0 plain weave fabrics, heir- (3/16) 1.5-7.0 (1/16-1/4) 2.5 1.5-4.0 Yes (3/32) (1/16-3/16) ( J ) No loom stitching, etc. Stitch Width [mm (inch...PM UTILITY STITCHES Pattern Presser Foot 70 stitches model 60 stitches model 50 stitches model 40 stitches model Twin Needle Walking Foot Reverse/ Reinforcement Stitching DECORATIVE ...
...sewing machine. thin, medium weight and 5.0 plain weave fabrics, heir- (3/16) 1.5-7.0 (1/16-1/4) 2.0 1.5-4.0 Yes (1/16) (1/16-3/16) ( J ) No loom stitching, etc. *Rfc.: Reinforcement 48 Rfc.* Rfc.* Rfc.* Rfc.* Rfc.* Rfc.* thin, medium weight and 5.0 plain weave fabrics, heir- (3/16) 1.5-7.0 (1/16-1/4) 2.5 1.5-4.0 Yes (3/32) (1/16-3/16) ( J ) No loom stitching, etc. Stitch Width [mm (inch...PM UTILITY STITCHES Pattern Presser Foot 70 stitches model 60 stitches model 50 stitches model 40 stitches model Twin Needle Walking Foot Reverse/ Reinforcement Stitching DECORATIVE ...
User Guide
Page 50
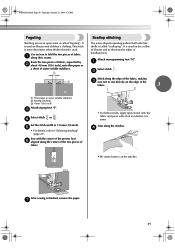
... by b about 4.0 mm (3/16 inch), onto thin paper or a sheet of fabric. • For better results, apply spray starch onto the fabric and press with the center of the presser foot f aligned along the edge of the fabric, making 1 c sure not to sew directly on the collars of blouses and... Scallop stitching The wave-shaped repeating pattern that looks like shells is called "fagoting". After sewing is sewn. It is used on the edge of fabric a along the stitches. e • For details, refer to 7.0 mm (1/4 inch). It is used . Use an iron to cut the stitches. NCBC2000.book Page 49...
... by b about 4.0 mm (3/16 inch), onto thin paper or a sheet of fabric. • For better results, apply spray starch onto the fabric and press with the center of the presser foot f aligned along the edge of the fabric, making 1 c sure not to sew directly on the collars of blouses and... Scallop stitching The wave-shaped repeating pattern that looks like shells is called "fagoting". After sewing is sewn. It is used on the edge of fabric a along the stitches. e • For details, refer to 7.0 mm (1/4 inch). It is used . Use an iron to cut the stitches. NCBC2000.book Page 49...


