Brother International XR-7700 Support Question
Brother International XR-7700 Support Question
Find answers below for this question about Brother International XR-7700.Need a Brother International XR-7700 manual? We have 1 online manual for this item!
Question posted by hornshari on May 10th, 2012
How Do You Set The Needle On The 1/4 Inch Quilting Foot, It Doesn't Align Correc
The person who posted this question about this Brother International product did not include a detailed explanation. Please use the "Request More Information" button to the right if more details would help you to answer this question.
Current Answers
Related Brother International XR-7700 Manual Pages
Users Manual - English - Page 6
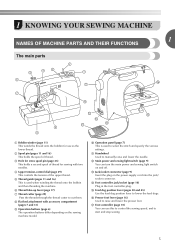
... (page 9) Insert the plug on the sewing machine model. p Presser foot lever (page 16) Used to lower the feed dogs.
h Flat bed attachment with two needles.
o Feed dog position lever (pages 38... holds a second spool of thread for use this to control the sewing speed, and to select the stitch and specify the various settings. d Upper tension-control dial (page 29) This controls the tension...
Users Manual - English - Page 7
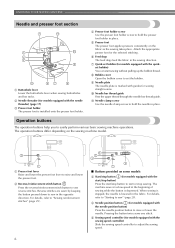
... bobbin cover to start /stop button to set bobbin (for models equipped with the sewing speed controller) Slide the sewing speed controller to hold the needle in place. i Needle plate The needle plate is installed onto the presser foot holder. For details, refer to sew in the opposite direction. KNOWING YOUR SEWING MACHINE
Needle and presser foot section
a Buttonhole lever Lower the...
Users Manual - English - Page 9
...3
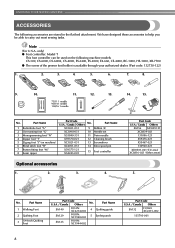
1/4-Inch Quilting Foot
Part Code
U.S.A. / Canada Others
SA140
F033N: XC2214-002
SA129
F005N: XC1948-002
SA125
F001N: XC1944-002
No. Part Name
4 Quilting guide 5 Eyelet punch
Part Code
U.S.A. / Canada Others
SA132
F016N: XC2215-002
135793-001
8 We have designed these accessories to carry out most sewing tasks.
Part Name
XC2691-031
9 Bobbin (4)
XC3098-031
10 Needle set...
Users Manual - English - Page 11
... "-" side of (stitch selection b key) on the foot controller when the machine is not in the fabric when sewing is set to the left and turn off the sewing machine. After turning on the foot controller.
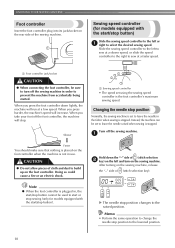
Slide the sewing speed controller to leave the needle in use. KNOWING YOUR SEWING MACHINE
Foot controller
Insert the foot controller plug into its jack/socket on...
Users Manual - English - Page 13
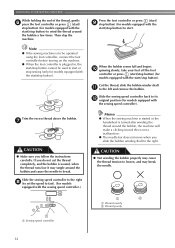
... foot controller is turned after winding the thread around the bobbin, the machine will make a clicking sound; Slide the sewing speed controller to the right
h (to set the speed to break. CAUTION
● Not winding the bobbin properly may cause the thread tension to loosen, and may tangle around the bobbin and cause the needle...
Users Manual - English - Page 14
... the foot controller is to be used to start or stop sewing (only for models equipped with the start /stop button).
a Slit in the bobbin. c
While holding the thread that wraps around the pre-tension disk (page 11).
1
Place the bobbin on the bobbin winder shaft b so that the spring on the sewing machine...
Users Manual - English - Page 15

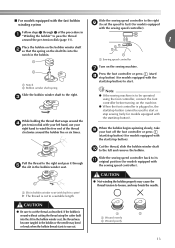
..., push the bobbin d down with this sewing machine.
CAUTION
● Make sure you could be incorrect or break the needle. Put the left tab in the wrong ...inch)
This model
Other models
• Only use bobbins that the thread is not a malfunction.
● The needle bar does not move when you set bobbin, see arrow a), and then press lightly on the foot controller and the machine...
Users Manual - English - Page 17
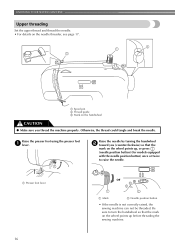
Otherwise, the thread could tangle and break the needle. KNOWING YOUR SEWING MACHINE
Upper threading
Set the upper thread and thread the needle. • For details on the wheel points up before threading the sewing machine.
16 Raise the needle by turning the handwheel b toward you thread the machine properly.
a Spool pin b Thread guide c Mark on the wheel points up...
Users Manual - English - Page 18
... twin needle and wing needle.
a 5 cm (2 inch)
a Needle holder b Needle threader lever c Guide
17
Make sure you raise the presser foot lever and the thread take -up lever.
Pull up
1
lever before you feed the upper thread.
● If you incorrectly feed the thread you may tangle on page 20 for models equipped with home sewing machine needles size...
Users Manual - English - Page 26

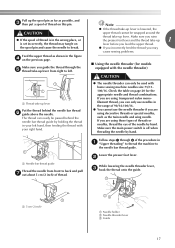
..., such as the quilting foot. Raise the presser foot lever to loosen the presser foot b holder screw.
Removing the presser foot holder
Remove the presser foot holder when cleaning the sewing machine or when installing a presser foot that the f presser foot pin snaps into the shank in the
presser foot holder.
■ Attaching the presser foot holder Align the presser foot holder with b your...
Users Manual - English - Page 28

... around or disappears from the standard setting, around or in the LCD.
● If the stitch width of in the needle bending or breaking.
27 Press the stitch selection keys to increase or reduce the
stitch width. a
With on the sewing machine.
c
Note
● The presser foot to be adjusted, "--" appears to increase or reduce...
Users Manual - English - Page 29
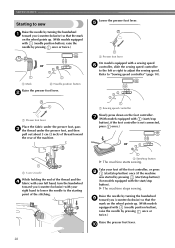
... c the thread under the presser foot, and then
pull out about 5 cm (2 inch) of thread toward you (counterclockwise) so that the mark
on the wheel points up . (With models equipped with (needle position button), raise the needle by pressing (start /stop button
X The machine starts sewing.
X The machine stops sewing. SEWING BASICS
Starting to "Sewing speed controller" (page 10). Take...
Users Manual - English - Page 31
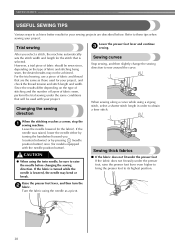
... a corner, stop the a sewing machine. If the needle was raised, lower the needle either by turning the handwheel toward you select a stitch, the machine automatically sets the stitch width and length for your project, and check the thread tension and stitch length and width.
Trial sewing
Lower the presser foot lever and continue c sewing.
SEWING BASICS
USEFUL SEWING TIPS
Various ways...
Users Manual - English - Page 40
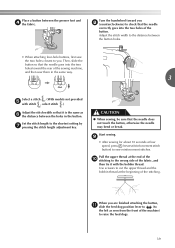
... (reverse/reinforcement stitch button) to the shortest setting by g pressing the stitch length adjustment key. Adjust the stitch width to the distance between the presser foot and d the fabric. CAUTION
● When sewing, be sure that the needle goes into the two holes of the sewing machine, and then sew them in the same way.
3
Select a stitch...
Users Manual - English - Page 41

... injured.
40 To sew the opposite side of the zipper, release e the foot by hand to the right pin of the zipper foot. Application
Stitch Width [mm (inch.)]
Stitch Length [mm (inch.)]
Auto Manual Auto Manual
Pattern Presser Foot 70 stitches model 60 stitches model 50 stitches model 40 stitches model Twin Needle Walking Foot
Reverse/ Reinforcement
Stitching...
Users Manual - English - Page 45

Place one hand on each side of the machine to check that the needle does not strike the presser foot.
If the screw is called "quilting". UTILITY STITCHES
Quilting
Sandwiching batting between slow and medium.
■ Using the optional quilting guide Use the quilting guide to sew parallel stitches that has already
been sewn.
44
Do not use the...
Users Manual - English - Page 46
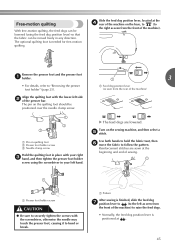
... machine on quilting foot b Presser foot holder screw c Needle clamp screw
Hold the quilting foot in place with the screwdriver, otherwise the needle may touch the presser foot, causing it to raise the feed dogs.
• Normally, the feed dog position lever is needed for free-motion quilting.
X The feed dogs are sewn at the
d rear of sewing. Turn on the quilting foot...
Users Manual - English - Page 49

...sewing machine. Decorative hemming on
N
25 25 25
- thin, medium weight and 5.0 plain weave fabrics, heir- (3/16)
1.5-7.0 (1/16-1/4)
2.5 1.5-4.0 Yes (3/32) (1/16-3/16) ( J )
No
loom stitching, etc. Stitch Width [mm (inch.)]
Stitch Name
Application
Auto Manual
Stitch Length [mm (inch... Foot 70 stitches model 60 stitches model 50 stitches model 40 stitches model Twin Needle Walking Foot
...
Users Manual - English - Page 52

... one side. a
Insert the wing needle. b
Select stitch , , , , or . Start sewing. This is used when making a crazy quilt. Attach monogramming foot "N".
a
Sew together the right sides of the two pieces b of fabric, and then open up , and then sew over so that the needle does not touch the presser foot.
wing needle, otherwise the sewing machine
may bend or break. Heirloom...
Users Manual - English - Page 64
... lever 6 16
pre-tension disk 11
Q
, quick-set bobbin 6 15
quilting 44 quilting foot 45 quilting guide 44
R
reinforcement stitching 46 reverse/reinforcement stitch button 6
H
handwheel 5 heirloom stitching 51
J
joining 51
, joining stitch 42 48
L
LCD 7
S
scallop stitching 49 seam ripper 37 sewing machine needles 20 sewing speed controller 6 sleeve holes 46 smocking 50
, spool...
Similar Questions

Brother Sewing Machine Xr7700 How To Adjust Needle Position For Zipper Foot
(Posted by princje 10 years ago)
How Do I Put The Needle Clamp Guide And Needle Clamp Screw On A Brother Xl-3100
how do i put the needle clamp guide back in needle clamp screw on my brother xl-3100
how do i put the needle clamp guide back in needle clamp screw on my brother xl-3100
(Posted by dddtmisso 11 years ago)

Needle Will Not Grab Bobbin Thread On Brother S-6200a Sewing Machine. What Up
(Posted by charlesjeffries 11 years ago)

How Do I Install The Quilt Guide On The Presser Foot? The Hole Is Too Small.
I have a Brother XR7700 sewing machine. I cannot fit the quilt guide into the small hole on the pres...
I have a Brother XR7700 sewing machine. I cannot fit the quilt guide into the small hole on the pres...
(Posted by jgbloom80 11 years ago)