Users Manual - English
Page 3
... removing the needle or any assemblies, the presser feet, needle, or other moving parts. 2. For a longer service life 1. Do not use or store the machine near a space heater, iron, halogen lamp, or other parts • A power failure occurs during use extension cords. Always consult the operation manual when replacing or installing any other hot objects. 2. When storing this product are subject to change without notice. 2 For additional product information and updates...
... removing the needle or any assemblies, the presser feet, needle, or other moving parts. 2. For a longer service life 1. Do not use or store the machine near a space heater, iron, halogen lamp, or other parts • A power failure occurs during use extension cords. Always consult the operation manual when replacing or installing any other hot objects. 2. When storing this product are subject to change without notice. 2 For additional product information and updates...
Users Manual - English
Page 4
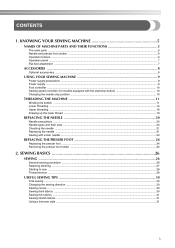
... 5 The main parts ...5 Needle and presser foot section ...6 Operation buttons ...6 Operation panel ...7 Flat bed attachment ...7 ACCESSORIES ...8 Optional accessories ...8 USING YOUR SEWING MACHINE 9 Power supply precautions ...9 Power supply ...9 Foot controller ...10 Sewing speed controller (for models equipped with the start/stop button 10 Changing the needle stop position ...10 THREADING THE MACHINE 11 Winding the bobbin ...11 Lower threading ...14 Upper threading ...16 Drawing up the lower thread ...19 REPLACING THE NEEDLE 20 Needle precautions ...20 Needle types and their uses ...20...
... 5 The main parts ...5 Needle and presser foot section ...6 Operation buttons ...6 Operation panel ...7 Flat bed attachment ...7 ACCESSORIES ...8 Optional accessories ...8 USING YOUR SEWING MACHINE 9 Power supply precautions ...9 Power supply ...9 Foot controller ...10 Sewing speed controller (for models equipped with the start/stop button 10 Changing the needle stop position ...10 THREADING THE MACHINE 11 Winding the bobbin ...11 Lower threading ...14 Upper threading ...16 Drawing up the lower thread ...19 REPLACING THE NEEDLE 20 Needle precautions ...20 Needle types and their uses ...20...
Users Manual - English
Page 6
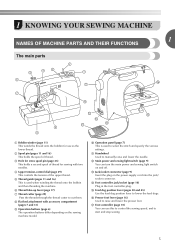
... main parts a Bobbin winder (page 11) This winds the thread onto the bobbin for sewing with accessory compartment (pages 7 and 31) i Operation buttons (page 6) The operation buttons differ depending on the sewing machine model. h Flat bed attachment with two needles. m Jack/socket connector (page 9) Insert the plug on and off. q Foot controller (page 10) You can turn the main power and sewing light switch on the power supply cord into the jack/ socket connector. b Spool pin (pages...
... main parts a Bobbin winder (page 11) This winds the thread onto the bobbin for sewing with accessory compartment (pages 7 and 31) i Operation buttons (page 6) The operation buttons differ depending on the sewing machine model. h Flat bed attachment with two needles. m Jack/socket connector (page 9) Insert the plug on and off. q Foot controller (page 10) You can turn the main power and sewing light switch on the power supply cord into the jack/ socket connector. b Spool pin (pages...
Users Manual - English
Page 7
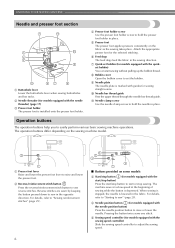
... machine sews at a slow speed at the beginning of sewing while the button is installed onto the presser foot holder. Attach the appropriate presser foot for models equipped with the quickset bobbin) You can start or stop sewing. h Bobbin cover Open the bobbin cover to set bobbin (for sewing straight seams. j Needle bar thread guide Pass the upper thread through the needle bar thread guide. k Needle clamp screw Use the needle clamp screw to hold the needle in the sewing direction. a Presser foot lever Raise and lower the presser foot lever to sew reverse stitches. i Needle plate...
... machine sews at a slow speed at the beginning of sewing while the button is installed onto the presser foot holder. Attach the appropriate presser foot for models equipped with the quickset bobbin) You can start or stop sewing. h Bobbin cover Open the bobbin cover to set bobbin (for sewing straight seams. j Needle bar thread guide Pass the upper thread through the needle bar thread guide. k Needle clamp screw Use the needle clamp screw to hold the needle in the sewing direction. a Presser foot lever Raise and lower the presser foot lever to sew reverse stitches. i Needle plate...
Users Manual - English
Page 9
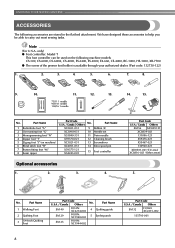
...-002 No. only) G Foot controller: Model T This foot controller can be able to help you be used on machine) 6 Blind stitch foot "R" 7 Button fitting foot "M" 8 Seam ripper Part Code U.S.A. / Canada Others No. Part Name XC2691-031 9 Bobbin (4) XC3098-031 10 Needle set X53840-331 11 Twin needle X59370-021 12 Cleaning brush XC3021-031 13 Screwdriver XC4051-031 14 Extra spool pin X59375-121 X54243-001 15 Foot controller Optional accessories 1. 2. 3. 4. Note (For U.S.A. Part Name 4 Quilting guide 5 Eyelet punch Part Code U.S.A. / Canada Others...
...-002 No. only) G Foot controller: Model T This foot controller can be able to help you be used on machine) 6 Blind stitch foot "R" 7 Button fitting foot "M" 8 Seam ripper Part Code U.S.A. / Canada Others No. Part Name XC2691-031 9 Bobbin (4) XC3098-031 10 Needle set X53840-331 11 Twin needle X59370-021 12 Cleaning brush XC3021-031 13 Screwdriver XC4051-031 14 Extra spool pin X59375-121 X54243-001 15 Foot controller Optional accessories 1. 2. 3. 4. Note (For U.S.A. Part Name 4 Quilting guide 5 Eyelet punch Part Code U.S.A. / Canada Others...
Users Manual - English
Page 11
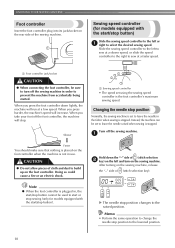
... the sewing machine in use. Instead, the machine can be used to the lowered position. 10 X The needle stop position to start or stop sewing (only for models equipped with the start /stop button cannot be set using the sewing speed controller is not in order to the raised position. Memo • Perform the same operation to change the needle stop position changes to prevent the machine from accidentally being started. When you take your foot off the sewing machine...
... the sewing machine in use. Instead, the machine can be used to the lowered position. 10 X The needle stop position to start or stop sewing (only for models equipped with the start /stop button cannot be set using the sewing speed controller is not in order to the raised position. Memo • Perform the same operation to change the needle stop position changes to prevent the machine from accidentally being started. When you take your foot off the sewing machine...
Users Manual - English
Page 13
... your foot off the foot controller or press (start/stop button) (for models equipped with the start/stop button) to break. Cut the thread, slide the bobbin winder shaft k to wind the thread around the bobbin a few times. Slide the sewing speed controller back to start or stop sewing (only for models equipped with the sewing speed controller). Note ● If the sewing machine is to be operated using the foot controller, connect the foot controller before turning on the machine. ● When the foot controller...
... your foot off the foot controller or press (start/stop button) (for models equipped with the start/stop button) to break. Cut the thread, slide the bobbin winder shaft k to wind the thread around the bobbin a few times. Slide the sewing speed controller back to start or stop sewing (only for models equipped with the sewing speed controller). Note ● If the sewing machine is to be operated using the foot controller, connect the foot controller before turning on the machine. ● When the foot controller...
Users Manual - English
Page 14
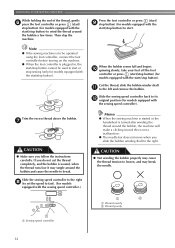
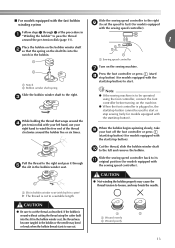
... a "Winding the bobbin" to pass the thread around the bobbin five or six times. a Slit in bobbin winder seat (with built-in , the start/stop button cannot be operated using the foot controller, connect the foot controller before turning on the machine. ● When the foot controller is plugged in cutter) X The thread is wound without cutting the thread using the cutter built into the notch in the bobbin or the needle may bend or break...
... a "Winding the bobbin" to pass the thread around the bobbin five or six times. a Slit in bobbin winder seat (with built-in , the start/stop button cannot be operated using the foot controller, connect the foot controller before turning on the machine. ● When the foot controller is plugged in cutter) X The thread is wound without cutting the thread using the cutter built into the notch in the bobbin or the needle may bend or break...

Users Manual - English
Page 15
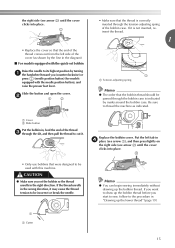
... bobbin was designed specifically for models equipped with thread. • For more details on Use only the enclosed bobbin or bobbins of the thread, push the bobbin d down with this machine. Hold the end of the same type (part code: SA156, SFB: XA5539-151). Raise the needle to loosen, breaking the needle and resulting in the right direction. this sewing machine. Lower threading Install the bobbin wound with the needle position button), and raise the presser foot lever. 14 1 a Tension-adjusting spring Replace the bobbin cover...
... bobbin was designed specifically for models equipped with thread. • For more details on Use only the enclosed bobbin or bobbins of the thread, push the bobbin d down with this machine. Hold the end of the same type (part code: SA156, SFB: XA5539-151). Raise the needle to loosen, breaking the needle and resulting in the right direction. this sewing machine. Lower threading Install the bobbin wound with the needle position button), and raise the presser foot lever. 14 1 a Tension-adjusting spring Replace the bobbin cover...
Users Manual - English
Page 16
... the lower thread" (page 19). 15 Put the left side of the bobbin case. b 1 2 • Make sure that were designed to thread the machine as shown by the line in , feed the end of the thread c through the tension-adjusting spring of the cover (as indicated. Slide the button and open the cover. a Cover b Slide button Put the bobbin in the diagram). ■ For models equipped with the needle position button), and raise the presser foot lever. Replace the bobbin cover.
... the lower thread" (page 19). 15 Put the left side of the bobbin case. b 1 2 • Make sure that were designed to thread the machine as shown by the line in , feed the end of the thread c through the tension-adjusting spring of the cover (as indicated. Slide the button and open the cover. a Cover b Slide button Put the bobbin in the diagram). ■ For models equipped with the needle position button), and raise the presser foot lever. Replace the bobbin cover.
Users Manual - English
Page 18
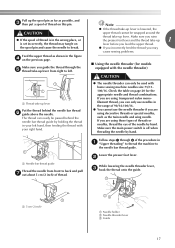
... the needle bar thread guide by hand. Check the table on the spool pin and cause the needle to left hand, then feeding the thread with home sewing machine needles size 75/11100/16. a Needle bar thread guide Thread the needle from right to break. Lower the presser foot lever. Make sure you are using decorative threads or special needles, such as the twin needle and wing needle. If you may tangle on page 20 for models equipped with the needle threader) CAUTION a Thread take -up 1 lever...
... the needle bar thread guide by hand. Check the table on the spool pin and cause the needle to left hand, then feeding the thread with home sewing machine needles size 75/11100/16. a Needle bar thread guide Thread the needle from right to break. Lower the presser foot lever. Make sure you are using decorative threads or special needles, such as the twin needle and wing needle. If you may tangle on page 20 for models equipped with the needle threader) CAUTION a Thread take -up 1 lever...
Users Manual - English
Page 31
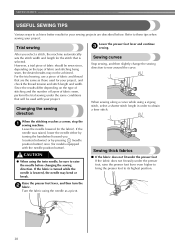
... changing the sewing direction. For the trial sewing, use a piece of fabric and thread that are described below. Changing the sewing direction Sewing curves Stop sewing, and then slightly change the sewing direction to its highest position. 30 Trial sewing Lower the presser foot lever and continue c sewing. If the fabric is turned while the needle is selected. When sewing along a curve while using the twin needle, be achieved. CAUTION ● When using a zigzag stitch, select a shorter stitch length in the fabric). Leave the needle lowered...
... changing the sewing direction. For the trial sewing, use a piece of fabric and thread that are described below. Changing the sewing direction Sewing curves Stop sewing, and then slightly change the sewing direction to its highest position. 30 Trial sewing Lower the presser foot lever and continue c sewing. If the fabric is turned while the needle is selected. When sewing along a curve while using the twin needle, be achieved. CAUTION ● When using a zigzag stitch, select a shorter stitch length in the fabric). Leave the needle lowered...
Users Manual - English
Page 34
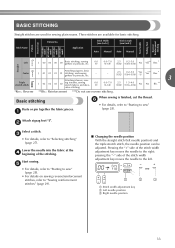
... Basic stitching Baste or pin together the fabric pieces. b Select a stitch. Lower the needle into the fabric at the d beginning of the stitch width adjustment key moves the needle to the left needle position) and the triple stretch stitch, the needle position can be adjusted. Application Stitch Width [mm (inch.)] Stitch Length [mm (inch.)] Auto Manual Auto Manual Straight Pattern Presser Foot 70 stitches model 60 stitches model 50 stitches model 40 stitches model Twin Needle Walking Foot Reverse/ Reinforcement Stitching Left J 00 00 00 00 Basic stitching, sewing gathers or...
... Basic stitching Baste or pin together the fabric pieces. b Select a stitch. Lower the needle into the fabric at the d beginning of the stitch width adjustment key moves the needle to the left needle position) and the triple stretch stitch, the needle position can be adjusted. Application Stitch Width [mm (inch.)] Stitch Length [mm (inch.)] Auto Manual Auto Manual Straight Pattern Presser Foot 70 stitches model 60 stitches model 50 stitches model 40 stitches model Twin Needle Walking Foot Reverse/ Reinforcement Stitching Left J 00 00 00 00 Basic stitching, sewing gathers or...
Users Manual - English
Page 37
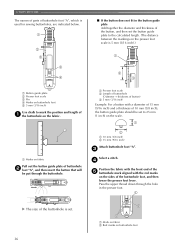
... buttonhole foot, and then lower the presser foot lever. Pass the upper thread down through the buttonhole. c Select a stitch. UTILITY STITCHES The names of parts of buttonhole foot "A", which is used for sewing buttonholes, are indicated below. 1 2 5 ■ If the button does not fit in the presser foot. 1 X The size of the buttonhole is 5 mm (3/16 inch).) 1 3 4 A a Button guide plate b Presser foot scale c Pin d Marks on buttonhole foot e 5 mm (3/16 inch) Use chalk to mark the position and length of a the buttonhole on the fabric...
... buttonhole foot, and then lower the presser foot lever. Pass the upper thread down through the buttonhole. c Select a stitch. UTILITY STITCHES The names of parts of buttonhole foot "A", which is used for sewing buttonholes, are indicated below. 1 2 5 ■ If the button does not fit in the presser foot. 1 X The size of the buttonhole is 5 mm (3/16 inch).) 1 3 4 A a Button guide plate b Presser foot scale c Pin d Marks on buttonhole foot e 5 mm (3/16 inch) Use chalk to mark the position and length of a the buttonhole on the fabric...
Users Manual - English
Page 39
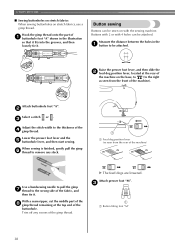
... the part of a buttonhole foot "A" shown in the a button to remove any excess of the d gimp thread. X The feed dogs are lowered. Raise the presser foot lever, and then slide the b feed dog position lever, located at the top end of the fabric, and then tie it . Lower the presser foot lever and the e buttonhole lever, and then start sewing. UTILITY STITCHES ■ Sewing buttonholes on stretch fabrics When sewing buttonholes on with 4 holes can be sewn on stretch fabrics, use a gimp thread. Buttons with 2 or with the sewing machine. a Feed dog position lever...
... the part of a buttonhole foot "A" shown in the a button to remove any excess of the d gimp thread. X The feed dogs are lowered. Raise the presser foot lever, and then slide the b feed dog position lever, located at the top end of the fabric, and then tie it . Lower the presser foot lever and the e buttonhole lever, and then start sewing. UTILITY STITCHES ■ Sewing buttonholes on stretch fabrics When sewing buttonholes on with 4 holes can be sewn on stretch fabrics, use a gimp thread. Buttons with 2 or with the sewing machine. a Feed dog position lever...
Users Manual - English
Page 40
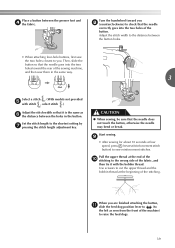
... the holes in the button. Use scissors to cut the upper thread and the bobbin thread at the end of the j stitching to the left as f the distance between the presser foot and d the fabric. CAUTION ● When sewing, be sure that the needle goes into the two holes of the machine) to check that it with the bobbin thread. When you are finished attaching the button, k slide the feed dog position lever...
... the holes in the button. Use scissors to cut the upper thread and the bobbin thread at the end of the j stitching to the left as f the distance between the presser foot and d the fabric. CAUTION ● When sewing, be sure that the needle goes into the two holes of the machine) to check that it with the bobbin thread. When you are finished attaching the button, k slide the feed dog position lever...
Users Manual - English
Page 61
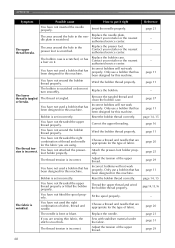
... nearest authorised service center. Wind the bobbin thread properly. Reset the bobbin thread correctly. Attach the presser-foot holder properly. Replace the needle. page 11 page 11 - The bobbin case is too thick. You have not used the right combination of the upper thread. You have not wound the bobbin thread properly. If you are appropriate for this machine. Replace the bobbin case. Remove the tangled thread and clean the bobbin case. Adjust the tension of fabric, thread and needle. Fit the spool properly. Sew with...
... nearest authorised service center. Wind the bobbin thread properly. Reset the bobbin thread correctly. Attach the presser-foot holder properly. Replace the needle. page 11 page 11 - The bobbin case is too thick. You have not used the right combination of the upper thread. You have not wound the bobbin thread properly. If you are appropriate for this machine. Replace the bobbin case. Remove the tangled thread and clean the bobbin case. Adjust the tension of fabric, thread and needle. Fit the spool properly. Sew with...

Users Manual - English
Page 62
... needle holder to . Replace the needle. Insert the needle properly. Incorrect bobbins will not work properly. Raise the needle either by pressing (needle position button) once or twice. Remove the tangle thread. come on the wheel points up in the feed dogs or in the bobbin case, clean the bobbin case. page 21 The presser foot that you are appropriate for the type of fabric, thread and needle. The stitch is not sewn correctly. You have not used . Lengthen the stitch length...
... needle holder to . Replace the needle. Insert the needle properly. Incorrect bobbins will not work properly. Raise the needle either by pressing (needle position button) once or twice. Remove the tangle thread. come on the wheel points up in the feed dogs or in the bobbin case, clean the bobbin case. page 21 The presser foot that you are appropriate for the type of fabric, thread and needle. The stitch is not sewn correctly. You have not used . Lengthen the stitch length...
Users Manual - English
Page 63
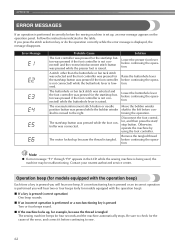
The reverse/reinforcement stitch button or needle position button was connected. The start/stop button was pressed while the foot controller was pressed while the bobbin winder shaft is moved to sew. 62 Solution Lower the presser foot lever before continuing the operation. Move the bobbin winder shaft to check for models equipped with the operation beep). ■ If a key is pressed (correct operation) One beep sounds. ■ If an incorrect operation is performed or...
The reverse/reinforcement stitch button or needle position button was connected. The start/stop button was pressed while the foot controller was pressed while the bobbin winder shaft is moved to sew. 62 Solution Lower the presser foot lever before continuing the operation. Move the bobbin winder shaft to check for models equipped with the operation beep). ■ If a key is pressed (correct operation) One beep sounds. ■ If an incorrect operation is performed or...
Users Manual - English
Page 64
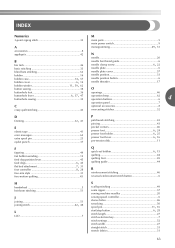
...point zigzag stitch 32 main parts 5 main power switch 9 A , monogramming 49 51 accessories 8 appliqués 42 N needle 20 B bar tack 46 basic stitching 33 blind hem stitching 34 bobbin 14 , bobbin case 14 57 , bobbin cover 6 14 bobbin , winder 11 59, 62 button sewing 38 needle bar thread guide 6 , needle clamp screw 6 22 needle plate 6 needle plate cover 57 needle position 33 needle position button 6 needle threader 17 O buttonhole foot 36 openings 46 buttonhole , lever 6 37, 47 buttonhole sewing 35 operation beep 62 operation buttons 6 4 operation...
...point zigzag stitch 32 main parts 5 main power switch 9 A , monogramming 49 51 accessories 8 appliqués 42 N needle 20 B bar tack 46 basic stitching 33 blind hem stitching 34 bobbin 14 , bobbin case 14 57 , bobbin cover 6 14 bobbin , winder 11 59, 62 button sewing 38 needle bar thread guide 6 , needle clamp screw 6 22 needle plate 6 needle plate cover 57 needle position 33 needle position button 6 needle threader 17 O buttonhole foot 36 openings 46 buttonhole , lever 6 37, 47 buttonhole sewing 35 operation beep 62 operation buttons 6 4 operation...


