
Brother International CS6000i Support Question
Brother International CS6000i Support Question
Find answers below for this question about Brother International CS6000i - Computerized Sewing Machine.Need a Brother International CS6000i manual? We have 1 online manual for this item!
Question posted by Viasunb on November 2nd, 2013
How To Attach A Brother Ruffler Foot To A Brother Cs6000i Sewing Machine
The person who posted this question about this Brother International product did not include a detailed explanation. Please use the "Request More Information" button to the right if more details would help you to answer this question.
Current Answers
Related Brother International CS6000i Manual Pages
User Guide - Page 3
... not use • Maintaining the machine • Leaving the machine unattended 3. When storing this product are subject to keep your local authorized Brother dealer. Remember to turn off the power switch and unplug the cord when:
• Operation is required, first follow the troubleshooting table in the back of the most advanced computerized household sewing machines.
User Guide - Page 4

...30 Changing the sewing direction ...30 Sewing curves ...30 Sewing thick fabrics ...30 Sewing thin fabrics ...31 Sewing stretch fabrics ...31 Using a free-arm style ...31
3 KNOWING YOUR SEWING MACHINE 5
NAMES OF MACHINE PARTS AND THEIR FUNCTIONS 5
The main parts ...5 Needle and presser foot section ...6 Operation buttons ...6 Operation panel ...7 Flat bed attachment ...7
ACCESSORIES ...8
Optional...
User Guide - Page 6

... to lower the feed dogs. m Jack/socket connector (page 9) Insert the plug on the sewing machine model. n Foot controller jack/socket (page 10) Plug in the foot controller plug.
q Foot controller (page 10) You can turn the main power and sewing light switch on and off.
o Feed dog position lever (pages 38 and 45) Use the...
User Guide - Page 7
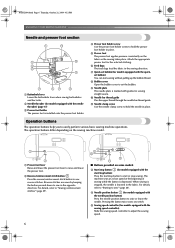
... reverse/reinforcement stitch button to adjust the sewing speed.
6 When sewing is stopped, the needle is marked with the sewing speed controller) Slide the sewing speed controller to sew reverse stitches. Pressing the button twice sews one stitch. e Presser foot The presser foot applies pressure consistently on the sewing machine model.
The machine sews at a slow speed at the beginning of...
User Guide - Page 8
...
the flat bed attachment.
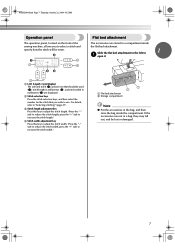
a LCD (Liquid crystal display)
The selected stitch (1), presser foot that you to...attachment to the left to "Selecting stitching" (page 27). For details, refer to
1
a open it. Flat bed attachment
The accessories are displayed. NCBC2000.book Page 7 Thursday, October 21, 2004 4:32 PM
Operation panel
The operation panel, located on the front of the sewing machine...
User Guide - Page 9

...2004 4:32 PM
KNOWING YOUR SEWING MACHINE
ACCESSORIES
The following machine models: CS-6000, CS-5100, CS-4000, BC-2500, BC-...foot "A" 2 Overcasting foot "G" 3 Monogramming foot "N" 4 Zipper foot "I" 5 Zigzag foot "J" (on the following accessories are stored in the flat bed attachment. Part Name
1 Walking Foot
2 Quilting Foot
3 1/4-Inch Quilting Foot
* May be able to carry out most sewing...
User Guide - Page 11
.... NCBC2000.book Page 10 Thursday, October 21, 2004 4:32 PM
KNOWING YOUR SEWING MACHINE
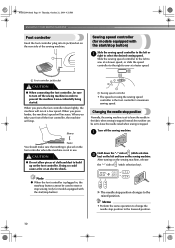
Foot controller
Insert the foot controller plug into its jack/socket on the foot controller.
After turning on the left and turn off the sewing machine. Slide the sewing speed controller to the left or a right to build up on the rear side of...
User Guide - Page 15

... and open the cover.
If it may cause the thread tension to be injured. Raise the needle to sew, you set bobbin, see arrow a), and then press lightly on the foot controller and the machine starts to its highest position by the arrow.
Actual size
11.5 mm (7/16 inch)
This model
Other models...
User Guide - Page 26
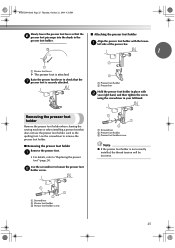
... screw
Note
● If the presser foot holder is securely attached.
a
• For details, refer to check that does not use the presser foot holder, such as the quilting foot. Removing the presser foot holder
Remove the presser foot holder when cleaning the sewing machine or when installing a presser foot that the g presser foot is not correctly installed, the thread...
User Guide - Page 27

For details on turning on the machine. Attach the presser foot appropriate for the area to be sewn. When sewing is in injuries. ● Make sure that the needle does not strike basting pins, otherwise the needle may break.
● Never use bent needles. Before operating the sewing machine, read the following precautions. Bent needles can easily...
User Guide - Page 28

... length.
If necessary, adjust the stitch length and d width.
• For details on , the straight stitch ( left changes the digit on the sewing machine. a
Press
(stitch selection keys).
Attach the presser foot. Pressing on the right changes the digit on the right and pressing
on the left needle position) is changed from the LCD...
User Guide - Page 33

... c against the d presser foot guide. Select a stitch. NCBC2000.book Page 32 Thursday, October 21, 2004 4:32 PM
UTILITY STITCHES
3 UTILITY STITCHES
OVERCASTING STITCHES
You can use reverse stitching.
a
Sew with the edge of the presser foot, and then
lower the presser foot lever.
They are also useful for sewing stretch materials. Rfc. **
Attach overcasting foot "G" or zigzag...
User Guide - Page 35
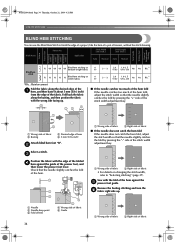
... Wrong side of fabric e Guide
34
a Wrong side of fabric
b Right side of hem d 5 mm (3/16 inch)
Attach blind hem foot "R".
a Wrong side of fabric
b Right side of fabric
• For details on stretch fabrics
0 (0)
3 - -3...the presser foot, and
then lower the presser foot lever. Sew with the fold of the hem against the guide of the folded d hem against the e presser foot guide. ...
User Guide - Page 45

...foot and the optional quilting guide. Note
● When sewing with the walking foot. Hook the connecting fork of the walking foot c onto the needle clamp screw, lower the
presser foot lever, and then use the presser foot holder screw to attach the walking foot to sew...straight or zigzag stitches. Insert the stem of the machine to "Removing the presser foot holder" (page 25). Select stitch , or ...
User Guide - Page 49

...elastic-attaching
5.0 (3/16)
1.5-7.0 (1/64-1/4)
1.0 0.2-4.0 Yes (1/16) (1/64-3/16) ( J )
No
Rfc.*
Decorative stitch
Lace sewing, ...Foot 70 stitches model 60 stitches model 50 stitches model 40 stitches model Twin Needle Walking Foot...sewing overcasting on both pieces
5.0 2.5-7.0 2.5 1.0-4.0 Yes (3/16) (3/32-1/4) (3/32) (1/16-3/16) ( J )
No
of fabrics, such as with this sewing machine...
User Guide - Page 52
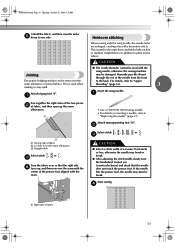
... needle, otherwise the sewing machine
Joining
Decorative bridging stitches can be sewn over so that the needle does not touch the presser foot. Manually pass the thread
through the eye of the presser foot aligned with the
center of the needle from the front
to "Upper
threading" (page 16).
3
Attach zigzag foot "J". a
Sew together the right sides...
User Guide - Page 60
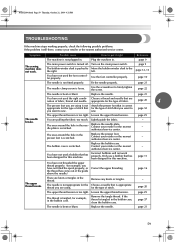
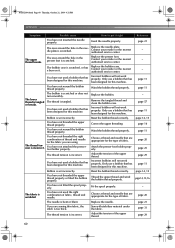
... the type of stitch.
-
Replace the needle. page 9
The sewing machine does not work properly. left.
Fit the needle properly. page 22
The needle is scratched. appropriate for the type of fabric. page 20
4
The presser foot you are using is not Attach the presser foot that is correct
appropriate for the type of stitch...
User Guide - Page 61
...or the nearest authorised service center. Replace the presser foot. Contact your retailer or the nearest authorised service ...blunt.
You have not attached the presserfoot holder properly. Wind the bobbin thread properly.
Sew with stabiliser material under ...Choose a thread and needle that are appropriate for this machine. Replace the bobbin.
Insert the needle properly. The area...
User Guide - Page 62
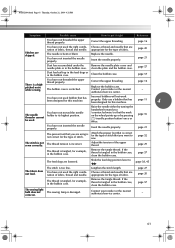
...sew. page 21
The presser foot that has been designed for this machine.
Slide the feed dog position lever to .
page 57
The sewing light bulb does not The sewing lamp is a highpitched noise while sewing...bobbin case.
Insert the needle properly.
Attach the presser foot that is correct for the type of stitch that are appropriate for this machine. The thread tension is too fine...
User Guide - Page 64
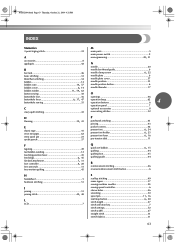
...-tension disk 11
Q
quick-set bobbin 6, 15
quilting 44 quilting foot 45 quilting guide 44
R
reinforcement stitching 46 reverse/reinforcement stitch button 6
H
handwheel 5 heirloom stitching 51
J
joining 51
joining stitch 42, 48
L
LCD 7
S
scallop stitching 49 seam ripper 37 sewing machine needles 20 sewing speed controller 6 sleeve holes 46 smocking 50
spool pin 11...
Similar Questions

How To Attach A Ruffler Foot To A Brother Ls 1217
(Posted by dabdoc 9 years ago)

How To Attach A Quilting Foot To Cs6000i
(Posted by rosudha 9 years ago)
How To Use Brother Cs6000i Sewing Machine
(Posted by rejerem 10 years ago)

From Where Can I Buy Brother Cs6000i Machine Design For Uk (230v).
(Posted by ranjithdassanayake 11 years ago)

What Model Number Bobbins Should Be Used On Brother Sc9500 Sewing Machine
Please provide me with the model/style bobbin that fits on a Brother SC9500 sewing machine. Thanks.
Please provide me with the model/style bobbin that fits on a Brother SC9500 sewing machine. Thanks.
(Posted by ezth2 11 years ago)