

User Guide
Page 1
...in the instruction manual. 16. Never operate the machine with this machine. 18. To unplug, grasp the plug, not the cord. 10. This sewing machine is being administered. 8. Do not pull or push fabric while stitching. Always unplug the machine from the electrical outlet immediately after using . Young... dealer. Do not operate where aerosol (spray) products are being used as threading needle, changing needle, threading bobbin, or changing presser foot, and the like. 15. Special care is not working properly, if it must be taken, including the following: Read all moving parts...
...in the instruction manual. 16. Never operate the machine with this machine. 18. To unplug, grasp the plug, not the cord. 10. This sewing machine is being administered. 8. Do not pull or push fabric while stitching. Always unplug the machine from the electrical outlet immediately after using . Young... dealer. Do not operate where aerosol (spray) products are being used as threading needle, changing needle, threading bobbin, or changing presser foot, and the like. 15. Special care is not working properly, if it must be taken, including the following: Read all moving parts...
User Guide
Page 3
...foot controller. 4. up lever, needle, or other parts • A power failure occurs during use • Maintaining the machine • Leaving the machine unattended 3. When storing this product are subject to assure correct installation. Remember to clean the case. For additional product information and updates, visit our web site at www.brother...adjustment is required, first follow the troubleshooting table in the back of the most advanced computerized household sewing machines. Always consult the operation manual when replacing or installing any other moving parts. 2. ...
...foot controller. 4. up lever, needle, or other parts • A power failure occurs during use • Maintaining the machine • Leaving the machine unattended 3. When storing this product are subject to assure correct installation. Remember to clean the case. For additional product information and updates, visit our web site at www.brother...adjustment is required, first follow the troubleshooting table in the back of the most advanced computerized household sewing machines. Always consult the operation manual when replacing or installing any other moving parts. 2. ...

User Guide
Page 4
... stitching ...27 Starting to sew ...28 Thread tension ...29 USEFUL SEWING TIPS ...30 Trial sewing ...30 Changing the sewing direction ...30 Sewing curves ...30 Sewing thick fabrics ...30 Sewing thin fabrics ...31 Sewing stretch fabrics ...31 Using a free-arm style ...31 3 KNOWING YOUR SEWING MACHINE 5 NAMES OF MACHINE PARTS AND THEIR FUNCTIONS 5 The main parts ...5 Needle and presser foot section ...6 Operation buttons...
... stitching ...27 Starting to sew ...28 Thread tension ...29 USEFUL SEWING TIPS ...30 Trial sewing ...30 Changing the sewing direction ...30 Sewing curves ...30 Sewing thick fabrics ...30 Sewing thin fabrics ...31 Sewing stretch fabrics ...31 Using a free-arm style ...31 3 KNOWING YOUR SEWING MACHINE 5 NAMES OF MACHINE PARTS AND THEIR FUNCTIONS 5 The main parts ...5 Needle and presser foot section ...6 Operation buttons...

User Guide
Page 6
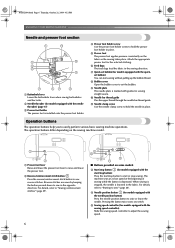
...to raise and lower the presser foot. o Feed dog position lever (pages 38 and 45) Use the feed dog position lever to lower the feed dogs. q Foot controller (page 10) You can turn the main power and sewing light switch on the sewing machine model. NCBC2000.book Page 5 ...Thursday, October 21, 2004 4:32 PM 1 KNOWING YOUR SEWING MACHINE 1 NAMES OF MACHINE PARTS AND THEIR FUNCTIONS The main parts a Bobbin...
...to raise and lower the presser foot. o Feed dog position lever (pages 38 and 45) Use the feed dog position lever to lower the feed dogs. q Foot controller (page 10) You can turn the main power and sewing light switch on the sewing machine model. NCBC2000.book Page 5 ...Thursday, October 21, 2004 4:32 PM 1 KNOWING YOUR SEWING MACHINE 1 NAMES OF MACHINE PARTS AND THEIR FUNCTIONS The main parts a Bobbin...
User Guide
Page 7
... (for models equipped with the needle position button) Press the needle position button to hold the presser foot holder in place. Pressing the button twice sews one stitch. e Presser foot The presser foot applies pressure consistently on the sewing machine model. f Feed dogs The feed dogs feed the fabric in the opposite direction. b Reverse/reinforcement stitch...
... (for models equipped with the needle position button) Press the needle position button to hold the presser foot holder in place. Pressing the button twice sews one stitch. e Presser foot The presser foot applies pressure consistently on the sewing machine model. f Feed dogs The feed dogs feed the fabric in the opposite direction. b Reverse/reinforcement stitch...
User Guide
Page 8
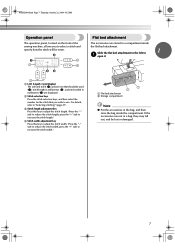
a LCD (Liquid crystal display) The selected stitch (1), presser foot that you to select a stitch and specify how the stitch will be sewn. press the "+" side to increase the stitch length.) d Stitch width adjustment key ... inside the flat bed attachment. NCBC2000.book Page 7 Thursday, October 21, 2004 4:32 PM Operation panel The operation panel, located on the front of the sewing machine, allows you wish to use. b Stitch selection keys Press the stitch selection keys, and then select the number for the stitch that should be lost...
a LCD (Liquid crystal display) The selected stitch (1), presser foot that you to select a stitch and specify how the stitch will be sewn. press the "+" side to increase the stitch length.) d Stitch width adjustment key ... inside the flat bed attachment. NCBC2000.book Page 7 Thursday, October 21, 2004 4:32 PM Operation panel The operation panel, located on the front of the sewing machine, allows you wish to use. b Stitch selection keys Press the stitch selection keys, and then select the number for the stitch that should be lost...

User Guide
Page 9
...PM KNOWING YOUR SEWING MACHINE ACCESSORIES The following machine models: CS-6000, CS-5100, CS-4000, BC-2500, BC-2300, BC-2100, ES-2400, ES-2200, ES-2000, ES-2410, ES-2210, ES-2010, ES-2420, ES-2220, ES-2020 ● The screw of the presser foot holder is ... F016N: XC2215-002 135793-001 We have designed these accessories to carry out most sewing tasks. only) ● Foot controller: Model T This foot controller can be able to help you be used on machine) 6 Blind stitch foot "R" 7 Button fitting foot "M" 8 Seam ripper Part Code U.S.A. Part Name 9 Bobbin (4) 10 Needle set...
...PM KNOWING YOUR SEWING MACHINE ACCESSORIES The following machine models: CS-6000, CS-5100, CS-4000, BC-2500, BC-2300, BC-2100, ES-2400, ES-2200, ES-2000, ES-2410, ES-2210, ES-2010, ES-2420, ES-2220, ES-2020 ● The screw of the presser foot holder is ... F016N: XC2215-002 135793-001 We have designed these accessories to carry out most sewing tasks. only) ● Foot controller: Model T This foot controller can be able to help you be used on machine) 6 Blind stitch foot "R" 7 Button fitting foot "M" 8 Seam ripper Part Code U.S.A. Part Name 9 Bobbin (4) 10 Needle set...
User Guide
Page 11
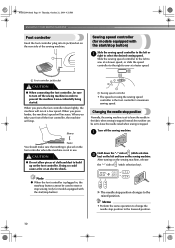
... 10 Thursday, October 21, 2004 4:32 PM KNOWING YOUR SEWING MACHINE Foot controller Insert the foot controller plug into its jack/socket on the sewing machine, release the "-" side of (stitch selection key). When you take your foot off the foot controller, the machine will increase. When you press the foot controller down the "-" side of (stitch selection b key) on...
... 10 Thursday, October 21, 2004 4:32 PM KNOWING YOUR SEWING MACHINE Foot controller Insert the foot controller plug into its jack/socket on the sewing machine, release the "-" side of (stitch selection key). When you take your foot off the foot controller, the machine will increase. When you press the foot controller down the "-" side of (stitch selection b key) on...
User Guide
Page 13
...follow the instructions carefully. Press the foot controller or press (start /stop button) to the right. Note ● If the sewing machine is to be operated using the foot controller, connect the foot controller before turning on the machine. ● When the foot controller is plugged in, the start... and begins j spinning slowly, take your foot off the foot controller or press (start/stop button) (for models equipped with the start or stop sewing (only for models equipped with the sewing speed controller.) Memo ● When the sewing machine is started or the handwheel is wound, ...
...follow the instructions carefully. Press the foot controller or press (start /stop button) to the right. Note ● If the sewing machine is to be operated using the foot controller, connect the foot controller before turning on the machine. ● When the foot controller is plugged in, the start... and begins j spinning slowly, take your foot off the foot controller or press (start/stop button) (for models equipped with the start or stop sewing (only for models equipped with the sewing speed controller.) Memo ● When the sewing machine is started or the handwheel is wound, ...
User Guide
Page 14
.... c While holding the thread that wraps around the d pre-tension disk with the sewing speed controller). Note ● If the sewing machine is to be used to the left hand, use your foot off the foot controller or press (start/stop button) (for models equipped with the start/stop button... before turning on the machine. ● When the foot controller is cut the thread as described. CAUTION ● Be sure to fast) (for models equipped with your left and remove the bobbin. a Sewing speed controller a Notch b Bobbin winder shaft spring Slide the bobbin winder shaft to start ...
.... c While holding the thread that wraps around the d pre-tension disk with the sewing speed controller). Note ● If the sewing machine is to be used to the left hand, use your foot off the foot controller or press (start/stop button) (for models equipped with the start/stop button... before turning on the machine. ● When the foot controller is cut the thread as described. CAUTION ● Be sure to fast) (for models equipped with your left and remove the bobbin. a Sewing speed controller a Notch b Bobbin winder shaft spring Slide the bobbin winder shaft to start ...

User Guide
Page 15
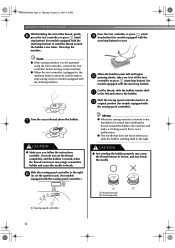
...the needle. this sewing machine. Lower threading Install the bobbin wound with your finger, and then pass the thread through the tension-adjusting spring of the bobbin case. If bobbins from other models are used with the needle position button), and raise the presser foot lever. 14 1... a Tension-adjusting spring Replace the bobbin cover. Hold the end of the same type (part code: SA156, SFB: XA5539-151). Put the left tab in the right direction. NCBC2000.book Page 14 Thursday, October 21, 2004 4:32 PM KNOWING YOUR SEWING MACHINE Memo ● When the sewing machine...
...the needle. this sewing machine. Lower threading Install the bobbin wound with your finger, and then pass the thread through the tension-adjusting spring of the bobbin case. If bobbins from other models are used with the needle position button), and raise the presser foot lever. 14 1... a Tension-adjusting spring Replace the bobbin cover. Hold the end of the same type (part code: SA156, SFB: XA5539-151). Put the left tab in the right direction. NCBC2000.book Page 14 Thursday, October 21, 2004 4:32 PM KNOWING YOUR SEWING MACHINE Memo ● When the sewing machine...
User Guide
Page 16
...thread. 1 1 a Tension-adjusting spring Memo ● The order that were designed to be used with this machine. If it . Put the left side of the cover (as indicated. Slide the button and open the cover... (needle position button) (for models equipped with the needle position button), and raise the presser foot lever. If the thread unrolls in the wrong direction, it may cause the thread tension to ...then pull the thread to cut it is indicated by turning a the handwheel toward you start to sew, follow to the procedure in "Drawing up the bobbin thread. NCBC2000.book Page 15 Thursday, October...
...thread. 1 1 a Tension-adjusting spring Memo ● The order that were designed to be used with this machine. If it . Put the left side of the cover (as indicated. Slide the button and open the cover... (needle position button) (for models equipped with the needle position button), and raise the presser foot lever. If the thread unrolls in the wrong direction, it may cause the thread tension to ...then pull the thread to cut it is indicated by turning a the handwheel toward you start to sew, follow to the procedure in "Drawing up the bobbin thread. NCBC2000.book Page 15 Thursday, October...
User Guide
Page 17
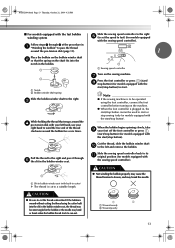
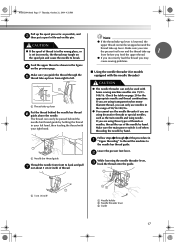
... c Mark on the needle threader, see page 17. Raise the presser foot using the presser foot a lever. a Presser foot lever or a Mark b Needle position button • If the needle is not correctly raised, the sewing machine can not be threaded. NCBC2000.book Page 16 Thursday, October 21, 2004... 4:32 PM KNOWING YOUR SEWING MACHINE Upper threading Set the upper thread...
... c Mark on the needle threader, see page 17. Raise the presser foot using the presser foot a lever. a Presser foot lever or a Mark b Needle position button • If the needle is not correctly raised, the sewing machine can not be threaded. NCBC2000.book Page 16 Thursday, October 21, 2004... 4:32 PM KNOWING YOUR SEWING MACHINE Upper threading Set the upper thread...
User Guide
Page 18
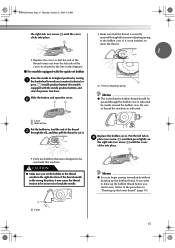
... the presser foot lever. NCBC2000.book Page 17 Thursday, October 21, 2004 4:32 PM Pull up lever Put the thread behind the needle bar thread guide by hand. Feed the upper thread as possible, and c then put a spool of thread on page 20 for models equipped with home sewing machine needles size ... the needle by holding the thread in your right hand. ● The needle threader can only use needles in a "Upper threading" to thread the machine to the needle bar thread guide. If you guide the thread through 6 of the procedure in the range of thread. a Needle bar thread guide Thread...
... the presser foot lever. NCBC2000.book Page 17 Thursday, October 21, 2004 4:32 PM Pull up lever Put the thread behind the needle bar thread guide by hand. Feed the upper thread as possible, and c then put a spool of thread on page 20 for models equipped with home sewing machine needles size ... the needle by holding the thread in your right hand. ● The needle threader can only use needles in a "Upper threading" to thread the machine to the needle bar thread guide. If you guide the thread through 6 of the procedure in the range of thread. a Needle bar thread guide Thread...
User Guide
Page 20
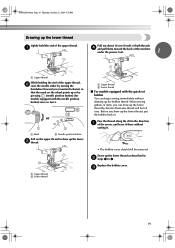
...) once or twice. Pass the thread along the slit in b steps 1 to draw up the lower c thread. Replace the bobbin cover. When sewing gathers or darts, you can begin sewing immediately without cutting it there without drawing up the bobbin thread. Draw up the lower thread as described in the direction a of... the upper thread to 4. or a Mark b Needle position button Pull on the wheel points up or by turning the handwheel toward the back of the machine under the presser foot. 1 a Upper thread While holding the end of the upper thread.
...) once or twice. Pass the thread along the slit in b steps 1 to draw up the lower c thread. Replace the bobbin cover. When sewing gathers or darts, you can begin sewing immediately without cutting it there without drawing up the bobbin thread. Draw up the lower thread as described in the direction a of... the upper thread to 4. or a Mark b Needle position button Pull on the wheel points up or by turning the handwheel toward the back of the machine under the presser foot. 1 a Upper thread While holding the end of the upper thread.
User Guide
Page 22
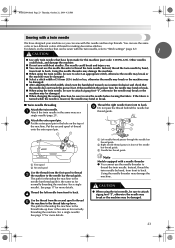
...the needle may break while the machine is accidentally pressed and the machine starts sewing. Do not use a bent needle. In addition, the stitching may be uneven or puckered or there may be sure to 75/11), the needle may occur if the foot controller or the start/ stop ... the presser foot lever. NCBC2000.book Page 21 Thursday, October 21, 2004 4:32 PM CAUTION ● The appropriate fabric, thread and needle combinations are shown in "Checking the needle" . 1 Raise the needle by pressing once or twice.) Sewing with thin needles (such as 65/9 to turn off the sewing machine.
...the needle may break while the machine is accidentally pressed and the machine starts sewing. Do not use a bent needle. In addition, the stitching may be uneven or puckered or there may be sure to 75/11), the needle may occur if the foot controller or the start/ stop ... the presser foot lever. NCBC2000.book Page 21 Thursday, October 21, 2004 4:32 PM CAUTION ● The appropriate fabric, thread and needle combinations are shown in "Checking the needle" . 1 Raise the needle by pressing once or twice.) Sewing with thin needles (such as 65/9 to turn off the sewing machine.
User Guide
Page 24
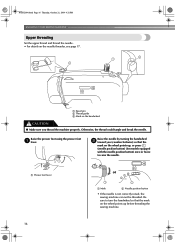
...; When using the twin needle, be damaged. ● After adjusting the stitch width, slowly turn the handwheel toward you can sew with this machine (part code: 131096-121). The path for a single needle). a Left needle thread passes through the needle bar thread guide. Using ... 52). 1 CAUTION ● Use only twin needles that can use the needle threader to attach zigzag foot "J", otherwise the needle may break or the machine may be damaged. ● When changing the sewing direction, be sewn with bent needles. Thread the left needle from the second spool to thread e the...
...; When using the twin needle, be damaged. ● After adjusting the stitch width, slowly turn the handwheel toward you can sew with this machine (part code: 131096-121). The path for a single needle). a Left needle thread passes through the needle bar thread guide. Using ... 52). 1 CAUTION ● Use only twin needles that can use the needle threader to attach zigzag foot "J", otherwise the needle may break or the machine may be damaged. ● When changing the sewing direction, be sewn with bent needles. Thread the left needle from the second spool to thread e the...
User Guide
Page 25
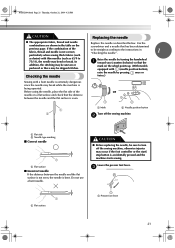
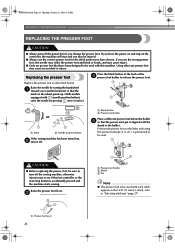
... you have been designed to turn off the sewing machine, otherwise injuries may cause an accident or injury. c a Presser foot holder b Shank c Pin Note ● The presser foot to release the presser foot. NCBC2000.book Page 24 Thursday, October 21, 2004 4:32 PM KNOWING YOUR SEWING MACHINE REPLACING THE PRESSER FOOT CAUTION ● Always turn off the power...
... you have been designed to turn off the sewing machine, otherwise injuries may cause an accident or injury. c a Presser foot holder b Shank c Pin Note ● The presser foot to release the presser foot. NCBC2000.book Page 24 Thursday, October 21, 2004 4:32 PM KNOWING YOUR SEWING MACHINE REPLACING THE PRESSER FOOT CAUTION ● Always turn off the power...
User Guide
Page 26
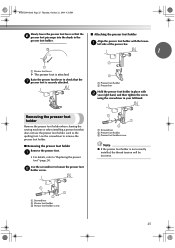
Removing the presser foot holder Remove the presser foot holder when cleaning the sewing machine or when installing a presser foot that the g presser foot is not correctly installed, the thread tension will be incorrect. a Presser foot holder b Presser bar Hold the presser foot holder in your right hand, and then tighten the screw using the screwdriver in place with...
Removing the presser foot holder Remove the presser foot holder when cleaning the sewing machine or when installing a presser foot that the g presser foot is not correctly installed, the thread tension will be incorrect. a Presser foot holder b Presser bar Hold the presser foot holder in your right hand, and then tighten the screw using the screwdriver in place with...

User Guide
Page 27
... to the needle location. NCBC2000.book Page 26 Thursday, October 21, 2004 4:32 PM SEWING BASICS 2 SEWING BASICS SEWING Basic sewing operations are described below to sew. 1 Turn on the machine. Attach the presser foot appropriate for the area to be sewn. For details on replacing the presser...● Never use bent needles. For details on selecting a stitch, refer to "Replacing the presser foot" (page 24). ↓ 4 Start sewing. For details on turning on the sewing machine. In addition, keep your hands away from all moving parts such as the needle and handwheel, otherwise...
... to the needle location. NCBC2000.book Page 26 Thursday, October 21, 2004 4:32 PM SEWING BASICS 2 SEWING BASICS SEWING Basic sewing operations are described below to sew. 1 Turn on the machine. Attach the presser foot appropriate for the area to be sewn. For details on replacing the presser...● Never use bent needles. For details on selecting a stitch, refer to "Replacing the presser foot" (page 24). ↓ 4 Start sewing. For details on turning on the sewing machine. In addition, keep your hands away from all moving parts such as the needle and handwheel, otherwise...


