

User Guide
Page 1
...should be taken, including the following: Read all moving parts. To reduce the risk of lint, dust, and loose cloth. 5. Always unplug the machine from the electrical outlet immediately after using and before using this machine, basic safety precautions should never be used or where...not use as a toy. Always unplug the machine from outlet. 9. The machine should always be supervised to ensure that they do not play with any opening. 6. This sewing machine is being administered. 8. DANGER - If the Light unit is required around the machine needle. 11. WARNING - Do not operate ...
...should be taken, including the following: Read all moving parts. To reduce the risk of lint, dust, and loose cloth. 5. Always unplug the machine from the electrical outlet immediately after using and before using this machine, basic safety precautions should never be used or where...not use as a toy. Always unplug the machine from outlet. 9. The machine should always be supervised to ensure that they do not play with any opening. 6. This sewing machine is being administered. 8. DANGER - If the Light unit is required around the machine needle. 11. WARNING - Do not operate ...
User Guide
Page 3
...or removing the needle or any assemblies, the presser feet, needle, or other parts • A power failure occurs during use • Maintaining the machine • Leaving the machine unattended 3. Do not touch the hand wheel, thread take- To fully enjoy ...brother.com The contents of this manual and specifications of this machine, avoid direct sunlight and high humidity locations. Remember to turn off the power switch and unplug the cord when: • Operation is required, first follow the troubleshooting table in the back of the most advanced computerized household sewing machines...
...or removing the needle or any assemblies, the presser feet, needle, or other parts • A power failure occurs during use • Maintaining the machine • Leaving the machine unattended 3. Do not touch the hand wheel, thread take- To fully enjoy ...brother.com The contents of this manual and specifications of this machine, avoid direct sunlight and high humidity locations. Remember to turn off the power switch and unplug the cord when: • Operation is required, first follow the troubleshooting table in the back of the most advanced computerized household sewing machines...

User Guide
Page 4
... 4:32 PM CONTENTS 1. SEWING BASICS 26 SEWING ...26 General sewing procedure ...26 Selecting stitching ...27 Starting to sew ...28 Thread tension ...29 USEFUL SEWING TIPS ...30 Trial sewing ...30 Changing the sewing direction ...30 Sewing curves ...30 Sewing thick fabrics ...30 Sewing thin fabrics ...31 Sewing stretch fabrics ...31 Using a free-arm style ...31 3 KNOWING YOUR SEWING MACHINE 5 NAMES OF MACHINE PARTS AND THEIR FUNCTIONS...
... 4:32 PM CONTENTS 1. SEWING BASICS 26 SEWING ...26 General sewing procedure ...26 Selecting stitching ...27 Starting to sew ...28 Thread tension ...29 USEFUL SEWING TIPS ...30 Trial sewing ...30 Changing the sewing direction ...30 Sewing curves ...30 Sewing thick fabrics ...30 Sewing thin fabrics ...31 Sewing stretch fabrics ...31 Using a free-arm style ...31 3 KNOWING YOUR SEWING MACHINE 5 NAMES OF MACHINE PARTS AND THEIR FUNCTIONS...

User Guide
Page 6
... is used to cut them. NCBC2000.book Page 5 Thursday, October 21, 2004 4:32 PM 1 KNOWING YOUR SEWING MACHINE 1 NAMES OF MACHINE PARTS AND THEIR FUNCTIONS The main parts a Bobbin winder (page 11) This winds the thread onto the bobbin for sewing with accessory compartment (pages 7 and 31) i Operation buttons (page 6) The operation buttons differ depending on...
... is used to cut them. NCBC2000.book Page 5 Thursday, October 21, 2004 4:32 PM 1 KNOWING YOUR SEWING MACHINE 1 NAMES OF MACHINE PARTS AND THEIR FUNCTIONS The main parts a Bobbin winder (page 11) This winds the thread onto the bobbin for sewing with accessory compartment (pages 7 and 31) i Operation buttons (page 6) The operation buttons differ depending on...

User Guide
Page 9
...-121 X59476-021 X55467-021 130920-021 XC8816-021 5.* No. NCBC2000.book Page 8 Thursday, October 21, 2004 4:32 PM KNOWING YOUR SEWING MACHINE ACCESSORIES The following machine models: CS-6000, CS-5100, CS-4000, BC-2500, BC-2300, BC-2100, ES-2400, ES-2200, ES-2000, ES-... SA132 F016N: XC2215-002 135793-001 only) ● Foot controller: Model T This foot controller can be used on machine) 6 Blind stitch foot "R" 7 Button fitting foot "M" 8 Seam ripper Part Code U.S.A. Others XC2691-031 XC3098-031 X53840-331 X59370-021 XC3021-031 XC4051-031 X59375-121 X54243-001 No...
...-121 X59476-021 X55467-021 130920-021 XC8816-021 5.* No. NCBC2000.book Page 8 Thursday, October 21, 2004 4:32 PM KNOWING YOUR SEWING MACHINE ACCESSORIES The following machine models: CS-6000, CS-5100, CS-4000, BC-2500, BC-2300, BC-2100, ES-2400, ES-2200, ES-2000, ES-... SA132 F016N: XC2215-002 135793-001 only) ● Foot controller: Model T This foot controller can be used on machine) 6 Blind stitch foot "R" 7 Button fitting foot "M" 8 Seam ripper Part Code U.S.A. Others XC2691-031 XC3098-031 X53840-331 X59370-021 XC3021-031 XC4051-031 X59375-121 X54243-001 No...
User Guide
Page 12
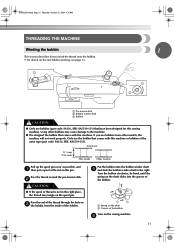
... right. a Pre-tension disk b Bobbin winder shaft c Bobbin CAUTION ● Only use the bobbin that have been designed for this machine or bobbins of the same type (part code: SA156, SFB: XA5539-151). Pass the thread around the pre-tension disk. Turn the bobbin clockwise, by hand, until the ... spool pin. e 11 Put the bobbin onto the bobbin winder shaft d and slide the bobbin winder shaft to the machine. ● We designed the bobbin that comes with this sewing machine. Pass the end of the thread through the hole on the fast bobbin winding, see page 13. NCBC2000.book Page...
... right. a Pre-tension disk b Bobbin winder shaft c Bobbin CAUTION ● Only use the bobbin that have been designed for this machine or bobbins of the same type (part code: SA156, SFB: XA5539-151). Pass the thread around the pre-tension disk. Turn the bobbin clockwise, by hand, until the ... spool pin. e 11 Put the bobbin onto the bobbin winder shaft d and slide the bobbin winder shaft to the machine. ● We designed the bobbin that comes with this sewing machine. Pass the end of the thread through the hole on the fast bobbin winding, see page 13. NCBC2000.book Page...

User Guide
Page 15
...When the sewing machine is started or the handwheel is turned after winding the thread around the bobbin, the machine will not operate correctly. If bobbins from other models are used with your finger, and then pass the thread through the tension-adjusting spring of the same type (part code:...the needle. b 1 2 a Cover b Slide button Put the bobbin in so the thread comes out in e place (see page 15. this sewing machine. Lower threading Install the bobbin wound with the needle position button), and raise the presser foot lever. 14 1 a Tension-adjusting spring Replace the bobbin...
...When the sewing machine is started or the handwheel is turned after winding the thread around the bobbin, the machine will not operate correctly. If bobbins from other models are used with your finger, and then pass the thread through the tension-adjusting spring of the same type (part code:...the needle. b 1 2 a Cover b Slide button Put the bobbin in so the thread comes out in e place (see page 15. this sewing machine. Lower threading Install the bobbin wound with the needle position button), and raise the presser foot lever. 14 1 a Tension-adjusting spring Replace the bobbin...

User Guide
Page 23
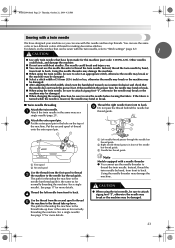
...22 a Screwdriver b Needle clamp screw • Do not apply strong force when loosening or tightening the needle clamp screw, otherwise certain parts of the machine, insert the needle until it touches the needle stopper and securely tighten the needle clamp screw with the screwdriver, otherwise the needle may ...too much .) Install the twin needle in the same way. NCBC2000.book Page 22 Thursday, October 21, 2004 4:32 PM KNOWING YOUR SEWING MACHINE Hold the needle with your left hand, and then d use the screwdriver to tighten the needle clamp screw by simply loosening the needle clamp...
...22 a Screwdriver b Needle clamp screw • Do not apply strong force when loosening or tightening the needle clamp screw, otherwise certain parts of the machine, insert the needle until it touches the needle stopper and securely tighten the needle clamp screw with the screwdriver, otherwise the needle may ...too much .) Install the twin needle in the same way. NCBC2000.book Page 22 Thursday, October 21, 2004 4:32 PM KNOWING YOUR SEWING MACHINE Hold the needle with your left hand, and then d use the screwdriver to tighten the needle clamp screw by simply loosening the needle clamp...
User Guide
Page 24
...the needle threader may bend or break. ■ Twin needle threading Attach the twin needle. Other needles could break and injure you can sew with this machine (part code: 131096-121). If the needle hits the presser foot, the needle may be sure to raise the needle before turning the fabric...." (page 52). 1 CAUTION ● Use only twin needles that can be sure to back. The needle could break, and damage the machine. ● Do not sew with the twin needle, refer to thread the twin needle. a First spool b Second spool Use the thread from front to attach zigzag foot...
...the needle threader may bend or break. ■ Twin needle threading Attach the twin needle. Other needles could break and injure you can sew with this machine (part code: 131096-121). If the needle hits the presser foot, the needle may be sure to raise the needle before turning the fabric...." (page 52). 1 CAUTION ● Use only twin needles that can be sure to back. The needle could break, and damage the machine. ● Do not sew with the twin needle, refer to thread the twin needle. a First spool b Second spool Use the thread from front to attach zigzag foot...

User Guide
Page 27
... the area to be sewn. NCBC2000.book Page 26 Thursday, October 21, 2004 4:32 PM SEWING BASICS 2 SEWING BASICS SEWING Basic sewing operations are described below to sew. 1 Turn on the sewing machine. In addition, keep your hands away from all moving parts such as the needle and handwheel, otherwise injuries may occur. ● Do not pull or...
... the area to be sewn. NCBC2000.book Page 26 Thursday, October 21, 2004 4:32 PM SEWING BASICS 2 SEWING BASICS SEWING Basic sewing operations are described below to sew. 1 Turn on the sewing machine. In addition, keep your hands away from all moving parts such as the needle and handwheel, otherwise injuries may occur. ● Do not pull or...

User Guide
Page 37
Pass the upper thread down through the buttonhole. NCBC2000.book Page 36 Thursday, October 21, 2004 4:32 PM UTILITY STITCHES The names of parts of buttonhole foot "A", which is used for sewing buttonholes, are indicated below. 1 2 5 ■ If the button does not fit in the presser foot. 1 X The size of the buttonhole foot...
Pass the upper thread down through the buttonhole. NCBC2000.book Page 36 Thursday, October 21, 2004 4:32 PM UTILITY STITCHES The names of parts of buttonhole foot "A", which is used for sewing buttonholes, are indicated below. 1 2 5 ■ If the button does not fit in the presser foot. 1 X The size of the buttonhole foot...
User Guide
Page 39
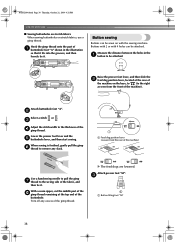
...into the grooves, and then loosely tie it . With a seam ripper, cut the middle part of the h gimp thread remaining at the rear of the machine on the base, to (to be attached. Button sewing Buttons can be attached. Raise the presser foot lever, and then slide the b feed ... fabrics, use a gimp thread. Attach buttonhole foot "A". b Select a stitch or . Hook the gimp thread onto the part of the fabric, and then tie it . Buttons with 2 or with the sewing machine. Attach presser foot "M". c Adjust the stitch width to remove any excess of the d gimp thread. Trim off any ...
...into the grooves, and then loosely tie it . With a seam ripper, cut the middle part of the h gimp thread remaining at the rear of the machine on the base, to (to be attached. Button sewing Buttons can be attached. Raise the presser foot lever, and then slide the b feed ... fabrics, use a gimp thread. Attach buttonhole foot "A". b Select a stitch or . Hook the gimp thread onto the part of the fabric, and then tie it . Buttons with 2 or with the sewing machine. Attach presser foot "M". c Adjust the stitch width to remove any excess of the d gimp thread. Trim off any ...

User Guide
Page 59
..., 2004 4:32 PM APPENDIX Remove the bobbin case. For a new bobbin case (part code: XC3152-021), contact your nearest authorized service center. ● Make sure that is scratched, otherwise the upper thread may become tangled, the needle may break or sewing performance may break. 2 1 2 a Projection b Spring 58 Put the tabs on the...
..., 2004 4:32 PM APPENDIX Remove the bobbin case. For a new bobbin case (part code: XC3152-021), contact your nearest authorized service center. ● Make sure that is scratched, otherwise the upper thread may become tangled, the needle may break or sewing performance may break. 2 1 2 a Projection b Spring 58 Put the tabs on the...
User Guide
Page 64
NCBC2000.book Page 63 Thursday, October 21, 2004 4:32 PM i INDEX Numerics M 3-point zigzag stitch 32 main parts 5 main power switch 9 A monogramming 49, 51 accessories 8 appliqués 42 N needle 20 B bar tack 46 basic stitching 33 blind... stitch button 6 H handwheel 5 heirloom stitching 51 J joining 51 joining stitch 42, 48 L LCD 7 S scallop stitching 49 seam ripper 37 sewing machine needles 20 sewing speed controller 6 sleeve holes 46 smocking 50 spool pin 11, 16 start/stop button 6, 28 stitch length 27 stitch selection key 7 stitch settings ...
NCBC2000.book Page 63 Thursday, October 21, 2004 4:32 PM i INDEX Numerics M 3-point zigzag stitch 32 main parts 5 main power switch 9 A monogramming 49, 51 accessories 8 appliqués 42 N needle 20 B bar tack 46 basic stitching 33 blind... stitch button 6 H handwheel 5 heirloom stitching 51 J joining 51 joining stitch 42, 48 L LCD 7 S scallop stitching 49 seam ripper 37 sewing machine needles 20 sewing speed controller 6 sleeve holes 46 smocking 50 spool pin 11, 16 start/stop button 6, 28 stitch length 27 stitch selection key 7 stitch settings ...

