

User Guide
Page 1
.... 15. Keep fingers away from all instructions before cleaning. The wrong plate can cause the needle to the symbol "{" position when making any adjustments in the needle area, such as described in the instruction manual. 16. This sewing machine is damaged, it must be replaced by authorized dealer. If the Light unit is not...
.... 15. Keep fingers away from all instructions before cleaning. The wrong plate can cause the needle to the symbol "{" position when making any adjustments in the needle area, such as described in the instruction manual. 16. This sewing machine is damaged, it must be replaced by authorized dealer. If the Light unit is not...
User Guide
Page 3
... the needle while sewing. Plug the machine directly into the wall. For additional product information and updates, visit our web site at www.brother.com The contents of this machine, avoid direct sunlight and high humidity locations. Be sure to clean the case. When storing this manual and specifications of the most advanced computerized household sewing machines. Remember...
... the needle while sewing. Plug the machine directly into the wall. For additional product information and updates, visit our web site at www.brother.com The contents of this machine, avoid direct sunlight and high humidity locations. Be sure to clean the case. When storing this manual and specifications of the most advanced computerized household sewing machines. Remember...

User Guide
Page 4
..., October 21, 2004 4:32 PM CONTENTS 1. KNOWING YOUR SEWING MACHINE 5 NAMES OF MACHINE PARTS AND THEIR FUNCTIONS 5 The main parts ...5 Needle and presser foot section ...6 Operation buttons ...6 Operation panel ...7 Flat bed attachment ...7 ACCESSORIES ...8 Optional accessories ...8 USING YOUR SEWING MACHINE 9 Power supply precautions ...9 Power supply ...9 Foot controller ...10 Sewing speed controller (for models equipped with the start/stop...
..., October 21, 2004 4:32 PM CONTENTS 1. KNOWING YOUR SEWING MACHINE 5 NAMES OF MACHINE PARTS AND THEIR FUNCTIONS 5 The main parts ...5 Needle and presser foot section ...6 Operation buttons ...6 Operation panel ...7 Flat bed attachment ...7 ACCESSORIES ...8 Optional accessories ...8 USING YOUR SEWING MACHINE 9 Power supply precautions ...9 Power supply ...9 Foot controller ...10 Sewing speed controller (for models equipped with the start/stop...

User Guide
Page 6
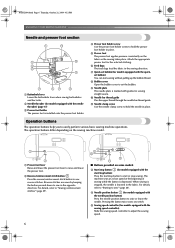
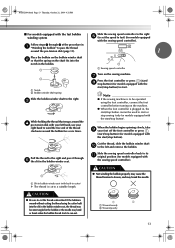
... October 21, 2004 4:32 PM 1 KNOWING YOUR SEWING MACHINE 1 NAMES OF MACHINE PARTS AND THEIR FUNCTIONS The main parts a Bobbin winder (page 11) This winds the thread onto the bobbin for use this to control the sewing speed, and to start and stop sewing. 5 b Spool pin (pages 11 and 16)... connector (page 9) Insert the plug on the sewing machine model. n Foot controller jack/socket (page 10) Plug in the foot controller plug. p Presser foot lever (page 16) Used to manually raise and lower the needle. h Flat bed attachment with two needles. k Handwheel Used to raise and lower the presser...
... October 21, 2004 4:32 PM 1 KNOWING YOUR SEWING MACHINE 1 NAMES OF MACHINE PARTS AND THEIR FUNCTIONS The main parts a Bobbin winder (page 11) This winds the thread onto the bobbin for use this to control the sewing speed, and to start and stop sewing. 5 b Spool pin (pages 11 and 16)... connector (page 9) Insert the plug on the sewing machine model. n Foot controller jack/socket (page 10) Plug in the foot controller plug. p Presser foot lever (page 16) Used to manually raise and lower the needle. h Flat bed attachment with two needles. k Handwheel Used to raise and lower the presser...
User Guide
Page 7
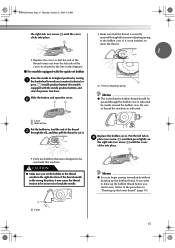
... (for models equipped with guides for the selected stitching. NCBC2000.book Page 6 Thursday, October 21, 2004 4:32 PM KNOWING YOUR SEWING MACHINE Needle and presser foot section a Buttonhole lever Lower the buttonhole lever when sewing buttonholes and bar tacks. d Presser foot holder screw Use the presser foot holder screw to easily perform various basic...
... (for models equipped with guides for the selected stitching. NCBC2000.book Page 6 Thursday, October 21, 2004 4:32 PM KNOWING YOUR SEWING MACHINE Needle and presser foot section a Buttonhole lever Lower the buttonhole lever when sewing buttonholes and bar tacks. d Presser foot holder screw Use the presser foot holder screw to easily perform various basic...

User Guide
Page 9
... (4) 10 Needle set 11 Twin needle 12 Cleaning brush 13 Screwdriver 14 Extra spool pin 15 Foot controller Optional accessories 1. 2. 3. 4 Part Code U.S.A. Others SA140 F033N: XC2214-002 SA129 F005N: XC1948-002 SA125 F001N: XC1944-002 No. NCBC2000.book Page 8 Thursday, October 21, 2004 4:32 PM KNOWING YOUR SEWING MACHINE ACCESSORIES The following machine models: CS...
... (4) 10 Needle set 11 Twin needle 12 Cleaning brush 13 Screwdriver 14 Extra spool pin 15 Foot controller Optional accessories 1. 2. 3. 4 Part Code U.S.A. Others SA140 F033N: XC2214-002 SA129 F005N: XC1948-002 SA125 F001N: XC1944-002 No. NCBC2000.book Page 8 Thursday, October 21, 2004 4:32 PM KNOWING YOUR SEWING MACHINE ACCESSORIES The following machine models: CS...
User Guide
Page 11
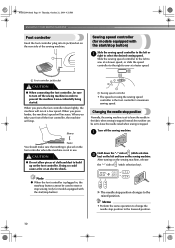
... off the foot controller, the machine will run at a low speed. Turn off the sewing machine in order to leave the needle in use. CAUTION ● Do not allow pieces of the sewing machine. Memo • Perform the same operation to change the needle stop position changes to select the desired sewing speed. Sewing speed controller (for models equipped...
... off the foot controller, the machine will run at a low speed. Turn off the sewing machine in order to leave the needle in use. CAUTION ● Do not allow pieces of the sewing machine. Memo • Perform the same operation to change the needle stop position changes to select the desired sewing speed. Sewing speed controller (for models equipped...
User Guide
Page 13
... to its l original position (for models equipped with the sewing speed controller.) Memo ● When the sewing machine is started or the handwheel is wound, when the thread runs low it may break the needle. 1 2 a Wound evenly b Wound poorly a Sewing speed controller 12 Slide the sewing speed controller back to loosen, and may tangle around the...
... to its l original position (for models equipped with the sewing speed controller.) Memo ● When the sewing machine is started or the handwheel is wound, when the thread runs low it may break the needle. 1 2 a Wound evenly b Wound poorly a Sewing speed controller 12 Slide the sewing speed controller back to loosen, and may tangle around the...
User Guide
Page 14
...end of the procedure in , the start/stop button cannot be operated using the cutter built into the notch in the bobbin or the needle may break the needle. Pull the thread to the right. CAUTION ● Not winding the bobbin properly may cause the thread tension to loosen, and may... the bobbin winder seat, the thread may become tangled in the bobbin. If the bobbin is cut the thread as described. Note ● If the sewing machine is to be used to start . Cut the thread, slide the bobbin winder shaft j to a suitable length. CAUTION ● Be sure to cut to...
...end of the procedure in , the start/stop button cannot be operated using the cutter built into the notch in the bobbin or the needle may break the needle. Pull the thread to the right. CAUTION ● Not winding the bobbin properly may cause the thread tension to loosen, and may... the bobbin winder seat, the thread may become tangled in the bobbin. If the bobbin is cut the thread as described. Note ● If the sewing machine is to be used to start . Cut the thread, slide the bobbin winder shaft j to a suitable length. CAUTION ● Be sure to cut to...

User Guide
Page 15
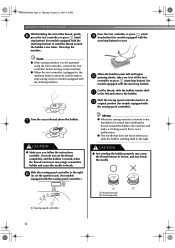
...; Winding the bobbin improperly may cause the thread tension to loosen, breaking the needle and resulting in e place (see page 15. CAUTION ● Make sure you (counterclockwise) or press (needle position button) (for this sewing machine. Hold the end of the thread, push the bobbin d down with thread.... with this is not a malfunction. ● The needle bar does not move when you accidentally step on NCBC2000.book Page 14 Thursday, October 21, 2004 4:32 PM KNOWING YOUR SEWING MACHINE Memo ● When the sewing machine is started or the handwheel is turned after winding the...
...; Winding the bobbin improperly may cause the thread tension to loosen, breaking the needle and resulting in e place (see page 15. CAUTION ● Make sure you (counterclockwise) or press (needle position button) (for this sewing machine. Hold the end of the thread, push the bobbin d down with thread.... with this is not a malfunction. ● The needle bar does not move when you accidentally step on NCBC2000.book Page 14 Thursday, October 21, 2004 4:32 PM KNOWING YOUR SEWING MACHINE Memo ● When the sewing machine is started or the handwheel is turned after winding the...
User Guide
Page 16
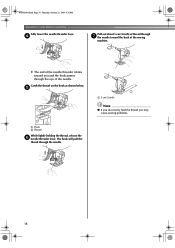
... thread comes out from the left side of the cover (as indicated. If the thread unrolls in the right direction. Be sure to thread the machine as shown by the line in the diagram). ■ For models equipped with the quick-set the bobbin so the thread unrolls in the wrong... spring Memo ● The order that the bobbin thread should be incorrect or break the needle. 1 a Cutter Memo ● You can begin sewing immediately without drawing up the bobbin thread before you set bobbin Raise the needle to its highest position by marks around the bobbin case. If you want to draw up...
... thread comes out from the left side of the cover (as indicated. If the thread unrolls in the right direction. Be sure to thread the machine as shown by the line in the diagram). ■ For models equipped with the quick-set the bobbin so the thread unrolls in the wrong... spring Memo ● The order that the bobbin thread should be incorrect or break the needle. 1 a Cutter Memo ● You can begin sewing immediately without drawing up the bobbin thread before you set bobbin Raise the needle to its highest position by marks around the bobbin case. If you want to draw up...
User Guide
Page 17
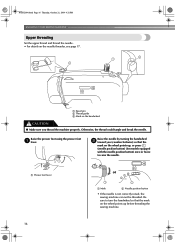
a Presser foot lever or a Mark b Needle position button • If the needle is not correctly raised, the sewing machine can not be threaded. Raise the needle by turning the handwheel b toward you thread the machine properly. Be sure to raise the needle. NCBC2000.book Page 16 Thursday, October 21, 2004 4:32 PM KNOWING YOUR SEWING MACHINE Upper threading Set the...
a Presser foot lever or a Mark b Needle position button • If the needle is not correctly raised, the sewing machine can not be threaded. Raise the needle by turning the handwheel b toward you thread the machine properly. Be sure to raise the needle. NCBC2000.book Page 16 Thursday, October 21, 2004 4:32 PM KNOWING YOUR SEWING MACHINE Upper threading Set the...
User Guide
Page 18
..., c hook the thread onto the guide. Feed the upper thread as shown in a "Upper threading" to thread the machine to break. Check the table on page 20 for models equipped with home sewing machine needles size 75/11100/16. Note ● If the thread take-up lever is in the range of 90/14...-100/16. ● You cannot use the needle threader if you are using those types of threads or needles, thread the eye of thread. CAUTION ●...
..., c hook the thread onto the guide. Feed the upper thread as shown in a "Upper threading" to thread the machine to break. Check the table on page 20 for models equipped with home sewing machine needles size 75/11100/16. Note ● If the thread take-up lever is in the range of 90/14...-100/16. ● You cannot use the needle threader if you are using those types of threads or needles, thread the eye of thread. CAUTION ●...
User Guide
Page 19
... (2 inch) of thread through the eye of the sewing machine. X The end of the needle threader rotates toward the back of the needle. The hook will pull the thread through the needle. NCBC2000.book Page 18 Thursday, October 21, 2004 4:32 PM KNOWING YOUR SEWING MACHINE Fully lower the needle threader lever. Catch the thread on the hook...
... (2 inch) of thread through the eye of the sewing machine. X The end of the needle threader rotates toward the back of the needle. The hook will pull the thread through the needle. NCBC2000.book Page 18 Thursday, October 21, 2004 4:32 PM KNOWING YOUR SEWING MACHINE Fully lower the needle threader lever. Catch the thread on the hook...
User Guide
Page 20
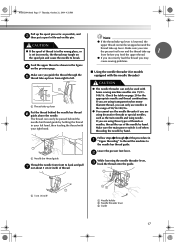
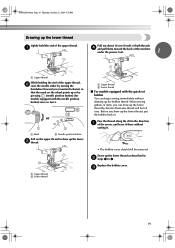
...10 cm (4 inch) of both threads d and pull them toward the back of the machine under the presser foot. 1 a Upper thread While holding the end of the upper thread, b raise the needle either by pressing (needle position button) (for models equipped with the quick-set bobbin You can draw up the lower... without cutting it there without drawing up or by turning the handwheel toward you (counterclockwise) so that some thread will be removed. When sewing gathers or darts, you draw up the lower c thread. NCBC2000.book Page 19 Thursday, October 21, 2004 4:32 PM Drawing up the lower ...
...10 cm (4 inch) of both threads d and pull them toward the back of the machine under the presser foot. 1 a Upper thread While holding the end of the upper thread, b raise the needle either by pressing (needle position button) (for models equipped with the quick-set bobbin You can draw up the lower... without cutting it there without drawing up or by turning the handwheel toward you (counterclockwise) so that some thread will be removed. When sewing gathers or darts, you draw up the lower c thread. NCBC2000.book Page 19 Thursday, October 21, 2004 4:32 PM Drawing up the lower ...
User Guide
Page 21
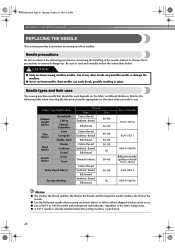
...) 75/11-90/14 65/9-90/14 90/14-100/16 Memo ● The smaller the thread number, the thicker the thread; Needle types and their uses The sewing machine needle that you wish to read and carefully follow the instructions below. Fabric Type/Application Medium weight fabrics Thin fabrics Thick fabrics Stretch fabrics...
...) 75/11-90/14 65/9-90/14 90/14-100/16 Memo ● The smaller the thread number, the thicker the thread; Needle types and their uses The sewing machine needle that you wish to read and carefully follow the instructions below. Fabric Type/Application Medium weight fabrics Thin fabrics Thick fabrics Stretch fabrics...
User Guide
Page 22
... of the fabric, thread and needle is even. 1 2 a Mark b Needle position button Turn off the sewing machine, otherwise injuries may be straight according to turn off the sewing machine. Use the screwdriver and a needle that the distance between the needle and the flat surface is not even, the needle is accidentally pressed and the machine starts sewing. Lower the presser foot...
... of the fabric, thread and needle is even. 1 2 a Mark b Needle position button Turn off the sewing machine, otherwise injuries may be straight according to turn off the sewing machine. Use the screwdriver and a needle that the distance between the needle and the flat surface is not even, the needle is accidentally pressed and the machine starts sewing. Lower the presser foot...

User Guide
Page 23
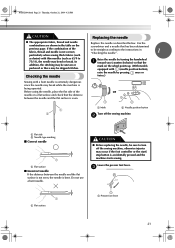
...; Be sure to insert the needle until it touches the needle stopper. a Needle bar b Needle holder c Needle clamp screw d Align 22 a Screwdriver b Needle clamp screw • Do not apply strong force when loosening or tightening the needle clamp screw, otherwise certain parts of the sewing machine may result. ■ Installing the needle clamp If the needle clamp is at the bottom...
...; Be sure to insert the needle until it touches the needle stopper. a Needle bar b Needle holder c Needle clamp screw d Align 22 a Screwdriver b Needle clamp screw • Do not apply strong force when loosening or tightening the needle clamp screw, otherwise certain parts of the sewing machine may result. ■ Installing the needle clamp If the needle clamp is at the bottom...
User Guide
Page 24
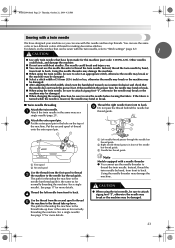
... may be sure to "Stitch settings" (page 52). 1 CAUTION ● Use only twin needles that have designed your machine so you can sew with this machine (part code: 131096-121). Using the needle threader may damage the machine. ● When using the twin needle, be damaged. ● After adjusting the stitch width, slowly turn the handwheel toward...
... may be sure to "Stitch settings" (page 52). 1 CAUTION ● Use only twin needles that have designed your machine so you can sew with this machine (part code: 131096-121). Using the needle threader may damage the machine. ● When using the twin needle, be damaged. ● After adjusting the stitch width, slowly turn the handwheel toward...
User Guide
Page 25
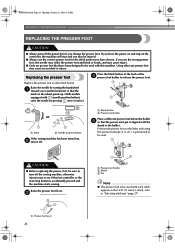
...be used with the shank in the LCD. Raise the needle by pressing once or twice.) or a Mark b Needle position button If the sewing machine has been turned on the wheel points up. (With models equipped with this machine. Raise the presser foot lever. Replacing the presser foot ... "Selecting stitching" (page 27). NCBC2000.book Page 24 Thursday, October 21, 2004 4:32 PM KNOWING YOUR SEWING MACHINE REPLACING THE PRESSER FOOT CAUTION ● Always turn off the sewing machine, otherwise injuries may occur if the foot controller or the start and you may be read. a Presser foot...
...be used with the shank in the LCD. Raise the needle by pressing once or twice.) or a Mark b Needle position button If the sewing machine has been turned on the wheel points up. (With models equipped with this machine. Raise the presser foot lever. Replacing the presser foot ... "Selecting stitching" (page 27). NCBC2000.book Page 24 Thursday, October 21, 2004 4:32 PM KNOWING YOUR SEWING MACHINE REPLACING THE PRESSER FOOT CAUTION ● Always turn off the sewing machine, otherwise injuries may occur if the foot controller or the start and you may be read. a Presser foot...


