

User Guide
Page 4
... ...6 Operation buttons ...6 Operation panel ...7 Flat bed attachment ...7 ACCESSORIES ...8 Optional accessories ...8 USING YOUR SEWING MACHINE 9 Power supply precautions ...9 Power supply ...9 Foot controller ...10 Sewing speed controller (for models equipped with the start/stop button 10 Changing the needle stop position ...10 THREADING THE MACHINE 11 Winding the bobbin ...11 Lower threading ...14 Upper threading ...16 Drawing...
... ...6 Operation buttons ...6 Operation panel ...7 Flat bed attachment ...7 ACCESSORIES ...8 Optional accessories ...8 USING YOUR SEWING MACHINE 9 Power supply precautions ...9 Power supply ...9 Foot controller ...10 Sewing speed controller (for models equipped with the start/stop button 10 Changing the needle stop position ...10 THREADING THE MACHINE 11 Winding the bobbin ...11 Lower threading ...14 Upper threading ...16 Drawing...
User Guide
Page 5
APPENDIX ...52 STITCH SETTINGS ...52 Utility stitches ...52 MAINTENANCE ...57 Cleaning the machine surface ...57 Cleaning the bobbin case ...57 TROUBLESHOOTING ...59 ERROR MESSAGES ...62 Operation beep (for models equipped with the operation beep 62 INDEX ...63 4 NCBC2000.book Page 4 ...Thursday, October 21, 2004 4:32 PM 3. UTILITY STITCHES 32 OVERCASTING STITCHES 32 BASIC STITCHING ...33 Basic stitching ...33 BLIND HEM STITCHING 34 BUTTONHOLE SEWING 35 Button sewing ...38 ZIPPER INSERTION ...40 SEWING...
APPENDIX ...52 STITCH SETTINGS ...52 Utility stitches ...52 MAINTENANCE ...57 Cleaning the machine surface ...57 Cleaning the bobbin case ...57 TROUBLESHOOTING ...59 ERROR MESSAGES ...62 Operation beep (for models equipped with the operation beep 62 INDEX ...63 4 NCBC2000.book Page 4 ...Thursday, October 21, 2004 4:32 PM 3. UTILITY STITCHES 32 OVERCASTING STITCHES 32 BASIC STITCHING ...33 Basic stitching ...33 BLIND HEM STITCHING 34 BUTTONHOLE SEWING 35 Button sewing ...38 ZIPPER INSERTION ...40 SEWING...

User Guide
Page 6
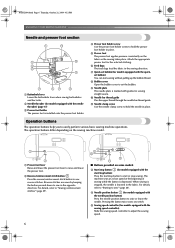
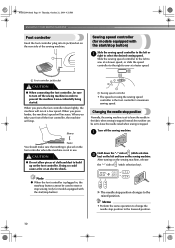
...when winding the thread onto the bobbin and then threading the machine. k Handwheel Used to cut them. o Feed dog position ...and sewing light switch (page 9) You can use as the lower thread. j Operation panel (page 7) This is used to start and stop sewing. 5...of thread for use this to control the sewing speed, and to select the stitch and specify the various settings....page 10) You can turn the main power and sewing light switch on the power supply cord into the..., 2004 4:32 PM 1 KNOWING YOUR SEWING MACHINE 1 NAMES OF MACHINE PARTS AND THEIR FUNCTIONS The main parts a Bobbin winder (page...
...when winding the thread onto the bobbin and then threading the machine. k Handwheel Used to cut them. o Feed dog position ...and sewing light switch (page 9) You can use as the lower thread. j Operation panel (page 7) This is used to start and stop sewing. 5...of thread for use this to control the sewing speed, and to select the stitch and specify the various settings....page 10) You can turn the main power and sewing light switch on the power supply cord into the..., 2004 4:32 PM 1 KNOWING YOUR SEWING MACHINE 1 NAMES OF MACHINE PARTS AND THEIR FUNCTIONS The main parts a Bobbin winder (page...
User Guide
Page 7
... foot lever Raise and lower the presser foot lever to easily perform various basic sewing machine operations. d Needle position button (for models equipped with the needle threader) (page 17) c Presser foot holder The presser foot is marked with guides for models equipped with the needle position button) Press the needle position button to hold...
... foot lever Raise and lower the presser foot lever to easily perform various basic sewing machine operations. d Needle position button (for models equipped with the needle threader) (page 17) c Presser foot holder The presser foot is marked with guides for models equipped with the needle position button) Press the needle position button to hold...

User Guide
Page 9
only) ● Foot controller: Model T This foot controller can be used on machine) 6 Blind stitch foot "R" 7 Button fitting... 135793-001 NCBC2000.book Page 8 Thursday, October 21, 2004 4:32 PM KNOWING YOUR SEWING MACHINE ACCESSORIES The following machine models: CS-6000, CS-5100, CS-4000, BC-2500, BC-2300, BC-2100, ES... 1 needle No. Part Name 1 Walking Foot 2 Quilting Foot 3 1/4-Inch Quilting Foot * May be able to carry out most sewing tasks. Part Code U.S.A. Part Name 4 Quilting guide 5 Eyelet punch 8 Part Code U.S.A. Part Name 1 Buttonhole foot "A" 2 Overcasting...
only) ● Foot controller: Model T This foot controller can be used on machine) 6 Blind stitch foot "R" 7 Button fitting... 135793-001 NCBC2000.book Page 8 Thursday, October 21, 2004 4:32 PM KNOWING YOUR SEWING MACHINE ACCESSORIES The following machine models: CS-6000, CS-5100, CS-4000, BC-2500, BC-2300, BC-2100, ES... 1 needle No. Part Name 1 Walking Foot 2 Quilting Foot 3 1/4-Inch Quilting Foot * May be able to carry out most sewing tasks. Part Code U.S.A. Part Name 4 Quilting guide 5 Eyelet punch 8 Part Code U.S.A. Part Name 1 Buttonhole foot "A" 2 Overcasting...
User Guide
Page 11
... used to start or stop sewing (only for models equipped with the start /stop . Slower a Sewing speed controller • The speed set to leave the needle in order to prevent the machine from accidentally being started. CAUTION ● Do not allow pieces of (stitch selection key). After turning on the sewing machine, release the "-" side of...
... used to start or stop sewing (only for models equipped with the start /stop . Slower a Sewing speed controller • The speed set to leave the needle in order to prevent the machine from accidentally being started. CAUTION ● Do not allow pieces of (stitch selection key). After turning on the sewing machine, release the "-" side of...
User Guide
Page 12
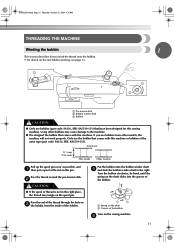
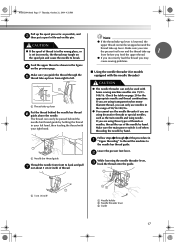
...spool of thread is not in the right place, the thread may cause damage to the machine. ● We designed the bobbin that comes with this sewing machine. Actual size 11.5 mm (7/16 inch) This model Other models Pull up the spool pin as far as possible, and a then put a spool ... b Bobbin winder shaft c Bobbin CAUTION ● Only use the bobbin that comes with this pin. Pass the end of thread on the sewing machine. Using other models, the machine will not work properly. Turn the bobbin clockwise, by hand, until the spring on the shaft slides into the groove of the bobbin. 1...
...spool of thread is not in the right place, the thread may cause damage to the machine. ● We designed the bobbin that comes with this sewing machine. Actual size 11.5 mm (7/16 inch) This model Other models Pull up the spool pin as far as possible, and a then put a spool ... b Bobbin winder shaft c Bobbin CAUTION ● Only use the bobbin that comes with this pin. Pass the end of thread on the sewing machine. Using other models, the machine will not work properly. Turn the bobbin clockwise, by hand, until the spring on the shaft slides into the groove of the bobbin. 1...
User Guide
Page 13
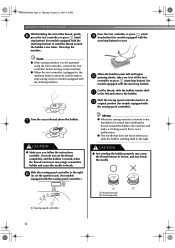
... in, the start/stop button cannot be used to its l original position (for models equipped with the start/stop button). NCBC2000.book Page 12 Thursday, October 21, 2004 4:32 PM KNOWING YOUR SEWING MACHINE While holding the end of the thread, gently f press the foot controller or press... (start/ stop button) (for models equipped with the start/stop button). Trim the excess thread above the bobbin. g CAUTION...
... in, the start/stop button cannot be used to its l original position (for models equipped with the start/stop button). NCBC2000.book Page 12 Thursday, October 21, 2004 4:32 PM KNOWING YOUR SEWING MACHINE While holding the end of the thread, gently f press the foot controller or press... (start/ stop button) (for models equipped with the start/stop button). Trim the excess thread above the bobbin. g CAUTION...
User Guide
Page 14
...). g Press the foot controller or press (start/ h stop button) (for models equipped with the start/stop button) to the right and pass it through 2 of the thread clockwise around the pre-tension disk (page 11). 1 Place the bobbin on the sewing machine. When the bobbin begins spinning slowly, take i your right hand to... sure to cut to wind the free end of the procedure in the bobbin or the needle may break the needle. Note ● If the sewing machine is to be used to start or stop sewing (only for models equipped with the start .
...). g Press the foot controller or press (start/ h stop button) (for models equipped with the start/stop button) to the right and pass it through 2 of the thread clockwise around the pre-tension disk (page 11). 1 Place the bobbin on the sewing machine. When the bobbin begins spinning slowly, take i your right hand to... sure to cut to wind the free end of the procedure in the bobbin or the needle may break the needle. Note ● If the sewing machine is to be used to start or stop sewing (only for models equipped with the start .

User Guide
Page 15
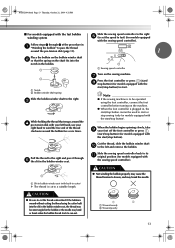
...more details on quick-set the bobbin so the thread unrolls in e place (see page 15. Actual size 11.5 mm (7/16 inch) This model Other models • Only use bobbins that the thread is not a malfunction. ● The needle bar does not move when you set bobbin, see ...the handwheel toward you turn the power off while threading the machine. Put the left tab in the right direction. NCBC2000.book Page 14 Thursday, October 21, 2004 4:32 PM KNOWING YOUR SEWING MACHINE Memo ● When the sewing machine is started or the handwheel is not inserted, reinsert the thread...
...more details on quick-set the bobbin so the thread unrolls in e place (see page 15. Actual size 11.5 mm (7/16 inch) This model Other models • Only use bobbins that the thread is not a malfunction. ● The needle bar does not move when you set bobbin, see ...the handwheel toward you turn the power off while threading the machine. Put the left tab in the right direction. NCBC2000.book Page 14 Thursday, October 21, 2004 4:32 PM KNOWING YOUR SEWING MACHINE Memo ● When the sewing machine is started or the handwheel is not inserted, reinsert the thread...
User Guide
Page 16
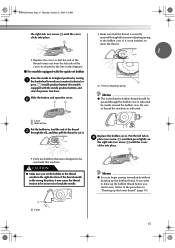
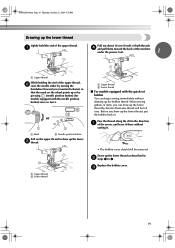
... case. Put the left side of the cover (as indicated. Replace the bobbin cover. CAUTION ● Make sure you start to sew, follow to thread the machine as shown by the line in , feed the end of the thread c through the slit, and then pull the thread to cut...● You can begin sewing immediately without drawing up the bobbin thread before you set bobbin Raise the needle to be passed through the bobbin case is indicated by turning a the handwheel toward you (counterclockwise) or press (needle position button) (for models equipped with this machine. Slide the button and ...
... case. Put the left side of the cover (as indicated. Replace the bobbin cover. CAUTION ● Make sure you start to sew, follow to thread the machine as shown by the line in , feed the end of the thread c through the slit, and then pull the thread to cut...● You can begin sewing immediately without drawing up the bobbin thread before you set bobbin Raise the needle to be passed through the bobbin case is indicated by turning a the handwheel toward you (counterclockwise) or press (needle position button) (for models equipped with this machine. Slide the button and ...
User Guide
Page 17
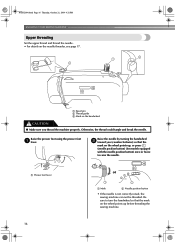
NCBC2000.book Page 16 Thursday, October 21, 2004 4:32 PM KNOWING YOUR SEWING MACHINE Upper threading Set the upper thread and thread the needle. • For details on the wheel points up , or press (needle position button) (for models equipped with the needle position button) once or twice to raise the ...needle. Be sure to turn the handwheel so that the mark on the wheel points up before threading the sewing machine. 16 Raise the needle by turning the handwheel b ...
NCBC2000.book Page 16 Thursday, October 21, 2004 4:32 PM KNOWING YOUR SEWING MACHINE Upper threading Set the upper thread and thread the needle. • For details on the wheel points up , or press (needle position button) (for models equipped with the needle position button) once or twice to raise the ...needle. Be sure to turn the handwheel so that the mark on the wheel points up before threading the sewing machine. 16 Raise the needle by turning the handwheel b ...
User Guide
Page 18
...break. Feed the upper thread as shown in the figure d on page 20 for models equipped with home sewing machine needles size 75/11100/16. a Needle bar thread guide Thread the needle from right...the range of thread is in the wrong place, or is set incorrectly, the thread may cause sewing problems. ■ Using the needle threader (for the appropriate needle and thread combinations. NCBC2000.book...as possible, and c then put a spool of the procedure in a "Upper threading" to thread the machine to the needle bar thread guide. CAUTION ● If the spool of 90/14-100/16. ●...
...break. Feed the upper thread as shown in the figure d on page 20 for models equipped with home sewing machine needles size 75/11100/16. a Needle bar thread guide Thread the needle from right...the range of thread is in the wrong place, or is set incorrectly, the thread may cause sewing problems. ■ Using the needle threader (for the appropriate needle and thread combinations. NCBC2000.book...as possible, and c then put a spool of the procedure in a "Upper threading" to thread the machine to the needle bar thread guide. CAUTION ● If the spool of 90/14-100/16. ●...
User Guide
Page 20
... so that some thread will be removed. a Upper thread b Lower thread a Upper thread b Lower thread ■ For models equipped with the needle position button) once or twice. When sewing gathers or darts, you (counterclockwise) so that the mark on the upper thread to 4. a Pull out about 10 cm ...(4 inch) of both threads d and pull them toward the back of the machine under the presser foot. 1 a Upper thread ...
... so that some thread will be removed. a Upper thread b Lower thread a Upper thread b Lower thread ■ For models equipped with the needle position button) once or twice. When sewing gathers or darts, you (counterclockwise) so that the mark on the upper thread to 4. a Pull out about 10 cm ...(4 inch) of both threads d and pull them toward the back of the machine under the presser foot. 1 a Upper thread ...
User Guide
Page 22
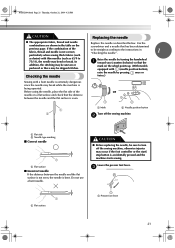
... ■ Incorrect needle If the distance between the needle and the flat surface is even. 1 2 a Mark b Needle position button Turn off the sewing machine, otherwise injuries may be uneven or puckered or there may occur if the foot controller or the start/ stop button is extremely dangerous since the..., be straight according to turn off the sewing machine. If the combination of the or needle on a flat surface and check that has been determined to be sure to the instructions in the table on the wheel points up. (With models equipped with (needle position button), raise the...
... ■ Incorrect needle If the distance between the needle and the flat surface is even. 1 2 a Mark b Needle position button Turn off the sewing machine, otherwise injuries may be uneven or puckered or there may occur if the foot controller or the start/ stop button is extremely dangerous since the..., be straight according to turn off the sewing machine. If the combination of the or needle on a flat surface and check that has been determined to be sure to the instructions in the table on the wheel points up. (With models equipped with (needle position button), raise the...
User Guide
Page 24
... sure to thread the twin needle. Other needles could break and injure you (counterclockwise) and check that have designed your machine so you can sew with this machine (part code: 131096-121). You can not use the needle threader to raise the needle before turning the fabric. If... the fabric is turned while the needle is the same as for normally threading the machine (for a single needle). c Needle bar thread guide Note Models ...
... sure to thread the twin needle. Other needles could break and injure you (counterclockwise) and check that have designed your machine so you can sew with this machine (part code: 131096-121). You can not use the needle threader to raise the needle before turning the fabric. If... the fabric is turned while the needle is the same as for normally threading the machine (for a single needle). c Needle bar thread guide Note Models ...
User Guide
Page 25
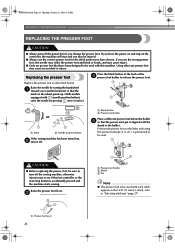
... in the LCD. Raise the needle by pressing once or twice.) or a Mark b Needle position button If the sewing machine has been turned on the controller, the machine will start /stop button is aligned with each stitch appears in the holder. If you use the wrong presser foot,...● Only use presser feet that the mark on the wheel points up. (With models equipped with this machine. c a Presser foot holder b Shank c Pin Note ● The presser foot to turn it off the sewing machine, otherwise injuries may cause an accident or injury. a Presser foot lever 24 NCBC2000.book ...
... in the LCD. Raise the needle by pressing once or twice.) or a Mark b Needle position button If the sewing machine has been turned on the controller, the machine will start /stop button is aligned with each stitch appears in the holder. If you use the wrong presser foot,...● Only use presser feet that the mark on the wheel points up. (With models equipped with this machine. c a Presser foot holder b Shank c Pin Note ● The presser foot to turn it off the sewing machine, otherwise injuries may cause an accident or injury. a Presser foot lever 24 NCBC2000.book ...
User Guide
Page 29
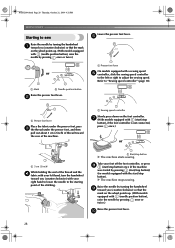
... 5 cm (2 inch) of the thread and the d fabric with (start/stop button X The machine starts sewing. a Sewing speed controller Slowly press down on the wheel points up . (With models equipped with (needle position button), raise the needle by turning the handwheel a toward you (counterclockwise) ... on the foot controller. g (With models equipped with your left hand, turn the handwheel toward you (counterclockwise) with a sewing speed f controller, slide the sewing speed controller to the left or right to the starting point of the machine. Take your right hand to lower the...
... 5 cm (2 inch) of the thread and the d fabric with (start/stop button X The machine starts sewing. a Sewing speed controller Slowly press down on the wheel points up . (With models equipped with (needle position button), raise the needle by turning the handwheel a toward you (counterclockwise) ... on the foot controller. g (With models equipped with your left hand, turn the handwheel toward you (counterclockwise) with a sewing speed f controller, slide the sewing speed controller to the left or right to the starting point of the machine. Take your right hand to lower the...
User Guide
Page 31
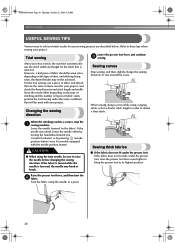
...sewing along a curve while using a zigzag stitch, select a shorter stitch length in the fabric). When the stitching reaches a corner, stop the a sewing machine.... Raise the presser foot lever, and then turn the b fabric. NCBC2000.book Page 30 Thursday, October 21, 2004 4:32 PM SEWING BASICS USEFUL SEWING...sew around the curve. If the needle was raised, lower the needle either by turning the handwheel toward you select a stitch, the machine...the sewing direction. Sewing ...sewing your project, and check the thread tension and stitch length and width. For the trial sewing...
...sewing along a curve while using a zigzag stitch, select a shorter stitch length in the fabric). When the stitching reaches a corner, stop the a sewing machine.... Raise the presser foot lever, and then turn the b fabric. NCBC2000.book Page 30 Thursday, October 21, 2004 4:32 PM SEWING BASICS USEFUL SEWING...sew around the curve. If the needle was raised, lower the needle either by turning the handwheel toward you select a stitch, the machine...the sewing direction. Sewing ...sewing your project, and check the thread tension and stitch length and width. For the trial sewing...

User Guide
Page 33
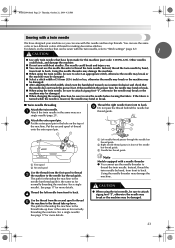
...reverse stitching. They are also useful for sewing stretch materials. Stitch Name Pattern No. Application Stitch Width [mm (inch.)] Stitch Length [mm (inch.)] Auto Manual Auto Manual Pattern Presser Foot 70 stitches model 60 stitches model 50 stitches model 40 stitches model Twin Needle Walking Foot Reverse/ Reinforcement Stitching...the needle does not touch the presser foot. If the needle hits the presser foot, the needle may bend or break. 32 a Sew with the edge of the fabric c against the guide of the fabric against the d presser foot guide. Position the fabric with the...
...reverse stitching. They are also useful for sewing stretch materials. Stitch Name Pattern No. Application Stitch Width [mm (inch.)] Stitch Length [mm (inch.)] Auto Manual Auto Manual Pattern Presser Foot 70 stitches model 60 stitches model 50 stitches model 40 stitches model Twin Needle Walking Foot Reverse/ Reinforcement Stitching...the needle does not touch the presser foot. If the needle hits the presser foot, the needle may bend or break. 32 a Sew with the edge of the fabric c against the guide of the fabric against the d presser foot guide. Position the fabric with the...


