
User Guide
Page 5
... STITCHES 32 OVERCASTING STITCHES 32 BASIC STITCHING ...33 Basic stitching ...33 BLIND HEM STITCHING 34 BUTTONHOLE SEWING 35 Button sewing ...38 ZIPPER INSERTION ...40 SEWING STRETCH FABRICS AND ELASTIC TAPE 41 Stretch stitching ...41 Elastic attaching ...41 APPLIQUÉ, PATCHWORK...stitching ...50 Joining ...51 Heirloom stitching ...51 4. APPENDIX ...52 STITCH SETTINGS ...52 Utility stitches ...52 MAINTENANCE ...57 Cleaning the machine surface ...57 Cleaning the bobbin case ...57 TROUBLESHOOTING ...59 ERROR MESSAGES ...62 Operation beep (for models equipped with the operation beep...
... STITCHES 32 OVERCASTING STITCHES 32 BASIC STITCHING ...33 Basic stitching ...33 BLIND HEM STITCHING 34 BUTTONHOLE SEWING 35 Button sewing ...38 ZIPPER INSERTION ...40 SEWING STRETCH FABRICS AND ELASTIC TAPE 41 Stretch stitching ...41 Elastic attaching ...41 APPLIQUÉ, PATCHWORK...stitching ...50 Joining ...51 Heirloom stitching ...51 4. APPENDIX ...52 STITCH SETTINGS ...52 Utility stitches ...52 MAINTENANCE ...57 Cleaning the machine surface ...57 Cleaning the bobbin case ...57 TROUBLESHOOTING ...59 ERROR MESSAGES ...62 Operation beep (for models equipped with the operation beep...
User Guide
Page 7
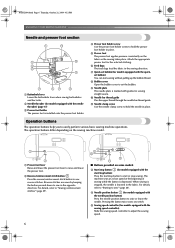
.... d Presser foot holder screw Use the presser foot holder screw to hold the presser foot holder in the sewing direction. d Needle position button (for the selected stitching. NCBC2000.book Page 6 Thursday, October 21, 2004 4:32 PM KNOWING YOUR SEWING MACHINE Needle and presser foot section a Buttonhole lever Lower the buttonhole lever when sewing buttonholes and bar tacks.
.... d Presser foot holder screw Use the presser foot holder screw to hold the presser foot holder in the sewing direction. d Needle position button (for the selected stitching. NCBC2000.book Page 6 Thursday, October 21, 2004 4:32 PM KNOWING YOUR SEWING MACHINE Needle and presser foot section a Buttonhole lever Lower the buttonhole lever when sewing buttonholes and bar tacks.

User Guide
Page 9
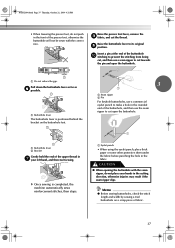
... Optional accessories 1. 2. 3. 4 Part Code U.S.A. only) ● Foot controller: Model T This foot controller can be used on machine) 6 Blind stitch foot "R" 7 Button fitting foot "M" 8 Seam ripper Part Code U.S.A. Others SA140 F033N: XC2214-002 SA129 F005N:...Buttonhole foot "A" 2 Overcasting foot "G" 3 Monogramming foot "N" 4 Zipper foot "I" 5 Zigzag foot "J" (on the following accessories are stored in the flat bed attachment. Note (For U.S.A. NCBC2000.book Page 8 Thursday, October 21, 2004 4:32 PM KNOWING YOUR SEWING MACHINE ACCESSORIES The following machine...
... Optional accessories 1. 2. 3. 4 Part Code U.S.A. only) ● Foot controller: Model T This foot controller can be used on machine) 6 Blind stitch foot "R" 7 Button fitting foot "M" 8 Seam ripper Part Code U.S.A. Others SA140 F033N: XC2214-002 SA129 F005N:...Buttonhole foot "A" 2 Overcasting foot "G" 3 Monogramming foot "N" 4 Zipper foot "I" 5 Zigzag foot "J" (on the following accessories are stored in the flat bed attachment. Note (For U.S.A. NCBC2000.book Page 8 Thursday, October 21, 2004 4:32 PM KNOWING YOUR SEWING MACHINE ACCESSORIES The following machine...

User Guide
Page 36
...* Rfc. A 34 34 - medium weight and thick fabrics 7.0 (1/4) 3.0-7.0 (1/8-1/4) 0.5 (1/32) 0.3-1.0 (1/64-1/16) No No Auto* Rfc. motion quilting, satin stitching, button sewing 3.5 (1/8) 0.0-7.0 (0-1/4) 1.4 (1/16) 0.0-4.0 (0-3/16) No Yes *Auto Rfc.: Automatic Reinforcement **Rfc.: Reinforcement The maximum buttonhole length is about 28 mm (1-1/8 inch) (diameter + thickness of the presser foot to the back, as shown below...
...* Rfc. A 34 34 - medium weight and thick fabrics 7.0 (1/4) 3.0-7.0 (1/8-1/4) 0.5 (1/32) 0.3-1.0 (1/64-1/16) No No Auto* Rfc. motion quilting, satin stitching, button sewing 3.5 (1/8) 0.0-7.0 (0-1/4) 1.4 (1/16) 0.0-4.0 (0-3/16) No Yes *Auto Rfc.: Automatic Reinforcement **Rfc.: Reinforcement The maximum buttonhole length is about 28 mm (1-1/8 inch) (diameter + thickness of the presser foot to the back, as shown below...

User Guide
Page 37
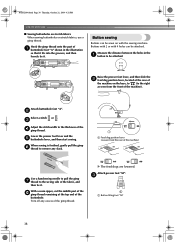
...with the red marks on the sides of the buttonhole foot, and then lower the presser foot lever. NCBC2000.book Page 36 Thursday, October 21, 2004 4:32 PM UTILITY STITCHES The names of parts of buttonhole foot "A", which is used for sewing buttonholes, are indicated below. 1 2 5 ■...; If the button does not fit in the presser foot. 1 X The size of the buttonhole is 5 mm (3/16 inch).) 1 3 4 A a Button guide plate b...
...with the red marks on the sides of the buttonhole foot, and then lower the presser foot lever. NCBC2000.book Page 36 Thursday, October 21, 2004 4:32 PM UTILITY STITCHES The names of parts of buttonhole foot "A", which is used for sewing buttonholes, are indicated below. 1 2 5 ■...; If the button does not fit in the presser foot. 1 X The size of the buttonhole is 5 mm (3/16 inch).) 1 3 4 A a Button guide plate b...
User Guide
Page 38
... sheet under the fabric before punching the hole in the fabric. CAUTION ● When opening the buttonhole with the correct size. Raise the buttonhole lever to cut the thread. a Buttonhole lever The buttonhole lever is completed, the machine automatically sews reinforcement stitches, then stops. Raise the presser foot lever, remove the h fabric, and cut open the...
... sheet under the fabric before punching the hole in the fabric. CAUTION ● When opening the buttonhole with the correct size. Raise the buttonhole lever to cut the thread. a Buttonhole lever The buttonhole lever is completed, the machine automatically sews reinforcement stitches, then stops. Raise the presser foot lever, remove the h fabric, and cut open the...
User Guide
Page 39
... sewing machine. Measure the distance between the holes in the illustration so that it fits into the grooves, and then loosely tie it . a Feed dog position lever (as seen from the rear of the machine) Use a handsewing needle to pull the gimp g thread to the wrong side of the buttonhole. b Select a stitch or . Button sewing...
... sewing machine. Measure the distance between the holes in the illustration so that it fits into the grooves, and then loosely tie it . a Feed dog position lever (as seen from the rear of the machine) Use a handsewing needle to pull the gimp g thread to the wrong side of the buttonhole. b Select a stitch or . Button sewing...

User Guide
Page 47
...mm (inch.)] Auto Manual Auto Manual Triple stretch stitch Attaching sleeves, sew- c • For details, refer to "Starting to reinforce sleeve holes and inseams. Attach zigzag foot "J". a Set the button guide plate on buttonhole foot "A" to the desired length. (The distance between the markings... on the presser foot scale is described below. Attach buttonhole foot "A". As an example, the procedure for sewing bar tacks at pocket corners is 5 mm (3/16 inch).) 1 2 3 a Presser foot scale b Length of bar tack c 5 mm (3/16 inch...
...mm (inch.)] Auto Manual Auto Manual Triple stretch stitch Attaching sleeves, sew- c • For details, refer to "Starting to reinforce sleeve holes and inseams. Attach zigzag foot "J". a Set the button guide plate on buttonhole foot "A" to the desired length. (The distance between the markings... on the presser foot scale is described below. Attach buttonhole foot "A". As an example, the procedure for sewing bar tacks at pocket corners is 5 mm (3/16 inch).) 1 2 3 a Presser foot scale b Length of bar tack c 5 mm (3/16 inch...

User Guide
Page 48
a Buttonhole lever The buttonhole lever is completed, the machine automatically sews reinforcement stitches, then stops. X Once sewing is positioned behind the bracket on the buttonhole foot. 1 a 2 mm (1/16 inch) 3 Pass the upper thread down the buttonhole lever as far as e possible. Raise the buttonhole lever to "Selecting stitching" (page 27). 47 a Buttonhole lever b Bracket Gently hold the end of the... faces toward you, and then lower the presser foot lever so that the needle drops 2 mm (1/16 inch) in f your left hand, and then start sewing.
a Buttonhole lever The buttonhole lever is completed, the machine automatically sews reinforcement stitches, then stops. X Once sewing is positioned behind the bracket on the buttonhole foot. 1 a 2 mm (1/16 inch) 3 Pass the upper thread down the buttonhole lever as far as e possible. Raise the buttonhole lever to "Selecting stitching" (page 27). 47 a Buttonhole lever b Bracket Gently hold the end of the... faces toward you, and then lower the presser foot lever so that the needle drops 2 mm (1/16 inch) in f your left hand, and then start sewing.

User Guide
Page 55
...Rfc. Appliqué quilting, free- ings 5.0 (3/16) 3.0-5.0 (1/8-3/16) 0.4 (1/64) 0.2-1.0 (1/64-1/16) No No Auto** Rfc. Keyhole buttonholes for stretch fabrics 6.0 3.0-6.0 1.5 1.0-3.0 (15/64) (1/8-15/64) (1/16) (1/16-1/8) No No Auto** Rfc. Piecing straight stitching - (with...of 5.0 mm (3/16 inch) or less. 0.0-7.0 (0-1/4) 1.4 0.0-4.0 (1/16) (0-3/16) No Yes Rfc.* 54 motion quilting, satin stitching, button sewing 3.5 (1/8) *Rfc.: Reinforcement **Auto Rfc.: AutomaticReinforcement ***Select a stitch width of the presser foot) 0.0-7.0 (0-1/4) 1.6 (1/16) 0.2-5.0 (1/64-3/16)...
...Rfc. Appliqué quilting, free- ings 5.0 (3/16) 3.0-5.0 (1/8-3/16) 0.4 (1/64) 0.2-1.0 (1/64-1/16) No No Auto** Rfc. Keyhole buttonholes for stretch fabrics 6.0 3.0-6.0 1.5 1.0-3.0 (15/64) (1/8-15/64) (1/16) (1/16-1/8) No No Auto** Rfc. Piecing straight stitching - (with...of 5.0 mm (3/16 inch) or less. 0.0-7.0 (0-1/4) 1.4 0.0-4.0 (1/16) (0-3/16) No Yes Rfc.* 54 motion quilting, satin stitching, button sewing 3.5 (1/8) *Rfc.: Reinforcement **Auto Rfc.: AutomaticReinforcement ***Select a stitch width of the presser foot) 0.0-7.0 (0-1/4) 1.6 (1/16) 0.2-5.0 (1/64-3/16)...
User Guide
Page 63
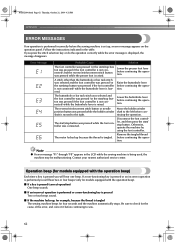
... stops. Follow the instructions indicated in the LCD while the sewing machine is displayed, the message disappears. Solution Lower the presser foot lever before continuing the operation. Raise the buttonhole lever before continuing the operation. A stitch other than the buttonhole or bar tack stitch was selected and the foot controller was pressed (or the...
... stops. Follow the instructions indicated in the LCD while the sewing machine is displayed, the message disappears. Solution Lower the presser foot lever before continuing the operation. Raise the buttonhole lever before continuing the operation. A stitch other than the buttonhole or bar tack stitch was selected and the foot controller was pressed (or the...
User Guide
Page 64
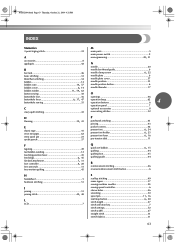
... 22 needle plate 6 needle plate cover 57 needle position 33 needle position button 6 needle threader 17 O buttonhole foot 36 openings 46 buttonhole lever 6, 37, 47 buttonhole sewing 35 operation beep 62 operation buttons 6 4 operation panel 7 C crazy quilt stitching 43 optional accessories 8 overcasting... 5 heirloom stitching 51 J joining 51 joining stitch 42, 48 L LCD 7 S scallop stitching 49 seam ripper 37 sewing machine needles 20 sewing speed controller 6 sleeve holes 46 smocking 50 spool pin 11, 16 start/stop button 6, 28 stitch length 27 stitch ...
... 22 needle plate 6 needle plate cover 57 needle position 33 needle position button 6 needle threader 17 O buttonhole foot 36 openings 46 buttonhole lever 6, 37, 47 buttonhole sewing 35 operation beep 62 operation buttons 6 4 operation panel 7 C crazy quilt stitching 43 optional accessories 8 overcasting... 5 heirloom stitching 51 J joining 51 joining stitch 42, 48 L LCD 7 S scallop stitching 49 seam ripper 37 sewing machine needles 20 sewing speed controller 6 sleeve holes 46 smocking 50 spool pin 11, 16 start/stop button 6, 28 stitch length 27 stitch ...


