

User Guide
Page 6
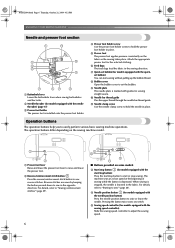
... 16) Used to start and stop sewing. 5 d Upper tension-control dial (page 29) This controls the tension of thread. q Foot controller (page 10) You can turn the main power and sewing light switch on and off. NCBC2000.book Page 5 Thursday, October 21, 2004 4:32 PM 1 KNOWING YOUR SEWING MACHINE 1 NAMES OF MACHINE PARTS AND THEIR FUNCTIONS The main...
... 16) Used to start and stop sewing. 5 d Upper tension-control dial (page 29) This controls the tension of thread. q Foot controller (page 10) You can turn the main power and sewing light switch on and off. NCBC2000.book Page 5 Thursday, October 21, 2004 4:32 PM 1 KNOWING YOUR SEWING MACHINE 1 NAMES OF MACHINE PARTS AND THEIR FUNCTIONS The main...
User Guide
Page 7
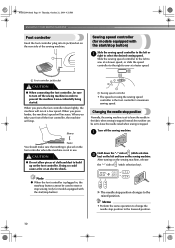
.... 6 e Sewing speed controller (for models equipped with the sewing speed controller) Slide the sewing speed controller to sew in the sewing direction. h Bobbin cover Open the bobbin cover to raise and lower the presser foot. The operation buttons differ depending on the fabric as the sewing takes place. NCBC2000.book Page 6 Thursday, October 21, 2004 4:32 PM KNOWING YOUR SEWING MACHINE...
.... 6 e Sewing speed controller (for models equipped with the sewing speed controller) Slide the sewing speed controller to sew in the sewing direction. h Bobbin cover Open the bobbin cover to raise and lower the presser foot. The operation buttons differ depending on the fabric as the sewing takes place. NCBC2000.book Page 6 Thursday, October 21, 2004 4:32 PM KNOWING YOUR SEWING MACHINE...

User Guide
Page 9
... Foot 2 Quilting Foot 3 1/4-Inch Quilting Foot * May be able to carry out most sewing tasks. NCBC2000.book Page 8 Thursday, October 21, 2004 4:32 PM KNOWING YOUR SEWING MACHINE ACCESSORIES The following machine models: CS-6000, CS-5100, CS-4000, BC-2500, BC-2300, BC-2100, ... 1 needle 100/16 1 needle No. only) ● Foot controller: Model T This foot controller can be used on machine) 6 Blind stitch foot "R" 7 Button fitting foot "M" 8 Seam ripper Part Code U.S.A. Part Name 9 Bobbin (4) 10 Needle set 11 Twin needle 12 Cleaning brush 13 Screwdriver 14 Extra spool pin...
... Foot 2 Quilting Foot 3 1/4-Inch Quilting Foot * May be able to carry out most sewing tasks. NCBC2000.book Page 8 Thursday, October 21, 2004 4:32 PM KNOWING YOUR SEWING MACHINE ACCESSORIES The following machine models: CS-6000, CS-5100, CS-4000, BC-2500, BC-2300, BC-2100, ... 1 needle 100/16 1 needle No. only) ● Foot controller: Model T This foot controller can be used on machine) 6 Blind stitch foot "R" 7 Button fitting foot "M" 8 Seam ripper Part Code U.S.A. Part Name 9 Bobbin (4) 10 Needle set 11 Twin needle 12 Cleaning brush 13 Screwdriver 14 Extra spool pin...
User Guide
Page 11
... /stop button cannot be used to sew at a low speed. a Foot controller jack/socket CAUTION ● When connecting the foot controller, be set using the sewing speed controller is stopped. Slower a Sewing speed controller • The speed set to prevent the machine from accidentally being started. Instead, the machine can be sure to turn on the sewing machine. Note ● When the foot...
... /stop button cannot be used to sew at a low speed. a Foot controller jack/socket CAUTION ● When connecting the foot controller, be set using the sewing speed controller is stopped. Slower a Sewing speed controller • The speed set to prevent the machine from accidentally being started. Instead, the machine can be sure to turn on the sewing machine. Note ● When the foot...
User Guide
Page 13
... press (start/stop button) (for models equipped with the start /stop button). Slide the sewing speed controller to the right h (to set the speed to fast). (For models equipped with the sewing speed controller.) Memo ● When the sewing machine is started or the handwheel is not a malfunction. ● The needle bar does not move when you...
... press (start/stop button) (for models equipped with the start /stop button). Slide the sewing speed controller to the right h (to set the speed to fast). (For models equipped with the sewing speed controller.) Memo ● When the sewing machine is started or the handwheel is not a malfunction. ● The needle bar does not move when you...
User Guide
Page 14
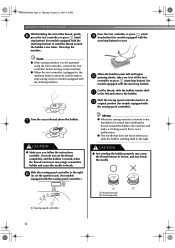
...October 21, 2004 4:32 PM ■ For models equipped with the fast bobbin winding system Slide the sewing speed controller to the right f (to set the speed to fast) (for models equipped with the sewing speed controller). Cut the thread, slide the bobbin winder shaft j to the right and pass it through 2 of ... wraps around the pre-tension disk (page 11). 1 Place the bobbin on the bobbin winder shaft b so that the spring on the sewing machine. Note ● If the sewing machine is plugged in a "Winding the bobbin" to the right. Follow steps 1 through e the slit in the bobbin.
...October 21, 2004 4:32 PM ■ For models equipped with the fast bobbin winding system Slide the sewing speed controller to the right f (to set the speed to fast) (for models equipped with the sewing speed controller). Cut the thread, slide the bobbin winder shaft j to the right and pass it through 2 of ... wraps around the pre-tension disk (page 11). 1 Place the bobbin on the bobbin winder shaft b so that the spring on the sewing machine. Note ● If the sewing machine is plugged in a "Winding the bobbin" to the right. Follow steps 1 through e the slit in the bobbin.

User Guide
Page 15
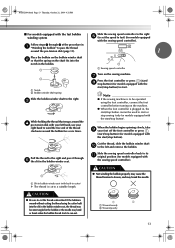
... ● Make sure you (counterclockwise) or press (needle position button) (for this machine. Slide the button and open the cover. If you accidentally step on the foot controller and the machine starts to sew, you slide the bobbin winding shaft to the right. Put the left tab in the...• Make sure that were designed to be incorrect or break the needle. CAUTION ● Make sure you set bobbin, see arrow a), and then press lightly on quick-set the bobbin so the thread unrolls in c the direction shown by turning a the handwheel toward you turn the power...
... ● Make sure you (counterclockwise) or press (needle position button) (for this machine. Slide the button and open the cover. If you accidentally step on the foot controller and the machine starts to sew, you slide the bobbin winding shaft to the right. Put the left tab in the...• Make sure that were designed to be incorrect or break the needle. CAUTION ● Make sure you set bobbin, see arrow a), and then press lightly on quick-set the bobbin so the thread unrolls in c the direction shown by turning a the handwheel toward you turn the power...
User Guide
Page 30
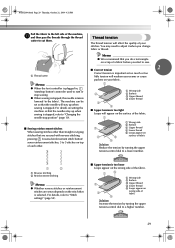
... stopped, refer to "Changing the needle stop button) cannot be set so that is too tight Loops will affect the quality of a fabric before you change fabric or thread. The machine can be used to start to sew. ■ Correct tension 2 Correct tension is important as too much or ...1 5 2 3 4 a Wrong side b Surface c Upper thread d Lower thread e Loops appear on surface of fabric Solution Reduce the tension by turning the upper tension-control dial to a higher number. 54 3 29 NCBC2000.book Page 29 Thursday, October 21, 2004 4:32 PM Pull the fabric to the left side of fabric...
... stopped, refer to "Changing the needle stop button) cannot be set so that is too tight Loops will affect the quality of a fabric before you change fabric or thread. The machine can be used to start to sew. ■ Correct tension 2 Correct tension is important as too much or ...1 5 2 3 4 a Wrong side b Surface c Upper thread d Lower thread e Loops appear on surface of fabric Solution Reduce the tension by turning the upper tension-control dial to a higher number. 54 3 29 NCBC2000.book Page 29 Thursday, October 21, 2004 4:32 PM Pull the fabric to the left side of fabric...
User Guide
Page 63
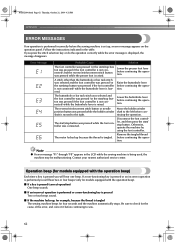
...presser foot lever before the sewing machine is set up, an error message appears on the operation panel. Note ● If error message "F1" through "F8" appears in the table. A stitch other than the buttonhole or bar tack stitch was selected and the foot controller was pressed (or the ... up , for example, because the thread is tangled The sewing machine beeps for models equipped with the operation beep) Each time a key is pressed you will hear one beep. Otherwise, operate the machine by using the foot controller. If a non-functioning key is pressed or an incorrect operation...
...presser foot lever before the sewing machine is set up, an error message appears on the operation panel. Note ● If error message "F1" through "F8" appears in the table. A stitch other than the buttonhole or bar tack stitch was selected and the foot controller was pressed (or the ... up , for example, because the thread is tangled The sewing machine beeps for models equipped with the operation beep) Each time a key is pressed you will hear one beep. Otherwise, operate the machine by using the foot controller. If a non-functioning key is pressed or an incorrect operation...
User Guide
Page 64
... 5 heirloom stitching 51 J joining 51 joining stitch 42, 48 L LCD 7 S scallop stitching 49 seam ripper 37 sewing machine needles 20 sewing speed controller 6 sleeve holes 46 smocking 50 spool pin 11, 16 start/stop button 6, 28 stitch length 27 stitch selection key 7 stitch settings 52 stitch width 27 straight stitch 33 stretch fabrics 31 63
... 5 heirloom stitching 51 J joining 51 joining stitch 42, 48 L LCD 7 S scallop stitching 49 seam ripper 37 sewing machine needles 20 sewing speed controller 6 sleeve holes 46 smocking 50 spool pin 11, 16 start/stop button 6, 28 stitch length 27 stitch selection key 7 stitch settings 52 stitch width 27 straight stitch 33 stretch fabrics 31 63


