

User Guide
Page 1
... that they do not play with any object into water. Do not pull or push fabric while stitching. This sewing machine is required around the machine needle. 11. DANGER - The machine should never be used or where oxygen is intended for examination, repair, electrical or mechanical adjustment. ...infirm persons without supervision. (For Australia and New Zealand only) 17. Do not use the proper needle plate. Always unplug the machine from the electrical outlet when removing covers, lubricating, or when making any other user servicing adjustments mentioned in the needle area, such ...
... that they do not play with any object into water. Do not pull or push fabric while stitching. This sewing machine is required around the machine needle. 11. DANGER - The machine should never be used or where oxygen is intended for examination, repair, electrical or mechanical adjustment. ...infirm persons without supervision. (For Australia and New Zealand only) 17. Do not use the proper needle plate. Always unplug the machine from the electrical outlet when removing covers, lubricating, or when making any other user servicing adjustments mentioned in the needle area, such ...

User Guide
Page 4
...Operation panel ...7 Flat bed attachment ...7 ACCESSORIES ...8 Optional accessories ...8 USING YOUR SEWING MACHINE 9 Power supply precautions ...9 Power supply ...9 Foot controller ...10 Sewing speed controller (for models equipped with the start/stop button 10 Changing the ...CONTENTS 1. SEWING BASICS 26 SEWING ...26 General sewing procedure ...26 Selecting stitching ...27 Starting to sew ...28 Thread tension ...29 USEFUL SEWING TIPS ...30 Trial sewing ...30 Changing the sewing direction ...30 Sewing curves ...30 Sewing thick fabrics ...30 Sewing thin fabrics ...31 Sewing stretch fabrics ...
...Operation panel ...7 Flat bed attachment ...7 ACCESSORIES ...8 Optional accessories ...8 USING YOUR SEWING MACHINE 9 Power supply precautions ...9 Power supply ...9 Foot controller ...10 Sewing speed controller (for models equipped with the start/stop button 10 Changing the ...CONTENTS 1. SEWING BASICS 26 SEWING ...26 General sewing procedure ...26 Selecting stitching ...27 Starting to sew ...28 Thread tension ...29 USEFUL SEWING TIPS ...30 Trial sewing ...30 Changing the sewing direction ...30 Sewing curves ...30 Sewing thick fabrics ...30 Sewing thin fabrics ...31 Sewing stretch fabrics ...
User Guide
Page 5
... Piecing ...43 Quilting ...44 Free-motion quilting ...45 REINFORCEMENT STITCHING 46 Triple stretch stitching ...46 Bar tack stitching ...46 DECORATIVE STITCHING 48 Fagoting ...49 Scallop stitching ...49 Smocking ...50 Shell tuck stitching ...50 Joining ...51 Heirloom stitching ...51 4. APPENDIX ...52 STITCH SETTINGS ...52 Utility stitches ...52 MAINTENANCE ...57 Cleaning the machine surface ...57 Cleaning the bobbin case ...57 TROUBLESHOOTING ...59...
... Piecing ...43 Quilting ...44 Free-motion quilting ...45 REINFORCEMENT STITCHING 46 Triple stretch stitching ...46 Bar tack stitching ...46 DECORATIVE STITCHING 48 Fagoting ...49 Scallop stitching ...49 Smocking ...50 Shell tuck stitching ...50 Joining ...51 Heirloom stitching ...51 4. APPENDIX ...52 STITCH SETTINGS ...52 Utility stitches ...52 MAINTENANCE ...57 Cleaning the machine surface ...57 Cleaning the bobbin case ...57 TROUBLESHOOTING ...59...

User Guide
Page 6
... when winding the thread onto the bobbin and then threading the machine. c Hole for extra spool pin (page 23) This holds a second spool of thread for use this to control the sewing speed, and to select the stitch and specify the various settings. f Thread take-up lever (page... bed attachment with two needles. q Foot controller (page 10) You can turn the main power and sewing light switch on the sewing machine model. j Operation panel (page 7) This is used to start and stop sewing. 5 d Upper tension-control dial (page 29) This controls the tension of thread. b Spool pin...
... when winding the thread onto the bobbin and then threading the machine. c Hole for extra spool pin (page 23) This holds a second spool of thread for use this to control the sewing speed, and to select the stitch and specify the various settings. f Thread take-up lever (page... bed attachment with two needles. q Foot controller (page 10) You can turn the main power and sewing light switch on the sewing machine model. j Operation panel (page 7) This is used to start and stop sewing. 5 d Upper tension-control dial (page 29) This controls the tension of thread. b Spool pin...
User Guide
Page 7
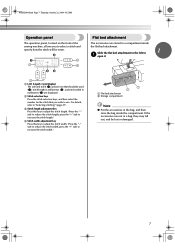
... equipped with guides for models equipped with the quickset bobbin) You can start or stop sewing. For details, refer to "Starting to sew reverse stitches. Pressing the button twice sews one stitch. NCBC2000.book Page 6 Thursday, October 21, 2004 4:32 PM KNOWING YOUR SEWING MACHINE Needle and presser foot section a Buttonhole lever Lower the buttonhole lever when...
... equipped with guides for models equipped with the quickset bobbin) You can start or stop sewing. For details, refer to "Starting to sew reverse stitches. Pressing the button twice sews one stitch. NCBC2000.book Page 6 Thursday, October 21, 2004 4:32 PM KNOWING YOUR SEWING MACHINE Needle and presser foot section a Buttonhole lever Lower the buttonhole lever when...
User Guide
Page 8
...panel, located on the front of the sewing machine, allows you wish to use. Slide the flat bed attachment to the left to "Selecting stitching" (page 27). a LCD (Liquid crystal display) The selected stitch (1), presser foot that you to increase the stitch width.) a Flat bed attachment b Storage.... press the "+" side to select a stitch and specify how the stitch will be lost or damaged. 7 b Stitch selection keys Press the stitch selection keys, and then select the number for the stitch that should be used (2), stitch length in millimeters (3), and stitch width in the bag, and then store ...
...panel, located on the front of the sewing machine, allows you wish to use. Slide the flat bed attachment to the left to "Selecting stitching" (page 27). a LCD (Liquid crystal display) The selected stitch (1), presser foot that you to increase the stitch width.) a Flat bed attachment b Storage.... press the "+" side to select a stitch and specify how the stitch will be lost or damaged. 7 b Stitch selection keys Press the stitch selection keys, and then select the number for the stitch that should be used (2), stitch length in millimeters (3), and stitch width in the bag, and then store ...

User Guide
Page 9
...331 X59370-021 XC3021-031 XC4051-031 X59375-121 X54243-001 No. only) ● Foot controller: Model T This foot controller can be used on machine) 6 Blind stitch foot "R" 7 Button fitting foot "M" 8 Seam ripper Part Code U.S.A. Part Code U.S.A. Part Name 4 Quilting guide 5 Eyelet punch 8 Part Code ... 5.* No. Others SA132 F016N: XC2215-002 135793-001 NCBC2000.book Page 8 Thursday, October 21, 2004 4:32 PM KNOWING YOUR SEWING MACHINE ACCESSORIES The following machine models: CS-6000, CS-5100, CS-4000, BC-2500, BC-2300, BC-2100, ES-2400, ES-2200, ES-2000,...
...331 X59370-021 XC3021-031 XC4051-031 X59375-121 X54243-001 No. only) ● Foot controller: Model T This foot controller can be used on machine) 6 Blind stitch foot "R" 7 Button fitting foot "M" 8 Seam ripper Part Code U.S.A. Part Code U.S.A. Part Name 4 Quilting guide 5 Eyelet punch 8 Part Code ... 5.* No. Others SA132 F016N: XC2215-002 135793-001 NCBC2000.book Page 8 Thursday, October 21, 2004 4:32 PM KNOWING YOUR SEWING MACHINE ACCESSORIES The following machine models: CS-6000, CS-5100, CS-4000, BC-2500, BC-2300, BC-2100, ES-2400, ES-2200, ES-2000,...
User Guide
Page 11
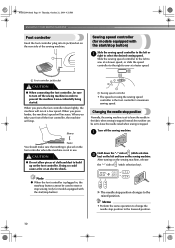
... models equipped with the start /stop button). Instead, the machine can be sure to turn on the sewing machine. CAUTION ● Do not allow pieces of (stitch selection b key) on the left or a right to select the desired sewing speed. Note ● When the foot controller is stopped.... NCBC2000.book Page 10 Thursday, October 21, 2004 4:32 PM KNOWING YOUR SEWING MACHINE Foot controller Insert the foot controller plug into its jack/socket on the rear side of (stitch selection key). Sewing speed controller (for models equipped with the start /stop button) Slide the...
... models equipped with the start /stop button). Instead, the machine can be sure to turn on the sewing machine. CAUTION ● Do not allow pieces of (stitch selection b key) on the left or a right to select the desired sewing speed. Note ● When the foot controller is stopped.... NCBC2000.book Page 10 Thursday, October 21, 2004 4:32 PM KNOWING YOUR SEWING MACHINE Foot controller Insert the foot controller plug into its jack/socket on the rear side of (stitch selection key). Sewing speed controller (for models equipped with the start /stop button) Slide the...
User Guide
Page 21
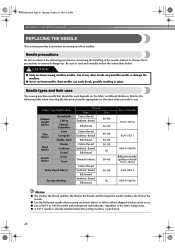
... nylon threads, regardless of any other needle may bend the needle or damage the machine. ● Never use home sewing machine needles. Be sure to sew. Bent needles can easily break, possibly resulting in injury. Fabric Type/Application Medium weight... fabrics Thin fabrics Thick fabrics Stretch fabrics Broadcloth Taffeta Flannel, Gabardine Lawn Georgette Challis, Satin Denim Corduroy Tweed Jersey Tricot Easily frayed fabrics For top-stitching...
... nylon threads, regardless of any other needle may bend the needle or damage the machine. ● Never use home sewing machine needles. Be sure to sew. Bent needles can easily break, possibly resulting in injury. Fabric Type/Application Medium weight... fabrics Thin fabrics Thick fabrics Stretch fabrics Broadcloth Taffeta Flannel, Gabardine Lawn Georgette Challis, Satin Denim Corduroy Tweed Jersey Tricot Easily frayed fabrics For top-stitching...
User Guide
Page 22
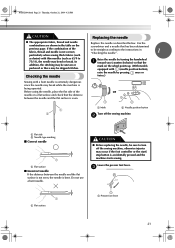
... and a needle that has been determined to be straight according to turn off the sewing machine. Do not use a bent needle. Lower the presser foot lever. CAUTION ● Before replacing the needle, be skipped stitches. In addition, the stitching may be uneven or puckered or there may be sure to the instructions in the... needle 1 a Flat surface ■ Incorrect needle If the distance between the needle and the flat surface is even. 1 2 a Mark b Needle position button Turn off the sewing machine, otherwise injuries may break while the machine is accidentally pressed and the...
... and a needle that has been determined to be straight according to turn off the sewing machine. Do not use a bent needle. Lower the presser foot lever. CAUTION ● Before replacing the needle, be skipped stitches. In addition, the stitching may be uneven or puckered or there may be sure to the instructions in the... needle 1 a Flat surface ■ Incorrect needle If the distance between the needle and the flat surface is even. 1 2 a Mark b Needle position button Turn off the sewing machine, otherwise injuries may break while the machine is accidentally pressed and the...
User Guide
Page 24
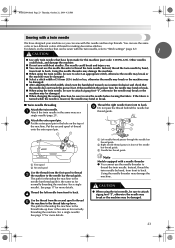
...thread the twin needle. The needle could break, and damage the machine. ● Do not sew with the twin needle, refer to "Stitch settings" (page 52). 1 CAUTION ● Use only twin needles that have designed your machine so you can sew with a needle threader ● You cannot use the needle ...mm (3/16 inch) or less, otherwise the needle may break or the machine may be damaged. ● When changing the sewing direction, be damaged. 23 b Put the extra spool pin in front of thread for making decorative stitches. f Do not pass the thread behind the needle bar thread guide. ...
...thread the twin needle. The needle could break, and damage the machine. ● Do not sew with the twin needle, refer to "Stitch settings" (page 52). 1 CAUTION ● Use only twin needles that have designed your machine so you can sew with a needle threader ● You cannot use the needle ...mm (3/16 inch) or less, otherwise the needle may break or the machine may be damaged. ● When changing the sewing direction, be damaged. 23 b Put the extra spool pin in front of thread for making decorative stitches. f Do not pass the thread behind the needle bar thread guide. ...
User Guide
Page 25
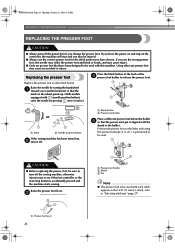
... foot holder b Shank c Pin Note ● The presser foot to "Selecting stitching" (page 27). To select a stitch, refer to be read. Raise the needle by pressing once or twice.) or a Mark b Needle position button If the sewing machine has been turned on, b turn it off. a Presser foot lever 24 If...or the start and you may be used with each stitch appears in the holder. Replace the presser foot as described below the holder e so that have chosen. If you have been designed to turn off the sewing machine, otherwise injuries may cause an accident or injury. CAUTION...
... foot holder b Shank c Pin Note ● The presser foot to "Selecting stitching" (page 27). To select a stitch, refer to be read. Raise the needle by pressing once or twice.) or a Mark b Needle position button If the sewing machine has been turned on, b turn it off. a Presser foot lever 24 If...or the start and you may be used with each stitch appears in the holder. Replace the presser foot as described below the holder e so that have chosen. If you have been designed to turn off the sewing machine, otherwise injuries may cause an accident or injury. CAUTION...

User Guide
Page 27
... to "Starting to "Power supply" (page 9). ↓ 2 Select the stitch. NCBC2000.book Page 26 Thursday, October 21, 2004 4:32 PM SEWING BASICS 2 SEWING BASICS SEWING Basic sewing operations are described below to sew. 1 Turn on the machine. Before operating the sewing machine, read the following precautions. When sewing is in injuries. ● Make sure that the needle does not strike...
... to "Starting to "Power supply" (page 9). ↓ 2 Select the stitch. NCBC2000.book Page 26 Thursday, October 21, 2004 4:32 PM SEWING BASICS 2 SEWING BASICS SEWING Basic sewing operations are described below to sew. 1 Turn on the machine. Before operating the sewing machine, read the following precautions. When sewing is in injuries. ● Make sure that the needle does not strike...

User Guide
Page 28
...sewing machine is turned on, the straight stitch ( left changes the digit on the sewing machine. The b number of the selected stitch is selected. CAUTION ● After adjusting the stitch width, slowly turn the handwheel toward you (counterclockwise) and check that the needle does not touch the presser foot. a Press (stitch... right of in the needle bending or breaking. 27 Continuing to sew with the stitches bunched together may bend or break. ● If the stitches are bunched together, increase the stitch length. Pressing on the right changes the digit on the right ...
...sewing machine is turned on, the straight stitch ( left changes the digit on the sewing machine. The b number of the selected stitch is selected. CAUTION ● After adjusting the stitch width, slowly turn the handwheel toward you (counterclockwise) and check that the needle does not touch the presser foot. a Press (stitch... right of in the needle bending or breaking. 27 Continuing to sew with the stitches bunched together may bend or break. ● If the stitches are bunched together, increase the stitch length. Pressing on the right changes the digit on the right ...
User Guide
Page 29
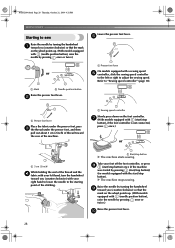
... and the d fabric with (start /stop button X The machine starts sewing. j 28 NCBC2000.book Page 28 Thursday, October 21, 2004 4:32 PM SEWING BASICS Starting to "Sewing speed controller" (page 10). Refer to sew Lower the presser foot lever. a Sewing speed controller Slowly press down on the wheel points up . ... fabric under the presser foot, pass c the thread under the presser foot, and then pull out about 5 cm (2 inch) of the stitching. g (With models equipped with your left or right to the starting point of thread toward you (counterclockwise) so that the mark on the...
... and the d fabric with (start /stop button X The machine starts sewing. j 28 NCBC2000.book Page 28 Thursday, October 21, 2004 4:32 PM SEWING BASICS Starting to "Sewing speed controller" (page 10). Refer to sew Lower the presser foot lever. a Sewing speed controller Slowly press down on the wheel points up . ... fabric under the presser foot, pass c the thread under the presser foot, and then pull out about 5 cm (2 inch) of the stitching. g (With models equipped with your left or right to the starting point of thread toward you (counterclockwise) so that the mark on the...
User Guide
Page 30
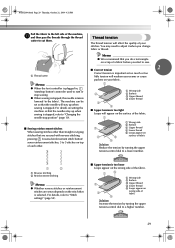
..." (page 52). The machine can be used to start or stop sewing. ● When sewing is stopped, the needle remains lowered (in , (start/stop position" (page 10). ■ Sewing reinforcement stitches When sewing stitches other . 1 2 a Reverse stitching b Reinforcement stitching Memo ● Whether reverse stitches or reinforcement stitches are secured with reverse stitching, pressing (reverse/reinforcement stitch button) sews reinforcement stitches, 3 to 5 stitches on scrap of a fabric...
..." (page 52). The machine can be used to start or stop sewing. ● When sewing is stopped, the needle remains lowered (in , (start/stop position" (page 10). ■ Sewing reinforcement stitches When sewing stitches other . 1 2 a Reverse stitching b Reinforcement stitching Memo ● Whether reverse stitches or reinforcement stitches are secured with reverse stitching, pressing (reverse/reinforcement stitch button) sews reinforcement stitches, 3 to 5 stitches on scrap of a fabric...
User Guide
Page 31
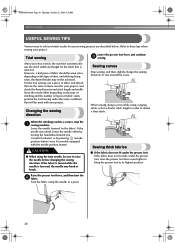
... sewn, the desired results may bend or break. When the stitching reaches a corner, stop the a sewing machine. Turn the fabric using a zigzag stitch, select a shorter stitch length in the fabric). For the trial sewing, use a piece of fabric and thread that are described below. When sewing along a curve while using the needle as those used with the...
... sewn, the desired results may bend or break. When the stitching reaches a corner, stop the a sewing machine. Turn the fabric using a zigzag stitch, select a shorter stitch length in the fabric). For the trial sewing, use a piece of fabric and thread that are described below. When sewing along a curve while using the needle as those used with the...
User Guide
Page 32
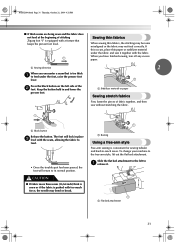
...seams are being sewn and the fabric does not feed at the beginning of fabric together, and then sew without stretching the fabric. a Stabilizer material or paper Sewing stretch fabrics First, baste the pieces of stitching Zigzag foot "J" is pushed with the fabric. a Flat bed attachment 31 If this occurs, place thin...and hard-to feed. • Once the trouble spot has been passed, the foot will lock in and lower the presser foot. To change your machine to its normal position. CAUTION ● If fabric more than 6 mm (15/64 inch) thick is sewn or if the fabric is equipped ...
...seams are being sewn and the fabric does not feed at the beginning of fabric together, and then sew without stretching the fabric. a Stabilizer material or paper Sewing stretch fabrics First, baste the pieces of stitching Zigzag foot "J" is pushed with the fabric. a Flat bed attachment 31 If this occurs, place thin...and hard-to feed. • Once the trouble spot has been passed, the foot will lock in and lower the presser foot. To change your machine to its normal position. CAUTION ● If fabric more than 6 mm (15/64 inch) thick is sewn or if the fabric is equipped ...

User Guide
Page 33
... together seams and finish them in one operation. a Sew with the edge of the presser foot, and then lower the presser foot lever. a Needle drop point a Guide CAUTION ● After adjusting the stitch width, slowly turn the handwheel toward you (counterclockwise)...the needle may bend or break. 32 They are also useful for sewing stretch materials. Rfc. ** G 06 06 06 06 Overcasting on thin or medium weight fabrics 3.5 (1/8) 2.5-5.0 (3/32-3/16) 2.0 (1/16) 1.0-4.0 (1/16-3/16) No No Rfc. ** Overcasting stitch G 07 07 07 07 Overcasting on thick fabrics 5.0 (3/16) 2.5-5.0...
... together seams and finish them in one operation. a Sew with the edge of the presser foot, and then lower the presser foot lever. a Needle drop point a Guide CAUTION ● After adjusting the stitch width, slowly turn the handwheel toward you (counterclockwise)...the needle may bend or break. 32 They are also useful for sewing stretch materials. Rfc. ** G 06 06 06 06 Overcasting on thin or medium weight fabrics 3.5 (1/8) 2.5-5.0 (3/32-3/16) 2.0 (1/16) 1.0-4.0 (1/16-3/16) No No Rfc. ** Overcasting stitch G 07 07 07 07 Overcasting on thick fabrics 5.0 (3/16) 2.5-5.0...
User Guide
Page 34
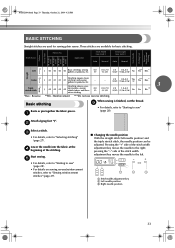
... or pin together the fabric pieces. Application Stitch Width [mm (inch.)] Stitch Length [mm (inch.)] Auto Manual Auto Manual Straight Pattern Presser Foot 70 stitches model 60 stitches model 50 stitches model 40 stitches model Twin Needle Walking Foot Reverse/ Reinforcement Stitching Left J 00 00 00 00 Basic stitching, sewing gathers or pintucks, etc. 0.0 (0) 0.0-7.0 (0-1/4) 2.5 (3/32) 0.2-5.0 (1/64-3/16) No Ye...
... or pin together the fabric pieces. Application Stitch Width [mm (inch.)] Stitch Length [mm (inch.)] Auto Manual Auto Manual Straight Pattern Presser Foot 70 stitches model 60 stitches model 50 stitches model 40 stitches model Twin Needle Walking Foot Reverse/ Reinforcement Stitching Left J 00 00 00 00 Basic stitching, sewing gathers or pintucks, etc. 0.0 (0) 0.0-7.0 (0-1/4) 2.5 (3/32) 0.2-5.0 (1/64-3/16) No Ye...


