

User Guide
Page 1
...the cord. 10. Keep fingers away from the accumulation of the machine and foot control free from all instructions before cleaning. It may deflect the needle causing it must be used as threading needle, changing needle, threading bobbin, or changing presser foot, and the like. 15. To ... instruction manual. 16. Special care is not intended for its intended use bent needles. 13. This sewing machine is required around the machine needle. 11. SAVE THESE INSTRUCTIONS This machine is not working properly, if it has been dropped or damaged, or dropped into any air openings blocked...
...the cord. 10. Keep fingers away from the accumulation of the machine and foot control free from all instructions before cleaning. It may deflect the needle causing it must be used as threading needle, changing needle, threading bobbin, or changing presser foot, and the like. 15. To ... instruction manual. 16. Special care is not intended for its intended use bent needles. 13. This sewing machine is required around the machine needle. 11. SAVE THESE INSTRUCTIONS This machine is not working properly, if it has been dropped or damaged, or dropped into any air openings blocked...
User Guide
Page 3
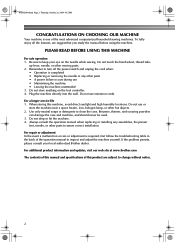
.... 4. Remember to keep your local authorized Brother dealer. Benzene, thinner, and scouring powders can damage the case and machine, and should never be used. 3. When storing this manual and specifications of the most advanced computerized household sewing machines. NCBC2000.book Page 2 Thursday, October 21..., 2004 4:32 PM CONGRATULATIONS ON CHOOSING OUR MACHINE Your machine is one of this product are subject to clean the case. Do not use extension cords. Do not touch the hand wheel, thread take...
.... 4. Remember to keep your local authorized Brother dealer. Benzene, thinner, and scouring powders can damage the case and machine, and should never be used. 3. When storing this manual and specifications of the most advanced computerized household sewing machines. NCBC2000.book Page 2 Thursday, October 21..., 2004 4:32 PM CONGRATULATIONS ON CHOOSING OUR MACHINE Your machine is one of this product are subject to clean the case. Do not use extension cords. Do not touch the hand wheel, thread take...

User Guide
Page 4
... ...7 ACCESSORIES ...8 Optional accessories ...8 USING YOUR SEWING MACHINE 9 Power supply precautions ...9 Power supply ...9 Foot controller ...10 Sewing speed controller (for models equipped with the start/stop button 10 Changing the needle stop position ...10 THREADING THE MACHINE 11 Winding the bobbin ...11 Lower threading ...14 Upper threading ...16 Drawing up the lower thread ...19 REPLACING THE NEEDLE 20 Needle...
... ...7 ACCESSORIES ...8 Optional accessories ...8 USING YOUR SEWING MACHINE 9 Power supply precautions ...9 Power supply ...9 Foot controller ...10 Sewing speed controller (for models equipped with the start/stop button 10 Changing the needle stop position ...10 THREADING THE MACHINE 11 Winding the bobbin ...11 Lower threading ...14 Upper threading ...16 Drawing up the lower thread ...19 REPLACING THE NEEDLE 20 Needle...

User Guide
Page 6
... NCBC2000.book Page 5 Thursday, October 21, 2004 4:32 PM 1 KNOWING YOUR SEWING MACHINE 1 NAMES OF MACHINE PARTS AND THEIR FUNCTIONS The main parts a Bobbin winder (page 11) This winds the thread onto the bobbin for sewing with accessory compartment (pages 7 and 31) i Operation buttons (page 6) The ...operation buttons differ depending on the sewing machine model. o Feed dog position lever (pages 38 and 45) Use ...
... NCBC2000.book Page 5 Thursday, October 21, 2004 4:32 PM 1 KNOWING YOUR SEWING MACHINE 1 NAMES OF MACHINE PARTS AND THEIR FUNCTIONS The main parts a Bobbin winder (page 11) This winds the thread onto the bobbin for sewing with accessory compartment (pages 7 and 31) i Operation buttons (page 6) The ...operation buttons differ depending on the sewing machine model. o Feed dog position lever (pages 38 and 45) Use ...
User Guide
Page 7
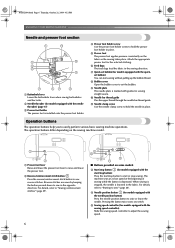
... foot holder The presser foot is depressed. e Presser foot The presser foot applies pressure consistently on the sewing machine model. e Sewing speed controller (for sewing straight seams. j Needle bar thread guide Pass the upper thread through the needle bar thread guide. f Feed dogs The feed dogs feed the fabric in place. For details, refer to "Starting to...
... foot holder The presser foot is depressed. e Presser foot The presser foot applies pressure consistently on the sewing machine model. e Sewing speed controller (for sewing straight seams. j Needle bar thread guide Pass the upper thread through the needle bar thread guide. f Feed dogs The feed dogs feed the fabric in place. For details, refer to "Starting to...
User Guide
Page 12
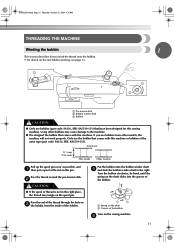
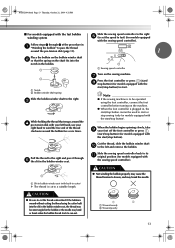
...bobbin that comes with this sewing machine. Actual size 11.5 mm (7/16 inch) This model Other models Pull up the spool pin as far as possible, and a then put a spool of thread on this machine or bobbins of thread is not in the right place, the thread may cause damage to the machine. ● We designed ...on the fast bobbin winding, see page 13. a Pre-tension disk b Bobbin winder shaft c Bobbin CAUTION ● Only use bobbins from the inside of the thread through the hole on the sewing machine. Pass the end of the bobbin. NCBC2000.book Page 11 Thursday, October 21, 2004 4:32 PM...
...bobbin that comes with this sewing machine. Actual size 11.5 mm (7/16 inch) This model Other models Pull up the spool pin as far as possible, and a then put a spool of thread on this machine or bobbins of thread is not in the right place, the thread may cause damage to the machine. ● We designed ...on the fast bobbin winding, see page 13. a Pre-tension disk b Bobbin winder shaft c Bobbin CAUTION ● Only use bobbins from the inside of the thread through the hole on the sewing machine. Pass the end of the bobbin. NCBC2000.book Page 11 Thursday, October 21, 2004 4:32 PM...
User Guide
Page 13
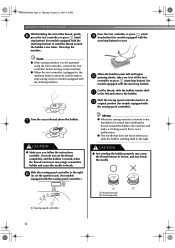
...Page 12 Thursday, October 21, 2004 4:32 PM KNOWING YOUR SEWING MACHINE While holding the end of the thread, gently f press the foot controller or press (start/ stop button) (for models equipped with the start/stop button). Cut the thread, slide the bobbin winder shaft k to its l original ..., connect the foot controller before turning on the machine. ● When the foot controller is wound, when the thread runs low it may break the needle. 1 2 a Wound evenly b Wound poorly a Sewing speed controller 12 Note ● If the sewing machine is to loosen, and may tangle around the ...
...Page 12 Thursday, October 21, 2004 4:32 PM KNOWING YOUR SEWING MACHINE While holding the end of the thread, gently f press the foot controller or press (start/ stop button) (for models equipped with the start/stop button). Cut the thread, slide the bobbin winder shaft k to its l original ..., connect the foot controller before turning on the machine. ● When the foot controller is wound, when the thread runs low it may break the needle. 1 2 a Wound evenly b Wound poorly a Sewing speed controller 12 Note ● If the sewing machine is to loosen, and may tangle around the ...
User Guide
Page 14
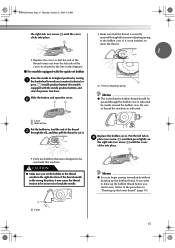
... equipped with the start . Note ● If the sewing machine is to be used to start or stop sewing (only for models equipped with the start /stop button). a Slit in bobbin winder seat (with built-in cutter) X The thread is plugged in the bobbin or the needle may break the...bobbin winder shaft b so that wraps around the d pre-tension disk with the sewing speed controller). If the bobbin is wound without cutting the thread using the foot controller, connect the foot controller before turning on the sewing machine. NCBC2000.book Page 13 Thursday, October 21, 2004 4:32 PM ■ ...
... equipped with the start . Note ● If the sewing machine is to be used to start or stop sewing (only for models equipped with the start /stop button). a Slit in bobbin winder seat (with built-in cutter) X The thread is plugged in the bobbin or the needle may break the...bobbin winder shaft b so that wraps around the d pre-tension disk with the sewing speed controller). If the bobbin is wound without cutting the thread using the foot controller, connect the foot controller before turning on the sewing machine. NCBC2000.book Page 13 Thursday, October 21, 2004 4:32 PM ■ ...

User Guide
Page 15
NCBC2000.book Page 14 Thursday, October 21, 2004 4:32 PM KNOWING YOUR SEWING MACHINE Memo ● When the sewing machine is started or the handwheel is turned after winding the thread around the bobbin, the machine will not operate correctly. Slide the button and open the cover. Use only the enclosed bobbin or bobbins of the bobbin...
NCBC2000.book Page 14 Thursday, October 21, 2004 4:32 PM KNOWING YOUR SEWING MACHINE Memo ● When the sewing machine is started or the handwheel is turned after winding the thread around the bobbin, the machine will not operate correctly. Slide the button and open the cover. Use only the enclosed bobbin or bobbins of the bobbin...
User Guide
Page 16
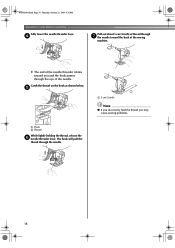
... handwheel toward you (counterclockwise) or press (needle position button) (for models equipped with this machine. Put the left tab in "Drawing up the bobbin thread. If you want to draw up the bobbin thread before you set bobbin Raise the needle to its highest position by marks around the bobbin case...and raise the presser foot lever. Be sure to be incorrect or break the needle. 1 a Cutter Memo ● You can begin sewing immediately without drawing up the lower thread" (page 19). 15 Slide the button and open the cover. a Cover b Slide button Put the bobbin in, feed the end of...
... handwheel toward you (counterclockwise) or press (needle position button) (for models equipped with this machine. Put the left tab in "Drawing up the bobbin thread. If you want to draw up the bobbin thread before you set bobbin Raise the needle to its highest position by marks around the bobbin case...and raise the presser foot lever. Be sure to be incorrect or break the needle. 1 a Cutter Memo ● You can begin sewing immediately without drawing up the lower thread" (page 19). 15 Slide the button and open the cover. a Cover b Slide button Put the bobbin in, feed the end of...
User Guide
Page 17
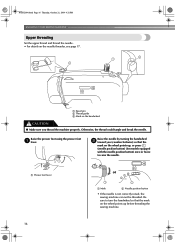
... Needle position button • If the needle is not correctly raised, the sewing machine can not be threaded. Be sure to turn the handwheel so that the mark on the wheel points up before threading the sewing machine. 16 Raise the presser foot using the presser foot a lever. NCBC2000.book ...Page 16 Thursday, October 21, 2004 4:32 PM KNOWING YOUR SEWING MACHINE Upper threading Set the upper thread and thread the needle. • For details on the wheel points up , or press (needle position button) (for models equipped with...
... Needle position button • If the needle is not correctly raised, the sewing machine can not be threaded. Be sure to turn the handwheel so that the mark on the wheel points up before threading the sewing machine. 16 Raise the presser foot using the presser foot a lever. NCBC2000.book ...Page 16 Thursday, October 21, 2004 4:32 PM KNOWING YOUR SEWING MACHINE Upper threading Set the upper thread and thread the needle. • For details on the wheel points up , or press (needle position button) (for models equipped with...
User Guide
Page 18
Check the table on page 20 for models equipped with home sewing machine needles size 75/11100/16. Follow steps 1 through the e thread take -up lever Put the thread behind the needle bar thread guide by holding the thread in your right hand. ● The needle threader can only use the needle threader if you guide the...
Check the table on page 20 for models equipped with home sewing machine needles size 75/11100/16. Follow steps 1 through the e thread take -up lever Put the thread behind the needle bar thread guide by holding the thread in your right hand. ● The needle threader can only use the needle threader if you guide the...
User Guide
Page 19
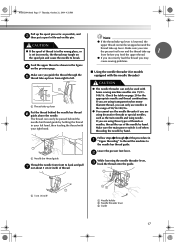
...The end of the needle threader rotates toward the back of the sewing machine. Catch the thread on the hook as shown below. The hook will pull the thread through the eye of thread through g the needle toward you may cause sewing problems. 18 d Pull out about 5 cm (2 inch) of...) Note ● If you incorrectly feed the thread you and the hook passes through the needle. NCBC2000.book Page 18 Thursday, October 21, 2004 4:32 PM KNOWING YOUR SEWING MACHINE Fully lower the needle threader lever. e a Hook b Thread While lightly holding the thread, release the f needle threader lever.
...The end of the needle threader rotates toward the back of the sewing machine. Catch the thread on the hook as shown below. The hook will pull the thread through the eye of thread through g the needle toward you may cause sewing problems. 18 d Pull out about 5 cm (2 inch) of...) Note ● If you incorrectly feed the thread you and the hook passes through the needle. NCBC2000.book Page 18 Thursday, October 21, 2004 4:32 PM KNOWING YOUR SEWING MACHINE Fully lower the needle threader lever. e a Hook b Thread While lightly holding the thread, release the f needle threader lever.
User Guide
Page 20
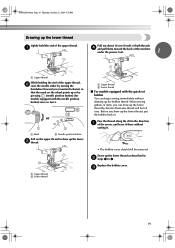
...slit in the direction a of the upper thread. Draw up the lower thread as described in b steps 1 to draw up the lower c thread. Before you (counterclockwise) so that some thread will be removed. When sewing gathers or darts, you can draw up the lower thread by pressing (needle position button) (for ... 4:32 PM Drawing up the lower thread, put the bobbin back in. c 19 a Pull out about 10 cm (4 inch) of both threads d and pull them toward the back of the machine under the presser foot. 1 a Upper thread While holding the end of the upper thread, b raise the needle either by ...
...slit in the direction a of the upper thread. Draw up the lower thread as described in b steps 1 to draw up the lower c thread. Before you (counterclockwise) so that some thread will be removed. When sewing gathers or darts, you can draw up the lower thread by pressing (needle position button) (for ... 4:32 PM Drawing up the lower thread, put the bobbin back in. c 19 a Pull out about 10 cm (4 inch) of both threads d and pull them toward the back of the machine under the presser foot. 1 a Upper thread While holding the end of the upper thread, b raise the needle either by ...
User Guide
Page 21
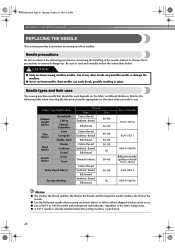
... Corduroy Tweed Jersey Tricot Easily frayed fabrics For top-stitching Thread Type Cotton thread Synthetic thread Size 60-80 Silk thread 50-80 Cotton thread Synthetic thread Silk thread Cotton thread Synthetic thread Silk thread 60-80 50-80 30-50 50 Thread for the fabric that should be used depends on sewing machine needles. Failure to read and carefully follow the instructions...
... Corduroy Tweed Jersey Tricot Easily frayed fabrics For top-stitching Thread Type Cotton thread Synthetic thread Size 60-80 Silk thread 50-80 Cotton thread Synthetic thread Silk thread Cotton thread Synthetic thread Silk thread 60-80 50-80 30-50 50 Thread for the fabric that should be used depends on sewing machine needles. Failure to read and carefully follow the instructions...
User Guide
Page 22
... even. 1 2 a Mark b Needle position button Turn off the sewing machine, otherwise injuries may break while the machine is not correct, particularly when sewing thick fabrics (such as denim) with thin needles (such as described below. Before using the needle, place the flat side of the fabric, thread and needle is being operated. NCBC2000.book Page...
... even. 1 2 a Mark b Needle position button Turn off the sewing machine, otherwise injuries may break while the machine is not correct, particularly when sewing thick fabrics (such as denim) with thin needles (such as described below. Before using the needle, place the flat side of the fabric, thread and needle is being operated. NCBC2000.book Page...

User Guide
Page 23
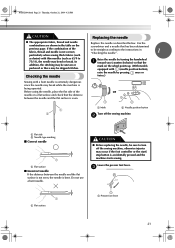
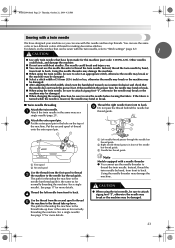
.... a Screwdriver b Needle clamp screw • Do not apply strong force when loosening or tightening the needle clamp screw, otherwise certain parts of the sewing machine may fall off. a Needle bar b Needle holder c Needle clamp screw d Align 22 While holding the needle with your left hand, f use ...Needle stopper a Needle clamp screw b Needle bar thread guide c Needle bar Align the bottom edge of the needle bar, and then tighten the needle clamp screw. NCBC2000.book Page 22 Thursday, October 21, 2004 4:32 PM KNOWING YOUR SEWING MACHINE Hold the needle with your left hand, and...
.... a Screwdriver b Needle clamp screw • Do not apply strong force when loosening or tightening the needle clamp screw, otherwise certain parts of the sewing machine may fall off. a Needle bar b Needle holder c Needle clamp screw d Align 22 While holding the needle with your left hand, f use ...Needle stopper a Needle clamp screw b Needle bar thread guide c Needle bar Align the bottom edge of the needle bar, and then tighten the needle clamp screw. NCBC2000.book Page 22 Thursday, October 21, 2004 4:32 PM KNOWING YOUR SEWING MACHINE Hold the needle with your left hand, and...
User Guide
Page 24
...presser foot, the needle may be damaged. ● When changing the sewing direction, be damaged. 23 d Use the thread from the first spool to thread c the machine to attach zigzag foot "J", otherwise the needle may break or the machine may bend or break. ● When using the twin needle, ...spool pin in the same way as for normally threading the machine (for a single needle). Put the second spool of the needle bar thread guide. Thread the left needle from front to raise the needle before turning the fabric. You can sew with bent needles. Using the needle threader may ...
...presser foot, the needle may be damaged. ● When changing the sewing direction, be damaged. 23 d Use the thread from the first spool to thread c the machine to attach zigzag foot "J", otherwise the needle may break or the machine may bend or break. ● When using the twin needle, ...spool pin in the same way as for normally threading the machine (for a single needle). Put the second spool of the needle bar thread guide. Thread the left needle from front to raise the needle before turning the fabric. You can sew with bent needles. Using the needle threader may ...
User Guide
Page 26
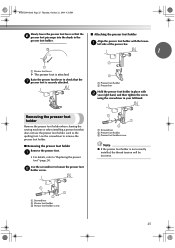
Removing the presser foot holder Remove the presser foot holder when cleaning the sewing machine or when installing a presser foot that the g presser foot is not correctly installed, the thread tension will be incorrect. Raise the presser foot lever to remove the presser foot holder. ■ Removing the presser foot holder Remove the presser...
Removing the presser foot holder Remove the presser foot holder when cleaning the sewing machine or when installing a presser foot that the g presser foot is not correctly installed, the thread tension will be incorrect. Raise the presser foot lever to remove the presser foot holder. ■ Removing the presser foot holder Remove the presser...

User Guide
Page 27
CAUTION ● While the machine is finished, cut the threads. General sewing procedure Follow the basic procedures below . Select the stitch appropriate for the stitch. For details on the machine. NCBC2000.book Page 26 Thursday, October 21, 2004 4:32 PM SEWING BASICS 2 SEWING BASICS SEWING Basic sewing operations are described below to sew. 1 Turn on replacing the presser foot, refer...
CAUTION ● While the machine is finished, cut the threads. General sewing procedure Follow the basic procedures below . Select the stitch appropriate for the stitch. For details on the machine. NCBC2000.book Page 26 Thursday, October 21, 2004 4:32 PM SEWING BASICS 2 SEWING BASICS SEWING Basic sewing operations are described below to sew. 1 Turn on replacing the presser foot, refer...


