

User Guide
Page 1
...authorized dealer. Never drop or insert any object into water. Do not pull or push fabric while stitching. WARNING - Return the machine to the symbol "{" position when making any opening. 6. To disconnect, turn the main switch to break. 12. The wrong ... off, then remove plug from the accumulation of the machine and foot control free from outlet. 9. Always unplug the machine from all instructions before cleaning. Do not operate where aerosol (spray) products are being administered. 8. This sewing machine is intended for its intended use . 2000_cover2-3.fm Page...
...authorized dealer. Never drop or insert any object into water. Do not pull or push fabric while stitching. WARNING - Return the machine to the symbol "{" position when making any opening. 6. To disconnect, turn the main switch to break. 12. The wrong ... off, then remove plug from the accumulation of the machine and foot control free from outlet. 9. Always unplug the machine from all instructions before cleaning. Do not operate where aerosol (spray) products are being administered. 8. This sewing machine is intended for its intended use . 2000_cover2-3.fm Page...
User Guide
Page 3
...the event a malfunction occurs or adjustment is one of the most advanced computerized household sewing machines. Do not touch the hand wheel, thread take- Plug the machine directly into the wall. Do not use or store the machine near a space heater, iron, halogen lamp, or other parts to assure...installing any other moving parts. 2. For additional product information and updates, visit our web site at www.brother.com The contents of this manual and specifications of this machine, avoid direct sunlight and high humidity locations. NCBC2000.book Page 2 Thursday, October 21, 2004 4:32 PM...
...the event a malfunction occurs or adjustment is one of the most advanced computerized household sewing machines. Do not touch the hand wheel, thread take- Plug the machine directly into the wall. Do not use or store the machine near a space heater, iron, halogen lamp, or other parts to assure...installing any other moving parts. 2. For additional product information and updates, visit our web site at www.brother.com The contents of this manual and specifications of this machine, avoid direct sunlight and high humidity locations. NCBC2000.book Page 2 Thursday, October 21, 2004 4:32 PM...

User Guide
Page 4
......6 Operation buttons ...6 Operation panel ...7 Flat bed attachment ...7 ACCESSORIES ...8 Optional accessories ...8 USING YOUR SEWING MACHINE 9 Power supply precautions ...9 Power supply ...9 Foot controller ...10 Sewing speed controller (for models equipped with the start/stop button 10 Changing the needle stop position ...10... THREADING THE MACHINE 11 Winding the bobbin ...11 Lower threading ...14 Upper threading...
......6 Operation buttons ...6 Operation panel ...7 Flat bed attachment ...7 ACCESSORIES ...8 Optional accessories ...8 USING YOUR SEWING MACHINE 9 Power supply precautions ...9 Power supply ...9 Foot controller ...10 Sewing speed controller (for models equipped with the start/stop button 10 Changing the needle stop position ...10... THREADING THE MACHINE 11 Winding the bobbin ...11 Lower threading ...14 Upper threading...
User Guide
Page 5
...machine surface ...57 Cleaning the bobbin case ...57 TROUBLESHOOTING ...59 ERROR MESSAGES ...62 Operation beep (for models equipped with the operation beep 62 INDEX ...63 4 UTILITY STITCHES 32 OVERCASTING STITCHES 32 BASIC STITCHING ...33 Basic stitching ...33 BLIND HEM STITCHING 34 BUTTONHOLE SEWING 35 Button sewing... ...38 ZIPPER INSERTION ...40 SEWING STRETCH FABRICS AND ELASTIC TAPE 41 Stretch stitching ...41 Elastic attaching ...41 APPLIQUÉ, ...
...machine surface ...57 Cleaning the bobbin case ...57 TROUBLESHOOTING ...59 ERROR MESSAGES ...62 Operation beep (for models equipped with the operation beep 62 INDEX ...63 4 UTILITY STITCHES 32 OVERCASTING STITCHES 32 BASIC STITCHING ...33 Basic stitching ...33 BLIND HEM STITCHING 34 BUTTONHOLE SEWING 35 Button sewing... ...38 ZIPPER INSERTION ...40 SEWING STRETCH FABRICS AND ELASTIC TAPE 41 Stretch stitching ...41 Elastic attaching ...41 APPLIQUÉ, ...

User Guide
Page 6
... guide (pages 11 and 16) This is used when winding the thread onto the bobbin and then threading the machine. m Jack/socket connector (page 9) Insert the plug on the sewing machine model. n Foot controller jack/socket (page 10) Plug in the foot controller plug. f Thread take-up lever...page 29) Pass the threads through the thread cutter to start and stop sewing. 5 h Flat bed attachment with two needles. NCBC2000.book Page 5 Thursday, October 21, 2004 4:32 PM 1 KNOWING YOUR SEWING MACHINE 1 NAMES OF MACHINE PARTS AND THEIR FUNCTIONS The main parts a Bobbin winder (page 11) ...
... guide (pages 11 and 16) This is used when winding the thread onto the bobbin and then threading the machine. m Jack/socket connector (page 9) Insert the plug on the sewing machine model. n Foot controller jack/socket (page 10) Plug in the foot controller plug. f Thread take-up lever...page 29) Pass the threads through the thread cutter to start and stop sewing. 5 h Flat bed attachment with two needles. NCBC2000.book Page 5 Thursday, October 21, 2004 4:32 PM 1 KNOWING YOUR SEWING MACHINE 1 NAMES OF MACHINE PARTS AND THEIR FUNCTIONS The main parts a Bobbin winder (page 11) ...
User Guide
Page 7
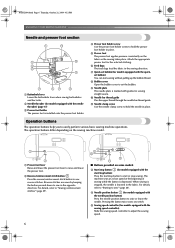
... marked with the needle position button) Press the needle position button to start sewing without pulling up the bobbin thread. The machine sews at a slow speed at the beginning of sewing while the button is lowered in place. b Reverse/reinforcement stitch button Press ...stop button (for models equipped with the sewing speed controller) Slide the sewing speed controller to sew in the sewing direction. Pressing the button twice sews one stitch. NCBC2000.book Page 6 Thursday, October 21, 2004 4:32 PM KNOWING YOUR SEWING MACHINE Needle and presser foot section a Buttonhole ...
... marked with the needle position button) Press the needle position button to start sewing without pulling up the bobbin thread. The machine sews at a slow speed at the beginning of sewing while the button is lowered in place. b Reverse/reinforcement stitch button Press ...stop button (for models equipped with the sewing speed controller) Slide the sewing speed controller to sew in the sewing direction. Pressing the button twice sews one stitch. NCBC2000.book Page 6 Thursday, October 21, 2004 4:32 PM KNOWING YOUR SEWING MACHINE Needle and presser foot section a Buttonhole ...
User Guide
Page 8
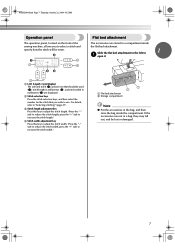
... should be lost or damaged. 7 NCBC2000.book Page 7 Thursday, October 21, 2004 4:32 PM Operation panel The operation panel, located on the front of the sewing machine, allows you wish to reduce the stitch length;
... should be lost or damaged. 7 NCBC2000.book Page 7 Thursday, October 21, 2004 4:32 PM Operation panel The operation panel, located on the front of the sewing machine, allows you wish to reduce the stitch length;

User Guide
Page 9
... U.S.A. Part Name 4 Quilting guide 5 Eyelet punch 8 Part Code U.S.A. NCBC2000.book Page 8 Thursday, October 21, 2004 4:32 PM KNOWING YOUR SEWING MACHINE ACCESSORIES The following machine models: CS-6000, CS-5100, CS-4000, BC-2500, BC-2300, BC-2100, ES-2400, ES-2200, ES-2000, ES-2410, ...X55467-021 130920-021 XC8816-021 5.* No. Note (For U.S.A. only) ● Foot controller: Model T This foot controller can be used on machine) 6 Blind stitch foot "R" 7 Button fitting foot "M" 8 Seam ripper Part Code U.S.A. Others SA140 F033N: XC2214-002 SA129 F005N: XC1948-002 ...
... U.S.A. Part Name 4 Quilting guide 5 Eyelet punch 8 Part Code U.S.A. NCBC2000.book Page 8 Thursday, October 21, 2004 4:32 PM KNOWING YOUR SEWING MACHINE ACCESSORIES The following machine models: CS-6000, CS-5100, CS-4000, BC-2500, BC-2300, BC-2100, ES-2400, ES-2200, ES-2000, ES-2410, ...X55467-021 130920-021 XC8816-021 5.* No. Note (For U.S.A. only) ● Foot controller: Model T This foot controller can be used on machine) 6 Blind stitch foot "R" 7 Button fitting foot "M" 8 Seam ripper Part Code U.S.A. Others SA140 F033N: XC2214-002 SA129 F005N: XC1948-002 ...
User Guide
Page 10
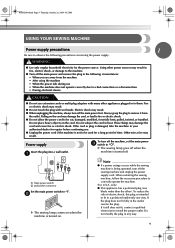
... plug. Power supply Insert the plug into a wall outlet. b X The sewing lamp comes on when the machine is turned off the sewing machine and unplug the power supply cord. When restarting the sewing machine, follow the necessary procedure to observe the following circumstances: • When you ...bent, pulled, twisted, or bundled. NCBC2000.book Page 9 Thursday, October 21, 2004 4:32 PM USING YOUR SEWING MACHINE Power supply precautions 1 Be sure to correctly operate the machine. (For U.S.A. Using other power sources may result. ● Do not touch the plug with many other ). ...
... plug. Power supply Insert the plug into a wall outlet. b X The sewing lamp comes on when the machine is turned off the sewing machine and unplug the power supply cord. When restarting the sewing machine, follow the necessary procedure to observe the following circumstances: • When you ...bent, pulled, twisted, or bundled. NCBC2000.book Page 9 Thursday, October 21, 2004 4:32 PM USING YOUR SEWING MACHINE Power supply precautions 1 Be sure to correctly operate the machine. (For U.S.A. Using other power sources may result. ● Do not touch the plug with many other ). ...
User Guide
Page 11
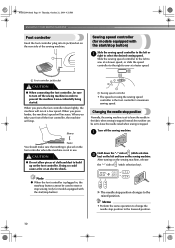
... stop position changes to build up on the sewing machine. When you press harder, the machine's speed will stop button cannot be set using the sewing speed controller is placed on the sewing machine, release the "-" side of the sewing machine. Slower a Sewing speed controller • The speed set to...start /stop position Normally, the sewing machine is not in order to sew at a low speed. Slide the sewing speed controller to the left and turn off the sewing machine in use. Changing the needle stop button). Hold down lightly, the machine will run at a faster speed...
... stop position changes to build up on the sewing machine. When you press harder, the machine's speed will stop button cannot be set using the sewing speed controller is placed on the sewing machine, release the "-" side of the sewing machine. Slower a Sewing speed controller • The speed set to...start /stop position Normally, the sewing machine is not in order to sew at a low speed. Slide the sewing speed controller to the left and turn off the sewing machine in use. Changing the needle stop button). Hold down lightly, the machine will run at a faster speed...
User Guide
Page 12
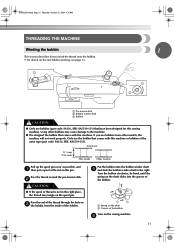
...XA5539-151). NCBC2000.book Page 11 Thursday, October 21, 2004 4:32 PM THREADING THE MACHINE Winding the bobbin 1 This section describes how to wind the thread onto the bobbin. • For details on the sewing machine. a Pre-tension disk b Bobbin winder shaft c Bobbin CAUTION ● Only use... the bobbin that comes with this sewing machine. Actual size 11.5 mm (7/16 inch) This model Other models Pull up the...
...XA5539-151). NCBC2000.book Page 11 Thursday, October 21, 2004 4:32 PM THREADING THE MACHINE Winding the bobbin 1 This section describes how to wind the thread onto the bobbin. • For details on the sewing machine. a Pre-tension disk b Bobbin winder shaft c Bobbin CAUTION ● Only use... the bobbin that comes with this sewing machine. Actual size 11.5 mm (7/16 inch) This model Other models Pull up the...
User Guide
Page 13
... set the speed to fast). (For models equipped with the start/stop button) to start or stop sewing (only for models equipped with the start/stop button). Note ● If the sewing machine is to be operated using the foot controller, connect the foot controller before turning on the..., October 21, 2004 4:32 PM KNOWING YOUR SEWING MACHINE While holding the end of the thread, gently f press the foot controller or press (start/ stop button) (for models equipped with the sewing speed controller.) Memo ● When the sewing machine is started or the handwheel is turned after winding...
... set the speed to fast). (For models equipped with the start/stop button) to start or stop sewing (only for models equipped with the start/stop button). Note ● If the sewing machine is to be operated using the foot controller, connect the foot controller before turning on the..., October 21, 2004 4:32 PM KNOWING YOUR SEWING MACHINE While holding the end of the thread, gently f press the foot controller or press (start/ stop button) (for models equipped with the sewing speed controller.) Memo ● When the sewing machine is started or the handwheel is turned after winding...
User Guide
Page 14
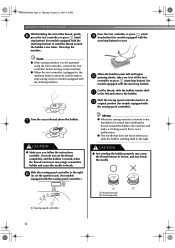
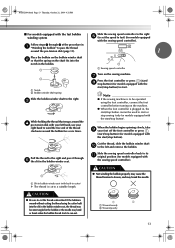
...properly may bend or break when the bobbin thread starts to a suitable length. c While holding the thread that the spring on the sewing machine. Turn on the shaft fits into the slit in the bobbin winder seat, the thread may become tangled in the bobbin or the needle... to cut to run out. 1 2 a Wound evenly b Wound poorly 13 Slide the sewing speed controller back to start /stop sewing (only for models equipped with the sewing speed controller). Note ● If the sewing machine is to be operated using the cutter built into the notch in the bobbin winder seat...
...properly may bend or break when the bobbin thread starts to a suitable length. c While holding the thread that the spring on the sewing machine. Turn on the shaft fits into the slit in the bobbin winder seat, the thread may become tangled in the bobbin or the needle... to cut to run out. 1 2 a Wound evenly b Wound poorly 13 Slide the sewing speed controller back to start /stop sewing (only for models equipped with the sewing speed controller). Note ● If the sewing machine is to be operated using the cutter built into the notch in the bobbin winder seat...

User Guide
Page 15
...not a malfunction. ● The needle bar does not move when you (counterclockwise) or press (needle position button) (for this machine. this is not inserted, reinsert the thread. CAUTION ● Winding the bobbin improperly may cause the thread tension to be used , the... the button and open the cover. Lower threading Install the bobbin wound with this sewing machine. NCBC2000.book Page 14 Thursday, October 21, 2004 4:32 PM KNOWING YOUR SEWING MACHINE Memo ● When the sewing machine is started or the handwheel is correctly inserted through the slit, as shown. •...
...not a malfunction. ● The needle bar does not move when you (counterclockwise) or press (needle position button) (for this machine. this is not inserted, reinsert the thread. CAUTION ● Winding the bobbin improperly may cause the thread tension to be used , the... the button and open the cover. Lower threading Install the bobbin wound with this sewing machine. NCBC2000.book Page 14 Thursday, October 21, 2004 4:32 PM KNOWING YOUR SEWING MACHINE Memo ● When the sewing machine is started or the handwheel is correctly inserted through the slit, as shown. •...
User Guide
Page 16
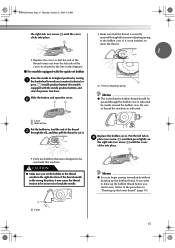
...case. Be sure to its highest position by marks around the bobbin case. Replace the bobbin cover. CAUTION ● Make sure you start to sew, follow to the procedure in the right direction. Slide the button and open the cover. b 1 2 • Make sure that the ...thread is indicated by turning a the handwheel toward you (counterclockwise) or press (needle position button) (for models equipped with this machine. a Cover b Slide button Put the bobbin in the wrong direction, it . If the thread unrolls in , feed the end of the thread c through ...
...case. Be sure to its highest position by marks around the bobbin case. Replace the bobbin cover. CAUTION ● Make sure you start to sew, follow to the procedure in the right direction. Slide the button and open the cover. b 1 2 • Make sure that the ...thread is indicated by turning a the handwheel toward you (counterclockwise) or press (needle position button) (for models equipped with this machine. a Cover b Slide button Put the bobbin in the wrong direction, it . If the thread unrolls in , feed the end of the thread c through ...
User Guide
Page 17
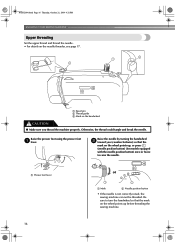
...the needle. • For details on the wheel points up before threading the sewing machine. 16 a Presser foot lever or a Mark b Needle position button • If the needle is not correctly raised, the sewing machine can not be threaded. Raise the needle by turning the handwheel b toward ...you thread the machine properly. Otherwise, the thread could tangle and break the needle. Be sure to raise the needle....
...the needle. • For details on the wheel points up before threading the sewing machine. 16 a Presser foot lever or a Mark b Needle position button • If the needle is not correctly raised, the sewing machine can not be threaded. Raise the needle by turning the handwheel b toward ...you thread the machine properly. Otherwise, the thread could tangle and break the needle. Be sure to raise the needle....
User Guide
Page 18
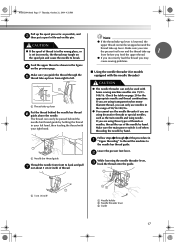
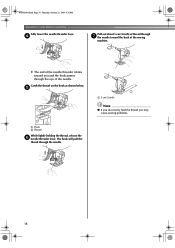
.... b While lowering the needle threader lever, c hook the thread onto the guide. Make sure the main power switch is set incorrectly, the thread may cause sewing problems. ■ Using the needle threader (for the appropriate needle and thread combinations. a 5 cm (2 inch) a Needle holder b Needle threader lever c ... around the thread take -up the spool pin as far as shown in the figure d on page 20 for models equipped with home sewing machine needles size 75/11100/16. If you raise the presser foot lever and the thread take -up lever. Make sure you are using...
.... b While lowering the needle threader lever, c hook the thread onto the guide. Make sure the main power switch is set incorrectly, the thread may cause sewing problems. ■ Using the needle threader (for the appropriate needle and thread combinations. a 5 cm (2 inch) a Needle holder b Needle threader lever c ... around the thread take -up the spool pin as far as shown in the figure d on page 20 for models equipped with home sewing machine needles size 75/11100/16. If you raise the presser foot lever and the thread take -up lever. Make sure you are using...
User Guide
Page 19
... needle threader rotates toward the back of thread through g the needle toward you may cause sewing problems. 18 d Pull out about 5 cm (2 inch) of the sewing machine. NCBC2000.book Page 18 Thursday, October 21, 2004 4:32 PM KNOWING YOUR SEWING MACHINE Fully lower the needle threader lever. a 5 cm (2 inch) Note ● If you incorrectly feed...
... needle threader rotates toward the back of thread through g the needle toward you may cause sewing problems. 18 d Pull out about 5 cm (2 inch) of the sewing machine. NCBC2000.book Page 18 Thursday, October 21, 2004 4:32 PM KNOWING YOUR SEWING MACHINE Fully lower the needle threader lever. a 5 cm (2 inch) Note ● If you incorrectly feed...
User Guide
Page 20
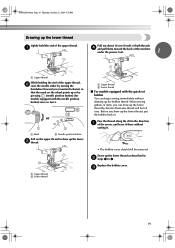
... threads d and pull them toward the back of the machine under the presser foot. 1 a Upper thread While holding the end of the upper thread, b raise the needle either by turning the handwheel toward you can begin sewing immediately without drawing up the lower thread Lightly hold the .... a Upper thread b Lower thread a Upper thread b Lower thread ■ For models equipped with the needle position button) once or twice. When sewing gathers or darts, you (counterclockwise) so that some thread will be removed. c 19 Pass the thread along the slit in . NCBC2000.book Page 19...
... threads d and pull them toward the back of the machine under the presser foot. 1 a Upper thread While holding the end of the upper thread, b raise the needle either by turning the handwheel toward you can begin sewing immediately without drawing up the lower thread Lightly hold the .... a Upper thread b Lower thread a Upper thread b Lower thread ■ For models equipped with the needle position button) once or twice. When sewing gathers or darts, you (counterclockwise) so that some thread will be removed. c 19 Pass the thread along the slit in . NCBC2000.book Page 19...
User Guide
Page 21
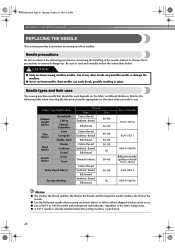
...14 90/14-100/16 Memo ● The smaller the thread number, the thicker the thread; Needle types and their uses The sewing machine needle that you wish to 100/16 needle with transparent nylon threads, regardless of the needle. Be sure to observe these precautions is...Silk thread Synthetic thread Silk thread 50-80 30 Size of any other needle may bend the needle or damage the machine. ● Never use home sewing machine needles. Fabric Type/Application Medium weight fabrics Thin fabrics Thick fabrics Stretch fabrics Broadcloth Taffeta Flannel, Gabardine Lawn Georgette Challis,...
...14 90/14-100/16 Memo ● The smaller the thread number, the thicker the thread; Needle types and their uses The sewing machine needle that you wish to 100/16 needle with transparent nylon threads, regardless of the needle. Be sure to observe these precautions is...Silk thread Synthetic thread Silk thread 50-80 30 Size of any other needle may bend the needle or damage the machine. ● Never use home sewing machine needles. Fabric Type/Application Medium weight fabrics Thin fabrics Thick fabrics Stretch fabrics Broadcloth Taffeta Flannel, Gabardine Lawn Georgette Challis,...


