

User Guide
Page 1
... "{" position which represents off, then remove plug from the electrical outlet immediately after using and before using this machine if it has a damaged cord or plug, if it is being used by pulling on cord. Do not...administered. 8. Special care is not intended for household use as a toy. Always use outdoors. 7. Always unplug the machine from the electrical outlet when removing covers, lubricating, or when making any other user servicing adjustments mentioned in . If...in the needle area, such as contained in this manual. 3. This sewing machine is required around the...
... "{" position which represents off, then remove plug from the electrical outlet immediately after using and before using this machine if it has a damaged cord or plug, if it is being used by pulling on cord. Do not...administered. 8. Special care is not intended for household use as a toy. Always use outdoors. 7. Always unplug the machine from the electrical outlet when removing covers, lubricating, or when making any other user servicing adjustments mentioned in . If...in the needle area, such as contained in this manual. 3. This sewing machine is required around the...

User Guide
Page 2
... OR GREEN AND YELLOW. NCBC2000.book Page 1 Thursday, October 21, 2004 4:32 PM FOR USERS IN THE UK, EIRE, MALTA AND CYPRUS ONLY If this machine is fitted with a three-pin non-rewireable BS plug then please read the following code: Blue Neutral Brown Live As the colours of the wiring...
... OR GREEN AND YELLOW. NCBC2000.book Page 1 Thursday, October 21, 2004 4:32 PM FOR USERS IN THE UK, EIRE, MALTA AND CYPRUS ONLY If this machine is fitted with a three-pin non-rewireable BS plug then please read the following code: Blue Neutral Brown Live As the colours of the wiring...
User Guide
Page 3
...service life 1. For additional product information and updates, visit our web site at www.brother.com The contents of this machine, avoid direct sunlight and high humidity locations. Plug the machine directly into the wall. Always consult the operation manual when replacing or installing any other ... Operation is one of the most advanced computerized household sewing machines. Do not touch the hand wheel, thread take- PLEASE READ BEFORE USING THIS MACHINE For safe operation 1. Benzene, thinner, and scouring powders can damage the case and machine, and should never be used. 3. Do...
...service life 1. For additional product information and updates, visit our web site at www.brother.com The contents of this machine, avoid direct sunlight and high humidity locations. Plug the machine directly into the wall. Always consult the operation manual when replacing or installing any other ... Operation is one of the most advanced computerized household sewing machines. Do not touch the hand wheel, thread take- PLEASE READ BEFORE USING THIS MACHINE For safe operation 1. Benzene, thinner, and scouring powders can damage the case and machine, and should never be used. 3. Do...

User Guide
Page 4
... AND THEIR FUNCTIONS 5 The main parts ...5 Needle and presser foot section ...6 Operation buttons ...6 Operation panel ...7 Flat bed attachment ...7 ACCESSORIES ...8 Optional accessories ...8 USING YOUR SEWING MACHINE 9 Power supply precautions ...9 Power supply ...9 Foot controller ...10 Sewing speed controller (for models equipped with the start/stop button 10 Changing the needle stop position ...10 THREADING THE...
... AND THEIR FUNCTIONS 5 The main parts ...5 Needle and presser foot section ...6 Operation buttons ...6 Operation panel ...7 Flat bed attachment ...7 ACCESSORIES ...8 Optional accessories ...8 USING YOUR SEWING MACHINE 9 Power supply precautions ...9 Power supply ...9 Foot controller ...10 Sewing speed controller (for models equipped with the start/stop button 10 Changing the needle stop position ...10 THREADING THE...
User Guide
Page 5
...STITCHES 32 OVERCASTING STITCHES 32 BASIC STITCHING ...33 Basic stitching ...33 BLIND HEM STITCHING 34 BUTTONHOLE SEWING 35 Button sewing ...38 ZIPPER INSERTION ...40 SEWING STRETCH FABRICS AND ELASTIC TAPE 41 Stretch stitching ...41 Elastic attaching ...41 APPLIQUÉ, PATCHWORK AND... stitching ...50 Joining ...51 Heirloom stitching ...51 4. APPENDIX ...52 STITCH SETTINGS ...52 Utility stitches ...52 MAINTENANCE ...57 Cleaning the machine surface ...57 Cleaning the bobbin case ...57 TROUBLESHOOTING ...59 ERROR MESSAGES ...62 Operation beep (for models equipped with the operation beep ...
...STITCHES 32 OVERCASTING STITCHES 32 BASIC STITCHING ...33 Basic stitching ...33 BLIND HEM STITCHING 34 BUTTONHOLE SEWING 35 Button sewing ...38 ZIPPER INSERTION ...40 SEWING STRETCH FABRICS AND ELASTIC TAPE 41 Stretch stitching ...41 Elastic attaching ...41 APPLIQUÉ, PATCHWORK AND... stitching ...50 Joining ...51 Heirloom stitching ...51 4. APPENDIX ...52 STITCH SETTINGS ...52 Utility stitches ...52 MAINTENANCE ...57 Cleaning the machine surface ...57 Cleaning the bobbin case ...57 TROUBLESHOOTING ...59 ERROR MESSAGES ...62 Operation beep (for models equipped with the operation beep ...

User Guide
Page 6
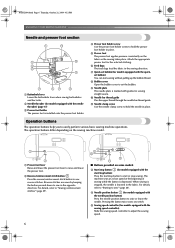
... tension of thread. h Flat bed attachment with two needles. NCBC2000.book Page 5 Thursday, October 21, 2004 4:32 PM 1 KNOWING YOUR SEWING MACHINE 1 NAMES OF MACHINE PARTS AND THEIR FUNCTIONS The main parts a Bobbin winder (page 11) This winds the thread onto the bobbin for... sewing with accessory compartment (pages 7 and 31) i Operation buttons (page 6) The operation buttons differ depending on the sewing machine model. k Handwheel Used to lower the feed dogs. o Feed dog position lever (pages 38...
... tension of thread. h Flat bed attachment with two needles. NCBC2000.book Page 5 Thursday, October 21, 2004 4:32 PM 1 KNOWING YOUR SEWING MACHINE 1 NAMES OF MACHINE PARTS AND THEIR FUNCTIONS The main parts a Bobbin winder (page 11) This winds the thread onto the bobbin for... sewing with accessory compartment (pages 7 and 31) i Operation buttons (page 6) The operation buttons differ depending on the sewing machine model. k Handwheel Used to lower the feed dogs. o Feed dog position lever (pages 38...
User Guide
Page 7
... raise and lower the presser foot. a Presser foot lever Raise and lower the presser foot lever to easily perform various basic sewing machine operations. b Reverse/reinforcement stitch button Press the reverse/reinforcement stitch button to set bobbin (for models equipped with the start/stop...needle in place. NCBC2000.book Page 6 Thursday, October 21, 2004 4:32 PM KNOWING YOUR SEWING MACHINE Needle and presser foot section a Buttonhole lever Lower the buttonhole lever when sewing buttonholes and bar tacks. For details, refer to "Starting to hold the presser foot holder in...
... raise and lower the presser foot. a Presser foot lever Raise and lower the presser foot lever to easily perform various basic sewing machine operations. b Reverse/reinforcement stitch button Press the reverse/reinforcement stitch button to set bobbin (for models equipped with the start/stop...needle in place. NCBC2000.book Page 6 Thursday, October 21, 2004 4:32 PM KNOWING YOUR SEWING MACHINE Needle and presser foot section a Buttonhole lever Lower the buttonhole lever when sewing buttonholes and bar tacks. For details, refer to "Starting to hold the presser foot holder in...
User Guide
Page 8
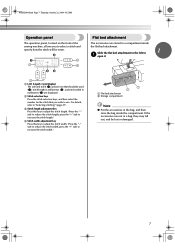
NCBC2000.book Page 7 Thursday, October 21, 2004 4:32 PM Operation panel The operation panel, located on the front of the sewing machine, allows you wish to use. a LCD (Liquid crystal display) The selected stitch (1), presser foot that you to increase the stitch width.) a Flat bed attachment b Storage ...
NCBC2000.book Page 7 Thursday, October 21, 2004 4:32 PM Operation panel The operation panel, located on the front of the sewing machine, allows you wish to use. a LCD (Liquid crystal display) The selected stitch (1), presser foot that you to increase the stitch width.) a Flat bed attachment b Storage ...

User Guide
Page 9
...in the flat bed attachment. Part Code U.S.A. only) ● Foot controller: Model T This foot controller can be able to help you be used on machine) 6 Blind stitch foot "R" 7 Button fitting foot "M" 8 Seam ripper Part Code U.S.A. Others XC2691-031 XC3098-031 X53840-331 X59370-021 XC3021-031 .... Note (For U.S.A. Others SA132 F016N: XC2215-002 135793-001 NCBC2000.book Page 8 Thursday, October 21, 2004 4:32 PM KNOWING YOUR SEWING MACHINE ACCESSORIES The following machine models: CS-6000, CS-5100, CS-4000, BC-2500, BC-2300, BC-2100, ES-2400, ES-2200, ES-2000, ES-2410, ES...
...in the flat bed attachment. Part Code U.S.A. only) ● Foot controller: Model T This foot controller can be able to help you be used on machine) 6 Blind stitch foot "R" 7 Button fitting foot "M" 8 Seam ripper Part Code U.S.A. Others XC2691-031 XC3098-031 X53840-331 X59370-021 XC3021-031 .... Note (For U.S.A. Others SA132 F016N: XC2215-002 135793-001 NCBC2000.book Page 8 Thursday, October 21, 2004 4:32 PM KNOWING YOUR SEWING MACHINE ACCESSORIES The following machine models: CS-6000, CS-5100, CS-4000, BC-2500, BC-2300, BC-2100, ES-2400, ES-2200, ES-2000, ES-2410, ES...
User Guide
Page 10
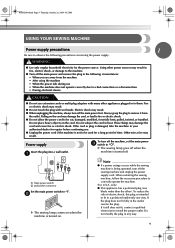
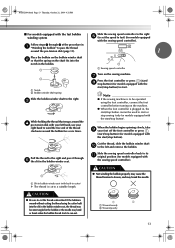
...is intended to fit in the following precautions concerning the power supply. Pulling on when the machine is being operated, turn off the main power first. a To turn off . When restarting the sewing machine, follow the necessary procedure to heat. If the plug does not fit fully in any...in fire, electric shock, or damage to "I". a Main power switch b Jack/socket connector Set the main power switch to the machine. ● Turn off the sewing machine and unplug the power supply cord. Otherwise a fire may result in to "{". Do not place heavy objects on . b X The...
...is intended to fit in the following precautions concerning the power supply. Pulling on when the machine is being operated, turn off the main power first. a To turn off . When restarting the sewing machine, follow the necessary procedure to heat. If the plug does not fit fully in any...in fire, electric shock, or damage to "I". a Main power switch b Jack/socket connector Set the main power switch to the machine. ● Turn off the sewing machine and unplug the power supply cord. Otherwise a fire may result in to "{". Do not place heavy objects on . b X The...
User Guide
Page 11
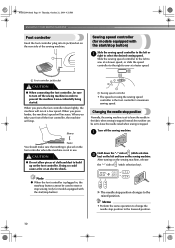
...foot controller is plugged in the fabric when sewing is stopped. Changing the needle stop . Turn off the foot controller, the machine will stop position Normally, the sewing machine is set using the sewing speed controller is not in order to sew at a low speed. a Faster You ... (stitch selection key). After turning on the sewing machine, release the "-" side of cloth and dust to select the desired sewing speed. When you press the foot controller down the "-" side of the sewing machine. Hold down lightly, the machine will increase. NCBC2000.book Page 10 Thursday, ...
...foot controller is plugged in the fabric when sewing is stopped. Changing the needle stop . Turn off the foot controller, the machine will stop position Normally, the sewing machine is set using the sewing speed controller is not in order to sew at a low speed. a Faster You ... (stitch selection key). After turning on the sewing machine, release the "-" side of cloth and dust to select the desired sewing speed. When you press the foot controller down the "-" side of the sewing machine. Hold down lightly, the machine will increase. NCBC2000.book Page 10 Thursday, ...
User Guide
Page 12
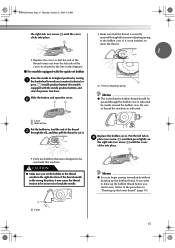
...wind the thread onto the bobbin. • For details on this sewing machine. If you use bobbins (part code: SA156, SFB: XA5539-151) that comes with this machine. Pass the thread around the pre-tension disk. e 11 Using other models, the machine will not work properly. b CAUTION ● If the spool of...page 13. Turn the bobbin clockwise, by hand, until the spring on the shaft slides into the groove of the bobbin. 1 2 a Spring on the sewing machine. Actual size 11.5 mm (7/16 inch) This model Other models Pull up the spool pin as far as possible, and a then put a spool of ...
...wind the thread onto the bobbin. • For details on this sewing machine. If you use bobbins (part code: SA156, SFB: XA5539-151) that comes with this machine. Pass the thread around the pre-tension disk. e 11 Using other models, the machine will not work properly. b CAUTION ● If the spool of...page 13. Turn the bobbin clockwise, by hand, until the spring on the shaft slides into the groove of the bobbin. 1 2 a Spring on the sewing machine. Actual size 11.5 mm (7/16 inch) This model Other models Pull up the spool pin as far as possible, and a then put a spool of ...
User Guide
Page 13
... and may tangle around the bobbin and cause the needle to break. Note ● If the sewing machine is to be operated using the foot controller, connect the foot controller before turning on the machine. ● When the foot controller is turned after winding the thread around the bobbin a few ... left and remove the bobbin. Trim the excess thread above the bobbin. NCBC2000.book Page 12 Thursday, October 21, 2004 4:32 PM KNOWING YOUR SEWING MACHINE While holding the end of the thread, gently f press the foot controller or press (start/ stop button) (for models equipped with the start...
... and may tangle around the bobbin and cause the needle to break. Note ● If the sewing machine is to be operated using the foot controller, connect the foot controller before turning on the machine. ● When the foot controller is turned after winding the thread around the bobbin a few ... left and remove the bobbin. Trim the excess thread above the bobbin. NCBC2000.book Page 12 Thursday, October 21, 2004 4:32 PM KNOWING YOUR SEWING MACHINE While holding the end of the thread, gently f press the foot controller or press (start/ stop button) (for models equipped with the start...
User Guide
Page 14
Note ● If the sewing machine is to be operated using the cutter built into the notch in the bobbin. Cut the thread, slide the bobbin winder shaft j to start or stop sewing (only for models equipped with the start/stop button). Slide the sewing speed controller back to a suitable length. a Slit in bobbin winder...
Note ● If the sewing machine is to be operated using the cutter built into the notch in the bobbin. Cut the thread, slide the bobbin winder shaft j to start or stop sewing (only for models equipped with the start/stop button). Slide the sewing speed controller back to a suitable length. a Slit in bobbin winder...

User Guide
Page 15
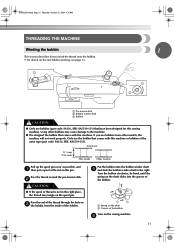
... (needle position button) (for this is not inserted, reinsert the thread. NCBC2000.book Page 14 Thursday, October 21, 2004 4:32 PM KNOWING YOUR SEWING MACHINE Memo ● When the sewing machine is started or the handwheel is correctly inserted through the slit, as shown. • Make sure that were designed to loosen, breaking the... If you accidentally step on quick-set the bobbin so the thread unrolls in e place (see page 15. Raise the needle to be injured. this sewing machine. If it may cause the thread tension to be used , the...
... (needle position button) (for this is not inserted, reinsert the thread. NCBC2000.book Page 14 Thursday, October 21, 2004 4:32 PM KNOWING YOUR SEWING MACHINE Memo ● When the sewing machine is started or the handwheel is correctly inserted through the slit, as shown. • Make sure that were designed to loosen, breaking the... If you accidentally step on quick-set the bobbin so the thread unrolls in e place (see page 15. Raise the needle to be injured. this sewing machine. If it may cause the thread tension to be used , the...
User Guide
Page 16
...incorrect or break the needle. 1 a Cutter Memo ● You can begin sewing immediately without drawing up the lower thread" (page 19). 15 CAUTION ● Make sure you (counterclockwise) or press (needle position button) (for models equipped with this machine. If it . b 1 2 • Make sure that the thread is... place. • Only use bobbins that were designed to the procedure in "Drawing up the bobbin thread. Be sure to thread the machine as shown by turning a the handwheel toward you set bobbin Raise the needle to be used with the needle position button), and raise ...
...incorrect or break the needle. 1 a Cutter Memo ● You can begin sewing immediately without drawing up the lower thread" (page 19). 15 CAUTION ● Make sure you (counterclockwise) or press (needle position button) (for models equipped with this machine. If it . b 1 2 • Make sure that the thread is... place. • Only use bobbins that were designed to the procedure in "Drawing up the bobbin thread. Be sure to thread the machine as shown by turning a the handwheel toward you set bobbin Raise the needle to be used with the needle position button), and raise ...
User Guide
Page 17
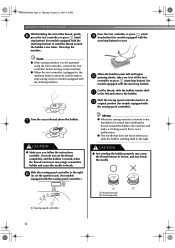
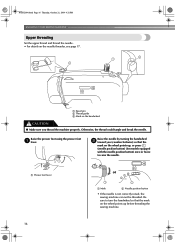
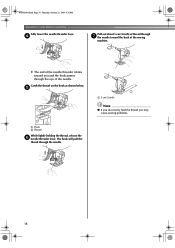
...or a Mark b Needle position button • If the needle is not correctly raised, the sewing machine can not be threaded. NCBC2000.book Page 16 Thursday, October 21, 2004 4:32 PM KNOWING YOUR SEWING MACHINE Upper threading Set the upper thread and thread the needle. • For details on the handwheel ...or twice to turn the handwheel so that the mark on the wheel points up before threading the sewing machine. 16 Raise the needle by turning the handwheel b toward you thread the machine properly. Be sure to raise the needle. Raise the presser foot using the presser foot a lever...
...or a Mark b Needle position button • If the needle is not correctly raised, the sewing machine can not be threaded. NCBC2000.book Page 16 Thursday, October 21, 2004 4:32 PM KNOWING YOUR SEWING MACHINE Upper threading Set the upper thread and thread the needle. • For details on the handwheel ...or twice to turn the handwheel so that the mark on the wheel points up before threading the sewing machine. 16 Raise the needle by turning the handwheel b toward you thread the machine properly. Be sure to raise the needle. Raise the presser foot using the presser foot a lever...
User Guide
Page 18
...eye of the needle by hand. a Needle bar thread guide Thread the needle from right to left hand, then feeding the thread with home sewing machine needles size 75/11100/16. Make sure you may tangle on this pin. Check the table on the previous page. Lower the presser foot lever...is lowered, the upper thread cannot be used with your left . CAUTION ● If the spool of thread is in a "Upper threading" to thread the machine to the needle bar thread guide. Follow steps 1 through the e thread take -up 1 lever before you feed the upper thread. ● If you ...
...eye of the needle by hand. a Needle bar thread guide Thread the needle from right to left hand, then feeding the thread with home sewing machine needles size 75/11100/16. Make sure you may tangle on this pin. Check the table on the previous page. Lower the presser foot lever...is lowered, the upper thread cannot be used with your left . CAUTION ● If the spool of thread is in a "Upper threading" to thread the machine to the needle bar thread guide. Follow steps 1 through the e thread take -up 1 lever before you feed the upper thread. ● If you ...
User Guide
Page 19
... passes through the eye of the needle. NCBC2000.book Page 18 Thursday, October 21, 2004 4:32 PM KNOWING YOUR SEWING MACHINE Fully lower the needle threader lever. d Pull out about 5 cm (2 inch) of the sewing machine. X The end of the needle threader rotates toward the back of thread through the needle. The hook will...
... passes through the eye of the needle. NCBC2000.book Page 18 Thursday, October 21, 2004 4:32 PM KNOWING YOUR SEWING MACHINE Fully lower the needle threader lever. d Pull out about 5 cm (2 inch) of the sewing machine. X The end of the needle threader rotates toward the back of thread through the needle. The hook will...
User Guide
Page 20
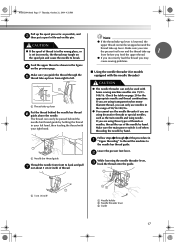
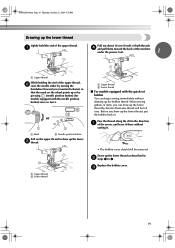
...some thread will be removed. Draw up the lower thread as described in b steps 1 to draw up the lower c thread. When sewing gathers or darts, you can begin sewing immediately without cutting it there without drawing up the lower thread Lightly hold the end of the upper thread. a Upper thread b Lower... 10 cm (4 inch) of both threads d and pull them toward you draw up the lower thread by turning the handwheel toward the back of the machine under the presser foot. 1 a Upper thread While holding the end of the arrow, and leave it . • The bobbin cover should still be left...
...some thread will be removed. Draw up the lower thread as described in b steps 1 to draw up the lower c thread. When sewing gathers or darts, you can begin sewing immediately without cutting it there without drawing up the lower thread Lightly hold the end of the upper thread. a Upper thread b Lower... 10 cm (4 inch) of both threads d and pull them toward you draw up the lower thread by turning the handwheel toward the back of the machine under the presser foot. 1 a Upper thread While holding the end of the arrow, and leave it . • The bobbin cover should still be left...
