

User Guide
Page 1
... break. 14. Close attention is necessary when the machine is being used or where oxygen is used as described in this machine. 18. Do not unplug by or near children. 2. Do not pull or push fabric while stitching. The machine should be left unattended while plugged in the instruction ... presser foot, and the like. 15. 2000_cover2-3.fm Page 1 Thursday, October 28, 2004 2:42 PM IMPORTANT SAFETY INSTRUCTIONS When using . This sewing machine is damaged, it to ensure that they do not play with any other user servicing adjustments mentioned in . Always unplug the...
... break. 14. Close attention is necessary when the machine is being used or where oxygen is used as described in this machine. 18. Do not unplug by or near children. 2. Do not pull or push fabric while stitching. The machine should be left unattended while plugged in the instruction ... presser foot, and the like. 15. 2000_cover2-3.fm Page 1 Thursday, October 28, 2004 2:42 PM IMPORTANT SAFETY INSTRUCTIONS When using . This sewing machine is damaged, it to ensure that they do not play with any other user servicing adjustments mentioned in . Always unplug the...

User Guide
Page 4
......6 Operation panel ...7 Flat bed attachment ...7 ACCESSORIES ...8 Optional accessories ...8 USING YOUR SEWING MACHINE 9 Power supply precautions ...9 Power supply ...9 Foot controller ...10 Sewing speed controller (for models equipped with the start/stop button 10 Changing the needle stop...25 2. SEWING BASICS 26 SEWING ...26 General sewing procedure ...26 Selecting stitching ...27 Starting to sew ...28 Thread tension ...29 USEFUL SEWING TIPS ...30 Trial sewing ...30 Changing the sewing direction ...30 Sewing curves ...30 Sewing thick fabrics ...30 Sewing thin fabrics ...31 Sewing stretch ...
......6 Operation panel ...7 Flat bed attachment ...7 ACCESSORIES ...8 Optional accessories ...8 USING YOUR SEWING MACHINE 9 Power supply precautions ...9 Power supply ...9 Foot controller ...10 Sewing speed controller (for models equipped with the start/stop button 10 Changing the needle stop...25 2. SEWING BASICS 26 SEWING ...26 General sewing procedure ...26 Selecting stitching ...27 Starting to sew ...28 Thread tension ...29 USEFUL SEWING TIPS ...30 Trial sewing ...30 Changing the sewing direction ...30 Sewing curves ...30 Sewing thick fabrics ...30 Sewing thin fabrics ...31 Sewing stretch ...
User Guide
Page 5
... Piecing ...43 Quilting ...44 Free-motion quilting ...45 REINFORCEMENT STITCHING 46 Triple stretch stitching ...46 Bar tack stitching ...46 DECORATIVE STITCHING 48 Fagoting ...49 Scallop stitching ...49 Smocking ...50 Shell tuck stitching ...50 Joining ...51 Heirloom stitching ...51 4. APPENDIX ...52 STITCH SETTINGS ...52 Utility stitches ...52 MAINTENANCE ...57 Cleaning the machine surface ...57 Cleaning the bobbin case ...57 TROUBLESHOOTING ...59...
... Piecing ...43 Quilting ...44 Free-motion quilting ...45 REINFORCEMENT STITCHING 46 Triple stretch stitching ...46 Bar tack stitching ...46 DECORATIVE STITCHING 48 Fagoting ...49 Scallop stitching ...49 Smocking ...50 Shell tuck stitching ...50 Joining ...51 Heirloom stitching ...51 4. APPENDIX ...52 STITCH SETTINGS ...52 Utility stitches ...52 MAINTENANCE ...57 Cleaning the machine surface ...57 Cleaning the bobbin case ...57 TROUBLESHOOTING ...59...

User Guide
Page 6
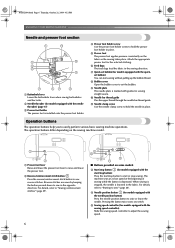
... Use the feed dog position lever to manually raise and lower the needle. q Foot controller (page 10) You can turn the main power and sewing light switch on the sewing machine model. e Thread guide (pages 11 and 16) This is used when winding the thread onto the bobbin and then threading the... to cut them. c Hole for extra spool pin (page 23) This holds a second spool of thread for use this to control the sewing speed, and to select the stitch and specify the various settings. n Foot controller jack/socket (page 10) Plug in the foot controller plug. f Thread take-up lever (...
... Use the feed dog position lever to manually raise and lower the needle. q Foot controller (page 10) You can turn the main power and sewing light switch on the sewing machine model. e Thread guide (pages 11 and 16) This is used when winding the thread onto the bobbin and then threading the... to cut them. c Hole for extra spool pin (page 23) This holds a second spool of thread for use this to control the sewing speed, and to select the stitch and specify the various settings. n Foot controller jack/socket (page 10) Plug in the foot controller plug. f Thread take-up lever (...
User Guide
Page 7
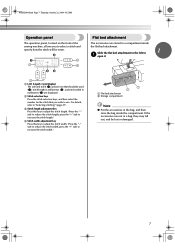
... and lower the presser foot. a Presser foot lever Raise and lower the presser foot lever to sew in the opposite direction. b Reverse/reinforcement stitch button Press the reverse/reinforcement stitch button to easily perform various basic sewing machine operations. e Sewing speed controller (for models equipped with guides for models equipped with the quickset bobbin) You can...
... and lower the presser foot. a Presser foot lever Raise and lower the presser foot lever to sew in the opposite direction. b Reverse/reinforcement stitch button Press the reverse/reinforcement stitch button to easily perform various basic sewing machine operations. e Sewing speed controller (for models equipped with guides for models equipped with the quickset bobbin) You can...
User Guide
Page 8
... millimeters (3), and stitch width in millimeters (4) are stored in the bag, and then store the bag inside the flat bed attachment. Flat bed attachment The accessories are displayed. NCBC2000.book Page 7 Thursday, October 21, 2004 4:32 PM Operation panel The operation panel, located on the front of the sewing machine, allows you wish...
... millimeters (3), and stitch width in millimeters (4) are stored in the bag, and then store the bag inside the flat bed attachment. Flat bed attachment The accessories are displayed. NCBC2000.book Page 7 Thursday, October 21, 2004 4:32 PM Operation panel The operation panel, located on the front of the sewing machine, allows you wish...

User Guide
Page 9
...SA140 F033N: XC2214-002 SA129 F005N: XC1948-002 SA125 F001N: XC1944-002 No. NCBC2000.book Page 8 Thursday, October 21, 2004 4:32 PM KNOWING YOUR SEWING MACHINE ACCESSORIES The following machine models: CS-6000, CS-5100, CS-4000, BC-2500, BC-2300, BC-2100, ES-2400, ES-2200, ES-2000, ES-2410, ES-2210...2. 3. 4 Part Code U.S.A. Note (For U.S.A. Part Code U.S.A. Others SA132 F016N: XC2215-002 135793-001 only) ● Foot controller: Model T This foot controller can be used on machine) 6 Blind stitch foot "R" 7 Button fitting foot "M" 8 Seam ripper Part Code U.S.A.
...SA140 F033N: XC2214-002 SA129 F005N: XC1948-002 SA125 F001N: XC1944-002 No. NCBC2000.book Page 8 Thursday, October 21, 2004 4:32 PM KNOWING YOUR SEWING MACHINE ACCESSORIES The following machine models: CS-6000, CS-5100, CS-4000, BC-2500, BC-2300, BC-2100, ES-2400, ES-2200, ES-2000, ES-2410, ES-2210...2. 3. 4 Part Code U.S.A. Note (For U.S.A. Part Code U.S.A. Others SA132 F016N: XC2215-002 135793-001 only) ● Foot controller: Model T This foot controller can be used on machine) 6 Blind stitch foot "R" 7 Button fitting foot "M" 8 Seam ripper Part Code U.S.A.
User Guide
Page 11
... button cannot be sure to the raised position. After turning on the sewing machine, release the "-" side of the sewing machine. CAUTION ● Do not allow pieces of (stitch selection b key) on the left and turn off the sewing machine in order to start or stop sewing (only for models equipped with the start /stop . Doing so could...
... button cannot be sure to the raised position. After turning on the sewing machine, release the "-" side of the sewing machine. CAUTION ● Do not allow pieces of (stitch selection b key) on the left and turn off the sewing machine in order to start or stop sewing (only for models equipped with the start /stop . Doing so could...
User Guide
Page 21
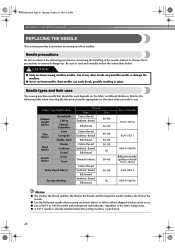
..., the thicker the needle. ● Use the ball point needle when sewing on stretch fabrics or fabrics where skipped stitches easily occur. ● Use a 90/14 to read and carefully follow the instructions below. Needle types and their uses The sewing machine needle that you wish to the following precautions concerning the handling of...
..., the thicker the needle. ● Use the ball point needle when sewing on stretch fabrics or fabrics where skipped stitches easily occur. ● Use a 90/14 to read and carefully follow the instructions below. Needle types and their uses The sewing machine needle that you wish to the following precautions concerning the handling of...
User Guide
Page 22
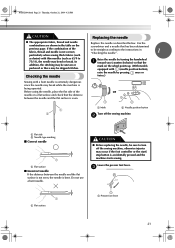
...is even. 1 2 a Mark b Needle position button Turn off the sewing machine, otherwise injuries may occur if the foot controller or the start/ stop button is bent. c 1 a Flat surface a Presser foot lever 21 In addition, the stitching may be uneven or puckered or there may break while the... machine is not correct, particularly when sewing thick fabrics (such as described below. Use the screwdriver and a needle that the distance between ...
...is even. 1 2 a Mark b Needle position button Turn off the sewing machine, otherwise injuries may occur if the foot controller or the start/ stop button is bent. c 1 a Flat surface a Presser foot lever 21 In addition, the stitching may be uneven or puckered or there may break while the... machine is not correct, particularly when sewing thick fabrics (such as described below. Use the screwdriver and a needle that the distance between ...
User Guide
Page 24
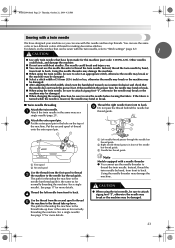
...b Right needle thread passes in the hole on the stitches that can be damaged. ● After adjusting the stitch width, slowly turn the handwheel toward you (counterclockwise) and check that have designed your machine so you can sew with bent needles. Using the needle threader may be ...spool to thread c the machine to select an appropriate stitch, otherwise the needle may break or the machine may be damaged. ● Select a stitch width of thread onto the extra spool pin. The needle could break, and damage the machine. ● Do not sew with this machine (part code: 131096-121...
...b Right needle thread passes in the hole on the stitches that can be damaged. ● After adjusting the stitch width, slowly turn the handwheel toward you (counterclockwise) and check that have designed your machine so you can sew with bent needles. Using the needle threader may be ...spool to thread c the machine to select an appropriate stitch, otherwise the needle may break or the machine may be damaged. ● Select a stitch width of thread onto the extra spool pin. The needle could break, and damage the machine. ● Do not sew with this machine (part code: 131096-121...
User Guide
Page 25
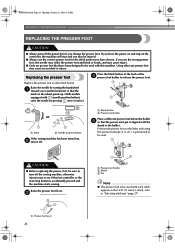
.... Raise the needle by pressing once or twice.) or a Mark b Needle position button If the sewing machine has been turned on the wheel points up. (With models equipped with each stitch appears in the holder. Raise the presser foot lever. c a Presser foot holder b Shank c ...before you use presser feet that the presser foot pin is accidentally pressed and the machine starts sewing. Replacing the presser foot Press the black button at the back of the d presser foot holder to "Selecting stitching" (page 27). a Black button b Presser foot holder Place a different presser ...
.... Raise the needle by pressing once or twice.) or a Mark b Needle position button If the sewing machine has been turned on the wheel points up. (With models equipped with each stitch appears in the holder. Raise the presser foot lever. c a Presser foot holder b Shank c ...before you use presser feet that the presser foot pin is accidentally pressed and the machine starts sewing. Replacing the presser foot Press the black button at the back of the d presser foot holder to "Selecting stitching" (page 27). a Black button b Presser foot holder Place a different presser ...

User Guide
Page 27
... 26 Thursday, October 21, 2004 4:32 PM SEWING BASICS 2 SEWING BASICS SEWING Basic sewing operations are described below to sew. 1 Turn on the machine. Before operating the sewing machine, read the following precautions. Attach the presser foot appropriate for the area to the needle location. Select the stitch appropriate for the stitch. Bent needles can easily break, possibly resulting in...
... 26 Thursday, October 21, 2004 4:32 PM SEWING BASICS 2 SEWING BASICS SEWING Basic sewing operations are described below to sew. 1 Turn on the machine. Before operating the sewing machine, read the following precautions. Attach the presser foot appropriate for the area to the needle location. Select the stitch appropriate for the stitch. Bent needles can easily break, possibly resulting in...

User Guide
Page 28
... Turn on the left changes the digit on the sewing machine. Press the stitch selection keys to increase or reduce the stitch length. X The stitch is turned on the left needle position) is indicated by one. a Stitch width adjustment key b Narrow c Wide Note ● When the stitch length or stitch width is displayed. NCBC2000.book Page 27 Thursday...
... Turn on the left changes the digit on the sewing machine. Press the stitch selection keys to increase or reduce the stitch length. X The stitch is turned on the left needle position) is indicated by one. a Stitch width adjustment key b Narrow c Wide Note ● When the stitch length or stitch width is displayed. NCBC2000.book Page 27 Thursday...
User Guide
Page 29
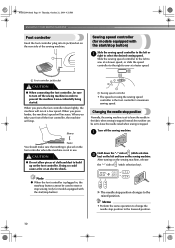
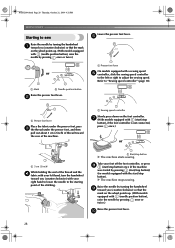
...that the mark on the foot controller. Refer to sew Lower the presser foot lever. g (With models ...machine was started by pressing once or twice.) Raise the presser foot lever. X The machine stops sewing. NCBC2000.book Page 28 Thursday, October 21, 2004 4:32 PM SEWING BASICS Starting to "Sewing...machine. a Sewing speed controller Slowly press down on the wheel points up. (With models equipped with a sewing speed f controller, slide the sewing... controller, or press h (start/stop button X The machine starts sewing. Raise the needle by pressing once or twice.) a...
...that the mark on the foot controller. Refer to sew Lower the presser foot lever. g (With models ...machine was started by pressing once or twice.) Raise the presser foot lever. X The machine stops sewing. NCBC2000.book Page 28 Thursday, October 21, 2004 4:32 PM SEWING BASICS Starting to "Sewing...machine. a Sewing speed controller Slowly press down on the wheel points up. (With models equipped with a sewing speed f controller, slide the sewing... controller, or press h (start/stop button X The machine starts sewing. Raise the needle by pressing once or twice.) a...
User Guide
Page 30
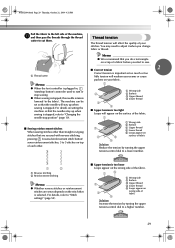
... appear on wrong side of each other. 1 2 a Reverse stitching b Reinforcement stitching Memo ● Whether reverse stitches or reinforcement stitches are sewn depends on the stitch that is selected. You may need to "Stitch settings" (page 52). The machine can be set so that the needles stay up when sewing is plugged in the fabric). a Thread cutter Memo ●...
... appear on wrong side of each other. 1 2 a Reverse stitching b Reinforcement stitching Memo ● Whether reverse stitches or reinforcement stitches are sewn depends on the stitch that is selected. You may need to "Stitch settings" (page 52). The machine can be set so that the needles stay up when sewing is plugged in the fabric). a Thread cutter Memo ●...
User Guide
Page 31
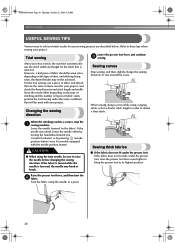
... the a sewing machine. Raise the presser foot lever, and then turn the b fabric. After you (counterclockwise) or by pressing (needle position button) once (for models equipped with your project. For the trial sewing, use a piece of fabric and thread that will be achieved. When sewing along a curve while using a zigzag stitch, select a shorter stitch length in...
... the a sewing machine. Raise the presser foot lever, and then turn the b fabric. After you (counterclockwise) or by pressing (needle position button) once (for models equipped with your project. For the trial sewing, use a piece of fabric and thread that will be achieved. When sewing along a curve while using a zigzag stitch, select a shorter stitch length in...
User Guide
Page 32
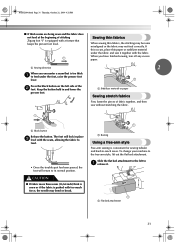
...the presser foot. a Basting Using a free-arm style Free-arm sewing is convenient for sewing tubular and hard-to the free-arm style, lift out the flat bed attachment. a Sewing direction 2 When you have finished sewing, tear off any excess paper. Press the black button on the ...position. a Stabilizer material or paper Sewing stretch fabrics First, baste the pieces of fabric together, and then sew without stretching the fabric. a Flat bed attachment 31 To change your machine to -reach areas. Sewing thin fabrics When sewing thin fabrics, the stitching may become misaligned or the fabric ...
...the presser foot. a Basting Using a free-arm style Free-arm sewing is convenient for sewing tubular and hard-to the free-arm style, lift out the flat bed attachment. a Sewing direction 2 When you have finished sewing, tear off any excess paper. Press the black button on the ...position. a Stabilizer material or paper Sewing stretch fabrics First, baste the pieces of fabric together, and then sew without stretching the fabric. a Flat bed attachment 31 To change your machine to -reach areas. Sewing thin fabrics When sewing thin fabrics, the stitching may become misaligned or the fabric ...

User Guide
Page 33
...és 3.5 (1/8) 0.0-7.0 (0-1/4) 1.4 (1/16) 0.0-4.0 (0-3/16) Yes ( J ) Ye*s** Rev.* Overcasting on stretch fabrics 5.0 (3/16) 0.0-7.0 (0-1/4) 2.5 0.5-4.0 Yes (3/32) (1/32-3/16) ( J ) No **Rfc.: Reinforcement ***Do not use the overcasting stitches to "Selecting stitching" (page 27). a Sew with the edge of the fabric c against the guide of the fabric against the d presser foot guide. NCBC2000.book Page 32 Thursday, October...
...és 3.5 (1/8) 0.0-7.0 (0-1/4) 1.4 (1/16) 0.0-4.0 (0-3/16) Yes ( J ) Ye*s** Rev.* Overcasting on stretch fabrics 5.0 (3/16) 0.0-7.0 (0-1/4) 2.5 0.5-4.0 Yes (3/32) (1/32-3/16) ( J ) No **Rfc.: Reinforcement ***Do not use the overcasting stitches to "Selecting stitching" (page 27). a Sew with the edge of the fabric c against the guide of the fabric against the d presser foot guide. NCBC2000.book Page 32 Thursday, October...
User Guide
Page 34
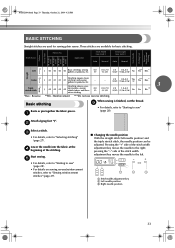
... Thursday, October 21, 2004 4:32 PM BASIC STITCHING Straight stitches are used for sewing plain seams. Three stitches are available for basic stitching. Stitch Name Pattern No. c • For details, refer to sew" (page 28). e • For details, refer to "Starting to sew" (page 28). • For details on sewing reverse/reinforcement stitches, refer to the left needle position) and...
... Thursday, October 21, 2004 4:32 PM BASIC STITCHING Straight stitches are used for sewing plain seams. Three stitches are available for basic stitching. Stitch Name Pattern No. c • For details, refer to sew" (page 28). e • For details, refer to "Starting to sew" (page 28). • For details on sewing reverse/reinforcement stitches, refer to the left needle position) and...


