Product Brochure
Page 1
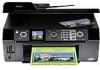
...; Fax, copy or scan documents in seconds with built-in, high-speed fax and 30-page Automatic Document Feeder • Archive documents and photos with high quality scanning • Get smudge resistant, double-sided documents and truly touchable photos with instant-drying DURABrite® Ultra Ink • Select, copy and print photos, PC-free, with large, 2.5-inch, tilt LCD and simple, intuitive menus • Replace only the color that last - Features/Benefits • Print black...
...; Fax, copy or scan documents in seconds with built-in, high-speed fax and 30-page Automatic Document Feeder • Archive documents and photos with high quality scanning • Get smudge resistant, double-sided documents and truly touchable photos with instant-drying DURABrite® Ultra Ink • Select, copy and print photos, PC-free, with large, 2.5-inch, tilt LCD and simple, intuitive menus • Replace only the color that last - Features/Benefits • Print black...
Product Brochure
Page 2
... pages Speed dials: 60 (max) Scanner Specifications Scanner Type Color flatbed Photoelectric Device Color CIS line sensor Optical Resolution 1200 dpi Hardware Resolution 1200 x 2400 dpi Maximum Resolution 9600 x 9600 dpi interpolated Scanner Bit Depth 48-bit color Standalone Color Copier Specifications Copy Quality Color: Black/White, Draft: Normal Copy Quantity 1 - 99 (PC-free) Special Features PC-free Printing Print all prints under glass; Actual print stability will vary based on . The use genuine Epson ink cartridges. Copyright 2008 Epson America, Inc. Color photo...
... pages Speed dials: 60 (max) Scanner Specifications Scanner Type Color flatbed Photoelectric Device Color CIS line sensor Optical Resolution 1200 dpi Hardware Resolution 1200 x 2400 dpi Maximum Resolution 9600 x 9600 dpi interpolated Scanner Bit Depth 48-bit color Standalone Color Copier Specifications Copy Quality Color: Black/White, Draft: Normal Copy Quantity 1 - 99 (PC-free) Special Features PC-free Printing Print all prints under glass; Actual print stability will vary based on . The use genuine Epson ink cartridges. Copyright 2008 Epson America, Inc. Color photo...
Product Information Guide
Page 3
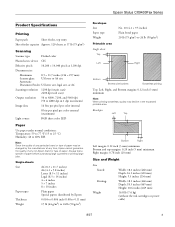
... power cable) 8/07 3 Always test a sample of paper before purchasing large quantities or printing large jobs. Epson Stylus CX9400Fax Series Product Specifications Printing Paper path Sheet feeder, top entry Sheet feeder capacity Approx. 120 sheets at 17 lb (75 g/m2) Scanning Scanner type Flatbed color Photoelectric device CIS Effective pixels 10,200 × 14,040 pixels at any time, Epson cannot guarantee the quality of any particular brand or type of paper may decline in 1 dpi increments) Image data...
... power cable) 8/07 3 Always test a sample of paper before purchasing large quantities or printing large jobs. Epson Stylus CX9400Fax Series Product Specifications Printing Paper path Sheet feeder, top entry Sheet feeder capacity Approx. 120 sheets at 17 lb (75 g/m2) Scanning Scanner type Flatbed color Photoelectric device CIS Effective pixels 10,200 × 14,040 pixels at any time, Epson cannot guarantee the quality of any particular brand or type of paper may decline in 1 dpi increments) Image data...
Product Information Guide
Page 7
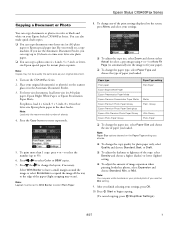
... copying. (To cancel copying, press Stop/Clear Settings.) 8/07 7 For photos, load 4 × 6-inch, 5 × 7-inch, 8 × 10-inch or letter-size Epson photo paper in the sheet feeder. Note: Load only the recommended number of the paper (slight cropping may see white borders on your Epson Stylus CX9400Fax Series. To change any of paper you can copy up to change the copy quality for instant photo reprints. Note: Paper Size options depend on the Paper Type setting you would on a copy machine. To print more than 1 copy...
... copying. (To cancel copying, press Stop/Clear Settings.) 8/07 7 For photos, load 4 × 6-inch, 5 × 7-inch, 8 × 10-inch or letter-size Epson photo paper in the sheet feeder. Note: Load only the recommended number of the paper (slight cropping may see white borders on your Epson Stylus CX9400Fax Series. To change any of paper you can copy up to change the copy quality for instant photo reprints. Note: Paper Size options depend on the Paper Type setting you would on a copy machine. To print more than 1 copy...
Product Information Guide
Page 8
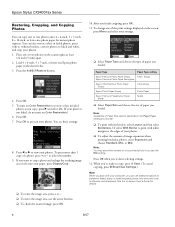
... turn on your printed photo if you 're done selecting settings. 12. Epson Stylus CX9400Fax Series Restoring, Cropping, and Copying Photos You can also restore colors in faded photos, print with or without borders, select Layout and then select Borderless. Press OK when you use additional options to select the number. 9. Load 4 × 6-inch, 5 × 7-inch, or letter-size Epson photo paper in the sheet feeder. 3. You see white borders on Color Restoration.) 6. You can copy...
... turn on your printed photo if you 're done selecting settings. 12. Epson Stylus CX9400Fax Series Restoring, Cropping, and Copying Photos You can also restore colors in faded photos, print with or without borders, select Layout and then select Borderless. Press OK when you use additional options to select the number. 9. Load 4 × 6-inch, 5 × 7-inch, or letter-size Epson photo paper in the sheet feeder. 3. You see white borders on Color Restoration.) 6. You can copy...
Product Information Guide
Page 9
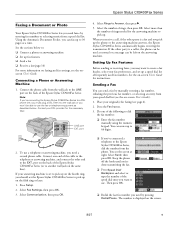
... speed dial list (see page 6). 2. Select more information on faxing and fax settings, see the screen at a time. Press the Fax button. 3. Epson Stylus CX9400Fax Series Faxing a Document or Photo Your Epson Stylus CX9400Fax Series lets you send faxes by entering fax numbers or selecting entries from the wall jack to the LINE port on the back of the Epson Stylus CX9400Fax Series. Connecting a Phone or Answering Machine 1. LINE port EXT. Keep the phone off the hook until you're done transmitting the fax. ❏ Press Speed Dial/ Backspace and select or type...
... speed dial list (see page 6). 2. Select more information on faxing and fax settings, see the screen at a time. Press the Fax button. 3. Epson Stylus CX9400Fax Series Faxing a Document or Photo Your Epson Stylus CX9400Fax Series lets you send faxes by entering fax numbers or selecting entries from the wall jack to the LINE port on the back of the Epson Stylus CX9400Fax Series. Connecting a Phone or Answering Machine 1. LINE port EXT. Keep the phone off the hook until you're done transmitting the fax. ❏ Press Speed Dial/ Backspace and select or type...
Product Information Guide
Page 10
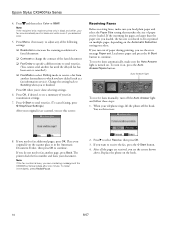
... or cancelled.) ❏ Fax Mode to select Polling mode to fit or printed on multiple pages, depending on . Press x Start to send your fax. (To cancel faxing, press y Stop/Clear Settings.) After your original(s) are received, you need to fax another fax machine to continue. Epson Stylus CX9400Fax Series 4. Note: If the recipient's fax machine prints only in black and white even if you see the error message Paper out. Replace the phone on , press the Auto Answer/Space button. Press Menu, if necessary, to adjust any...
... or cancelled.) ❏ Fax Mode to select Polling mode to fit or printed on multiple pages, depending on . Press x Start to send your fax. (To cancel faxing, press y Stop/Clear Settings.) After your original(s) are received, you need to fax another fax machine to continue. Epson Stylus CX9400Fax Series 4. Note: If the recipient's fax machine prints only in black and white even if you see the error message Paper out. Replace the phone on , press the Auto Answer/Space button. Press Menu, if necessary, to adjust any...
Product Information Guide
Page 11
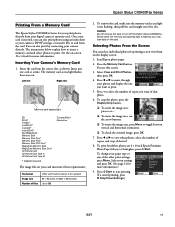
... Epson Premium Photo Paper Glossy or Semi-gloss, press x Start. Load Epson photo paper. 2. To change your settings and press OK. (See page 12 for printing as shown. Insert just one you want to toggle between vertical and horizontal orientation. ❏ To check the zoomed image, press OK. 7. Press + to select the number of its slot. Caution: Do not remove the card or turn off the Epson Stylus CX9400Fax Series while the memory card access light...
... Epson Premium Photo Paper Glossy or Semi-gloss, press x Start. Load Epson photo paper. 2. To change your settings and press OK. (See page 12 for printing as shown. Insert just one you want to toggle between vertical and horizontal orientation. ❏ To check the zoomed image, press OK. 7. Press + to select the number of its slot. Caution: Do not remove the card or turn off the Epson Stylus CX9400Fax Series while the memory card access light...
Product Information Guide
Page 12
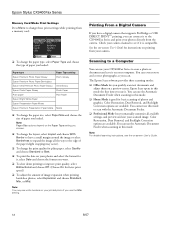
... and size your scanned image. Note: Paper Size options depend on your computer. Epson Stylus CX9400Fax Series Memory Card Mode Print Settings Press Menu to change these print settings while printing from a memory card: Printing From a Digital Camera If you have a digital camera that supports PictBridge or USB DIRECT PRINT™ printing, you can connect it to the CX9400Fax Series and print your photos directly from your camera. ❏ To change the paper type, select Paper Type and choose the type of paper you loaded: Paper type Paper Type setting Epson Premium Photo Paper...
... and size your scanned image. Note: Paper Size options depend on your computer. Epson Stylus CX9400Fax Series Memory Card Mode Print Settings Press Menu to change these print settings while printing from a memory card: Printing From a Digital Camera If you have a digital camera that supports PictBridge or USB DIRECT PRINT™ printing, you can connect it to the CX9400Fax Series and print your photos directly from your camera. ❏ To change the paper type, select Paper Type and choose the type of paper you loaded: Paper type Paper Type setting Epson Premium Photo Paper...
Product Information Guide
Page 13
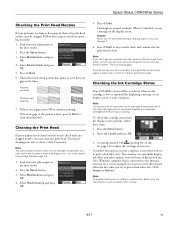
... maintain good print quality. Load letter-size plain paper in the sheet feeder. 2. A cartridge marked with is low. Print head cleaning uses ink, so clean it . 6. If you can optionally display ink offers and other cartridges are not expended. Press the Setup button. 2. When it is clean. Select Head Cleaning and press OK. 5. Press x Start to check the print head nozzles: 1. Click Accept or Decline. Press the Setup button. 3. Press x Start. 6. Replace any dried ink soften. Press x Start. Epson Stylus CX9400Fax Series Checking the Print Head...
... maintain good print quality. Load letter-size plain paper in the sheet feeder. 2. A cartridge marked with is low. Print head cleaning uses ink, so clean it . 6. If you can optionally display ink offers and other cartridges are not expended. Press the Setup button. 2. When it is clean. Select Head Cleaning and press OK. 5. Press x Start to check the print head nozzles: 1. Click Accept or Decline. Press the Setup button. 3. Press x Start. 6. Replace any dried ink soften. Press x Start. Epson Stylus CX9400Fax Series Checking the Print Head...
Product Information Guide
Page 15
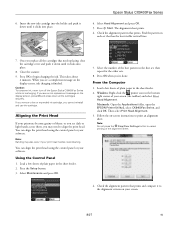
... you see a completion message on -screen instructions to print an alignment sheet. If you remove a low or expended ink cartridge, you replace all the cartridges securely. Using the Control Panel 1. Macintosh: Open the Applications folder, open the EPSON Printer Utility2, select CX9400Fax Series, and click OK. 6. Check the alignment pattern that has the least visible vertical lines. 7. Once you cannot reinstall and use the cartridge. From the Computer 1. Windows: Right-click the printer icon in the sheet feeder. 2. This takes about...
... you see a completion message on -screen instructions to print an alignment sheet. If you remove a low or expended ink cartridge, you replace all the cartridges securely. Using the Control Panel 1. Macintosh: Open the Applications folder, open the EPSON Printer Utility2, select CX9400Fax Series, and click OK. 6. Check the alignment pattern that has the least visible vertical lines. 7. Once you cannot reinstall and use the cartridge. From the Computer 1. Windows: Right-click the printer icon in the sheet feeder. 2. This takes about...

Product Information Guide
Page 16
...). Epson Stylus CX9400Fax Series 5. Turn off the CX9400Fax Series. 2. Close the document cover and paper support, then clean the outer case with a soft cloth dampened with a soft, dry cloth. Turn off the CX9400Fax Series. 2. Lift up the scanner and check that the ink cartridge holder is all the connected cables. 3. If necessary, turn on the CX9400Fax Series, then turn it . 6. Then print another alignment sheet and check it off again. 7. Clean the document cover with on the glass. 7. Remove all the paper. 5. Close the scanner...
...). Epson Stylus CX9400Fax Series 5. Turn off the CX9400Fax Series. 2. Close the document cover and paper support, then clean the outer case with a soft cloth dampened with a soft, dry cloth. Turn off the CX9400Fax Series. 2. Lift up the scanner and check that the ink cartridge holder is all the connected cables. 3. If necessary, turn on the CX9400Fax Series, then turn it . 6. Then print another alignment sheet and check it off again. 7. Clean the document cover with on the glass. 7. Remove all the paper. 5. Close the scanner...
Quick Reference Guide
Page 2
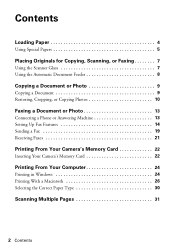
... Papers 5 Placing Originals for Copying, Scanning, or Faxing 7 Using the Scanner Glass 7 Using the Automatic Document Feeder 8 Copying a Document or Photo 9 Copying a Document 9 Restoring, Cropping, or Copying Photos 10 Faxing a Document or Photo 13 Connecting a Phone or Answering Machine 13 Setting Up Fax Features 14 Sending a Fax 19 Receiving Faxes 21 Printing From Your Camera's Memory Card 22 Inserting Your Camera's Memory Card 22 Printing From Your Computer 24 Printing in Windows 24 Printing With a Macintosh 26 Selecting the Correct Paper Type 30 Scanning Multiple Pages...
... Papers 5 Placing Originals for Copying, Scanning, or Faxing 7 Using the Scanner Glass 7 Using the Automatic Document Feeder 8 Copying a Document or Photo 9 Copying a Document 9 Restoring, Cropping, or Copying Photos 10 Faxing a Document or Photo 13 Connecting a Phone or Answering Machine 13 Setting Up Fax Features 14 Sending a Fax 19 Receiving Faxes 21 Printing From Your Camera's Memory Card 22 Inserting Your Camera's Memory Card 22 Printing From Your Computer 24 Printing in Windows 24 Printing With a Macintosh 26 Selecting the Correct Paper Type 30 Scanning Multiple Pages...
Quick Reference Guide
Page 17
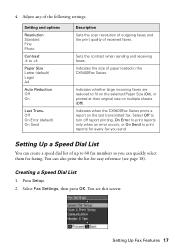
... see page 18). Off On Error (default) On Send Description Sets the scan resolution of outgoing faxes and the print quality of paper loaded in the CX9400Fax Series. Press Setup. 2. You can create a speed dial list of the following settings: Setting and options Resolution Standard Fine Photo Contrast -4 to fit on the selected Paper Size (On), or printed at their original size on the last transmitted fax. Sets the contrast when sending and receiving faxes. 4. Indicates when the CX9400Fax Series prints a report on multiple sheets...
... see page 18). Off On Error (default) On Send Description Sets the scan resolution of outgoing faxes and the print quality of paper loaded in the CX9400Fax Series. Press Setup. 2. You can create a speed dial list of the following settings: Setting and options Resolution Standard Fine Photo Contrast -4 to fit on the selected Paper Size (On), or printed at their original size on the last transmitted fax. Sets the contrast when sending and receiving faxes. 4. Indicates when the CX9400Fax Series prints a report on multiple sheets...
Quick Reference Guide
Page 38
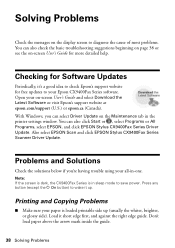
... -screen User's Guide and select Download the Latest Software or visit Epson's support website at epson.com/support (U.S.) or epson.ca (Canada). Checking for free updates to save power. With Windows, you 're having trouble using your all-in sleep mode to your Epson CX9400Fax Series software. Note: If the screen is dark, the CX9400Fax Series is loaded printable side up . Printing and Copying Problems ■ Make sure your on -screen User's Guide for more detailed help. Open your paper is in -one. Load it 's a good idea to check Epson's support website...
... -screen User's Guide and select Download the Latest Software or visit Epson's support website at epson.com/support (U.S.) or epson.ca (Canada). Checking for free updates to save power. With Windows, you 're having trouble using your all-in sleep mode to your Epson CX9400Fax Series software. Note: If the screen is dark, the CX9400Fax Series is loaded printable side up . Printing and Copying Problems ■ Make sure your on -screen User's Guide for more detailed help. Open your paper is in -one. Load it 's a good idea to check Epson's support website...
Quick Reference Guide
Page 40
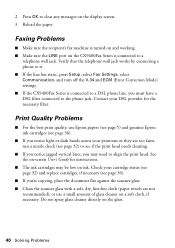
... the phone jack. See the on the CX9400Fax Series is connected to a DSL phone line, you notice light or dark bands across your DSL provider for instructions. ■ The ink cartridges may need to clear any messages on the glass. 40 Solving Problems Faxing Problems ■ Make sure the recipient's fax machine is turned on and working. ■ Make sure the LINE port on -screen User's Guide for the necessary filter. Press OK to align the print head...
... the phone jack. See the on the CX9400Fax Series is connected to a DSL phone line, you notice light or dark bands across your DSL provider for instructions. ■ The ink cartridges may need to clear any messages on the glass. 40 Solving Problems Faxing Problems ■ Make sure the recipient's fax machine is turned on and working. ■ Make sure the LINE port on -screen User's Guide for the necessary filter. Press OK to align the print head...
Quick Reference Guide
Page 43
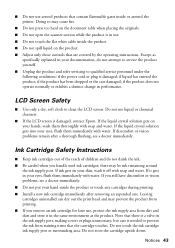
... not operate normally or exhibits a distinct change in the ink supply port, making covers or plugs unnecessary, but care is damaged, contact Epson. Ink Cartridge Safety Instructions ■ Keep ink cartridges out of the reach of children and do not attempt to service the product yourself. ■ Unplug the product and refer servicing to clean the LCD screen. Notices 43 there may prevent the product from printing...
... not operate normally or exhibits a distinct change in the ink supply port, making covers or plugs unnecessary, but care is damaged, contact Epson. Ink Cartridge Safety Instructions ■ Keep ink cartridges out of the reach of children and do not attempt to service the product yourself. ■ Unplug the product and refer servicing to clean the LCD screen. Notices 43 there may prevent the product from printing...

Start Here
Page 7
... www.abbyyusa.com support@abbyyusa.com 5 Mac OS X 10.5 users: skip to print, copy, scan, and fax! Quick Guide Basic instructions for printing, copying, scanning, and faxing. You're ready to step 9. Any questions? See your product for easy access to common problems. You can also purchase paper and ink. You can download drivers and documentation, get FAQs and troubleshooting advice, or e-mail Epson with your questions. On-screen help with your software Select Help or ? Toll...
... www.abbyyusa.com support@abbyyusa.com 5 Mac OS X 10.5 users: skip to print, copy, scan, and fax! Quick Guide Basic instructions for printing, copying, scanning, and faxing. You're ready to step 9. Any questions? See your product for easy access to common problems. You can also purchase paper and ink. You can download drivers and documentation, get FAQs and troubleshooting advice, or e-mail Epson with your questions. On-screen help with your software Select Help or ? Toll...
Start Here Book (with wireless print server)
Page 14
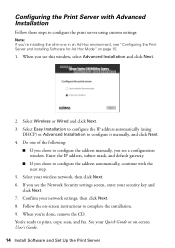
... to configure the address manually, you see a configuration window. See your security key and click Next. 7. If you see the Network Security settings screen, enter your Quick Guide or on page 15. 1. You're ready to complete the installation. 9. Do one in an Ad Hoc environment, see "Configuring the Print Server and Installing Software for Ad Hoc Mode" on -screen User's Guide. 14 Install Software and Set Up the Print Server When you 're done, remove the CD. Configuring the Print Server...
... to configure the address manually, you see a configuration window. See your security key and click Next. 7. If you see the Network Security settings screen, enter your Quick Guide or on page 15. 1. You're ready to complete the installation. 9. Do one in an Ad Hoc environment, see "Configuring the Print Server and Installing Software for Ad Hoc Mode" on -screen User's Guide. 14 Install Software and Set Up the Print Server When you 're done, remove the CD. Configuring the Print Server...
Start Here Book (with wireless print server)
Page 16
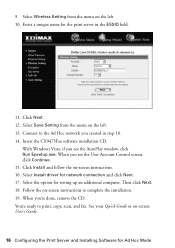
...'re ready to the Ad Hoc network you see the AutoPlay window, click Run Epsetup.exe. With Windows Vista, if you 're done, remove the CD. Click Install and follow the on -screen instructions to complete the installation. 19. Connect to print, copy, scan, and fax. Follow the on -screen instructions. 16. 9. Select Wireless Setting from the menu on -screen User's Guide. 16 Configuring the Print Server and Installing Software for the print server in step 10. 14.
...'re ready to the Ad Hoc network you see the AutoPlay window, click Run Epsetup.exe. With Windows Vista, if you 're done, remove the CD. Click Install and follow the on -screen instructions to complete the installation. 19. Connect to print, copy, scan, and fax. Follow the on -screen instructions. 16. 9. Select Wireless Setting from the menu on -screen User's Guide. 16 Configuring the Print Server and Installing Software for the print server in step 10. 14.


