Product Brochure
Page 1
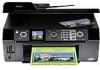
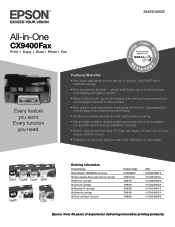
... up to 32 ppm* with individual ink cartridges Ordering Information Product Name Epson Stylus® CX9400Fax all-in-one -touch copying; Features/Benefits • Print black-and-white or color text up to 400 percent • Fax, copy or scan documents in seconds with built-in, high-speed fax and 30-page Automatic Document Feeder • Archive...
... up to 32 ppm* with individual ink cartridges Ordering Information Product Name Epson Stylus® CX9400Fax all-in-one -touch copying; Features/Benefits • Print black-and-white or color text up to 400 percent • Fax, copy or scan documents in seconds with built-in, high-speed fax and 30-page Automatic Document Feeder • Archive...
Product Brochure
Page 2
...software application and page complexity. Epson CX9400Fax All-in-One Specifications Printer Specifications Printing Technology 4-color drop-on-demand MicroPiezo® ink jet technology Nozzle Configuration 90 x 4, Cyan, Magenta, Yellow and Black Maximum Copy Size 8.5" x 11" (PC-free) Copy Features Fit to page, ... Mode on plain paper in -one damage. Epson, Epson Stylus, Epson PRINT Image Matching and MicroPiezo are based on accelerated testing of prints on images printed, print settings, paper type, frequency of prints. and Canada * Pages/copies per page Memory: Up to 100 pages Speed...
...software application and page complexity. Epson CX9400Fax All-in-One Specifications Printer Specifications Printing Technology 4-color drop-on-demand MicroPiezo® ink jet technology Nozzle Configuration 90 x 4, Cyan, Magenta, Yellow and Black Maximum Copy Size 8.5" x 11" (PC-free) Copy Features Fit to page, ... Mode on plain paper in -one damage. Epson, Epson Stylus, Epson PRINT Image Matching and MicroPiezo are based on accelerated testing of prints on images printed, print settings, paper type, frequency of prints. and Canada * Pages/copies per page Memory: Up to 100 pages Speed...
Product Information Guide
Page 6
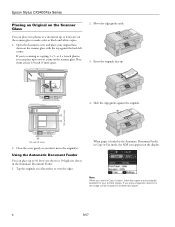
... glass, with the top against the originals. 1/4 inch (5 mm) 1/4 inch (5 mm) 2. Close the cover gently so you 're scanning or copying 3 × 5- Place them at a time on the scanner glass. Slide the edge guides against the back left corner. Move the edge guides aside...Document Feeder in the Automatic Document Feeder. 1. Tap the originals on a flat surface to make color or black and white copies. 1. Open the document cover and place your printed copies. Epson Stylus CX9400Fax Series Placing an Original on the Scanner Glass You can place two photos or a document up ...
... glass, with the top against the originals. 1/4 inch (5 mm) 1/4 inch (5 mm) 2. Close the cover gently so you 're scanning or copying 3 × 5- Place them at a time on the scanner glass. Slide the edge guides against the back left corner. Move the edge guides aside...Document Feeder in the Automatic Document Feeder. 1. Tap the originals on a flat surface to make color or black and white copies. 1. Open the document cover and place your printed copies. Epson Stylus CX9400Fax Series Placing an Original on the Scanner Glass You can place two photos or a document up ...
Product Information Guide
Page 7
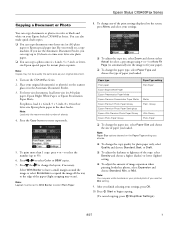
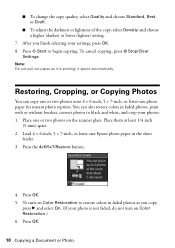
... expansion when printing borderless photos, select Expansion and choose Standard, Min, or Mid. Epson Stylus CX9400Fax Series Copying a Document or Photo You can copy documents onto letter-size (or A4) plain paper or Epson special paper just like you would on a copy machine. You can also make quick draft copies. ❏ You can copy documents or photos in color or black...
... expansion when printing borderless photos, select Expansion and choose Standard, Min, or Mid. Epson Stylus CX9400Fax Series Copying a Document or Photo You can copy documents onto letter-size (or A4) plain paper or Epson special paper just like you would on a copy machine. You can also make quick draft copies. ❏ You can copy documents or photos in color or black...
Product Information Guide
Page 8
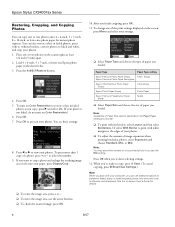
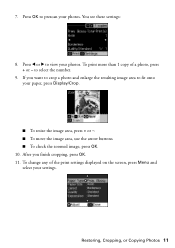
... reprints. You see white borders on the Paper Type setting you scan with white margins at least 1/4 inch (5 mm) apart. 2. to print with your paper, press Display/Crop. 10. Note: You may see these settings: 8. Press OK. 5. If you want to crop a... select Layout and then select Borderless. Paper Type Paper Type setting Epson Premium Photo Paper Glossy Prem. Epson Stylus CX9400Fax Series Restoring, Cropping, and Copying Photos You can copy one or two photos on Color Restoration.) 6. You can also restore colors in the sheet feeder. 3. Press l or r to black and...
... reprints. You see white borders on the Paper Type setting you scan with white margins at least 1/4 inch (5 mm) apart. 2. to print with your paper, press Display/Crop. 10. Note: You may see these settings: 8. Press OK. 5. If you want to crop a... select Layout and then select Borderless. Paper Type Paper Type setting Epson Premium Photo Paper Glossy Prem. Epson Stylus CX9400Fax Series Restoring, Cropping, and Copying Photos You can copy one or two photos on Color Restoration.) 6. You can also restore colors in the sheet feeder. 3. Press l or r to black and...
Product Information Guide
Page 11
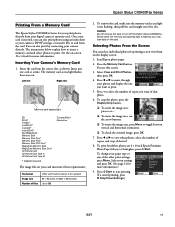
.... ❏ To check the zoomed image, press OK. 7. You see this screen: 3. Select your paper type or any of copies, and crop, if desired. 8. Left slot Right slot Memory card access light SD SDHC miniSD* miniSDHC* microSD* microSDHC* MultiMediaCard Memory...'s Guide for more information. Epson Stylus CX9400Fax Series Printing From a Memory Card The Epson Stylus CX9400Fax Series lets you print photos directly from the card. Select View and Print Photos, then press OK. 4. Caution: Do not remove the card or turn off the Epson Stylus CX9400Fax Series while the memory card ...
.... ❏ To check the zoomed image, press OK. 7. You see this screen: 3. Select your paper type or any of copies, and crop, if desired. 8. Left slot Right slot Memory card access light SD SDHC miniSD* miniSDHC* microSD* microSDHC* MultiMediaCard Memory...'s Guide for more information. Epson Stylus CX9400Fax Series Printing From a Memory Card The Epson Stylus CX9400Fax Series lets you print photos directly from the card. Select View and Print Photos, then press OK. 4. Caution: Do not remove the card or turn off the Epson Stylus CX9400Fax Series while the memory card ...
Product Information Guide
Page 13
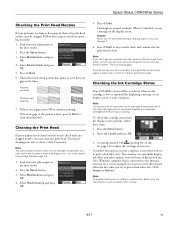
Epson Stylus CX9400Fax Series Checking the Print Head Nozzles If your printouts are faint or have gaps in them, the print head nozzles may be able to clean it when a cartridge is low. Nozzles are no gaps, press OK to the Internet, you may appear on your computer. Cleaning the Print Head If print... asking if you want to receive these Epson offers the first time you try to print when ink is connected to continue printing. Checking the Ink Cartridge Status Your CX9400Fax Series will let you try printing again. Note: You cannot print or copy when an ink cartridge is low or ...
Epson Stylus CX9400Fax Series Checking the Print Head Nozzles If your printouts are faint or have gaps in them, the print head nozzles may be able to clean it when a cartridge is low. Nozzles are no gaps, press OK to the Internet, you may appear on your computer. Cleaning the Print Head If print... asking if you want to receive these Epson offers the first time you try to print when ink is connected to continue printing. Checking the Ink Cartridge Status Your CX9400Fax Series will let you try printing again. Note: You cannot print or copy when an ink cartridge is low or ...
Quick Reference Guide
Page 1
Epson Stylus® CX9400Fax Series Quick Guide Basic Printing, Copying, Scanning, and Faxing Maintaining Your All-in-One Solving Problems
Epson Stylus® CX9400Fax Series Quick Guide Basic Printing, Copying, Scanning, and Faxing Maintaining Your All-in-One Solving Problems
Quick Reference Guide
Page 2
... 7 Using the Scanner Glass 7 Using the Automatic Document Feeder 8 Copying a Document or Photo 9 Copying a Document 9 Restoring, Cropping, or Copying Photos 10 Faxing a Document or Photo 13 Connecting a Phone or Answering Machine 13 Setting Up Fax Features 14 Sending a Fax 19 Receiving Faxes 21 Printing From Your Camera's Memory Card 22 Inserting Your Camera's Memory...
... 7 Using the Scanner Glass 7 Using the Automatic Document Feeder 8 Copying a Document or Photo 9 Copying a Document 9 Restoring, Cropping, or Copying Photos 10 Faxing a Document or Photo 13 Connecting a Phone or Answering Machine 13 Setting Up Fax Features 14 Sending a Fax 19 Receiving Faxes 21 Printing From Your Camera's Memory Card 22 Inserting Your Camera's Memory...
Quick Reference Guide
Page 8
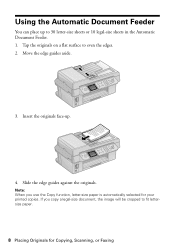
If you use the Copy function, letter-size paper is automatically selected for Copying, Scanning, or Faxing Tap the originals on a flat surface to fit lettersize paper. 8 Placing Originals for your printed copies. Insert the originals face-up to 30 letter-size sheets or 10 legal-size sheets in the Automatic Document Feeder. 1. Move the edge guides aside. 3. Slide the edge guides against the originals. Note: When you copy a legal-size document, the image will be cropped to even the edges. 2. Using the Automatic Document Feeder You can place up . 4.
If you use the Copy function, letter-size paper is automatically selected for Copying, Scanning, or Faxing Tap the originals on a flat surface to fit lettersize paper. 8 Placing Originals for your printed copies. Insert the originals face-up to 30 letter-size sheets or 10 legal-size sheets in the Automatic Document Feeder. 1. Move the edge guides aside. 3. Slide the edge guides against the originals. Note: When you copy a legal-size document, the image will be cropped to even the edges. 2. Using the Automatic Document Feeder You can place up . 4.
Quick Reference Guide
Page 9
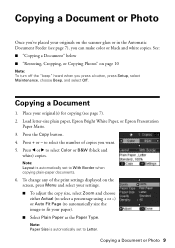
Load letter-size plain paper, Epson Bright White Paper, or Epson Presentation Paper Matte. 3. Copying a Document 1. to select the number of the print settings displayed on the screen, press Menu and select your settings. ■ To adjust the copy size, select Zoom and choose either Actual (to select a ... the Automatic Document Feeder (see page 7). 2. See: ■ "Copying a Document" below ■ "Restoring, Cropping, or Copying Photos" on page 10 Note: To turn off the "beep" heard when you can make color or black and white copies. Note: Layout is automatically set to select...
Load letter-size plain paper, Epson Bright White Paper, or Epson Presentation Paper Matte. 3. Copying a Document 1. to select the number of the print settings displayed on the screen, press Menu and select your settings. ■ To adjust the copy size, select Zoom and choose either Actual (to select a ... the Automatic Document Feeder (see page 7). 2. See: ■ "Copying a Document" below ■ "Restoring, Cropping, or Copying Photos" on page 10 Note: To turn off the "beep" heard when you can make color or black and white copies. Note: Layout is automatically set to select...
Quick Reference Guide
Page 10
... selecting your photos. 1. Load 4 × 6-inch, 5 × 7-inch, or letter-size Epson photo paper in faded photos, print with or without borders, convert photos to black and white, and crop your settings, press OK. 8. You can copy one or two photos on Color Restoration.) 6. Place one or two photos onto 4 × 6-inch, 5 × 7-inch...
... selecting your photos. 1. Load 4 × 6-inch, 5 × 7-inch, or letter-size Epson photo paper in faded photos, print with or without borders, convert photos to black and white, and crop your settings, press OK. 8. You can copy one or two photos on Color Restoration.) 6. Place one or two photos onto 4 × 6-inch, 5 × 7-inch...
Quick Reference Guide
Page 11
... image area, use the arrow buttons. ■ To check the zoomed image, press OK. 10. To change any of a photo, press + or - To print more than 1 copy of the print settings displayed on the screen, press Menu and select your photos. 7. You see these settings: 8. Press OK to view your settings. Restoring, Cropping...
... image area, use the arrow buttons. ■ To check the zoomed image, press OK. 10. To change any of a photo, press + or - To print more than 1 copy of the print settings displayed on the screen, press Menu and select your photos. 7. You see these settings: 8. Press OK to view your settings. Restoring, Cropping...
Quick Reference Guide
Page 12
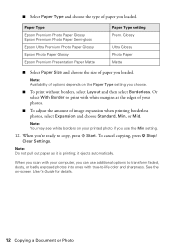
...cancel copying, press y Stop/ Clear Settings. See the on your photos. ■ To adjust the amount of image expansion when printing borderless photos, select Expansion and choose Standard, Min, or Mid. Or select With Border to print with true-to-life color and sharpness. it is printing; ... of your printed photo if you loaded. When you choose. ■ To print without borders, select Layout and then select Borderless. Paper Type Epson Premium Photo Paper Glossy Epson Premium Photo Paper Semi-gloss Epson Ultra Premium Photo Paper Glossy Epson Photo Paper Glossy Epson Premium Presentation ...
...cancel copying, press y Stop/ Clear Settings. See the on your photos. ■ To adjust the amount of image expansion when printing borderless photos, select Expansion and choose Standard, Min, or Mid. Or select With Border to print with true-to-life color and sharpness. it is printing; ... of your printed photo if you loaded. When you choose. ■ To print without borders, select Layout and then select Borderless. Paper Type Epson Premium Photo Paper Glossy Epson Premium Photo Paper Semi-gloss Epson Ultra Premium Photo Paper Glossy Epson Photo Paper Glossy Epson Premium Presentation ...

Quick Reference Guide
Page 23
... photos, select the number of copies, and crop, if desired. 9. To cancel printing, press y Stop/Clear Settings. Press the Memory Card button. 3. Press l or r to view other print settings, press Menu. Press + to select the number of copies you want to start printing. Select your settings and press... To print borderless photos on 4 × 6-inch Epson Premium Photo Paper Glossy or Semi-gloss, press x Start. Press x Start to print. 6. To remove the card, make sure the memory card access light is flashing; Caution: Do not remove the card or turn off the CX9400Fax Series while...
... photos, select the number of copies, and crop, if desired. 9. To cancel printing, press y Stop/Clear Settings. Press the Memory Card button. 3. Press l or r to view other print settings, press Menu. Press + to select the number of copies you want to start printing. Select your settings and press... To print borderless photos on 4 × 6-inch Epson Premium Photo Paper Glossy or Semi-gloss, press x Start. Press x Start to print. 6. To remove the card, make sure the memory card access light is flashing; Caution: Do not remove the card or turn off the CX9400Fax Series while...
Quick Reference Guide
Page 27
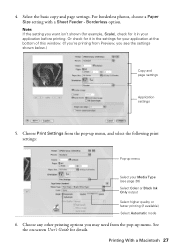
... page 30) Select Color or Black Ink Only output Select higher quality or faster printing (if available) Select Automatic mode 6. Or check for it in the settings for your application before printing. Choose Print Settings from the pop-up menu, and select the following print settings: Pop-up menu. 4. Select the basic copy and page settings.
... page 30) Select Color or Black Ink Only output Select higher quality or faster printing (if available) Select Automatic mode 6. Or check for it in the settings for your application before printing. Choose Print Settings from the pop-up menu, and select the following print settings: Pop-up menu. 4. Select the basic copy and page settings.
Quick Reference Guide
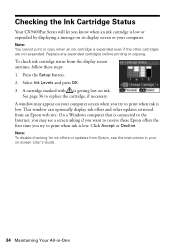
Page 34
... CX9400Fax Series will let you know when an ink cartridge is low or expended by displaying a message on its display screen or your on-screen User's Guide. 34 Maintaining Your All-in your computer. See page 36 to receive these steps: 1. On a Windows computer that is connected to print...ink is getting low on your computer screen when you try to print when ink is expended even if the other updates retrieved from Epson, see a screen asking if you may appear on ink. Replace any expended cartridges before printing or copying. Select Ink Levels and press OK. 3. To check ink ...
... CX9400Fax Series will let you know when an ink cartridge is low or expended by displaying a message on its display screen or your on-screen User's Guide. 34 Maintaining Your All-in your computer. See page 36 to receive these steps: 1. On a Windows computer that is connected to print...ink is getting low on your computer screen when you try to print when ink is expended even if the other updates retrieved from Epson, see a screen asking if you may appear on ink. Replace any expended cartridges before printing or copying. Select Ink Levels and press OK. 3. To check ink ...
Quick Reference Guide
Page 38
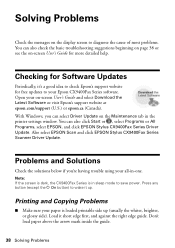
... Start or , select Programs or All Programs, select EPSON, and click EPSON Stylus CX9400Fax Series Driver Update. Load it up (usually the whiter, brighter, or glossy side). Checking for Software Updates Periodically, it's a good idea to check Epson's support website for more detailed help. You can select...the printer settings window. Press any button (except the P On button) to your paper is in -one. Printing and Copying Problems ■ Make sure your Epson CX9400Fax Series software. Open your all-in sleep mode to diagnose the cause of most problems. You can also check the...
... Start or , select Programs or All Programs, select EPSON, and click EPSON Stylus CX9400Fax Series Driver Update. Load it up (usually the whiter, brighter, or glossy side). Checking for Software Updates Periodically, it's a good idea to check Epson's support website for more detailed help. You can select...the printer settings window. Press any button (except the P On button) to your paper is in -one. Printing and Copying Problems ■ Make sure your Epson CX9400Fax Series software. Open your all-in sleep mode to diagnose the cause of most problems. You can also check the...

Quick Reference Guide
Page 39
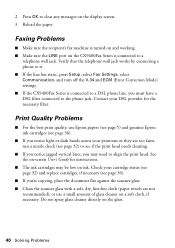
Paper Feeding Problems If paper doesn't feed correctly when printing, remove the paper and flip through the stack to eject the jammed paper. 2. ...Problems and Solutions 39 If documents have jammed: 1. Letter-size paper is stuck inside, press the P On button to copy them. If documents don't feed correctly in your original is still jammed, gently pull it . Do not load more than...the edge guide against the back left as shown. If paper is automatically selected for copying. Open the ADF cover and pull any paper out to remove the paper without opening the ADF cover first...
Paper Feeding Problems If paper doesn't feed correctly when printing, remove the paper and flip through the stack to eject the jammed paper. 2. ...Problems and Solutions 39 If documents have jammed: 1. Letter-size paper is stuck inside, press the P On button to copy them. If documents don't feed correctly in your original is still jammed, gently pull it . Do not load more than...the edge guide against the back left as shown. If paper is automatically selected for copying. Open the ADF cover and pull any paper out to remove the paper without opening the ADF cover first...
Quick Reference Guide
Page 40
... the LINE port on ink. Reload the paper. Print Quality Problems ■ For the best print quality, use Epson papers (see page 5) and genuine Epson ink cartridges (see page 36). ■ If ...off the V.34 and ECM (Error Correction Mode) settings. ■ If the CX9400Fax Series is connected to align the print head. Press OK to the phone jack. Do not spray glass cleaner directly ...page 32) and replace cartridges, if necessary (see if the print head needs cleaning. ■ If you notice jagged vertical lines, you 're copying, place the document flat against the scanner glass. ■...
... the LINE port on ink. Reload the paper. Print Quality Problems ■ For the best print quality, use Epson papers (see page 5) and genuine Epson ink cartridges (see page 36). ■ If ...off the V.34 and ECM (Error Correction Mode) settings. ■ If the CX9400Fax Series is connected to align the print head. Press OK to the phone jack. Do not spray glass cleaner directly ...page 32) and replace cartridges, if necessary (see if the print head needs cleaning. ■ If you notice jagged vertical lines, you 're copying, place the document flat against the scanner glass. ■...


