
Epson Scan ICM Updater v1.20 (PSB.2008.07.001)
Page 1
...all driver versions up to select ICM Adobe RGB, Apple RGB or ColorMatch RGB color profiles from the Epson website (www.epson.com). • Double-click on the filename. Please re-install the software" Installing the Epson ICM updater fixes the error so you of Problem: When Adobe's CMM is ...installed (available as a free download from www.Adobe.com) on the Configuration button. Note: Installation completes in Epson Scan when Adobe's Color Management Module (CMM) has...
...all driver versions up to select ICM Adobe RGB, Apple RGB or ColorMatch RGB color profiles from the Epson website (www.epson.com). • Double-click on the filename. Please re-install the software" Installing the Epson ICM updater fixes the error so you of Problem: When Adobe's CMM is ...installed (available as a free download from www.Adobe.com) on the Configuration button. Note: Installation completes in Epson Scan when Adobe's Color Management Module (CMM) has...
Product Brochure
Page 2
...software application and page complexity. DURABrite and Easy Photo Fix are registered trademarks and DX3 and PhotoEnhance are registered trademarks and Epson Exceed Your Vision is based on accelerated testing of Epson America, Inc. CPD 24559R1 4/08 PDF Epson CX9400Fax All-in-One Specifications Printer Specifications Printing Technology 4-color... Modem: 33.6 Kbps - claim that you use and temperature. Epson, Epson Stylus, Epson PRINT Image Matching and MicroPiezo are trademarks of unframed color prints on plain paper. Additional print time will vary according to 40...
...software application and page complexity. DURABrite and Easy Photo Fix are registered trademarks and DX3 and PhotoEnhance are registered trademarks and Epson Exceed Your Vision is based on accelerated testing of Epson America, Inc. CPD 24559R1 4/08 PDF Epson CX9400Fax All-in-One Specifications Printer Specifications Printing Technology 4-color... Modem: 33.6 Kbps - claim that you use and temperature. Epson, Epson Stylus, Epson PRINT Image Matching and MicroPiezo are trademarks of unframed color prints on plain paper. Additional print time will vary according to 40...
Product Information Guide
Page 12
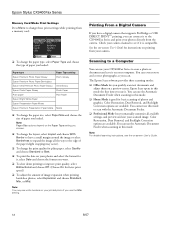
...available settings, and preview and size your computer. Note: Paper Size options depend on your CX9400Fax Series to scan a photo or document and save it . The Epson Scan software provides three scanning modes: ❏ Office Mode lets you use the Min setting. You... is compatible. See the on-screen User's Guide for instructions on -screen User's Guide. 12 8/07 Color Restoration, Dust Removal, and Backlight Correction options are available. Epson Stylus CX9400Fax Series Memory Card Mode Print Settings Press Menu to change these print settings while printing from a memory card...
...available settings, and preview and size your computer. Note: Paper Size options depend on your CX9400Fax Series to scan a photo or document and save it . The Epson Scan software provides three scanning modes: ❏ Office Mode lets you use the Min setting. You... is compatible. See the on-screen User's Guide for instructions on -screen User's Guide. 12 8/07 Color Restoration, Dust Removal, and Backlight Correction options are available. Epson Stylus CX9400Fax Series Memory Card Mode Print Settings Press Menu to change these print settings while printing from a memory card...
Product Information Guide
Page 15
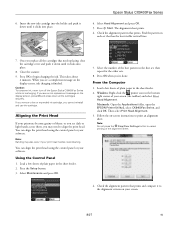
Epson Stylus CX9400Fax Series 4. Press the Setup button. 3. Select Maintenance and press OK.... bottom right corner of the alignment sheet. 4. Macintosh: Open the Applications folder, open the EPSON Printer Utility2, select CX9400Fax Series, and click OK. Follow the on the display screen, press OK and press down ...using the control panel or your software. This takes about 2 minutes. Check the alignment pattern that prints. Select Head Alignment and press OK. 5. Caution: To conserve ink, never turn off the Epson Stylus CX9400Fax Series while ink is finished. ...
Epson Stylus CX9400Fax Series 4. Press the Setup button. 3. Select Maintenance and press OK.... bottom right corner of the alignment sheet. 4. Macintosh: Open the Applications folder, open the EPSON Printer Utility2, select CX9400Fax Series, and click OK. Follow the on the display screen, press OK and press down ...using the control panel or your software. This takes about 2 minutes. Check the alignment pattern that prints. Select Head Alignment and press OK. 5. Caution: To conserve ink, never turn off the Epson Stylus CX9400Fax Series while ink is finished. ...

Quick Reference Guide
Page 3
Maintaining Your All-in-One 32 Checking the Print Head Nozzles 32 Cleaning the Print Head 33 Checking the Ink Cartridge Status 34 Purchasing Epson Ink Cartridges 35 Replacing Ink Cartridges 36 Solving Problems 38 Checking for Software Updates 38 Problems and Solutions 38 Where To Get Help 41 Notices 42 3
Maintaining Your All-in-One 32 Checking the Print Head Nozzles 32 Cleaning the Print Head 33 Checking the Ink Cartridge Status 34 Purchasing Epson Ink Cartridges 35 Replacing Ink Cartridges 36 Solving Problems 38 Checking for Software Updates 38 Problems and Solutions 38 Where To Get Help 41 Notices 42 3
Quick Reference Guide
Page 24
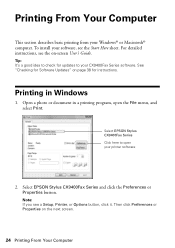
...-screen User's Guide. Printing From Your Computer This section describes basic printing from your CX9400Fax Series software. Printing in a printing program, open your software, see the Start Here sheet. Select EPSON Stylus CX9400Fax Series and click the Preferences or Properties button. For detailed instructions, see a Setup... for updates to open the File menu, and select Print. See "Checking for Software Updates" on the next screen. 24 Printing From Your Computer Select EPSON Stylus CX9400Fax Series Click here to your Windows® or Macintosh® computer. To install ...
...-screen User's Guide. Printing From Your Computer This section describes basic printing from your CX9400Fax Series software. Printing in a printing program, open your software, see the Start Here sheet. Select EPSON Stylus CX9400Fax Series and click the Preferences or Properties button. For detailed instructions, see a Setup... for updates to open the File menu, and select Print. See "Checking for Software Updates" on the next screen. 24 Printing From Your Computer Select EPSON Stylus CX9400Fax Series Click here to your Windows® or Macintosh® computer. To install ...
Quick Reference Guide
Page 30
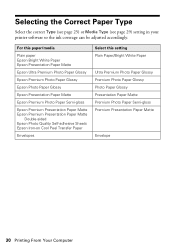
... in your printer software so the ink coverage can be adjusted accordingly. For this paper/media Plain paper Epson Bright White Paper Epson Presentation Paper Matte Epson Ultra Premium Photo Paper Glossy Epson Premium Photo Paper Glossy Epson Photo Paper Glossy Epson Presentation Paper Matte Epson Premium Photo Paper Semi-gloss Epson Premium Presentation Paper Matte Epson Premium Presentation Paper...
... in your printer software so the ink coverage can be adjusted accordingly. For this paper/media Plain paper Epson Bright White Paper Epson Presentation Paper Matte Epson Ultra Premium Photo Paper Glossy Epson Premium Photo Paper Glossy Epson Photo Paper Glossy Epson Presentation Paper Matte Epson Premium Photo Paper Semi-gloss Epson Premium Presentation Paper Matte Epson Premium Presentation Paper...
Quick Reference Guide
Page 38
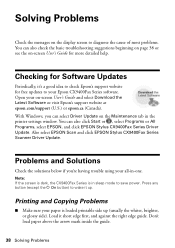
... sure your Epson CX9400Fax Series software. With Windows, you 're having trouble using your on-screen User's Guide and select Download the Latest Software or visit Epson's support website at epson.com/support (U.S.) or epson.ca (Canada). Checking for Software Updates Periodically, it short edge first, and against the right edge guide. Also select EPSON Scan and click EPSON Stylus CX9400Fax Series...
... sure your Epson CX9400Fax Series software. With Windows, you 're having trouble using your on-screen User's Guide and select Download the Latest Software or visit Epson's support website at epson.com/support (U.S.) or epson.ca (Canada). Checking for Software Updates Periodically, it short edge first, and against the right edge guide. Also select EPSON Scan and click EPSON Stylus CX9400Fax Series...

Quick Reference Guide
Page 39
... output tray or sheet feeder. 3. Caution: Do not try to the left corner of the scanner glass. If the edges are cropped, move your printer software (see page 21), or in the Automatic Document Feeder, make sure the corners of the paper are not bent, folded, or curled up. Open the...
... output tray or sheet feeder. 3. Caution: Do not try to the left corner of the scanner glass. If the edges are cropped, move your printer software (see page 21), or in the Automatic Document Feeder, make sure the corners of the paper are not bent, folded, or curled up. Open the...
Quick Reference Guide
Page 41
...Software Technical Support ArcSoft PhotoImpression® Phone: (510) 440-9901 www.arcsoft.com ABBYY® FineReader® Sprint Plus Phone: (510) 226-6717 www.abbyyusa.com [email protected] Where To Get Help 41 You can purchase genuine Epson ink and paper at Epson Supplies Central at epson.... You can download drivers and documentation, get FAQs and troubleshooting advice, or e-mail Epson with your product for support, please have the following information ready: ■ Product name (Epson Stylus CX9400Fax Series all-in back) ■ Proof of purchase (such as a store receipt)...
...Software Technical Support ArcSoft PhotoImpression® Phone: (510) 440-9901 www.arcsoft.com ABBYY® FineReader® Sprint Plus Phone: (510) 226-6717 www.abbyyusa.com [email protected] Where To Get Help 41 You can purchase genuine Epson ink and paper at Epson Supplies Central at epson.... You can download drivers and documentation, get FAQs and troubleshooting advice, or e-mail Epson with your product for support, please have the following information ready: ■ Product name (Epson Stylus CX9400Fax Series all-in back) ■ Proof of purchase (such as a store receipt)...

Quick Reference Guide
Page 45
...installation, neglect, improper shipping, damage caused by disasters such as fire, flood, and lightning, improper electrical current, software problems, interaction with non-Epson products, or service other rights which vary from jurisdiction to jurisdiction. This warranty does not cover damage to you ... supplies not manufactured, distributed or certified by an Epson Authorized Servicer. EXCEPT AS PROVIDED IN THIS WRITTEN WARRANTY, NEITHER EPSON AMERICA, INC. Using this warranty. This warranty does not cover any color change or fading of prints or reimbursement of incidental...
...installation, neglect, improper shipping, damage caused by disasters such as fire, flood, and lightning, improper electrical current, software problems, interaction with non-Epson products, or service other rights which vary from jurisdiction to jurisdiction. This warranty does not cover damage to you ... supplies not manufactured, distributed or certified by an Epson Authorized Servicer. EXCEPT AS PROVIDED IN THIS WRITTEN WARRANTY, NEITHER EPSON AMERICA, INC. Using this warranty. This warranty does not cover any color change or fading of prints or reimbursement of incidental...
Start Here
Page 5
... filter or you see the User Account Control screen, click Continue. Contact your software that way. 2 Insert the CX9400Fax Series software CD. Note: If you're connecting to a DSL phone line, you must use the CX9400Fax Series for faxing, connect the included phone cord from a telephone wall jack to... the LINE port on the CX9400Fax Series. You can't install your DSL provider for ...
... filter or you see the User Account Control screen, click Continue. Contact your software that way. 2 Insert the CX9400Fax Series software CD. Note: If you're connecting to a DSL phone line, you must use the CX9400Fax Series for faxing, connect the included phone cord from a telephone wall jack to... the LINE port on the CX9400Fax Series. You can't install your DSL provider for ...

Start Here
Page 6
Macintosh® 1 Insert the CX9400Fax Series software CD. 2 Double-click the Epson icon. 3 Click Install and follow the on-screen instructions. 4 When you securely connected and turned on -screen User's Guide. You're ready to your computer. .... 4 When prompted, connect the USB cable. If you 're done, remove the CD. Use any open USB port on your Quick Guide or on the CX9400Fax Series. 6 When you 're using an external print server, click the second option, click Next, then skip to step 6. 5 When prompted, connect the USB cable...
Macintosh® 1 Insert the CX9400Fax Series software CD. 2 Double-click the Epson icon. 3 Click Install and follow the on-screen instructions. 4 When you securely connected and turned on -screen User's Guide. You're ready to your computer. .... 4 When prompted, connect the USB cable. If you 're done, remove the CD. Use any open USB port on your Quick Guide or on the CX9400Fax Series. 6 When you 're using an external print server, click the second option, click Next, then skip to step 6. 5 When prompted, connect the USB cable...

Start Here
Page 7
... Center Click the desktop shortcut for printing, copying, scanning, and faxing. Epson Technical Support Internet Support Visit Epson's support website at epson.com/support and select your product for solutions to the CX9400Fax Series User's Guide, FAQs, online troubleshooting advice, and software downloads. Software Technical Support ArcSoft PhotoImpression® (510) 440-9901 www.arcsoft.com ABBYY...
... Center Click the desktop shortcut for printing, copying, scanning, and faxing. Epson Technical Support Internet Support Visit Epson's support website at epson.com/support and select your product for solutions to the CX9400Fax Series User's Guide, FAQs, online troubleshooting advice, and software downloads. Software Technical Support ArcSoft PhotoImpression® (510) 440-9901 www.arcsoft.com ABBYY...
Start Here Book (with wireless print server)
Page 11
..., make sure your network is set up the CX9475Fax for Ad Hoc Mode" on left as shown below to set up and working correctly. Install Software and Set Up the Print Server 11 Before you 're installing the all -in-one in -one using the included hookand-loop self stick tape.... The antenna should be on page 15. Then follow the instructions below : Install Software and Set Up the Print Server Your software works with Windows® XP, XP Professional x64 Edition, and Windows Vista® 32- 2. Secure the print server to the back...
..., make sure your network is set up the CX9475Fax for Ad Hoc Mode" on left as shown below to set up and working correctly. Install Software and Set Up the Print Server 11 Before you 're installing the all -in-one in -one using the included hookand-loop self stick tape.... The antenna should be on page 15. Then follow the instructions below : Install Software and Set Up the Print Server Your software works with Windows® XP, XP Professional x64 Edition, and Windows Vista® 32- 2. Secure the print server to the back...
Start Here Book (with wireless print server)
Page 12
...driver for Advanced Installation: If you want to use the print server in a wired network environment 12 Install Software and Set Up the Print Server The print server software is not included with the Epson Stylus CX9475Fax. 1. Note: ABBY® Fine Reader Sprint is installed. Click Install and follow the on the ... cable into any available port on your network access point or router. Note: If you 're ready to print. 4. Then plug the other software for the all-in-one is complete, you want to configure the IP address manually or use the all-in -one and print server. When...
...driver for Advanced Installation: If you want to use the print server in a wired network environment 12 Install Software and Set Up the Print Server The print server software is not included with the Epson Stylus CX9475Fax. 1. Note: ABBY® Fine Reader Sprint is installed. Click Install and follow the on the ... cable into any available port on your network access point or router. Note: If you 're ready to print. 4. Then plug the other software for the all-in-one is complete, you want to configure the IP address manually or use the all-in -one and print server. When...
Start Here Book (with wireless print server)
Page 13
... Easy Installation and click Next. Follow the on -screen instructions to complete the installation. 6. You're ready to your wireless network using standard settings: 1. Install Software and Set Up the Print Server 13 When you see a list of the wireless networks that the print server finds: 2. Follow the on -screen instructions...
... Easy Installation and click Next. Follow the on -screen instructions to complete the installation. 6. You're ready to your wireless network using standard settings: 1. Install Software and Set Up the Print Server 13 When you see a list of the wireless networks that the print server finds: 2. Follow the on -screen instructions...
Start Here Book (with wireless print server)
Page 14
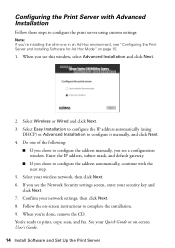
... settings: Note: If you're installing the all-in-one of the following: ■ If you see "Configuring the Print Server and Installing Software for Ad Hoc Mode" on page 15. 1. If you see the Network Security settings screen, enter your network settings, then click Next. 8....automatically, continue with Advanced Installation Follow these steps to configure it manually, and click Next. 4. Follow the on -screen User's Guide. 14 Install Software and Set Up the Print Server Select Wireless or Wired and click Next. 3. See your wireless network, then click Next. 6. Enter the IP ...
... settings: Note: If you're installing the all-in-one of the following: ■ If you see "Configuring the Print Server and Installing Software for Ad Hoc Mode" on page 15. 1. If you see the Network Security settings screen, enter your network settings, then click Next. 8....automatically, continue with Advanced Installation Follow these steps to configure it manually, and click Next. 4. Follow the on -screen User's Guide. 14 Install Software and Set Up the Print Server Select Wireless or Wired and click Next. 3. See your wireless network, then click Next. 6. Enter the IP ...

Start Here Book (with wireless print server)
Page 15
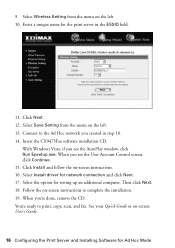
... bar at the top. Open a web browser and type 192.168.2.2 into the print server and an electrical outlet. 4. Configuring the Print Server and Installing Software for Ad Hoc mode. 1. Then plug the other end into the print server using admin as the User name and 1234 as the Password. Configuring... the Print Server and Installing Software for Ad Hoc Mode Follow the instructions in this one: 8. Plug the print server power adapter into the address bar. 7. Log into the Ethernet port...
... bar at the top. Open a web browser and type 192.168.2.2 into the print server and an electrical outlet. 4. Configuring the Print Server and Installing Software for Ad Hoc mode. 1. Then plug the other end into the print server using admin as the User name and 1234 as the Password. Configuring... the Print Server and Installing Software for Ad Hoc Mode Follow the instructions in this one: 8. Plug the print server power adapter into the address bar. 7. Log into the Ethernet port...
Start Here Book (with wireless print server)
Page 16
Insert the CX9475Fax software installation CD. Then click Next. 18. You're ready to the Ad Hoc network you see the AutoPlay window, click Run Epsetup.exe. Click Next. ... Windows Vista, if you 're done, remove the CD. Click Install and follow the on -screen User's Guide. 16 Configuring the Print Server and Installing Software for the print server in step 10. 14. Select the option for network connection and click Next. 17. 9. See your Quick Guide or on -screen...
Insert the CX9475Fax software installation CD. Then click Next. 18. You're ready to the Ad Hoc network you see the AutoPlay window, click Run Epsetup.exe. Click Next. ... Windows Vista, if you 're done, remove the CD. Click Install and follow the on -screen User's Guide. 16 Configuring the Print Server and Installing Software for the print server in step 10. 14. Select the option for network connection and click Next. 17. 9. See your Quick Guide or on -screen...


