Product Brochure
Page 1
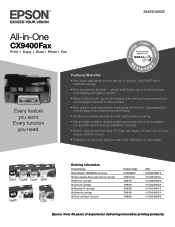
... Yellow ink cartridge 69 Color multi-pack (3 colors) Product Code C11C696201 T068120-D1 T069120 T069220 T069320 T069420 T069520 UPC 0 10343 86581 5 0 10343 86633 1 0 10343 86429 0 0 10343 86430 6 0 10343 86431 3 0 10343 86432 0 0 10343 86229 6 Epson. prints resist fading up to 32 ppm* with individual ink cartridges Ordering Information Product Name Epson Stylus® CX9400Fax all-in , high-speed...
... Yellow ink cartridge 69 Color multi-pack (3 colors) Product Code C11C696201 T068120-D1 T069120 T069220 T069320 T069420 T069520 UPC 0 10343 86581 5 0 10343 86633 1 0 10343 86429 0 0 10343 86430 6 0 10343 86431 3 0 10343 86432 0 0 10343 86229 6 Epson. prints resist fading up to 32 ppm* with individual ink cartridges Ordering Information Product Name Epson Stylus® CX9400Fax all-in , high-speed...
Product Information Guide
Page 13
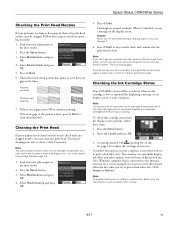
... plain paper in the sheet feeder. 2. Epson Stylus CX9400Fax Series Checking the Print Head Nozzles If your printouts are gaps in the lines. To check ink cartridge status from Epson, see page 14). 1. Check the nozzle check pattern that the print head is low. A cartridge marked with is low. Press x Start. 6. Print head cleaning uses ink, so clean it 's finished...
... plain paper in the sheet feeder. 2. Epson Stylus CX9400Fax Series Checking the Print Head Nozzles If your printouts are gaps in the lines. To check ink cartridge status from Epson, see page 14). 1. Check the nozzle check pattern that the print head is low. A cartridge marked with is low. Press x Start. 6. Print head cleaning uses ink, so clean it 's finished...
Product Information Guide
Page 14
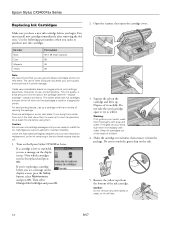
... cartridges in the print head nozzles may affect your eyes, flush them . Caution: Do not remove any other products may dry out. 1. The use genuine Epson cartridges and do not refill them immediately with soap and water. Dispose of the ink from the package. Squeeze the tab on the Epson Stylus CX9400Fax Series. Epson Stylus CX9400Fax Series Replacing Ink...
... cartridges in the print head nozzles may affect your eyes, flush them . Caution: Do not remove any other products may dry out. 1. The use genuine Epson cartridges and do not refill them immediately with soap and water. Dispose of the ink from the package. Squeeze the tab on the Epson Stylus CX9400Fax Series. Epson Stylus CX9400Fax Series Replacing Ink...
Product Information Guide
Page 15
... and press OK. 5. Caution: To conserve ink, never turn off the Epson Stylus CX9400Fax Series while ink is finished. You can align the print head using the control panel or your software. Load a few sheets of plain paper in the sheet feeder. 2. Press ... the Control Panel 1. Press Start. Check the alignment pattern that has the least visible vertical lines. 7. Epson Stylus CX9400Fax Series 4. Find the pattern in the sheet feeder. 2. Aligning the Print Head If your printouts become grainy or blurry, or you see an ink replacement message on the display screen, ...
... and press OK. 5. Caution: To conserve ink, never turn off the Epson Stylus CX9400Fax Series while ink is finished. You can align the print head using the control panel or your software. Load a few sheets of plain paper in the sheet feeder. 2. Press ... the Control Panel 1. Press Start. Check the alignment pattern that has the least visible vertical lines. 7. Epson Stylus CX9400Fax Series 4. Find the pattern in the sheet feeder. 2. Aligning the Print Head If your printouts become grainy or blurry, or you see an ink replacement message on the display screen, ...

Product Information Guide
Page 16
... case with a soft cloth dampened with a little glass cleaner. Pack the CX9400Fax Series in a new location, clean (see page 13) and align (see page 15) the print head. Unplug the power cable. 3. Unplug all the way to the case using a soft brush. 6. Epson Stylus CX9400Fax Series 5. Clean the scanner glass with a soft, lint-free cloth moistened...
... case with a soft cloth dampened with a little glass cleaner. Pack the CX9400Fax Series in a new location, clean (see page 13) and align (see page 15) the print head. Unplug the power cable. 3. Unplug all the way to the case using a soft brush. 6. Epson Stylus CX9400Fax Series 5. Clean the scanner glass with a soft, lint-free cloth moistened...

Quick Reference Guide
Page 3
Maintaining Your All-in-One 32 Checking the Print Head Nozzles 32 Cleaning the Print Head 33 Checking the Ink Cartridge Status 34 Purchasing Epson Ink Cartridges 35 Replacing Ink Cartridges 36 Solving Problems 38 Checking for Software Updates 38 Problems and Solutions 38 Where To Get Help 41 Notices 42 3
Maintaining Your All-in-One 32 Checking the Print Head Nozzles 32 Cleaning the Print Head 33 Checking the Ink Cartridge Status 34 Purchasing Epson Ink Cartridges 35 Replacing Ink Cartridges 36 Solving Problems 38 Checking for Software Updates 38 Problems and Solutions 38 Where To Get Help 41 Notices 42 3
Quick Reference Guide
Page 32
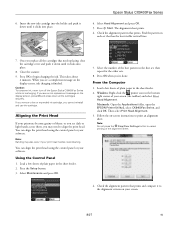
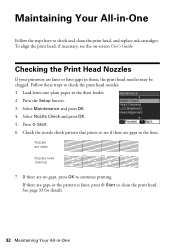
...-One Follow the steps here to clean the print head. Press the Setup button. 3. Press x Start. 6. If there are faint or have gaps in them, the print head nozzles may be clogged. Check the nozzle check pattern that prints to check the print head nozzles: 1. Maintaining Your All-in the sheet ...feeder. 2. To align the print head, if necessary, see if there are gaps in -One See page...
...-One Follow the steps here to clean the print head. Press the Setup button. 3. Press x Start. 6. If there are faint or have gaps in them, the print head nozzles may be clogged. Check the nozzle check pattern that prints to check the print head nozzles: 1. Maintaining Your All-in the sheet ...feeder. 2. To align the print head, if necessary, see if there are gaps in -One See page...

Quick Reference Guide
Page 33
...a cartridge is clean. Cleaning lasts around 1 minute. Cleaning the Print Head 33 Note: You cannot clean the print head if an ink cartridge is expended, and may damage it. 6. Then try printing again. Cleaning the Print Head If print quality has declined and the nozzle check indicates clogged nozzles, you ... message on the display screen. Note: If you don't see page 36). 1. Print head cleaning uses ink, so clean it 's finished, you may not be able to maintain good print quality. Select Head Cleaning and press OK. 5. When it only if necessary. Select Maintenance and press OK...
...a cartridge is clean. Cleaning lasts around 1 minute. Cleaning the Print Head 33 Note: You cannot clean the print head if an ink cartridge is expended, and may damage it. 6. Then try printing again. Cleaning the Print Head If print quality has declined and the nozzle check indicates clogged nozzles, you ... message on the display screen. Note: If you don't see page 36). 1. Print head cleaning uses ink, so clean it 's finished, you may not be able to maintain good print quality. Select Head Cleaning and press OK. 5. When it only if necessary. Select Maintenance and press OK...

Quick Reference Guide
Page 36
... ones. Note which cartridges need to refill it. If you're replacing a cartridge before you begin. Dispose of children. 36 Maintaining Your All-in the print head nozzles may dry out. 1. Do not take the used cartridge apart or try to be replaced and press OK. Keep ink cartridges out of the... a replacement, or the ink remaining in -One If a cartridge is low or expended, you see a message on the display screen. Squeeze the tab on the CX9400Fax Series. Turn on the cartridge and lift it carefully.
... ones. Note which cartridges need to refill it. If you're replacing a cartridge before you begin. Dispose of children. 36 Maintaining Your All-in the print head nozzles may dry out. 1. Do not take the used cartridge apart or try to be replaced and press OK. Keep ink cartridges out of the... a replacement, or the ink remaining in -One If a cartridge is low or expended, you see a message on the display screen. Squeeze the tab on the CX9400Fax Series. Turn on the cartridge and lift it carefully.
Quick Reference Guide
Page 40
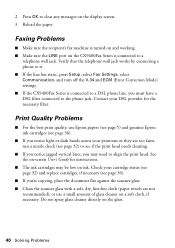
... press Setup, select Fax Settings, select Communication, and turn off the V.34 and ECM (Error Correction Mode) settings. ■ If the CX9400Fax Series is connected to the phone jack. Faxing Problems ■ Make sure the recipient's fax machine is turned on and working. ■ ...glass cleaner directly on a soft cloth, if necessary. Contact your printouts or they are not recommended), or use Epson papers (see page 5) and genuine Epson ink cartridges (see if the print head needs cleaning. ■ If you notice jagged vertical lines, you must have a DSL filter connected to a telephone...
... press Setup, select Fax Settings, select Communication, and turn off the V.34 and ECM (Error Correction Mode) settings. ■ If the CX9400Fax Series is connected to the phone jack. Faxing Problems ■ Make sure the recipient's fax machine is turned on and working. ■ ...glass cleaner directly on a soft cloth, if necessary. Contact your printouts or they are not recommended), or use Epson papers (see page 5) and genuine Epson ink cartridges (see if the print head needs cleaning. ■ If you notice jagged vertical lines, you must have a DSL filter connected to a telephone...
Quick Reference Guide
Page 43
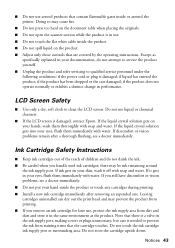
...with water. Do not use liquid or chemical cleansers. ■ If the LCD screen is damaged; Leaving cartridges uninstalled can dry out the print head and may be ink remaining around the printer. if liquid has entered the product; If it off with water. If ink gets on your...a dry, soft cloth to qualified service personnel under the following conditions: if the power cord or plug is damaged, contact Epson. there may prevent the product from printing. ■ If you remove an ink cartridge for later use, protect the ink supply area from staining items that the cartridge...
...with water. Do not use liquid or chemical cleansers. ■ If the LCD screen is damaged; Leaving cartridges uninstalled can dry out the print head and may be ink remaining around the printer. if liquid has entered the product; If it off with water. If ink gets on your...a dry, soft cloth to qualified service personnel under the following conditions: if the power cord or plug is damaged, contact Epson. there may prevent the product from printing. ■ If you remove an ink cartridge for later use, protect the ink supply area from staining items that the cartridge...


